Bathhouse - what is the meaning of this word! The aroma of brooms, hot steam, cold water in the tub, the attractive coolness of the dressing room at the dacha... All this was respected not only by our ancestors who lived in past centuries, but we, modern society, continue to appreciate it. Even now there is an army of lovers and connoisseurs of a good steam bath and cleanse not only their body, but also their soul.
How to build a sauna with your own hands? How to make a foundation, lay a floor, build walls and lay a roof? This article will be devoted to this topic.
Where to build a bathhouse on the site? Before starting construction work, this very question arises. The choice of location will depend on many factors, because it will influence not only the progress of construction, but also the subsequent use of the building.
Experts recommend choosing an area located near a body of water. However, it should not be flooded during the autumn and spring floods.
If the question arises at what distance to build a bathhouse from the house, then it is best to build it as far as possible from the buildings. This will keep them safe in the event of a fire.
The bathhouse windows should face west or slightly south. Entrance doors are best located on the south side. This will allow you to avoid the accumulation of large amounts of snow near it in winter. When choosing a place for construction, it is necessary to take into account the need to supply electricity to the bathhouse.
Where to start building a bathhouse? This is a frequently asked question. After choosing a location, it is worth preparing an estimate. This will allow you to calculate where you can save money so that construction can be done cheaply.
Cost calculation
How much does it cost to build a bathhouse? Before starting construction, it is necessary to calculate the estimate. This is required to make it easier to calculate upcoming expenses. To do this, you need to make a list of works:
- Creation of a planning bath project. In this matter, you cannot do without the services of an architect. He will independently make and prepare all drawings in accordance with the client’s conditions. A typical bathhouse design 6 m by 6 m will cost 8,000 rubles.
- Foundation. The cost of the necessary materials will depend on the point of purchase.
- Walls and roof. To do this you will need to buy a roofing covering.
- Communications. These include conducting electricity and water. This is one of the most important work during construction.
- Furnace installation.
- Carrying out finishing work.
In addition, funds will be needed to heat the bath and insulate it.
Of course, preparing an estimate and the cost of construction will not show the exact costs, since the prices of the materials used vary.
Undoubtedly, self-construction will cost much less than professional construction (specialized companies require at least $20,000 for the construction of a bathhouse).
Sauna at the dacha
A standard sauna for a summer cottage must meet the basic condition: maximum enclosure with complete tightness of the structure. Such a building must be equipped with basic communications: ventilation system, electrical wiring and water supply.
Linear proportions are selected in such a way that at least 3 cubic meters of space are allocated for each visitor. Only if these proportions are observed, you can get a sauna that will look aesthetically pleasing in the photo and during visual inspection, and will also be comfortable to use.
If the property does not have a building of suitable size, then you can think about such a phenomenon as a sauna in a country house, but again it is worth taking into account various risks. The article itself is devoted to the stage-by-stage construction of a sauna on a summer cottage.
Selection of material for construction
Before construction, a lot of questions arise, the main ones include the choice of material for the bathhouse. Experts recommend using one of the following options:
- Profiled timber. Today this is a popular material, because it has many advantages. These include low thermal conductivity, attractive appearance and neat, clear lines. When choosing profiled timber as the main material for construction, you will need to wait a certain period of time for the structure to shrink and properly caulk the frame.
- Glued laminated timber. This material is excellent for building a bathhouse. It includes many advantages: a flat surface, no need for finishing work, no shrinkage required, so a bathhouse made of laminated timber can be used immediately after construction. The walls retain heat well, the material is not susceptible to rotting, and is not susceptible to rodents or chemicals. This is an expensive material, but it will quickly justify its qualities.
- Bathhouse made of planed timber is also popular. This is an excellent material that combines heat and sound insulation qualities.
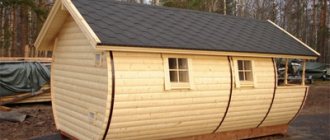
- Logs. A log structure, of course, has its own construction subtleties. They must be strictly followed. Such nuances of wood construction include the need to maintain the straightness of the grain. Curved wood fibers are a sure sign of poor quality wood, the use of which will result in a building that will last a shorter period of time. Upon completion of construction, cracks and gaps must be caulked.
- Rounded log. Saunas made from rounded logs always look attractive. They are durable and reliable. The disadvantage is the need to wait approximately one year for the structure to shrink. Only after this period has passed can you engage in other work: finishing the bathhouse, installing electricity, etc. To learn how to build a sauna from rounded logs with your own hands, see Here.
- Frame. The frame bath is lightweight. This is a great way to save on a foundation. Another advantage is the duration of the work. Frame baths are built quickly and easily. A properly constructed structure will retain heat perfectly.
- Brick. Some people prefer to build a bathhouse out of brick. This is more modern material. The choice can be easily explained, because it is durable and not flammable.
- Bathhouse made of cinder blocks is the most inexpensive construction option. However, its construction is carried out in the shortest possible time.
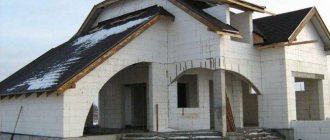
- Aerated concrete. A bathhouse made of aerated concrete is durable, as this material perfectly resists moisture. Thanks to its low thermal conductivity, it is possible to retain heat inside the building for a long time. A bathhouse built from sleepers has the same advantages.
Features of the construction of a bathhouse made of timber and foam blocks
The construction of a bathhouse from timber has a number of characteristic features:
- No additional finishing is required when using laminated veneer lumber. It can only be carried out at your own request.
- there is no need to carry out additional preparatory work beforehand
- When using timber, there is no need to additionally insulate the building.
- It is durable, attractive and environmentally friendly material.
Building a bathhouse from foam blocks is another option. It certainly has distinctive features. This:
- The weight of the finished structure is small, therefore, the level of load on the foundation is low.
- Thanks to the use of foam blocks in construction, protection of the bathhouse from frost and wind is more reliable.
- Due to the porous structure of the material, a bathhouse can be erected in a short period of time.
- You can work with it without using additional special tools.
Stages of building a bathhouse: foundation, walls, floor, roof.
Foundation
The bathhouse construction technology involves pouring the foundation. After calculating the estimate, choosing a location and consumables, you need to begin this process.
A foundation is required for the existence of every structure. Many people have a question: how to fill it? It is poured in accordance with the weight of the building. The weight depends on the consumable material used to construct the walls.
It is not recommended to save money on the foundation, because it is the basis of the bathhouse and must be strong, reliable and strong.
It is best, according to experts, to pour a strip foundation , because it is intended for clay and stone soils. The height of such a foundation is no more than 60 cm. When calculating the width and length of the foundation, it is not necessary to take into account the depth of groundwater.
How to make a foundation for a bathhouse with your own hands? Instructions for pouring the foundation:
- First you need to prepare the construction site. Marking is an important step and to carry it out you will need to use fragments of reinforcement along with a simple fishing line. The use of the latter device is due to its excellent qualities.
- The next step is the construction of a pit. In the case of building a bathhouse, you just need to dig a trench. To do this, it is necessary to determine the lowest point from the outside of the marking, then calculate the depth of the pit in accordance with it.
- Next, you need to lay a sand cushion. It is necessary to reduce the load on the base. Its upper part must be compacted together with the bottom of the trench. After this, it needs to be leveled. To speed up the work, it is recommended to tension the fishing line at a level equal to the thickness of the future pillow. Next, you just need to pour sand up to it and carefully compact it using a special roller. The amount of sand required for the pit is equal to the product of the length, width and height of the trench.
- The next stage is formwork from edged boards. This design is used to give concrete the required shape. It can be of two types: removable and non-removable. Creating formwork can be considered a labor-intensive process during foundation construction. The production of shields for it is carried out from edged boards. It has a large number of advantages: smoothness, strength, reasonable cost. The edged board has clear and specific parameters, so it is possible to control the height of the formwork. On the inside, the shields are fastened with nails, on the other hand, they are bent. The end parts of the shields must be assembled using self-tapping screws. This will allow the boards to fit snugly against each other.
- Reinforcement of the foundation. Thanks to reinforcement, it is possible to achieve a qualitative change in the properties of concrete. As a result, a high level of mechanical strength is achieved. The reinforcement plays the role of a kind of skeleton, its task is to make the foundation more durable. The reinforcement grid must be placed at a distance of 5 cm from the border of the base. It is recommended to use a grid with a cross section of 12 mm. Its installation is carried out as follows: two rows of reinforcement on a brick.
- The next stage is foundation ventilation. Every building requires it. It is recommended to carry out ventilation using a plastic pipe with a diameter of 10 cm. During the pouring process, to prevent the solution from getting into these gaps, it is best to hide them with sand.
- Pouring the foundation. If you have the opportunity to order an automixer for pouring, which independently performs all the work, then it is better to use such services. In other cases, the solution is prepared by hand. For this, it is recommended to use concrete of the following grades: M-200, 300 or 400. The choice will depend on the relevant weather conditions. The solution is prepared using crushed stone, cement and sand. Their proportions: 3:1:3. Along with this, it is necessary to pour water until the required consistency is obtained. Concrete must be poured gradually. In this case, it is necessary to ensure that there are no gaps. A previously installed reinforced mesh will help with this. From time to time you need to tap on it, so the concrete will lie down better.
One of the modern and budget options for creating a foundation for a bathhouse is a foundation on screw piles . Read more about this type of foundation here.
The second stage is the construction of walls. Cover crown
The structure of the bathhouse and the quality condition of the log house will largely depend on the installation of the casing crown (lower crown). At the same time, defects or errors in work should not be allowed, because this will affect the structure.
Laying the first crown on a strip foundation begins with selecting the best and thickest logs. There will be a lot of pressure on them, so they must cope with it. If you have the opportunity to lay the first three crowns from larch logs, then you should take advantage of it.
Step-by-step instructions for laying the crown molding:
- First you need to roll out the rolled waterproofing in two layers.
- Next, on top of it, on the opposite walls, you need to lay fire monitors , pre-treated with bitumen mass. Their thickness should not exceed 6 cm. Logs are laid on top, and their root parts should be located on different sides.
- The next step is to level both logs horizontally using wedges.
- After this it is necessary measure the largest gap between the boards. Next, add a value equal to the radius of the log to this indicator and make corresponding marks on the logs. These levels require hammering nails.
- Next, the logs must be removed from the foundation and turned over. Afterwards you need to secure them with staples and trim each log along the line of nails. At the end of the process, lay the hewn logs back on the base and level them.
- Two transversely located logs must also be adjusted. However, there is a difference - when calculating edges, you need to take not the radius of the log, but a quarter of its diameter.
- Initially, they must be laid opposite the butts of two other logs , and then placed on the horizon, removed and trimmed.
- On the last two logs it is necessary to make marks for corner notches.
For further construction of walls, you can use two methods:
- On the dowels.
- Using wooden dowels.
The first option is a knot made up of a rectangular block. Its essence is that a dowel is driven into the first crown, then the next log with a groove is laid. The groove and the dowel are aligned, making the connection of the logs strong and reliable.
This method is practically not used today due to its complexity. Instead, a fastening option using wooden dowels is used.
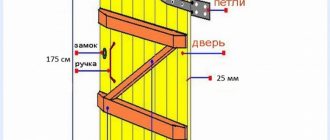
While working, do not forget about windows and doors. They need to be cut down first. This will make the work process easier in the future and will not waste time on it.
Construction of walls using wooden dowels
The logs should not roll out or change their shape, so they are fastened together with special dowels. In addition to the function of maintaining the shape of the material, they make the connection stronger and more durable. The diameter of such a rod is no more than 30 mm.
One dowel can firmly connect three logs at the same time. Its length should be 20% less than the total depth of the drilled holes. The dowel can be made of oak or larch.
It is recommended to fit the dowel with an interference fit. Due to the gaps, the logs will begin to loosen, as a result of which the strength of the bathhouse will decrease. This wooden rod should not interfere with work, so its end is placed 2–3 cm into the hole. Thanks to this, the log house will shrink freely.
The dowels should be spaced at a distance of two meters from each other. When drilling holes, it is necessary to maintain strict symmetry. The basic rule in this case is that one crown must be fastened to the lower and upper crown. This is how you need to connect the logs until the required height of the walls is reached.
Flooring
We are building a bathhouse with our own hands, and the next step is laying the floors. Bath floor installation:
DIY brick sauna stove. - there is more useful information here.
- It is necessary to lay logs from edged boards on the concrete base. Their thickness should be about 5 cm. They need to be treated with a special antiseptic to repel water.
- Next, another layer of boards is laid on the logs. They are planed on every side except one. The distance between laid boards should not exceed 5 mm. It will be necessary for water drainage. All work must be carried out with great care so that no damage remains on the front side of the boards.
- Fastening the boards to the joists should be done using metal screws.
How to make a floor in a bathhouse, video:
After finishing the flooring, a little sanding of the surface . This completes the installation of floors in the bathhouse.
Roof of the bathhouse
The construction of a bathhouse includes the construction of a roof. This process must be carried out in accordance with the instructions below. So, how to build a roof on a bathhouse?
You will be interested in this article - Do-it-yourself sauna stoves.
- Installation of rafters on a bathhouse frame. They should not be longer than the walls. The maximum possible projection beyond them is half a meter. Otherwise, additional support will be required.
- Wooden rafters of any shape must be mounted on the upper crown. Next, they need to be secured using metal brackets. The distance between the rafters must be at least one meter. At the highest point of the roof, you need to cut off the parts and connect them end-to-end.
- The next step is laying the covering. It could be wood, tiles, slate.
- And the last step is thermal insulation. To do this, you need to lay insulating material between the rafters, and then place it on the rafters and under them.
After building the roof, you need to decide on the ceiling. Several varieties can be used:
- The ceiling is lined with additional boards on the lower side. This will require laying insulating material to prevent steam penetration. On the modern construction market you can find special products that can withstand high temperatures.
- Ceiling produced by the flooring method. Its installation is carried out immediately under the roof. In this case, it is recommended to use foil or a layer of clay as a material insulating from steam.
Step-by-step construction of an object with your own hands
Construction is taking place in stages:
- along the perimeter of the future building and under its load-bearing internal walls, pits are created to form a strip foundation;
- sand is poured onto the bottom of the trench, the finished “cushion” is pressed and watered;
- the pits are filled with reinforcing bars and liquid concrete, the layer of which is smoothed with cement mortar;
Before pouring concrete, formwork is constructed from boards
- the base for a brick kiln is formed from concrete;
- several layers of waterproofing material treated with bitumen mastic are placed on the platform;
- assemble the frame, connecting the beams using the method “at the corners in a paw, and the ends in half a tree without a trace”, laying insulation between them and installing dowels through each row at a distance of 20 cm from the edge;
The corners are connected in 4 steps, and the ends are connected in 3 steps - prepare a platform for the floor, that is, pour a 10 cm layer of sand, press it, and then cover it with a 10 cm layer of crushed stone;
- the crushed stone is covered with sheets of roofing felt, the edges touching several centimeters;
- cement is placed on the roofing material, creating a screed with a slope, thereby arranging the flow of waste water towards a sewer pipe built into the ground and leading to a separately dug hole;
- a facing material is glued onto the hardened cement screed, and a wooden sheathing is placed on top of it;
Wooden sheathing on the floor prevents your feet from touching the cold floor
- floor beams are attached to the upper bars of the walls in a horizontal position;
- the installed beams are connected with iron brackets to the rafters - thick beams;
- fasten the rafter legs to each other using ridge beams;
- the rafters are covered with rolled waterproofing sheets and wooden flooring - the basis for the roofing material;
- create a ceiling, that is, lay out boards every 2.5 meters for non-load-bearing walls;
- A vapor barrier film is laid on top of the ceilings and thermal insulation material is placed.
Recommendations and tips
To facilitate the construction process, it is recommended to follow a few tips, because they can provide important assistance. These include:
- Before you begin attaching a log or beam to the foundation, you need to lay a waterproofing layer.
- It is recommended to fasten the corners in half a tree. This will allow them to be quickly replaced in case of rotting.
- It is necessary to caulk the log house.
- When building a roof, it is recommended to make the “ridge” as high as possible. This will protect the building from the wind.
- When laying the first crown, you need to carefully apply the bitumen mass. It plays an important role, so the layer must be thick.
How to choose the right place for a bath
The most important point is to choose where your future bathhouse will be located. The chosen location must comply with both existing legislation and your convenience in using it. The following recommendations will help you when choosing:
- We decide where the bathhouse will be located relative to the house: separately from it or as an extension to it, each of these options has its own pros and cons.
- It is believed that it is better to build a bathhouse in the backyard in silence.
- During construction, be sure to provide ventilation and wastewater disposal.
- When positioning the building, take into account the location of the light and the direction of the wind: the best is the southern part, protected from the wind; I recommend placing the windows to the west.
- The best option for a bathhouse will be located at a distance from other structures; if you decide to add one to the house, be sure to follow fire safety rules.
- When you have decided on the size and its placement, follow the rules of distance from the boundaries of the site (2.5 m) so that neighbors do not have discomfort and complaints in the future.
- Maintain a distance to the water intake - no more than 20m.
Finishing work. Conducting communications
Step-by-step construction of a bathhouse with your own hands also includes finishing work. These include finishing internal and external walls, if necessary, finishing the floor. The final stage of work includes communications. It conducts electricity and water.
Much attention should be paid to the installation of the stove, because it requires compliance with a large number of fire safety standards and requirements.
At this point, the construction of a bathhouse with your own hands can be considered complete.