Modern technologies improve the quality of life; thanks to them, many who like to improve their health with bath procedures using heated water steam have the opportunity to receive health benefits without leaving their home. To do this, set up a sauna on the balcony in an apartment or private house with the effect of a Russian steam bath or a Finnish dry bath, occupying a small area and reliably isolated from the external environment with thermal insulation materials.
A sauna on a loggia or balcony is not designed for washing the body using water (it is poured only on stones), and therefore does not require a complex system for supplying hot and cold water supply or drainage. This greatly simplifies its installation and makes it possible to independently manufacture the structure with your own hands if you know the technology, have some carpentry skills and suitable tools.
Balcony saunas with lighting
Preparing the balcony
Before you make a sauna on the balcony, you should strengthen it - the weight of the suspended structure will increase significantly, and you may need metal supports for the concrete slab.
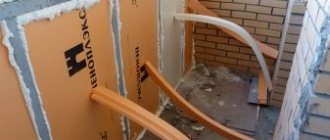
The room must be insulated. Since the balcony area is often quite modest, it is recommended to carry out insulation from the outside - this way the thermal insulation material will not affect the size of the room. Mineral wool is best suited for this purpose - it is not a flammable or fusible material, unlike penoplex and polystyrene foam.
Additionally, you will need insulation, which will perform several tasks at once:
• protect mineral wool from moisture; • protect the floor and ceiling of neighbors above and below from heating while using the sauna; • improve the soundproofing properties of the structure.
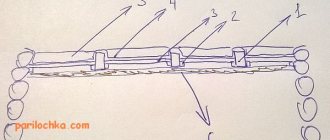
Ceiling insulation
The bars are nailed to the surface at a distance of about 30 cm from each other. Mineral wool slabs are placed in the finished cells, after which they are covered with foil insulation or other insulation. The joints are taped with metallized tape. The structure is covered with wooden planks.
Since hot air always rises, it is worth laying a double layer of insulation on the ceiling.
Wall insulation
Before starting work, it is necessary to stretch a separate cable from the electric meter, which will be used exclusively for heating the sauna. Using timber with a cross section of 50*50 mm, vertical lathing is performed on the walls. The elements are fixed using self-tapping screws, the distance between the bars is a maximum of 50 cm. The made frame is filled with mineral wool, sheathed with foil insulation, fastening the joints with metallized tape. To maintain an air gap inside the structure, slats are nailed onto the sheathing elements on top of the insulation, and lining or other finishing material is fixed onto them.
Floor insulation
Wooden logs are placed on the floor, leaving a distance of 30 cm between the elements. The cells are filled with mineral wool, waterproofing material is laid on top, and then boards are laid.
Where to begin
The very first thing is to prepare the balcony or loggia itself. It is necessary not only to do glazing and insulation, but also to carry out some other work. All this for the sake of their neighbors, because if they constantly hear suspicious noise coming from the neighboring balcony, then they may not like it, which means they need to carry out soundproofing. If you have insulated your balcony, then the thermal insulation material will already be able to muffle the noise, but it is still better to be on the safe side.
Also, the neighbors below may not like the water drips coming from your mini-sauna, so waterproofing must be done especially carefully. You shouldn’t save on this if you don’t want to quarrel with your neighbors. Once the balcony is finished, you need to prepare the necessary material and equipment. Here is a small list of what you will definitely need:
- wooden panels (they should be easy to assemble and disassemble, because you will transfer them to the balcony with your own hands);
- electric stove (it must be hot in the sauna, which means you can’t do without a heat source);
- a box with stones (no sauna is complete without them).
There are special requirements for wooden panels. The first thing you need is the type of wood. Spruce, pine, aspen or linden are suitable for a sauna. Also, all boards must be carefully prepared. The humidity in them should not be more than ten percent. The entire surface must be sanded. In addition, the boards must be coated with a special antifungal agent.
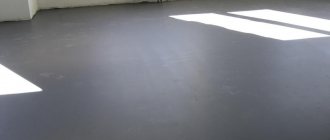
Then you can begin construction. You need to start from the floor. It's already insulated, so we need to start finishing it. The best floor for a sauna is wooden, so it is advisable to cover the surface under the structure with floorboards.
When it comes to the walls, you need to assemble a box from timber with your own hands. It should be installed close to the walls. The beam itself should be 50x50 mm in size. The outside of the box is lined with plywood; this must be done, since the walls in our houses do not have the correct geometry, and besides, this will help retain heat inside the structure.
Photo 3. Installation of the future steam room box
The next stage is insulating the box from the inside. This can be done using mineral wool. The layer of such insulation should be thick enough, because the rate of heating of the air inside the steam room will depend on this. The choice of mineral wool is determined by several parameters: firstly, such thermal insulation material is cheaper, and secondly, it is impossible to use polystyrene foam or other non-natural insulation in a steam room, they do not tolerate strong heat. Unnatural insulation will begin to melt and release toxic gases, as a result, instead of improving your health, you will get harm to your health due to harmful gases.
Photo 4. Insulating the box from the inside
Next, the entire internal area of the future sauna needs to be covered with aluminum foil. This must be done everywhere, otherwise the heat will easily evaporate even through a thick layer of insulation. This coating is able to retain up to ninety-eight percent of infrared heat. Secure the foil itself with aluminum tape.
Photo 5. Lining the body with foil from the inside
The next stage will be finishing the interior space with clapboard. This is not difficult to do with your own hands, you just need to be careful, because the lining will lie on a layer of foil, and it is very easy to tear it. The lining itself should be made of hardwood; you can use coniferous boards devoid of resin. The latter breed has a very bad effect on the body when heated.
Photo 6. Lining the sauna box with clapboard from the inside
To avoid getting burned on heated nails while taking a steam bath, they need to be deepened into the lining, or better yet, all the heads should be covered with decorative panels, which will improve the appearance. After this, you can proceed to the shelf. This design must support the weight of two people, so it is advisable to make separate racks for the shelf. They are covered with boards five centimeters thick.
To ensure normal circulation of hot air in the sauna, the shelf itself must not be made solid. Leave a gap of one and a half centimeters between the boards. It is also advisable to round the edges of the boards, this will also be safe, you will not hit the sharp edges.
The material for the shelf is poplar, aspen or linden wood. But the best option is abashi. This African tree is ideal for saunas and contains no resin. Of course, such wood is quite expensive, but its quality is excellent.
Photo 7. Stages of constructing a shelf in a sauna
Selection of cladding material
The most suitable material for finishing the walls and ceiling of a sauna on a balcony is considered to be lining made of hardwood (alder, linden, aspen). When heated, they emit a pleasant smell, the structure of the material is smooth.
Materials made from coniferous wood - cedar, larch, pine or spruce - are not recommended: when heated, they release resin, which not only gives off a strong odor, but also has an effect on the skin.
To avoid burns or injuries, all self-tapping screws, screws and other metal structural elements should either be buried in wood or the caps should be hidden with wooden plugs.
How to make a steam room yourself
A very common and simplest method is to purchase a ready-made structure. Of course, it will cost between two and three thousand dollars, depending on the size and configuration. Manufacturers will provide you with it completely disassembled.
You can assemble it yourself or use the services of specialists. They can be hired directly when purchasing from manufacturers.
When choosing the size, make sure that the sauna is the width of your balcony; of course, in extreme cases it can be expanded. A DIY infrared sauna requires less insulation and insulation, so it can be installed more compactly.
Organization of ventilation
In a sauna on a loggia, proper forced ventilation must be organized. The ventilation duct should exit to the street.
To do this, a small hole (up to 50*50 cm) is punched in the wall, which, when used as a sauna, will be closed with a special plug.
For the plug, take a wooden board, cut out a piece of such a size that it covers the ventilation hole on all sides by 5-7 cm. A piece of foam plastic is attached to it with such parameters that it fits exactly into the ventilation duct, tightly adjacent to the walls. It is not recommended to use mineral wool - it will quickly become unusable.
Additionally, the foam is wrapped in polyethylene.
Insulation
A sauna, like a bathhouse, is good when it actually accumulates heat and does not lose it due to poor sealing. Therefore, it is necessary to completely eliminate all possible heat loss from the stove:
- seal all cracks;
- insulate with mineral wool or polystyrene foam boards from the outside (it is possible inside, but a lot of usable space will be lost.
This way you will level out heat loss and create a good foundation for achieving excellent steam in your future sauna.
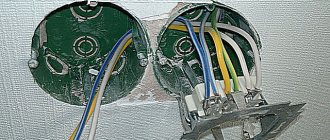
Organization of electrical wiring
The cable must have good heat-resistant properties. Sauna stoves are very powerful and consume a lot of electricity, so they must be connected via a separate cable.
Work order:
1. A separate machine is installed on the distribution panel, taking into account the power of the heating device. 2. The power supply network is equipped with a residual current device. 3. A separate outlet is installed on the balcony. 4. The cable is laid, protecting it with a corrugated pipe. 5. The wire to the lamp is laid in a metal hose.
It is recommended to use special sealed thermal spotlights as a lighting device for a sauna. They work properly at temperatures up to 120 °C.
Switches, sockets and distribution boxes cannot be installed in the steam room. They must be taken outside of this compartment.
Shelf installation
To ensure that the structure is reliable and can accommodate 2 people at the same time, you should not attach the shelves to the wall - it is wiser to place it on racks.
Work order:
• bars with a cross section of 80 mm are fixed to the floor; • well-polished boards with rounded edges (about 5 cm thick) are attached to them, placing each one at a distance of 1-1.5 cm from each other to ensure air circulation; • the assembled structure is treated with wood oil. If the size of the room allows it, it is possible to install an upper shelf with a ladder.
The most suitable wood for the shelf is poplar, linden, abashi. The installation fasteners are either hidden with wooden caps or pressed into bars, since when heated, they come into contact with the skin and can cause a burn.
Choosing a sauna stove
Unlike a bathhouse, electric stoves can be used in a sauna, so there is no need to organize a chimney.
It is recommended to use special designs designed for mini-saunas. They are affordable, safe and designed with small spaces in mind. Homemade heating installations will not cost much less, but no one can guarantee their uninterrupted operation and compliance with safety standards.
Terminal boxes for sauna stoves are located on the rear wall, this provides protection against accidental water entering the elements. Ready-made devices may vary in size and the presence or absence of additional functions.
When choosing a device, you should pay attention to the area of the available room. This will help reduce heating costs.
When installing the selected stove indoors, you should strictly follow the recommendations given in the instructions for the device. Otherwise, not only premature failure of the device is possible, but also a fire.
Legitimacy of the idea
After enterprising citizens began installing mini-saunas in their apartments, representatives of the housing office and the fire inspectorate unanimously banned this installation. But according to regulatory documents, such installation can be carried out.
In fact, when installing a sauna, the balcony is not structurally rebuilt. Even if a partition is made, it will not be considered a major repair. Theoretically, there are no violations. Before installing a steam room at home, it is recommended that you familiarize yourself with the types of documentation:
- “Architectural and planning solutions for multi-apartment residential buildings” (SP 31 - 107 - 2004);
- “Residential multi-apartment buildings” (SNiP 31 – 01 – 2003).
It is recommended to contact the Management Company for registration to obtain a list of services from which you can obtain permission to install a mini-steam room. But if the neighbors don’t mind and security measures are followed, you don’t have to collect documentation.
Fire safety
In a steam room installed in an apartment building, only an electric stove is allowed. Its power should be up to 4.5 kW. In this case, there must be a ventilation system. It is prohibited to discharge steam into the ventilation shaft inside the house, since this load was not provided for during construction. The fire inspector will also require the installation of a special dry pipe that automatically supplies water in the event of a fire. The dry pipe must be connected to the fire alarm system.