A shower stall with a “roof” looks massive, the bathroom space is perceived as cramped and uncomfortable. Showers with floor drains look spacious and modern. To protect the room from splashes, it is enough to install a transparent tempered glass partition. This makes the bathroom look spacious and bright. In order not to create an emergency situation and not flood your neighbors from below, it is important to know how to make a shower drain in the floor correctly.
How to make a shower drain in the floor?
Design features
In addition to the stylish design, the design with a drain has many advantages: it takes up little space and makes the bathroom interior more functional and comfortable. To decorate the walls and floors, use traditional tiles, mosaics or waterproof wall panels. The partition is most often made of transparent or frosted tempered glass. Despite its external lightness, such a shower has excellent sound insulation.
It is convenient to organize such a shower in a niche
One of the main requirements for organizing a shower with a drain in the floor is the installation of high-quality waterproofing. As for the configuration of the shower, there are no restrictions. The minimum size is 100 x 100 cm. The shape in plan can be square, rectangular, and in a small room you can completely abandon the partition.
The corner location of the shower is emphasized by the decoration of adjacent walls
Expert opinion: Masalsky A.V.
Editor of the “construction” category on the Stroyday.ru portal. Specialist in engineering systems and drainage.
If you decide to renovate your bathroom yourself, it is recommended to start with a drawing. It is necessary to reflect the layout of the drain and sewage system, the layout of the tiles, and the places where the equipment is attached. The drain can be located in the center of the shower or near the wall.
Types of designs
There are two ways to arrange a shower: with a ladder or a podium.
A shower with a drain cannot be installed in every room. It is necessary to fill the screed to a certain height. Initially, it is better to provide for this moment at the stage of building a house. Otherwise, you will need to make a step or raise the floor structure in the room.
When making a drawing, note the dimensions of the shower, its design features, its location and drain hole. To ensure that water is drained from the floor surface without problems, installation time and materials are reduced, it is advisable to place the drain as close to the sewer pipe as possible.
Installation of drain in screed
To make the shower structure airtight, you will need two layers of screed and a layer of waterproofing material (coating mastic or roofing felt). The pipes are located inside the screed. The drainage can be point or linear. If you disassemble the floor structure layer by layer, it consists of:
- Concrete base.
- Expanded polystyrene.
- Ties.
- Waterproofing material.
- Second layer of screed.
- Decorative moisture-resistant coating (tiles, mosaics).
This type of shower can be equipped with a partition with or without a door.
The tiles are laid with a slope towards the drain hole
A shower with a podium can be installed in any room; this does not require upgrading the floor structure to install a drainage system. A podium with small sides is installed above the floor level. The floor is also tiled with a slope towards the drain.
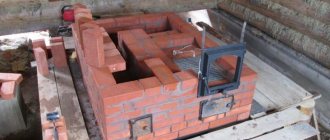
Structurally, the podium consists of a metal support and brick sides.
Shower room with podium
Apocalypse - the gaslighter's secret weapon
What do you find most painful? Your gaslighter will hit you where it hurts with their secret weapon. He can:
- Manage your worst fears. “You’re so fat/frigid/vulnerable/complicated...”
- Threatening to leave “No one will love you.” “You will be alone all your life.” "No man will tolerate you."
- Refer to other problematic relationships. "No wonder you don't get along with your parents." "That's probably why your friend Susie is avoiding you." “Can’t you see that this is why your boss doesn’t respect you?”
- Use your ideals against you. “Isn’t marriage about unconditional love?” “I thought girlfriends were supposed to help each other.” “A real professional would take the hit himself.”
- Causing you to doubt your own perceptions, memory, or sense of reality. “I never said this. You came up with it yourself." “You promised to pay this bill, don’t you remember?” “My mother was very offended by your words.” “You looked so ridiculous. The guests laughed at you."
If you hate raised tones, you can say that you don't intend to listen to them. Other women are probably fine with talking at a shouting level, but you're not one of them. If you are a vulnerable person, be one. You have the right to define your own boundaries and not be equal to others who are “less vulnerable.”
Also, it is important to understand that screaming will not destroy your world. This doesn't mean the gaslighter has the right to yell at you, but you don't have to give in every time he threatens to yell.
It will probably be unpleasant for you to leave a screaming man alone, slam the door, or leave the house for a while. This reaction can make the situation worse.
But you must understand that your partner's weapon is not so powerful that you must always be inferior to him.
More about this: Stern Robin. Hidden manipulations to control your life. STOP gaslighting. — SPb.: Peter, 2020
Functional characteristics
The drain has a simple design - it is designed to collect and drain water from the floor surface into the sewerage system. The device is made of stainless steel, reinforced or metal-plastic.
In addition to the main function, the ladder solves the following problems:
- Does not allow debris to pass through and thereby prevents clogging of sewer pipes.
- Does not allow unpleasant odors from the sewer into the room.
- Allows you to quickly clean the drain hole, providing free access to it.
Drainage devices with a dry seal prevent unpleasant odors from the sewer system.
There are two types of drains. A linear drain collects water in a tray, while a point drain is designed in the form of a funnel. The second type is more common, as it allows you to mount a drain anywhere in the shower. You only need to tilt the floor towards the drain so that the water drains by gravity.
Since the working area of a linear ladder is increased due to the presence of a tray, its throughput capacity is much greater than that of a point device. Such a drain can be located along the wall or in the center of the shower room. You will also need a slope towards the ladder on one side. Outside, a linear stainless steel strip in the form of a narrow long rectangle is mounted on the floor surface. The grille can be traditional or patterned. It is located on the same level with the plane of the tiled floor.
Linear ladder design
linear shower drain
When choosing a ladder model, consider the following:
- Technical capabilities of the device, its throughput and size.
- Where is the sewer pipe located?
- Where is the shower room located in the room?
- The style of the room, as well as the finishing material of the walls and floor.
Important! The model of the ladder must be chosen in accordance with the design of the room so that it looks organically in the interior and does not attract undue attention.
Some manufacturers offer the installation of a drain that imitates floor tiles - water flows through the cracks along its perimeter.
Today, choosing a device of the required height, size and shape is not difficult. Drains differ in the shape of the lid (round, square, rectangular) and the material used.
Most drains are equipped with a water seal inside the siphon. If the shower is used infrequently and the water evaporates, a conventional device will not protect against foreign odors. But a device with a dry water seal is more effective. It reliably protects the room from “sewage” odors, as it not only has a water seal, but also several dampers. They automatically block the drain channel if water does not flow through it.
Dry gate drain elements
There are several options for the location of the drain hole:
- In the center is a common way to locate the drain. In this case, the floor is sloped on four sides.
- Linear ladders are placed at the junction of the wall and the floor, and the floor is tilted from the opposite wall.
- The point drain located in the corner of the shower room is as inconspicuous as possible. The slope is made on both sides so that the water flows into the corner.
Expert opinion: Masalsky A.V.
Editor of the “construction” category on the Stroyday.ru portal. Specialist in engineering systems and drainage.
The throughput of a product depends not only on its size, but also on its height. The bigger it is, the better. There are products with a height adjustment function. In some cases, it may be necessary to upgrade the floor structure.
Safety shutter: types
The design of the safety valve depends on how often the shower is used. The siphon water seal functions perfectly in showers that are used daily. The water barrier reliably protects the room from the penetration of odors from the sewer. The disadvantage of this design is its massiveness. In addition, the shutter ceases to cope with its function when it dries out. This happens for various reasons: when the shower is rarely used, the slope of the structure was initially chosen incorrectly or the “warm floor” was installed.
Siphon valve
Therefore, modern models with a “dry” locking device have gained popularity. There are three varieties:
- The diaphragm-type dry shutter is equipped with a movable spring-loaded membrane. The diaphragm allows water to pass through, lowering under its pressure.
- In a float valve, the locking element rises when the water is drained, and then lowers and “plugs” the hole.
- In a pendulum lock, a special device blocks the drain under the influence of gravity.
The elements of the dry drain, which are located inside the floor structure, are made of plastic, and the outer cover is made of stainless steel.
Device
A shower drain is a complex plumbing device. The visible part of the drain resembles a funnel (a funnel-shaped inlet or body) through which water goes into the sewer system. The design also includes other elements:
- drain grate, which prevents clogging and minimizes the possibility of failure of the sewer system; sealing rings or flanges are used to secure it;
- a siphon with a shutter (dry, water or combined) is connected to the pipeline using a coupling;
- outlet part connected to the drain of the sewer system.
Corner drain 10x10 cm. D50 mm.45 plastic. Stroylandia Photos
The drain body can have different shapes: an elongated rectangular tray or a round container (snail). The body, inside of which the siphon is located, is fixed to the floor. The siphon has a shutter and performs all the functions of the structure, but more on this later. A pipe connecting the siphon and the sewer is connected to the outlet part. The removable grille performs a decorative function , as it hides the technical part of the structure. In addition, it serves as a support for the feet when using the shower. For the ladder to function properly and perform all its functions, the structural elements must be securely fastened and fastened to each other.
Video
This video shows the device of one of the budget models of this device.
And the next video shows how you can modify a purchased drain with your own hands and it will definitely be dry and frost-free.
Which drain material to choose
Different materials are used to make shower drains. Most often, plastic products are found on sale. Their difference:
- affordable price;
- light weight;
- resistance to detergents and disinfectants;
- easy care;
- durability;
- versatility.
The height of the plastic product varies from 7.5 to 18 cm. Plastic goes well with many finishing materials.
Devices with a stainless steel body and lid not only have a stylish appearance, but are also hygienic, which is why they are often used in rooms with high sanitary requirements.
Triangular drain with perforated steel grille for a stylish interior
Stylish linear stainless steel drains are used for arranging showers in a modern style. They fit perfectly into the style of minimalism or hi-tech, as they are practically invisible on the floor made of ceramic tiles or porcelain stoneware.
For public areas of showers and baths, laundries and specialized laboratories, cast iron structures are chosen. They have the greatest throughput and cope with the drainage of rain and household water. Cast iron has anti-corrosion resistance and lasts for at least 50 years.
Table. Popular drain models
| Illustration | Description | Average cost as of April 2021, rubles |
| "BAD415502" from "Tim" | Linear type drain with water seal and perforated grate. Peculiarities:
| 2600 |
| "BAD011502" by "Tim" | Stainless steel point drain. Peculiarities:
| 324 |
| Viega 4935.1 557 119 | Shower drain from a German manufacturer. Material: plastic. Height is adjustable. Features: swivel nozzle 10 x 10 cm. | 3400 |
| Viega 4935.1 557 119 | Stainless steel ladder. Peculiarities:
| 300 |
| AlcaPLAST APV31 | Drain made of polypropylene with a stainless steel cover with a connection diameter of 5 cm. The total installation height varies from 8.8 to 17.4 cm. Features:
| 1100 |
Criterias of choice
In addition to choosing the design of the shutter, it is advisable to select the size of the mesh so that it is convenient to lay the tiles on the floor: it is desirable that the size of the drain be a multiple of the size of the tile (including mosaics). Pay attention to the material of the case. For a shower stall in an apartment or house, plastic is quite suitable. These are the most affordable options. Floor drains made of polypropylene are more expensive, and stainless steel is even more expensive.
There are even corner models
It is also worth choosing the height of the ladder. The minimum value is about 6-7 cm, the maximum is up to 20 cm. Among the technical characteristics, this equipment only has a maximum throughput - how many liters it can dispense per minute. Select depending on the maximum pressure that your shower can produce: the throughput of the drain ladder should not be less than the maximum amount of water dispensed. Both parameters are measured in liters per minute (L/min), so there shouldn't be any problems.
Changing the floor height to install a drain
The height of the shower drain starts at 6 cm. In addition, the device must be tilted when installing it to ensure effective water removal. Therefore, in some cases it is necessary to raise the floor to a certain height. The top point will be the plane of the device's drain grate. When choosing a new floor height, take into account the height of the drain, which is selected taking into account the area of the shower room and the intensity of its use.
In addition to the height of the ladder, the thickness of the rough and finishing screed, insulation, and waterproofing material is taken into account
Changing the height of the bathroom floor is done in different ways. The choice depends on the material and condition of the ceiling.
Choosing a screed
The easiest way to make a floor with a slope is to use a screed. However, this option is not suitable for weakened floors, since the “wet” screed has a lot of weight (approximately 15 kg per 1 m2 at a height of 1 cm). Therefore, it cannot be used in old houses.
Forming a slope for a “wet” screed
It should also be taken into account that when installing a “wet” screed, it will take time for it to “mature”. Another disadvantage: installing a traditional screed is a “dirty” process.
Traditional “wet” screed in the bathroom
Extruded polystyrene foam will help lighten the cement-sand screed - these are slabs that, unlike foam, retain their shape under the weight of the screed and have heat, sound and waterproofing properties. The result will be an insulated floor. The height of such a screed is at least 3 cm. This floor design is used when installing a “warm floor” system. For an apartment, it is better to choose an electric heated floor - it is faster to install and if we are talking about a small area, then you don’t have to worry about a high electricity bill.
"Warm floor" in the shower
To install a screed on a weak foundation, you can use lightweight concrete (polystyrene concrete and other varieties). This will also make it possible to resolve the issue of insulating the structure without the use of additional materials due to the thermal insulation qualities of the composition. It makes sense to use this composition to create a rough screed - the weight of the floor cake will be reduced and its insulation will be ensured. Together with the main screed and other layers of the structure, the required height for installing the ladder will be 120 mm.
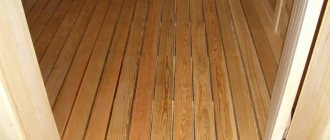
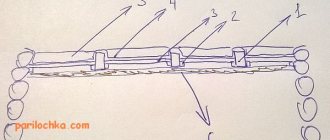
Wooden structure
Installing a wooden podium will reduce the load on the floor. The main thing is to properly treat the wood with moisture-proofing compounds and choose a species that is resistant to a humid microclimate.
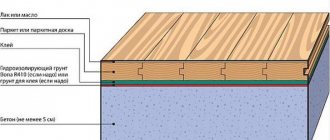
When installing logs, choose their arrangement – “envelope”. In the center, determine the place for the drain hole. To fix the lags in the screed, holes are drilled for the studs in increments of 300 mm. Logs are attached to the studs taking into account the slope. If necessary, the tree can be cut down towards the drain. Moisture-resistant plywood 1.2 cm thick, a sheet of moisture-resistant plasterboard, a waterproofing layer and cladding (tiles) are attached to the joists on top.
Scheme of laying logs in the shower
Another option for forming a slope on a wooden or concrete floor involves adjusting the thickness of the tile adhesive. This method is recommended for small rooms and showers. The advantage of this method is its light weight, but the disadvantage is that it is labor intensive.
Note! The only technical characteristic of the ladder is its throughput. It should ensure timely removal of water; liquid should not accumulate and “stand” in the pan.
Special equipment will allow you to lay tiles with high quality
Useful tips
- When purchasing a drainage device, you should choose models with a throughput of at least 1.5 liters per second.
- You need to create the optimal tile layout in advance using a computer program or manually.
- The dimensions of the tile joints should not exceed 2-3 mm.
- It is better to choose a metal grate for the ladder rather than a plastic one. It costs more, but will last longer.
- It is recommended to periodically moisten the cement that hardens in the screed and level it with a trowel. This will make the surface smoother and stronger.
- Isoplast waterproofing can be easily replaced by liquid coating mixtures - “Tekhnoprok”, “Elastomix”, “Elastopaz”.
- If you plan to install a modern “tropical shower” system in the shower room, it makes sense to install a linear drain. It has the highest throughput properties.
A tiled shower drain provides an excellent opportunity to create a shower room within a limited space. It will be appropriate in small apartments and rooms where water getting on the floor is inevitable. With proper installation and construction work, the system will operate stably and serve for a long time.
What tools will you need?
The set of tools that will be required for the work depends on the installation method and the selected materials:
- A mandatory tool is a level. It is necessary to control the slope of the floor plane. You can use a regular building level or a high-precision laser device.
- To apply the markings you will need a pencil and a tape measure.
- You will need to purchase the ladder itself and plastic pipes of the appropriate diameter in advance (usually 50 mm).
- If you are going to install a podium, you will need blocks for the sides, a metal profile, and gypsum board sheets.
- You will definitely need waterproofing material. It can be rolled or in the form of mastic.
- If you are going to fill the screed, you will need a dry construction mixture, a container for preparing the solution, a mixer attachment, usually a spatula, and a grater.
- For insulation of screeds, extruded polystyrene foam is purchased. You will also need a damper tape, which is installed around the perimeter of the room before pouring the screed. To fix it to the wall, use masking tape.
- To install the front covering you will need: ceramic floor tiles, glue, PVC crosses, grout, tile cutting devices.
- Silicone waterproof sealant.
ceramic tiles for bathroom
Tools for work The set of tools required for work depends on the installation method
Working in difficult conditions
As you now understand, such a structure cannot be installed on a wooden floor. The floor itself will have to be completely disassembled and a completely waterproofed covering installed. But if the issue of room design is critical, then in this case you just need to choose tiles in brown tones in order to bring the colors as close as possible to wood.
Another problem is small apartments. It is their users who often want to install a shower with a drain instead of a bathtub. But in such premises the sewerage level is often set too high, which prevents a full raising of the floor level. In this case, they resort to creating a podium. All structures will be hidden under it, and it will take up little space in the bathroom.
A visual demonstration of the installation of a drain in the corner of a shower stall
Shower with drain: step-by-step instructions
Despite the large assortment of shower drains, they are all installed according to the same principle - in the floor. Therefore, the sequence of work is the same.
Stage 1: preparation
First, you need to install a drainage system - a pipe through which water will go into the sewer. The slope of the pipe should be 2 cm per meter. The location is chosen depending on the point where the ladder is installed.
The diameter of the pipe must match the drain outlet
Next, you need to outline the height of the floor pie. To do this, take into account the thickness of each layer: rough screed, insulation, waterproofing, finishing screed. The ladder grating should be located in the same plane with the cladding, which is not laid at an angle.
On the wall, mark the upper limit of the front finish along the perimeter of the room, taking into account the slope
If the slope is formed due to the thickness of the adhesive layer, then mark the height of the screed and the height of the first row of tiles on the wall.
Important! The thickness of the screed layers is selected based on the height of the drainage device.
Stage 2: determine the thickness of the layers of the screed cake
It is no secret that the surface of tiles is cold, especially if it is laid on a pure concrete floor. To make the floor surface warmer, insulation is installed into the screed - slabs of extruded polystyrene foam. They are distinguished by high density, thermal insulation qualities, low weight, do not rot and do not absorb moisture.
The slabs do not deform under the weight of the screed and floor covering
The thickness of the polystyrene foam in the screed is 50 mm. At the location of the drain hole, the screed has a thickness of 30 mm. Towards the walls its thickness increases - this is how the slope is formed. To calculate the height of the rough screed, it is necessary to set aside the thickness of the finishing screed and slab insulation from the zero mark of the finished floor downwards. The top point of the subfloor is marked on the wall.
Rough expanded clay concrete screed
To make rough screeds, lightweight concrete is used, for example, containing expanded clay. This allows you to level, insulate the base and prevent it from being overloaded. If it is necessary to significantly raise the height of the floor due to screed, then to minimize “wet” processes, part of the height can be compensated with the help of foam blocks. A reinforcing mesh is laid on top and a screed 3 cm high is poured.
For ease of fixation, the damper tape has an adhesive layer
The screed device involves fixing a damper tape around the perimeter of the room, which will compensate for the expansion of the floor structure and prevent it from deforming. This type of floor is also called “floating”, since it is not rigidly connected to the walls. The height of the tape is selected so that it rises above the floor by at least 10 - 20 mm. Sometimes the damper tape is replaced with thin foam. After the screed is poured, the excess tape is cut off.
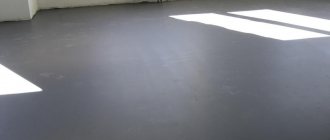
Floating concrete floor
After pouring the solution, the screed is left for at least 7 days to dry and gain strength. During this time, the strength of concrete will be 50% of the final parameter. This is enough to continue the rest of the work.
Stage 3: waterproofing measures
An important stage in the installation of screed in the shower is associated with waterproofing measures. The protective layer must be multi-layered. To prevent any leaks, preference should be given to mastic waterproofing. Apply it with a roller or brush to the floor and walls. After drying, it forms a water-repellent thin monolithic layer. Apply the composition in several layers, extending 30 cm onto the walls.
This method of waterproofing is the most convenient and reliable
The most vulnerable places are the joints between the floor and the wall, corners and the place where the pipe connects to the drain hole. You can fix roll waterproofing in the corners and apply a liquid compound on top. Then repeat the process to get multi-layer protection.
For reliability, a layer of insulation can be applied to the base - before pouring the rough screed. When using roll waterproofing, the sheets are laid with an overlap of 12-15 cm, and the seams are coated with bitumen mastic.
Stage 4: installing the ladder
It is important to choose the right place to install the drainage device - its grate should look organically against the background of the floor covering. You must first lay the tiles “dry” on the floor, taking into account the thickness of the seams and the gap between the wall and the first row. This will allow you to evaluate the selected tile configuration and grate design.
It is best to place the drain along the far wall if it is linear or in the corner if it is point-type. This will prevent water from getting outside the shower area.
When choosing a location for a ladder, you should try to make as few adjustments as possible during the process of laying tiles - this will reduce work time
Please note the following:
- Sometimes the final location of the ladder may change during the work process. After dismantling the old cladding, it is discovered that the desired installation will require adjusting the position of the sewer pipes. It’s easier to install the ladder closer to them and not have to do additional work.
- The choice of location for the drain may be affected by the drain cover. A point device is installed in the center, a linear device is installed along the wall.
- To install a drain in a corner, it is recommended to purchase special corner models.
Table. The process of connecting the ladder
| Illustration | Description |
| Step 1 | The drain snail is connected to the sewer pipe and checked that it is level with the floor. To rigidly fix the ladder structure, a self-leveling solution is used, which flows under the snail and securely fastens it. This will avoid a situation where the ladder will fail when loaded from above. |
| Step 2 | Then you need to lay the slab insulation, cutting it around the drainage device. A damper tape or fragments of thin polystyrene foam (20 - 30 mm) are fixed along the perimeter of the walls. This will further insulate the wall. To ensure tightness and prevent leakage of the solution, the contact areas of adjacent elements (joint) are taped with moisture-resistant tape. |
| Step 3 | The space around the ladder is reinforced with fine metal mesh. |
| Step 4 | The remaining space is reinforced with a large mesh (10 x 10 cm). |
| Step 5 | Throw in the solution. Then you need to pick up the mesh with your finger and “pull it out” so that it is closer to the top of the screed. |
| Step 6 | The solution is smoothed out. It takes at least three weeks for the screed to “ripen”. It is important to maintain optimal humidity for uniform drying of the solution, and cover with film if necessary. It is necessary to moisten with water for the first few days. |
Stage 5: floor covering
If the slope was initially provided for by the screed configuration, then laying the mosaic will not be difficult.
In a special article we will tell you how to choose tiles for a bath, what to pay attention to first, and also show ready-made ideas for stylish and practical interiors for every taste and budget.
Table. Mosaic floor covering
| Illustration | Description |
| Step 1 | Tile adhesive is diluted in the proportion indicated on the package. The quality of tile laying depends on following the instructions. Using a spatula, glue is applied to the floor surface. |
| Step 2 | Mosaics are produced in the form of pixels glued onto a mesh backing. The mats are laid on top of glue, which must first be leveled so that it lies in an even layer. The mats are laid so that between them there is a gap of the same width as between the pixels of the mosaic. |
| Step 3 | Then the mosaic must be smoothed so that there are no air voids between the mat and the glue. |
| Step 4 | When laying the mats, PVC crosses are installed between them to form even seams. |
| Step 5 | When the glue dries (time indicated on the package), the seams are filled with grout. |
| Step 6 | The material is rubbed in with a sponge in a circular motion. |
| Step 7 | When the grout has dried, the floor covering is thoroughly washed. |
| Step 8 | At the final stage, the drain cover is installed. |
When the finishing work in the shower is completed, you can begin installing the doors. The best option that supports the idea of open space is transparent glass doors. Depending on the area of the room, choose the opening option: hinged or sliding. They can be made to order or purchased ready-made. A budget option is plastic doors or curtains.
Despite their external fragility, tempered glass doors are very durable and safe
Laying tiles requires skill, so it is better to entrust the process of making a shower with a drain to a professional craftsman.
How to install?
Before starting work, you must prepare all the necessary tools and materials. The amount of consumables depends on the size of the bathroom.
To work you will need:
- tape measure, laser or regular ruler, corner;
- construction knife;
- marker;
- a set of keys and screwdrivers;
- wire cutters;
- bucket and shovel for screed mortar;
- hand tools for leveling the base: trowels, spatulas and graters;
- tile cutter;
- complete ladder;
- metal-plastic pipes;
- dry sand-cement mixture for screed (5 kg per 1 m2);
- expanded clay and foam concrete - for the first layer of screed;
- sheets of expanded polystyrene 5 cm thick;
- waterproofing membrane (3 kg per 1 m2);
- mastic (3 kg per 1 m3);
- isoplast;
- tile adhesive (5 kg per 1 m2);
- grout for seams;
- sealant paste;
- ceramic tile.
The situation is different if the drain needs to be installed in the bathroom of an apartment building. Installation work must be carried out in stages. First of all, pipes with a ladder are laid and work is carried out on the screed and waterproofing layer. All tasks must be solved simultaneously. The entire structure is laid in several levels and is more reminiscent of a multi-layer cake, which is laid at a slope of at least 2%. Then comes the screed again, and then the floor tiles.
Detailed step-by-step instructions.
- The outlet pipe is connected to the sewer pipe at an angle of about 2 cm. The connection contour is covered with sealant paste.
- The main requirement for such showers is that the floor covering must have a slight slope to allow water to drain quickly. In this case, you will not need to additionally install sides and borders along the edges. Therefore, the next important step is to calculate the height of the screed. To do this, measure the drain 1.5 cm above the outlet pipe and use a laser ruler to mark the wall. For unhindered water flow, it is necessary to make a slope of about 1 cm per linear meter. On the wall, indicate the height of the future floor with a marker.
- In a new house under construction, all work can be completed without any difficulties. In an older home, you will need to remove the bathroom flooring and replace the pipes, and then do the work step by step. As for apartment buildings, in most cases it is necessary to raise the floor level by 12-15 cm at an angle.
- Next, you need to completely clean the surface and repair any existing cracks or irregularities. Subtract 8 cm from the floor level mark indicated on the wall (5 cm for a sheet of polystyrene foam and 3 cm for a screed). Using the new mark, we begin work on the rough screed. To ensure a smooth tilt, it is necessary to use special metal slats. But before this, it is necessary to lay a damper tape along the walls; it will create the effect of a floating screed and will not allow the floor to deform in the future. For the first screed we use foam concrete and expanded clay, they are necessary in order to reduce the weight of the future floor. After this stage, it is necessary to dry the rough layer of screed. As a rule, about 14 days are needed for a 3 cm layer.
- After two weeks, you can move on to the waterproofing layer. To do this, apply a sealant to the water pipe using a wide brush.
- Then a thermal insulation layer of expanded polystyrene is laid. The floor is covered from individual parts of the material.
- After this, you can move on to the second layer of screed. A few days after complete drying, it is necessary to lay a waterproofing layer. To do this, you can use isoplast; the material is laid in separate sheets on the floor and heated from the back using a blowtorch. Irregularities and corners must be treated with sealing mastic.
- Next, the drain body is completely assembled, but instead of a decorative grille, a small piece of waterproofing material is placed on top. This is necessary to ensure that the cement mortar does not clog the internal structure. After which the third layer of screed is poured, its thickness should be lower than the height of the ladder by the thickness of the tile and the layer of adhesive mortar. Before laying the tiles, the entire cake must be completely dry. Experts recommend waiting 40 days.
- After a few weeks, the tiles are laid according to the chosen pattern. Installation starts from the ladder towards the wall. After a couple of days, it is necessary to treat the seams with moisture-resistant grout. Next, you can cover the drain with a decorative grille. The joint between the drain and the tile is filled with silicone sealant.
- After all stages of work have been completed, you can proceed to installing a fence for the shower stall or leave the space open. In this case, you can choose transparent partitions or curtains.
Closing events
A water seal siphon is placed directly into the drain body. A receiving grid is installed on the drain hole.
Important! The grille should be installed on a thin polymer collar. This will ensure that it drains directly into the hole rather than along the edges of the grate. Draining along the edges is unacceptable if the pipe holes are assembled into a joint and the hole for the grate has a larger diameter.
After this, tiles with the required decor and height are selected. It is installed using special mounting adhesive and cut with a tile cutter in the required installation locations.
Finished bathroom floor with drain
Drying lasts at least two days, after which it is necessary to clean the joints from dried glue. This is done using a spatula and specialized cleaning products.
Basic malfunctions and their elimination
Unpleasant odor - this situation occurs when the valve is faulty or the pipe entering the riser is disconnected.
Stagnation of water - this may be caused by a clogged hair net or one going from the device into the sewer. This problem is eliminated by clearing hair from the grate and breaking through the blockage with a small flexible sewer cable.
Low water throughput - this problem can be caused by both blockage and the wrong choice of drainage device. In the first case, the pipe is cleaned with a cable, in the second, part of the pan is dismantled, the drain is removed and replaced with one with greater drainage capacity.
What you might encounter when remodeling your shower
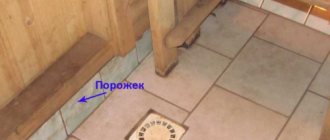
If the shower is not installed immediately during the construction of the house, structural problems may arise. In houses with a basement, problems usually do not arise, but in old buildings the question is inevitable: where to place the drain? However, there is an emergency solution: raise flat shower surfaces by 10-15 cm so as not to disturb the existing floor.
Too thin layer of monolithic floor
To install a rigid foam element or shower channel in a monolithic floor, a groove must be hollowed out. Often you have to cut a little through the concrete panel. In this case, you should first consult with an architect or building structure specialist.
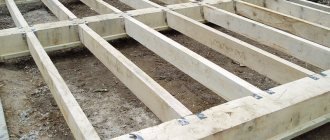
Beam floors
With beam floors, a shower with a flat floor can only be installed if the drain runs parallel to the supporting beam and if the floor above the beam is of sufficient thickness.
Replacing the shower tray
Anyone replacing an old shower tray with a flat floor shower will have to replace the missing tiles and re-tile the connection in the floor. As a rule, there are no spare tiles. Possible option: make a mosaic pattern around the edge.