- Selection of materials
A chaise lounge or its modification - a lounger - is a product that is often used in relaxation rooms of baths and saunas. On such a mobile device you can comfortably rest in three positions at once - sitting, reclining and lying down. There are many varieties of this attribute. Moreover, many of them can be made with your own hands, without the use of expensive materials and with the initial inclinations of a carpenter.
Frame and decking
Support - a canopy frame made of timber for subsequent flooring with boards can be fixed both on the floor and on the wall.
The floor frame makes cleaning a little more difficult, and the wall frame may become deformed due to shrinkage of the walls. A reliable frame is assembled from vertical posts, longitudinal and transverse crossbars - jumpers. To make a safe canopy for a bathhouse with your own hands, experienced craftsmen recommend starting work from the top tier, installing two beams horizontally across the width of the canopy. These beams form a support post, and between them transverse struts are placed every 50 cm, like stiffening ribs. When installing a system of vertical racks, all surfaces of parts in contact with the floor are insulated using specialized rubberized gaskets. In addition, this gives additional stability to the structure.
For those owners who are at least a little familiar with carpentry, this bath canopy is a simple structure similar to a bench. How creatively you can approach the process of creating an ordinary canopy can be seen from the many images on the Internet. Warm colors and the smell of natural wood in themselves already create comfort in any room. And the master’s ability to put a piece of his soul into his works will give the steam room an atmosphere of hospitality and care.
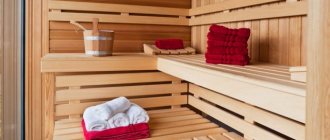
Several options for a comfortable bath canopy
A deck made of boards is attached to a frame made of beams, where air should circulate freely and water should drain freely. When installing, a gap of 5–20 mm is left between the edges of all boards, the principle of which is also preserved for the floor and walls. The boards are supposed to be slightly tilted so that water does not stagnate and is not absorbed into the wood. The inter-level vertical space is also covered with boards while maintaining gaps, providing access under the canopy for cleaning.
We suggest you read: How to properly make lining in a bathhouse
Another interesting solution
This design is completely different from the previous one. But nevertheless, making it with your own hands is no more difficult. Such a chaise lounge is not very convenient to move, but, if carefully executed and carefully processed, it is quite aesthetically pleasing and easy to implement.
The tools we need are:
- 2.5×8×60 cm – 13 pcs. (slats for seating);
- 5×10×21 cm – 2 pcs. (longitudinal bars for the frame);
- 5×10×50 cm – 2 pcs. (cross bars for the frame);
- 5×10×35 cm – 6 pcs. (chaise lounge legs);
- 5×10×88 cm – 2 pcs. (back of the product);
- 5×10×39 cm – 3 pcs. (back of the product);
- 2.5×8×88 cm – 6 pcs. (slats on the back frame);
- 5×10×60 cm – 1 pc. (bar for fixing the backrest in the desired position);
- wood screws;
- pins for fixation;
- paint or varnish;
- impregnation for wood.
The first step is to treat the wood. Then you need to make a frame. To do this, take 2 longitudinal beams of 215 cm each and 2 transverse beams of 50 cm each. We connect them with screws.
Frame
Next, take 13 60 cm strips and secure them to the frame with self-tapping screws, leaving a 1 cm gap between them. To make the distance even, you can use centimeter spacers in the form of planks. So we got a seat.
Making the seat
The next step is to install 35 cm legs from timber (the length of the legs can be changed as desired). On the seat side, to strengthen the structure, we make double legs.
Next, we make the backrest from two beams 88 cm long and three beams 39 cm long. The frame of the backrest should fit freely into the main structure, and it is also necessary to leave a small gap between these blanks.
Making the back frame
Now fix the back boards in the longitudinal direction. The edge planks can be rounded to give them a more aesthetic appearance.
Sewing the back frame
So that the back can easily rise and fall, make through holes at a distance of 9 cm from the edge of the seat through both structures. Fastening is carried out using special pins.
Fastening the backrest
After this, you need to make 2 grooves in the base of the chaise longue in which the support bars will be placed. Due to this, the backrest can be fixed in different positions. One groove is made at a distance of 9 cm from the stud, measuring 5x10 cm. The next groove is made at a distance of 20 cm from the previous one, 5x5 cm.
Making recesses
A horizontal beam 60 cm long is placed in the first groove, which will hold the backrest in the desired position. If you want to change the position of the backrest, then the beam is shifted into the second groove.
Finished chaise longue
Following this pattern, the process of making a wooden chaise lounge is almost completed. All that remains is to sand the structure, varnish or paint it.
Wood selection
Not every type of wood can withstand the specific conditions of a Russian bath, so you need to choose the material very carefully. It also matters where exactly the lounger will be used - in the steam room or relaxation room. For a steam room you need wood that is resistant to moisture and high temperatures, with low thermal conductivity, without resin pockets. In addition, the material should be easy to process, have a pleasant smell and color, and be light in weight. Pine and spruce are not suitable due to their resinous content; larch, oak and birch have a high density and are difficult to process. Maple and ash do not tolerate exposure to water well and rot quickly, just like beech.
Wood shades
Linden, aspen, and black alder meet the highest requirements. These types of wood have low thermal conductivity and will never burn the skin even in a hot steam room. Easily processed wood does not warp when dried, is not afraid of fungi, and retains a pleasant color and texture for a long time. Loungers made of linden or aspen are lightweight, so you can rearrange or move them without much effort.
Aspen
Linden
Pine
Alder lining
In the rest room, where both humidity and temperature are always normal, you can use pine furniture as the most budget-friendly one. A bench made from carefully processed pine boards has a very attractive appearance, although it is slightly inferior to products made from linden or alder. Of course, furniture made from African oak, Canadian cedar and mahogany looks the most presentable, but such material also costs a lot.
Solid wood lounger
What do we have?
Comfortable long chairs look completely different. And before you start working directly, you should understand what type of chaise lounge you need to make. They are:
- in the form of a rocking chair (the back is at an angle, so the relaxation process is very comfortable. You can not only sit, but also lie down and even sleep);
- in the form of a regular chair (elements of a folding bed or crib are taken as a basis; armrests can be mounted as desired);
- in the form of a monolithic product (during manual assembly, all parts are tightly fastened, so disassembly is impossible; it is strong and reliable. Back adjustment is not provided, the product itself does not fold);
- in the form of a soldered product with beautiful hand-made inserts (a handmade chaise longue with amazing beauty; can fit into any interior);
- in the form of a sun lounger (a strong and reliable sun lounger made of plastic or wood; beautifully sanded and varnished);
- in the form of a portable product (it is compact and reliable; a position-regulating mechanism is provided).
How to care for shelves?
Not only the shelves, but also the entire steam room room must be kept clean, ventilated and dried. It is very good to dry the beds in the sun. And in this sense, it makes more sense to make them removable.
To clean them, you must use only clean warm water. And to dry the shelves as quickly as possible, you should wipe them with a dry, moisture-absorbing cloth and ventilate the sauna room after each use.
- Enter the parameters of your sauna or simply leave a request
- We will receive an estimate for your project from each of our contractors
- We will choose the best offer and contact you
- You will get a sauna at the best price
Your promo code: “Sauna for you”! Tell it to our employee and the surveyor’s visit will be free for you.
Folding the oven
For a mobile bathhouse, you can make a stove directly at your resting place.
If you have a car, you can make a more advanced version from a pipe and a potbelly stove. Where can you get stones? It is better to purchase them in advance in the store, and find a few more cobblestones of not very large size on the spot. Stones bought in a store heat up instantly, but also quickly give off heat. Therefore, the stones you find will help retain heat longer.
There are three masonry options:
- Solid.
- Vaulted.
- With jumper.
It is worst to use the “solid” option, since the fire does not reach the top stones. The easiest way is to fold the stove with a jumper.
You can heat hot water for the bath on the stove using a metal bucket. It will boil within 3 hours. All that remains is to take a broom and pour water over the stones. Enjoy Your Bath!
Choosing material for the lounger
In this bath case, hardwoods become the favorite. The advantage is that at high temperatures they do not release resins that can cause skin burns. There are other requirements for the wood used to make benches, as well as shelves for the steam room.
Strict requirements for a steam room
The material must withstand high temperatures and high humidity with honor, otherwise the furniture will not be in danger of a long service life. Low thermal conductivity is also necessary for a comfortable rest, since there will be no need to spread a sheet on the sunbed. The list of suitable breeds includes:
- Aspen. The tree is distinguished not only by its light weight and low price: it is believed that it is endowed with healing properties and is capable of absorbing negative energy (the “saving” aspen stake immediately comes to mind). The material is practical: the manufactured sunbeds will serve their owners faithfully for a long time. However, when choosing wood, you need to make sure that there are no signs of rot, especially internal rot.
- Linden. This tree is a leader if you evaluate the material in terms of quality-price ratio. It is quite light, easy to process, beautiful, and at elevated temperatures it begins to exude a subtle, pleasant aroma. Another advantage of linden is its durability: the wood is resistant to rotting, and cracks do not appear on it either. A relative disadvantage of wood is the appearance over time in some places of small defects - darkened areas.
- Regular and black alder. The main advantage of these rocks is their very low thermal conductivity, so steaming on such loungers will be very comfortable. Alder is not affected by either high humidity or high temperature, so cracking is not typical for the material. During use, alder almost does not change color: for those who want sunbeds of a darker color, it is better to choose black species. The disadvantages of the material are poor flexibility, tendency to rot.
Other breeds have more weak points. Birch and oak are difficult to process due to the fact that their wood has a high density. Beech, maple, ash are materials that are not indifferent to moisture, so they begin to rot relatively quickly. African oak, mahogany, and Canadian cedar look great, but few owners of a “wet place”—a bathhouse—are willing to pay such a large sum for beauty. Especially for the latter coniferous (and therefore resinous) plant, which requires special treatment. Regardless of the choice of wood species, when purchasing material, you must make sure that it does not contain knots, as well as other defects - cracks, nicks, signs of rotting.
Washing room, dressing room, rest room
In this case, there is no direct threat to the wood from high temperatures, so the range of candidates expands slightly. In the washing department, which is characterized by a constant and large abundance of water, the only suitable option is coniferous wood, since it is the resins that are able to protect the wood from moisture and not give it a chance to rot.
The cheapest material is pine, but not only it can withstand humidity: deciduous trees are also suitable, but they definitely need high-quality water-repellent impregnation. There are absolutely no restrictions on materials in the waiting room and rest room. Any wood can be used for furniture here. To protect it from moisture, all kinds of impregnations and varnishes are allowed.
Prepared boards designed specifically for shelves can be purchased at the store. This option will greatly simplify the work, since these materials are already completely ready for installation: they are sanded and the corners of the boards are rounded. If you plan to cut boards with your own hands, then you need to take into account their careful processing. There is one more point: to prevent the wood from cracking or warping in the near future, it is necessary to “notch it at the nose”: the width of the board cannot exceed four times the width.
Sun beds for baths and saunas - what are their main differences?
First of all, what you need to remember when equipping a Russian bathhouse is convenience and functionality. The beauty and appearance of the interior are secondary in this case. Unlike a Russian bathhouse, which is saturated with steam, people usually come to a sauna to sit and bask in the dry air. And most of the multi-stage shelf projects presented on the Internet or in advertising brochures are still sauna beds.
They are not entirely suitable for a Russian bath for the following reasons:
- Solid lower shelves limit the steamer's access to the working lounger (middle or upper tier), on which the steamer is most often located.
- The narrow size of such a lounger does not allow you to sit on it comfortably and comfortably.
- As a rule, such sunbeds are sewn up from the bottom with slats, which will not allow for proper cleaning of debris and leaves falling from the broom.
Often, sauna manufacturing companies take advantage of the inexperience of buyers and sell them sun loungers and chaise lounges for baths in exquisite shapes and with built-in lighting. Unfortunately, over time, during use, their shortcomings and inconvenience for the Russian steam room become obvious. Therefore, there is a need to remake it in accordance with your needs and desires.
Preliminary planning and calculations
Calculations and a basic design are prerequisites for a successful result. Draw a preliminary small plan of the room, put down dimensions, mark the location of equipment, window and door openings.
Scheme and principles of placement of regiments
Therefore, owners of steam rooms with windows who decide to independently manufacture comfortable shelves for a bath have a limited choice. They will be able to draw a plan for a future multi-stage structure only along walls without windows and without glazed ventilation vents. Otherwise, the placement schemes are the same for everyone. Shelves can be arranged:
- a single linear object along one wall in one, two or three rows;
- G-shaped design with numerous variations in the number of steps. Two or three along each wall, or the upper and lower benches along the long wall, and the middle one along the adjacent short one, etc.;
- two parallel structures, symmetrical or asymmetrical, installed at opposite walls of the steam room, as in a railway compartment. Or how in the same compartment there are two equal tiers of shelves.
Draw out several options from which you can choose the best. Only for competent planning and calculation of costs for the purchase of lumber, you will also need the exact dimensions of multi-stage or single-stage shelves for a bathhouse.
Dimensions of bath seats or beds
To begin with, we list the traditional sizes of places for receiving bath procedures in a lying and sitting position:
- 1.5 m of length is needed in order to lie on a shelf with legs bent at the knees;
- 1.8 m in length will allow the average majority not to bend their legs when lying down. But according to this parameter, everything is purely individual, sometimes 2.00 m is not enough;
- 0.4 m is the minimum width of the shelf, most often the lower one, used primarily as a stand under the feet of a bathhouse attendant wielding a broom. It will be quite comfortable to stand on such a step, and you can also sit down to refresh yourself and cool down;
- 0.6 m is the most common size for the width of a sauna bench, although not very conducive to lying down;
- The 0.9 m width will allow you to sit across the shelf with your legs tucked in, and people with any physiological characteristics will be able to lie down.
Variations are acceptable, but bath attendants do not recommend doing less than the minimum limits.
Let's figure out the height of bath furniture
In terms of height, the principles of arranging shelves in a bathhouse are radically different from standard designs. All calculations begin with determining the height of the upper bench. In order to be able to sit on it and, when waving a broom, treat the back of a lying person, and not the bath floor, the plane of the upper shelf is located at a distance of 1.10 - 1.20 m from the ceiling. There is another reference point - the level of the steam door of the heating equipment. It is up to the owner to decide whether to adhere to it.
The height of the sauna benches varies from 0.4 m to 0.6 m. A “run-up” of 20 cm will allow you to slightly raise or lower the lines of the benches in the drawing so that the steam room has the required number of steps. The main thing is that the lower tier is at least 0.3 m above the floor surface.
Layout of users in the steam room
Before choosing a method for making curtains in a bathhouse (a shelf in a bathhouse), you should understand the main options for its use, user preferences and the possibilities of placing sunbeds in a limited space.
Traditionally, in a Russian bathhouse, users lie down, but the size of the loungers is chosen taking into account the ability to sit. A useful option is one with stops that allow you to raise your legs: this makes it easier to perceive the heat and humidity of the steam room. If bathhouse visitors prefer to sit and do not use brooms for skin cleansing and massage, the size of the shelves can be reduced in length and two or three tiers can be arranged in the room.
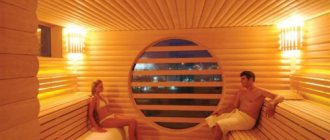
It is also important to consider the air movement pattern in the room. Usually it corresponds to that shown in the illustration, but depending on the layout of the bath there may be differences
The distribution of temperatures and the position of places for lying and sitting are interconnected: a sitting person is more susceptible to overheating of the head, a lying person experiences uniform heating.
The layout of the room is related both to the location of the stove and door (these areas are not used), and to the planned number of visitors. Typically, small steam rooms are equipped with one or two shelves, located side by side (letter G) or in two tiers. Large rooms are equipped with two or three-tier places for users, which occupy 2/3…3/4 of the perimeter of the room.
To save space in small areas, use a “P” arrangement of tiers at different levels, as shown in the illustration. At the same time, each place allows you to sit and lie, although the convenience of this layout is limited.
Blueprints
The presented drawings will help you design a sun lounger yourself:
Drawing with dimensions of parts
Drawing of a wooden deck chair
Determination of height and length
Design diagram
Scheme of a sun lounger with a canopy
Layout
The area of the bathhouse is an important factor for determining the location of the canopy and the number of its tiers. After all, when they create a canopy in a bathhouse with their own hands, they focus on the longest wall. But with the obligatory consideration of the absence of direct steam from the stove into the steaming space, as well as drafts. Depending on the size, the bath canopy allows you to sit, recline or lie down.
Typically, canopies are made of two or three levels to allow you to choose a more comfortable temperature zone. In the classic three-stage version, the middle tier is made stationary. The collapsible design, where the upper and lower shelves are removable, allows for better drying of the wooden parts of the bathhouse.
Along one wall there can be stepped and compartment options for the arrangement of shelves. The most economical option for arranging the canopy is like in a sleeping car compartment, one shelf above the other. They are attached with the ability to fold, freeing up space in the bathhouse if necessary. With the third L-shaped method, one of the shelves is located on the adjacent wall.
The ideal length for the canopy so that the average person can lie on it freely at full height without bending their legs. Typically the minimum bench length dimensions used are:
- sun lounger – 180–220 cm;
- recliner – 150 cm;
- seat – 40–90 cm.
The most important dimensions for the height of the canopy tiers are the distance from the floor and ceiling of the bathhouse, the optimal location of the upper and lower shelves. The main point of these dimensions is that there is enough space so that an average adult can sit down without hindrance when taking a steam bath. And also so that the steamer or massage therapist does not take uncomfortable, crooked positions during the procedures. Recommended height:
- from the ceiling to the top canopy – 110 cm;
- interlevel height – 60–80 cm.
The standard width of the canopy is considered to be 60 cm, but the upper bed should have a larger transverse dimension - 90 cm. It is quite acceptable to reduce or increase all dimensions to suit the existing standards of the bathhouse room. If the width of the main canopy is designed for two steamers, then this will already be paid. How to make a canopy in a bathhouse to suit the needs of a particular family is up to the owner to decide.
The constituent elements of any standard canopy are:
- frame - support post made of beams;
- the surface of sun loungers, seats made of boards;
- backrest for sitting on the top bunk.
All parts of the canopy must be from the same type of wood.
It is not advisable to use material made from coniferous trees, since with constant heating they begin to release resins that will stick to the bodies of vacationers. The minimum resin content of such popular hardwood species in our country:
- Linden - healing properties, homogeneous structure, darkens over time under the influence of steam and humidity.
- Aspen is relatively inexpensive, has a healing effect, is resistant to moisture, and never rots.
- Alder is a dense wood with healing properties.
- Poplar has a uniform texture; after drying, the wood becomes hard.
The wood of these trees tolerates high humidity, frequent temperature changes, and has a low level of thermal conductivity. Despite all these wonderful properties, they are additionally treated with special natural oils to protect against mold. Under no circumstances should it be impregnated with any chemicals or varnished.
Experienced craftsmen know that wood material is classified by quality. We recommend making your own canopy only from “Extra” or “A” quality wood. In appearance, this smoothly planed wood is distinguished by the absence of knots, chips and cracks. The more knots there are on the material, the more susceptible it will be to rapid destruction under extreme steam room conditions.
In sanded wood, all sharp corners should be smoothed with a chamfer to protect the skin of bathhouse visitors from possible cuts. Boards for flooring sunbeds and seats will last a long time if their width does not exceed four times the thickness. That is, in order for the boards to dry quickly and not crack, they must be thin enough.
To prevent the structure from swaying and creaking, the racks-bars for the canopy frame should have a cross-sectional size of 50×70 mm or 65×15 mm. Fasteners must be made of galvanized iron. When choosing the old fastening method, it will be necessary to drill holes at the joints for oak wedges - tenons. To avoid burns, the heads of metal screws - self-tapping screws or anchor bolts - are buried deep in the wood and protected with special decorative caps.
DIY scented soap
The finest soap for a bath with your own hands can be prepared using an opaque soap base.
Take 100 grams of base and melt in a regular water bath.
Stirring gently, add half a teaspoon of jojoba oil, a couple of drops of glycerin and two teaspoons of dried sea aquatic plants. At the very end of cooking, add 5 drops of eucalyptus or fir essential oil. If you are thirsty, you can add a greenish dye to the mixture at this time. Stir your brew well again and pour it into the molds. Don't worry, when the soap dries, it will easily separate from the containers.
If you often make “soap” devices for baths, photos of various master classes on the Internet will definitely intrigue you. So, you will be able to improve your skills and make beautiful bath gifts for friends and relatives.
Selection of materials for manufacturing
When choosing a material to make shelves in a bathhouse with your own hands, you should immediately forget about metal, plastic, glass and other modern options. Only wood is used, and the requirements for it are quite stringent:
- low thermal conductivity;
- high resistance to the destructive effects of moisture and heat;
- uniform and high density;
- no pungent odor or resin content.
As can be seen from the table below, coniferous wood (cedar, larch, fir, spruce) is quite small - but the high resin content makes them unsuitable for use in a steam room. If you want to enjoy the aroma of cedar or larch boards, they can be used to decorate a relaxation room; in a steam room it is better to use linden shelves for a bath.
The density of wood is usually determined at normal humidity; at elevated humidity it increases, thereby changing thermal conductivity. However, on average, when choosing a material, you can rely on the data in the table.
According to aggregate data - the absence of resins, low thermal conductivity and relatively high density - three “budget” wood options are usually chosen: linden, aspen, alder. The fourth option, African oak (abashi or abash), with other higher parameters, is disappointing with its high price, twice as expensive as linden.
On sale are usually prepared boards for shelves in a bathhouse, already sanded, with rounded corners. Its width is convenient for installing a set-up bed of any width; the length is selected as a multiple of the full length of the bed or its half. When planning to cut boards yourself in order to make a bathhouse shelf with your own hands, you should remember the need for careful processing. To prevent warping and cracking, we take into account: the width of the board should not exceed four times its thickness.
Mandatory rounding of edges and corners, sanding until smooth will help avoid damage during operation and extend the life of the lumber.
How to treat shelves in a steam room
Processing boards (beams) to create a bathhouse environment is not limited to mechanical
It is more important to protect the wood from moisture with a special impregnation. The usual options - drying oil, primers, varnishes, paints - are excluded
The reason is that when heated, the substances begin to emit harmful fumes and unpleasant odors. The lack of constantly running ventilation in the bathhouse and high humidity, combined with high temperature, create a risk of intoxication of the body.
To avoid problems, bath shelves are treated with natural non-toxic impregnations:
- acrylic varnish on a natural basis, designed specifically for baths and saunas. Apply in two or three layers after sanding and washing (drying) the wood surface. Includes antiseptics, available colorless and tinted;
- special impregnations and antiseptics. Depending on the type and capabilities of the manufacturer, they provide a greater or lesser degree of preservation of the wood after processing. They are applied to the prepared surface in two or three layers, have no color, penetrate deeply into the fibers;
- linseed oil, pure or mixed with natural beeswax. Despite the high cost, this composition will protect the tree from rotting, cracking, delamination and swelling as safely as possible for health. Before application, the surface is sanded until smooth; the composition can be applied with a brush, roller or thick cloth (cotton, wool, linen). The proportions of linseed oil and wax are 5:1...2:1, depending on the desired degree of protection. The composition is applied heated to a temperature of 35...45 degrees, this promotes rapid absorption, after application the surface is polished with a thick cloth;
- beeswax, carnauba, special protective waxes with synthetic additives. The method of application and surface preparation are specified by the manufacturer; bee and carnauba are usually used heated to a liquid or semi-liquid state.
The choice of natural impregnations allows you to ensure the necessary durability of the sauna shelves and at the same time create a pleasant atmosphere of natural odors in the steam room.
Kentucky chair
Let's consider the original version - the Kentucky chair, which is assembled entirely from bars. If necessary, the chair can be folded at any time and put away where it is needed for storage.
Kentucky chair
In order to make a chair you will need the following material:
- Galvanized wire with a diameter of 4 mm and 16 galvanized staples to secure the wire.
- Hammer and wire cutters.
- Fine grit sandpaper.
- You also need to take 50x33 mm bars, which are obtained if you cut a 50x100 mm board into three equal parts. If all the bars are put together, you should get 13 meters.
Build process
When the bars are ready for assembly, they need to be processed for strength (and protection from ultraviolet radiation, moisture, weathering) and to give them additional beauty.
Size and quantity table
To do this, the tree is treated with a stain called Beitz. To treat a sun lounger, you need to buy an external stain, the best of which are based on oils and wax). Among other things, you can use parquet oils, which are ideal for all wooden products.
Assembly diagram
You can apply a protective coating to the bars either with a brush or with a spray gun (the best option).
Assembling the chair
The diameter of the holes should be made one and a half to two millimeters larger than the thickness of the wire used.
We thread the wire into the bars
After preparing the required number of bars, it is necessary that the edges be carefully processed with fine-grain sandpaper. We begin to assemble the structure.
Raise the chair
You can also use galvanized studs (the edges are secured with eight nuts and washers) instead of staples and galvanized wire.
Grinding
After assembly, carefully lift the chair
Rules for constructing shelves for a steam room
The recommendations below, which explain how to properly install shelves in a bathhouse with a steam room, will ensure the comfort of steaming, guarantee safety and extend the service life of the finishing and bath furniture:
- There should be a ventilation gap of 10 cm between the walls of the steam room and the shelves. When the steps are permanently attached to the walls, this gap is ensured by installing pieces of timber. More precisely, first a beam cut into pieces is attached to the wall, then the frame elements are screwed to it with self-tapping screws with heads recessed into the array.
- The recommended dimensions of the timber for constructing the frame are 50 × 70 mm. The thickness of the board should be four times less than its width so that the wood can dry completely.
- The number of supports is determined by the thickness of the planks. If the thickness of the board is 22 cm, then there should be at least 0.6 m between the supports.
- To ensure stability, it is advisable to tie the frame supports with a board both at the top and bottom along the entire length.
- Rubber pads must be nailed to the bottom surface of the legs of all stationary steps and portable benches.
- Instead of self-tapping screws, it is recommended to use wooden pins, driven into holes drilled for them, or wooden nails as fasteners for flooring boards. If you can’t find anything other than self-tapping screws, it is better to fasten it from the back so that the metal parts do not burn users. Metal heats up much stronger and faster than wood. If there is no way out and you have to fasten it from the outside, be sure to bury the metal caps in a secret place.
- There should be a gap of at least 1 cm between the planks of all elements of the flooring of the bench seats.
The sides of steam room shelves, made in accordance with Finnish sauna rules, are made with ventilation gaps by analogy with the technology for constructing the entire flooring. However, in Russian bathhouses the sides were sewn up tightly with boards to reduce the cubic meters of space heated by wasted steam. Of course, a steam room reduced by this method will heat up faster, but the wood of the floor and wall decoration hidden under the furniture will also dry out worse. The owner will choose what is more practical.
There are no special tricks in how to make a bathhouse bench or shelves for a bathhouse. The shop will be the same in Africa. The main thing is not to forget about the peculiarities of constructing a multi-stage bath structure and get down to business responsibly.
Construction from timber
This is another option for a budget bathhouse, which is built as quickly as a frame bathhouse. Construction is carried out in 9 steps:
- Preparing the construction site, performing preliminary work for the foundation: constructing “formwork”, resolving the issue regarding drainage of water, namely, where and how to place the opening. Keep in mind that even a small sauna made of timber will weigh 4-5 tons, and therefore, a minimal foundation is highly desirable for it;
- Installation of the reinforcement cage into the formwork and pouring the foundation with concrete;
- Laying the finished log house, the first beams of which are placed on boards pre-treated with an antiseptic. You can also put moss between the boards and the first crown. It can also perform antiseptic functions;
- Assembling the walls, after which they must be left for some time to shrink;
- Fastening rafters and erecting a roof;
- Installation of a frame partition between the components of the future bathhouse. This partition will need to be insulated with mineral wool and sheathed on both sides;
- Laying the floor under the stove and final finishing of the walls;
- Exiting the chimney through the roof to the street;
- Fastening shelves in the steam room, supplying water and electricity.
Standard design of steam room shelves
It’s not for nothing that a bath shelf is often simply called a bench. Yes, these are benches of different heights, arranged according to a special pattern. Their design includes two main elements:
- A frame that serves as the basis for attaching planks to a stationary deck or as a support for a dismountable deck system. Most often, the frame is constructed from support posts, reminiscent of bench legs, and connected by transverse jumper boards. Less commonly, the frame is made according to the principle of a stair stringer, to which the steps of the bath shelves are mounted. Using technology borrowed from Finnish dry steam lovers, the frame is sometimes built without supports in the form of a railway shelf attached to the walls of the steam room.
- The flooring is made of linden or aspen boards, carefully sanded with gaps of 1.0-2.0 cm. As already mentioned, it is either attached to the frame or individual components are knocked together, like floor ladders. It is more convenient to remove and ventilate loose flooring outside the walls of the steam room. It serves as a seat, a bed, and a podium for the tireless bathhouse attendant, who treats the mortal bodies of his clients with a fragrant broom. According to the principle of constructing the flooring, they also knock together: seat backs, sides of shelves, special “bath pillows” and devices for taking a relaxed “lying” pose with the legs positioned at head level or higher.
Since the steam room is usually small in size, since a small room is easier, more economical and quicker to bring to the required condition, the furniture for its arrangement has an extremely simple rectangular geometry in plan, profile and frontal view. The imagination of craftsmen usually justifiably draws the semblance of a staircase with two or three large steps. True, these steps may resemble chaise lounges or corner sofas with a rounded shape. But such delights are indulged mainly by the owners of bathhouses with large steam rooms, who do not mind taking up space with their personal quirks.
Why are the bath shelves multi-stage?
According to the laws of physics familiar from school, steam and heated air tend to rush upward. Having given off the healing hot power and cooled under the ceiling, the air flow is partially expelled by the ventilation system of the steam room, and partially returns down, reflected from the upper ceiling by a special ceiling system. That’s why it’s much hotter at the top than at the bottom of the sauna “pyramid.”
Multi-stage functionality allows users to independently choose the optimal steaming mode for them with the appropriate temperature background. Craftsmen who decide to build shelves in a bathhouse with their own hands will have to adhere to the traditional “staircase” configuration in order to ensure the opportunity to both enjoy the most intense steam and a gentle microclimate.
In Russian steam rooms, two regiments were most often arranged. But no one forbids making three, as long as there is enough space to install them. In the sense that there is space left for the movement of people receiving bath procedures without traumatic consequences.
Finishing touches
To give the bathhouse a finished look, we equipped the porch with a canopy and a homemade staircase. The height of the steps on the stairs is 18 cm, the parts were assembled using mounting angles and self-tapping screws.
A path leads to the bathhouse
brooms
Relaxation corner
I made a path from the gate to the entrance, and near the bathhouse I managed to collect a compost box and a decent firewood rack. We brought furniture inside the bathhouse, hung shelves, curtains, and hung brooms. In the future, I plan to arrange a front garden near the bathhouse and build an outdoor barbecue.
8 cubes of firewood
- https://derevyannie-doma.com/materialy/karkasnaya-banya-proekty-i-chertezhi.html
- https://dekoriko.ru/banya/proekty/karkasnaya/
- https://obustroen.ru/banya-i-sauna/karkasnaya-banya.html
- https://svoimi-rykami.ru/stroitelstvo-doma/banya/karkasnye-bani-proekty-svoimi-rukami.html
- https://okarkase.ru/drugie-postrojki/banya/karkasnaya-banya-4×4-svoimi-rukami-poshagovaya-instrukciya.html
- https://tolkostroyka.ru/banya/karkasnye-bani-proekty-svoimi-rukami/
- https://bouw.ru/article/proekt-karkasnoy-bani-5h5
- https://2proraba.com/malye-postrojki/xozpostrojki/karkasnaya-banya-5×5-proekty-i-chertezhi.html
- https://stroyday.ru/istorii-polzovateley/kak-ya-stroil-karkasnuyu-banyu.html
Features of shelves for a bath or steam room
As a rule, these designs are not distinguished by any special decorative delights, so if you have certain carpentry skills, you can make them yourself. However, in order for these products to be truly convenient and functional, it is first recommended to carefully study their main design features and varieties.
It is also necessary to take a very responsible approach to the choice of the material used, since the wood used must be very resistant to both extremely high temperatures and significantly increased humidity.
Device
All bath shelves usually have a very simple structure. Most often they are a wooden bench placed along one or several blank walls of the steam room. The main frame is usually made of a narrow wooden deck with small vertical supports and horizontal lintels.
In modern baths, as in saunas, the shelves can be multi-tiered. In this case, they are usually installed according to the principle of a stair stringer or simply like benches with legs one above the other. The lower shelves are usually used for sitting, while the upper ones are mainly used for lying down.
Requirements for shelves
Making shelves for a bathhouse is a simple process, but there are special requirements for these products.
Requirements that must be taken into account when creating a design:
- To avoid injury, all wood decking must have slightly rounded corners.
- The supporting frame must be as strong as possible. It must withstand fairly high weight loads.
- To prevent accidental burns, the surface of the shelves must be completely free of metal parts.
As a rule, shelves in steam rooms are not mounted flush against the walls. To ensure water drainage and uniform circulation of hot steam, it is necessary to provide a small gap of approximately 10 cm.
The requirements for the wood used deserve special attention:
- First of all, it must be of very high quality. Be sure to choose cleanly planed and carefully sanded boards without any defects.
- Suitable wood must withstand both high humidity and constant exposure to hot steam. It should also be very resistant to deformation and rot.
- To avoid burns, choose a decking material with very low thermal conductivity.
In extreme bath conditions, it is prohibited to use boards with a paint coating. To protect wood, only special water-repellent and natural-based antifungal preparations can be used. The use of artificial synthetic drugs is extremely undesirable, since under the influence of hot steam they can emit fumes that are harmful to health.
DIY washcloth
Washcloths are an indispensable bath attribute, so it’s not at all surprising that their range in stores does not stop growing. Soft and hard, big and small, round and square, in the shape of a loop and a mitten - your eyes will run wild. You should choose based on your own taste preferences, not forgetting the degree of skin sensitivity. Since the body may not perfectly perceive natural and synthetic standards.
If you were unable to find a good version of this device in the store, you may be able to make it yourself.
Knitting washcloths is, in principle, an easy process. Select sheep, goat or any other wool that suits your needs in terms of texture and stiffness, and start making your own crafts. First, the handle for the washcloth is knitted, and then the fabric itself is knitted until it reaches the appropriate length.
Pay attention! Try to make the handle very strong - otherwise it will lose its appearance after the first contact with water. To release a washcloth of “initial” hardness, douse it with boiling water before first use.
To free a washcloth of “initial” hardness, douse it with boiling water before the first use.