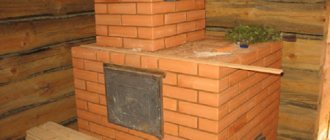
Furnaces created according to the designs of Igor Kuznetsov are currently among the most efficient among all existing designs. For half a century now, such stoves have been used by a huge number of people not only in our country, but also abroad. You can build such a stove with your own hands in your home or country house if you follow the recommended laying pattern for a certain model.
- 2 Design and its distinctive features
2.1 Design features of bell-type furnaces
- 5.1 Useful tips for craftsmen before starting work
- 6.1 Step-by-step instructions for laying a Kuznetsov stove with your own hands - ordering (photo)
- 7.1 Video: building a Kuznetsov stove with your own hands
Design and its distinctive features
The design principle of bell-type stoves is quite simple and lies in the fact that the lower tier of the structure and the hearth are combined into a common space. It is called a cap, inside which hot gases circulate.
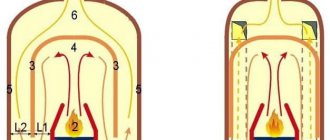
The lightest hot gases, which are formed during the combustion of fuel, rise to the top of the bell. There they will remain until all their heat is transferred to the brick walls of the masonry.
Standard bell furnace design
As they cool, they become heavy and sag. The following hot gases “come” in their place, and such a cycle occurs as long as the fuel burns in the hearth. Thus, the hot air is always under a kind of hood until the brick absorbs all the heat. It won't be able to come out until it cools down completely and becomes too heavy to go down.
Design features of bell-type furnaces
In order to understand how such a stove works, we can consider the option with a glass container, when the hot smoke in it cannot escape anywhere and gradually falls down as it cools.
But you need to know that the cooled gas that goes down is not cold in the literal sense of the word. It has a temperature of more than 200°C, and the combustion temperature of solid fuel is about 800°C, so the air rising will be just as hot. Cooling down, the gas falls to the exhaust channels, which are located at the bottom of the furnace masonry. And then it enters the next cap, located above the first. And if for this cap the gas was cold enough, then for the top one it will be hot and therefore will again rise to the very top. There they will also heat the material of the furnace walls. After cooling, they will go down, as in the first case, but with a temperature of about 130°C.
That's the whole process of how the stove works, but, like every effective device, there is a small nuance here, which is called a “dry gap”. It is an opening located vertically in the oven, about 2–3 centimeters wide, which combines the firebox with the lower hood from the floor to the end point of the chamber. Thanks to the dry gap, heavy cold air can directly exit into the pipe without mixing with rising hot gas and without reducing the efficiency of solid fuel combustion.
Dry joint in the masonry of a bell furnace
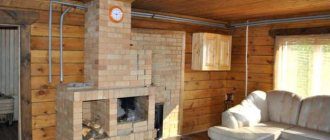
A sauna stove has the same operating principle as a heating stove, but its design is slightly different.
- The lower cap is equipped with a special metal baking tray with stones.
- There is access for water to enter and special holes for hot steam to escape.
- The oven has thicker outer walls, which allow the stones to heat up as much as possible, and the room itself does not overheat.
- The hood has a circuit for heating water in the washing room.
The stones are heated by two methods:
- Directly from hot gases.
- In a steel closed pallet.
Since the stones are located at the top of the first cap and therefore they are heated to the maximum temperature. This occurs due to the fact that the hot air “envelops” the stones from all sides at the same time.
For such a stove, it is best to purchase round, streamlined stones. This shape will cope well with heating the air.
If possible, you can add 1/3 of the cast iron pigs to the stones.
Basics
Most of the advantages of Kuznetsov furnaces come from the principle of free passage of gases. Let us explain again with an example.
Let's imagine a stove with a complex system of smoke ducts: an ethermark, a four-five-turn Dutch oven. In this cramped labyrinth, strong turbulence will inevitably arise. Have you heard the furnace humming? This is only a minor manifestation of the vortex energy raging within her. And there’s nowhere to get it from except from the fuel stash. If the channels are long and narrow enough, then at first glance there is nothing terrible here: the vortices, by the time they reach the pipe, will dissipate, cooling, and will still give their energy to the body of the furnace, and it to the room. But in reality, nuances appear, which will be discussed later in the text. Because of them, the efficiency of a channel furnace over 60% is an exceptional rarity.
In a channel stove, while it is being heated, a huge flow of energy rushes about, and only a small part of it can be used for heating or heating water without disturbing its operation. Such a furnace is somewhat similar to a nuclear reactor. Don’t be alarmed, just because of the synergy, i.e. along the paths of energy circulation in it. A nuclear reactor has to be loaded with tens of times more fuel than is necessary to ensure the design energy output. Otherwise, the neutrons will simply fly out without having time to meet the uranium atoms ready to receive them. In a channel furnace, hot vortices, without having time to cool, will fly out into the chimney or, conversely, will cool down immediately, producing smoke and soot.
But the Kuznetsovkas (details below) are closer in synergy to the thermonuclear reactors of the future. “Thermonylus” sounds scary, but this is only due to its association with the hydrogen bomb. In fact, fusion reactors are quite safe.
Why? Because they generate exactly as much energy as the consumer needs, and the technological power reserve required for rarefied plasma is scanty. If suddenly the chamber of a tokamak or stellarator suddenly completely collapses, the plasma will be completely emitted (there are no heavy atoms in it) and will cool down before it reaches the walls of the room. The repairmen will curse - maybe the duty department is sharpening their laces - but after 5 minutes. will be able to blunt to elimination without protective equipment.
So what do Kuznetsov furnaces have in common with thermonuclear reactors? The fact that the energy of the flue gases, thanks to the principle of free passage, does not scroll many times in the flow until it is pushed into the body of the furnace, but saturates it immediately . And now she has nowhere to go from there except into the room and/or the water heating register.
Calculation of basic parameters
In order to correctly build a Kuznetsov furnace, it is necessary to strictly follow the diagram developed by specialists. Craftsmen who have extensive experience in the construction of such furnaces recommend that before starting major masonry, practice laying it “dry” if you are doing this for the first time.
If the stove is being built during the construction of the house itself, then it is necessary to draw up the project in such a way that it can heat several rooms at once.
The foundation for the stove must be of high quality and must have a waterproofing layer. It is also necessary to take into account that the foundation of the house should not go into the base for the stove. This structure must have its own foundation, which shrinks on its own.
The concrete base should be approximately 10 centimeters larger than the size of the stove on all sides. The degree of its depth will depend on the height of the structure and the soil composition where the furnace will be built. Typically the depth of the pit is from 40 to 60 centimeters. A sand cushion is placed at the bottom for waterproofing and a layer of crushed stone to strengthen the building. To form the side walls, formwork from boards is installed.
Layout diagram of the bell-type furnace OVIK-9
- The oven (OVIK-9) has a cooking chamber with 2 burners and steel lockable doors.
- It is equipped with a separate exhaust duct, which allows you to regulate the temperature inside the locked niche.
- It can be used as an oven, so metal runners for baking sheets are built into the walls.
- The two-bell stove can be used in “summer” and “winter” mode. Therefore, in the summer you can only cook with it.
Heating and cooking stove Kuznetsov OVIK-9
The depth of the firebox is 450x470 mm with a dry seam to expand the brick by 2–3 cm. If the firebox needs a large size of 510x530 mm, then the back wall is laid out not in ½ brick, as shown in the order, but in ¼ brick.
Why is Kuznetsovki better than others?
Consumers always ask themselves: why is it worth buying this particular product and not the one next to it? A completely natural and logical question. Before purchasing, we always look at the strengths and weaknesses of a product, and only then draw the appropriate conclusions. As for Kuznetsov furnaces, they are famous for their high efficiency. As a rule, we are talking about figures such as 80% or more. For example, a standard 4 kW unit can heat a house of 100 square meters. At the same time, Western branded fireboxes must have a power of at least 10-12 kW. By the way, orders for Kuznetsovka from the USA, Sweden, Canada and a number of other countries are not uncommon. It is impossible not to mention that Kuznetsov stoves (orders) are “omnivorous”, that is, low-grade combustible materials, for example, sawdust, can be used as fuel. It is also possible to install equipment that provides hot water supply. At the same time, performance characteristics do not deteriorate.
Required materials and tools
To build a furnace we will need a fairly large amount of materials and tools. This list does not take into account the structure of the foundation and chimney.
- Red brick - about 450 pieces.
- For the installation of the firebox, refractory bricks (grade SHA-8) - 22 pieces.
- Door for the firebox (brand DT-3) size 210x250 mm.
- Blower door (DPK) size 140x250 mm.
- Grate size 250x252 mm.
- Cooktop (stove) with 2 burners, size 586x336 mm.
- Doors for the cooking furnace size 510x340 mm - 2 pieces.
- Gate valve for firebox size 130x130 mm.
- “Summer” valve size 130x130 mm.
- Valve for chimney pipe size 130x250 mm.
- Metal corner size 36x36x4x600 mm - 4 pieces.
- Metal strip size 40x4x600 mm.
- Metal sheet size 600x550x3 mm.
- Pre-ceiling metal sheet size 500x700x3 mm. Can be replaced with ceramic tiles or any fire-resistant material.
Brick for laying a bell furnace
Tools
- Trowel.
- Plumb and building level.
- Container for mixing the solution.
- Spatulas.
- Construction corner.
- Hammer.
- Bulgarian.
- Mixer attachment.
Mechanical removal
How to remove super glue from laminate flooring mechanically? The most important thing is never try to pick super glue from the laminate; it is bound to the substrate at the molecular level. You will simply tear off a drop along with a piece of laminate, thereby irreversibly damaging the surface.
But there is a way, and with the help of a file, a needle file, a sharpening stone or just a nail file, you can achieve good results.
Due to the transparency of cyanoacrylate, you can gradually remove the top layers to the base, however, the main thing is not to overdo it. A thin layer of glue will remain on the floor, which will not be very noticeable, and if the stain is located where the inhabitants of the house constantly walk, it will be erased over time.
Let's summarize. The best and relatively safe way to remove glue from laminate flooring, and indeed from any other surface, is naturally specialized means - debonders, preferably using the same brand.
In any case, no matter what method you use, you need to clean the surface carefully and slowly. You should not make excessive efforts; in addition, you should scrub surfaces using cleaning agents or solvents without using abrasive materials.
Preparatory work before assembling the stove
Before you start building a stove, you need to study in detail the floor plan of the room where the stove will be located. Since it weighs quite a lot, the foundation must be well strengthened.
The following information will help you build the stove correctly and efficiently in order to avoid problems during its further operation.
- The cap and the hearth should be combined with a dry seam - the size is 2-3 centimeters. It is necessary for the correct movement of air flows. Heavy gases saturated with water vapor will move in the hearth and create a certain vibration, increasing the quality of firewood combustion.
- You cannot combine the furnace with a hood, since the firewood must burn in a certain volume. This is the only way to create the highest possible temperature.
- A catalyst made of refractory bricks in the form of a grate should be installed above the combustion chamber. Here they heat up to the maximum and burn out what was burned in the hearth.
If the stove is being built in a wooden house, then it is very important to protect the walls from severe overheating. To do this, it is recommended to install gaskets made of refractory material at the junctions of the walls and the stove itself.
Also, at the joints of the furnace, the gaps, which will be filled with refractory material, are needed for the free movement of expansion of the masonry during its heating. Otherwise, the mortar on the seams will crack and the stove will become deformed.
Useful tips for craftsmen before starting work
- The fireproof protection inside the furnace should be positioned as if it were suspended in the air. That is, it should not come into contact with the walls of the oven.
- The internal masonry must be installed on edge. External masonry is done at the discretion of the master.
- The wire is needed to strengthen the brick bond. Therefore, it is necessary to lay it every 2-3 rows to make the oven more durable and stable.
- After the solution has completely dried, the furnace walls must be treated with a special refractory substance.
- Test lighting should be carried out at the lowest possible temperature, with a gradual increase in heat.
Temperature conditions for different types of poultry
Suitable temperature is one of the most important conditions for incubation, without which hatching of chicks is simply impossible.
For each type of bird, these indicators are purely individual, so when laying eggs from chickens, ducks, geese or turkeys, you should focus on the following values:
| Type of eggs | Required temperature in the first days of incubation, °C | Required temperature in the last days of incubation, °C |
| Chicken | 37,9 | 37,6 |
| Goose | 38,4 | 37,4 |
| Duck | 38,0 | 37,1 |
| Turkeys | 37,6 | 37,1 |
| Quail | 37,8 | 37,5 |
In general, a homemade incubator is a good solution both for those who are just trying their hand at poultry farming, and for experienced farmers who do not want to spend extra money on purchasing ready-made equipment. By equipping the structure with automatic egg turning, you can achieve 80–90% hatchability of chicks.
DIY bell furnace construction
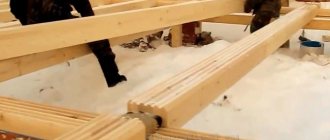
We will begin the construction of the furnace from the foundation, since it is its foundation and one of the main elements in ensuring the strength characteristics of the structure.
- We dig a rectangular hole, about 1 meter deep (dimensions: width 1 m, length 1.5 meters).
- Pour about 15 cm of sand onto the bottom and leave it for several days to shrink.
- We make formwork from boards or other unnecessary wooden products.
- We put a thin metal rod to reinforce the concrete.
- Slowly pour the concrete, periodically removing air bubbles from it using a regular shovel or a small concrete vibrator. As a result, we should get an even, smooth slab. The foundation of 2 bricks should not reach the floor level.
Construction of the foundation for the furnace
We leave the concrete to harden for several weeks, since the longer the foundation stands, the stronger and more reliable it will be.
Step-by-step instructions for laying a Kuznetsov stove with your own hands - ordering (photo)
- Lay out the first row of bricks. It must be perfectly even, as it is a solid basis for future order. We make the thickness of the seams about 5 mm. Checking the correct angles. We will need 20 bricks for this masonry.
Laying out the first row of bricks for the stove - We begin to create the blower chamber and the lower cap.
In order to be able to clean its base after finishing the masonry, we place two halves of brick protruding from the main row and do not sit them on the mortar. We install the ash door and temporarily support it with bricks. We lay the second row of the stove - Place the 3rd row according to the drawing.
During the laying period, we secure the ash door tightly. Laying the third row - We partially lay out the 4th row of fireclay bricks. From it we create the side walls of the combustion chamber and the end wall. We cover the blower door with 2 ordinary bricks, let them out a little above it and cut them at an angle. We also place 2 hewn bricks at the end of the vent. We leave a five-millimeter gap between the two types of bricks. To do this, we put a simple five-millimeter corrugated cardboard between them. In the future, it will simply burn out and the thermal hole we need will remain. We will have to make such gaps in other rows where two types of bricks will be joined.
- We continue laying 4 rows.
After we lay the bricks on the side above the blower door, we cover the middle of the door with fireproof and ordinary bricks, hewn on both sides from the side. We will need to take 1 regular and 1 fireclay brick. Laying the fourth row - From the fifth row we create a fuel chamber.
We cut the brick at an angle and place the front wall of the fireplace. The internal space of the firebox between the masonry should be similar to the size of the grate so that it easily fits into the brick rectangle and onto the bricks of the previous row protruding by 10 -15 mm. We make a five-millimeter gap between the walls and the grille. Behind the firebox, where the first hood is located, we create a channel of ½ brick to connect the two hoods. We will need 12 and ½ red and 4 fire bricks. Here we place a grate on the protruding bricks of the previous row (do not fix it with mortar). We fill the holes with sand. Laying the fifth row - On the sixth row we install the combustion chamber door.
We fill the holes between the bricks and the door with asbestos. Laying the sixth row - Place the next row.
When laying the end wall of the firebox on the left side, we make a gap of 2–3 cm, which will serve as a dry seam. We use 12 regular and 3 fire bricks. Laying the seventh row - We lay the eighth row according to the drawing, using 12 ceramic and 3 refractory bricks.
Laying the eighth row - In the 9th row we make the walls of the hearth, and between it and the hood below we create a passage where the combustion products will go. We make the side walls ten millimeters lower than the rest of the masonry. We move the bricks that we place above the firebox a little to cover a small part of its frame. Before this, we cut the bricks obliquely and thus create a “recess” into which we will lay the main central brick. We use 12 regular and 2 and a half fire bricks.
- Here, between the façade side bricks, which are located above the chamber door, we place a centering brick covering the rim of the door.
Before doing this, we cut it obliquely. We cover the side of the chamber on the left with a 10 mm asbestos strip. It will line the entire 9th row. Laying the ninth row - On the bricks of the tenth row, which are covered with fire-resistant asbestos, we place ordinary bricks on a “dry” surface. In the masonry that frames the firebox, we make a small ten-millimeter cutout on which the hob will lie. We leave a 5 mm gap between the slab and the brick on all sides to heat the metal. We cut the fireclay brick, which we lay in front and to the right of the firebox, at an angle. We make a small ten-millimeter gap between the slab and the masonry.
- After we have laid out the 10th row, we place asbestos twine, which is soaked in a clay mixture, on the openings in the masonry.
We put the panel on top. We fill all the holes between it and the bricks with sand. Laying the tenth row - On the 11th row we begin to create the walls of the cooking chamber and install a frame with doors.
We make a 5 mm gap between the steel frame and the masonry. To form the frame, we wrap it with fireproof rope. Laying the eleventh row - We lay out the 12th row according to the drawing from 11 ceramic bricks.
Laying the twelfth row - On the 13th row we continue to form the chamber and side channels.
Laying row 13 - We lay out the 14th row strictly according to the drawing.
Laying row 14 - We put the 15th row in two approaches.
First, we raise the walls of the chamber and channels to the level of the steel door frame, and then create a jumper for it. We place a metal sheet 600x550 mm on this row and make a cutout in it for the hood. For strength, we place 4 iron corners and 1 strip on top of the sheet. Laying row 15 - We place regular brick on the corners of the 16th row and the strip as indicated in the drawing. Leave the channel openings open. On the bricks that frame the nearest channel and for exhaust, before laying, we make holes for the chimney valves. We make a 5 mm gap in the masonry.
- Here, on the platform with the openings, we install 2 valves.
Laying row 16 - On the next row, we cover the cooking hearth and valves with ceramic bricks so that the drainage channels are open.
Laying row 17 - Next we form the second cap.
To do this, we install two halves of bricks without mortar, which we raise above the main masonry. This is necessary so that you can then clean the base of the stove hood. After finishing the masonry, we fix these bricks with mortar. Place row 18 - We lay the 19th row according to the drawing from 12 and a half red bricks.
Place row 19 - We lay out the 20th row according to the drawing from 13 and a half red bricks.
Place row 20 - We lay out 21 rows according to the drawing of 14 bricks.
We put 21 rows - Next, we lay a large section of the furnace according to the specified drawing with alternating rows.
So we lay out rows 22, 24 and 26 of 14 bricks each. Lay out row 26 - We lay out rows 23 and 25 in the same way.
Lay out row 25 - For the 27th row we will need 14 bricks, but their placement on the masonry is slightly different from the previous ones.
Here we prepare the basis for the following almost continuous surfaces. We put the 27th row - On the 28th row in the masonry that frames the chimney duct, we make 10 mm cutouts for installing the main chimney damper.
When making openings, we regularly apply a latch so that it is located 5 mm from the walls of the oven and fits freely into the gap we have made. Place row 28 - Here we also install the valve itself into the opening onto the solution.
- For the 29th row we take 19 ordinary bricks and almost completely cover the surface of the structure.
We leave only the chimney opening with the valve intact. Place row 29 - On row 30 we also almost completely cover the surface of the oven according to the pattern.
Place row 30 - On the 31st row we lay the base of the pipe in 1 brick.
Its size must correspond to the cross-section of the chimney. The masonry is made of 5 bricks. We put 31 rows - Then we create the chimney pipe.
For each row we need 5 ceramic bricks. The furnace has been built. Now it should stand until the solution dries completely. Lay out the chimney pipe at the required height
About followers
Drawing of a homemade Kuznetsov stove
However, “blacksmithing” is not some kind of unspeakable miracle. There have already been many amateurs and professional craftsmen who not only repeat Igor Viktorovich’s original designs, but also create their own. In Fig. on the right is a drawing, and in Fig. in the section - the order of one of them.
She has two features. The first is kindling moves on the 21st row. They are quite similar to Kuznetsov’s idle air passages, but they are included in the work during kindling, speeding up and facilitating it. On a flame or smoldering, their throughput does not allow for the escape of gases, and these channels are drowned out by gas plugs.
The second is sawn along, and even at an angle, bricks in the 17th, 28th and some other rows. In fact, both stove makers and just builders know that bricks are not sawed lengthwise. But this belief arose at a time when the concept of “angle drill”, aka grinder, did not exist. People only heard about diamond tools back then, saying that they were used somewhere in the secret workshops of military factories.
But it’s still impossible to saw a brick lengthwise with a grinder while it’s in weight; its strength will drop below the minimum limit due to the beating of the tool in your hands. There are two options, the first is to install the tool in a frame with a lever running in a vertical plane to create a cutting machine. You can make this yourself, there are ready-made ones for sale.
Ordering a homemade Kuznetsov stove
Another method is suitable if the farm has a circular machine with at least 1500 rpm, and better - 2500-3000. Then a diamond wheel for stone is tucked into it instead of a standard toothed saw. This option is preferable: a support board with an angle stop provides a much cleaner and more accurate cut. And if necessary, you can finish it on the other side without the risk of getting a high step on the cut.
Video: the process of laying a 3 x 3.5 brick oven
Features of operation
The difference between Kuznetsov stoves is that they do not require special care and are very easy to operate. For them, it is enough only to prepare the appropriate dry solid fuel (firewood) in the required quantity.
Since the efficiency of a bell-type stove is very high, the consumption of firewood will be much less than in conventional stoves that we are used to.
In bell-type furnaces, virtually no soot is formed, since it is spent on secondary combustion and an increase in thermal energy.
- Before using the oven, it must be thoroughly dried. To do this, you need to heat it 2 times a day, one hour and a half at a time, with a small amount of fuel. The ash and furnace doors must be open.
- It is not recommended to use large amounts of wood chips and cardboard for kindling. Only for a short time they will give the maximum temperature, which will lead to cracking of the bricks.
- To light the stove, it is best to use paper, torches or birch bark. This will remove cold air from the chimney pipe, create the necessary draft and obtain a firewood burning temperature of about 350°C. In winter, if the stove has not been used for a long time, it is recommended to do the kindling with the “summer” valve open.
- After combustion begins, firewood must be placed in the combustion chamber in order to obtain a maximum operating temperature of 800–900°C.
Bell-type stoves practically do not need cleaning, and if the need arises, it is best to seek help from professional stove makers. They will quickly and efficiently clean the chimney, firebox, grate and other elements of the stove.
Device characteristics
There are no narrow channels in the structure; a bell-type stove has less resistance to the heated flow, so the chimneys are made shorter.
Reasons for effectiveness:
- two hoods contribute to uniform heating of gas and brick surfaces;
- hot smoke is retained for a long time, which gives the greatest heating and accumulates heat;
- collecting products from fuel burnout in one place reduces the likelihood of soot appearing in the chimney.
The water heat exchanger is placed in a hood, so the furnace productivity increases and efficiency increases. It is not so easy to build a two-bell structure in compliance with all standards; the master must follow the order for the Kuznetsov stove and lay bricks strictly according to the plan of each row.
Video guide
The essence of the operation of such systems is quite simple: hot gas circulates not under the influence of the exhaust pipe, but due to the gravity of the gases. In other words, if we comply with the simplest physical laws, hot gases, which have less weight, collect under the roof of the bell, while cold (and, therefore, heavy) gases remain below. Due to the interaction of these gases, a “zone” of turbulence is formed inside the bell, due to which the walls of the structure absorb thermal energy more efficiently. Actually, gas here is the main heat carrier.
In order to consolidate knowledge about this stove, as well as to emphasize its peculiarity, below we have given its distinctive features.
- Multifunctionality, an impressive indicator of efficiency.
- Quite high efficiency.
- Pleasant “appearance”, aesthetics.
- Easy to use, no need for regular channel cleaning.
- Durability.
Most stove owners, as well as experienced professionals, are convinced that a bell-type stove is rightfully considered one of the highest quality and most efficient heating devices ever created.
Well, we’ve sorted out the design features, now let’s get straight to the construction process!
Advantages of stove heating
In the fall, there is still a lot of work in the garden and vegetable garden, but the daylight hours are short, and you want to do more, to get everything done. By evening, fatigue accumulates. And therefore it is very pleasant to wash in the bathhouse and spend the evening and night in the warmth.
With the onset of cold weather, the craving for the evening warmth of the home increases. But what to do if the heating has not yet been turned on in a city apartment, and spending the night in a country house requires the operation of an electric heater and high energy consumption. In addition, the widespread use of this heating method distances people from communication with nature - living fire.
My wife and I once returned to the dacha after a 4-day absence. The house greeted us with cold and dampness. We lit the mini-fireplace, then the stove. After 4 hours the house was filled with warmth.
The summer of 2021 also turned out to be cold, so they burned the entire carry-over supply of dry firewood, but nothing, they found a simple means of kindling with new firewood. Moreover, heating with wood is also useful for obtaining mineral fertilizer - wood ash.
| Mineral content in wood ash, % | ||||
| Type of firewood | Р2О5 | K2O | Sao | Source |
| birch | 7,1 | 13,8 | 36,3 | Development of a summer cottage / Yu.M. Andreev, Moscow: EKSMO-Press: Lik press, 2001, – p.114 |
| pine | 2,0 | 6,9 | 31,8 | |
Two years ago, wood ash appeared in stores in 1 liter packaging at a price of 65 rubles. However, the name of the wood from which it was obtained was not indicated on the pack. But the composition of ash is important for plants.