Causes of cracks
Owners of brick fireplaces, having discovered a problem, rush to find out how to cover the stove in the house so that it does not crack in the future. It is important to understand that damage is caused by various reasons, and not all of them can be eliminated by cosmetic repairs. In most cases, violation of the integrity of the masonry is not dangerous and can be easily eliminated. Seams crack for the following reasons:
- Irregular use. In winter, the house is heated with long breaks (for example, the owners come to the dacha on weekends). Temperature changes inevitably lead to the appearance of cracks in the seams of the furnace walls.
- Violation of operating rules. Cracks cannot be avoided if the stove is not given time to stand and dry well after laying.
- Design flaws. Different zones of the structure are heated unevenly, and the material expands differently when heated. Cracks run along the boundaries of areas with different temperatures.
- Finishing errors. Poor quality solution selected; its layer is too thick, or, conversely, too thin.
The problem is obvious Source pechdoc.ru
- Error in choosing masonry mixture. Problems arise when masonry is done with the wrong mortar, causing the thermal expansion of the brick and the mortar to mismatch. The result is a network of microcracks, which appears on the heated structure.
The question of how to coat a stove with clay so as not to crack goes to another level if the reasons for the damage are more fundamental:
- Construction errors. If errors are made in the foundation design, restoration of the seams will not help, and the owners will face a major overhaul. The solidity of the furnace walls is also compromised if there are defects in the furnace design. Both options are life-threatening due to through cracks, a source of carbon monoxide.
- Calculation errors. If the physical characteristics of the materials were not taken into account when calculating the seams and no reserve was left for thermal expansion, the resulting cracks create a threat of collapse. The stove structure will have to be rebuilt.
Note! Before you begin eliminating cracks, it is worth conducting diagnostics. If the cause is global, restoration makes no sense. You can start choosing a mixture if the reason is insignificant.
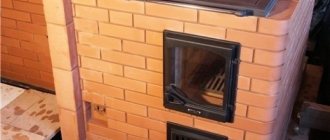
Cracks around the fire Source tengrinews.kz
How to cover the gap in the oven between the bricks and the door
The practice of bathhouse owners shows that one of the weak points in a sauna stove is the area between the masonry and the metal frame of the door. During combustion, adding fuel and mixing coals, the doors are constantly opening and closing. This provokes loosening of the door block and cracking of nearby bricks. If there are problems with the stove door closing tightly or there are gaps in the masonry, there is a danger of the combustion material falling out. This may cause a fire. To minimize damage or seal the resulting gap in the masonry, use clay mortar and fireclay.
In the first case, you can strengthen the new seam using a stainless steel plate or using a piece of metal mesh with small cells. The interlayer reduces the thermal load on the brickwork around the door. Fireclay clay is also suitable for preventing the stove from smoking. Compared to clay-sand mortar, which you can make yourself, this material has high heat resistance.
On a note!
The gaps must be removed immediately, since the presence of gaps in the stove increases the likelihood of carbon monoxide poisoning.
Solutions and mixtures for restoration
External defects on the stove can be corrected using several compounds; Some of them are mixed independently, others can be purchased ready-made. Each of the compositions has its own characteristics, but all of them will reliably seal the cracks and prevent carbon monoxide from entering the room.
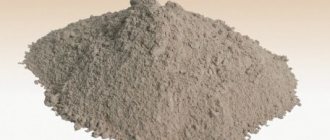
Fireclay putty
Chamotte is clay with fire-resistant properties, a professional option for stove restoration. Chamotte is sold in construction stores; it has valuable advantages. It is often chosen by owners when evaluating options for how to coat the stove to prevent it from cracking.
The main advantage is the combination of heat resistance and strength. After application and drying, the clay becomes vapor-tight and moisture-resistant. It is also important that fireclay is a natural, healthy material suitable for use in residential premises.
To prepare the mixture for restoration, mix one part of M-500 cement, two parts of fireclay and seven parts of river sand. Water is added until a plastic consistency is obtained. The materials are pre-prepared: sand and cement are sifted, clay is soaked in water for several hours.
Fireclay putty recipe Source tproekt.com
See also: Catalog of companies that specialize in the design and installation of fireplaces and stoves
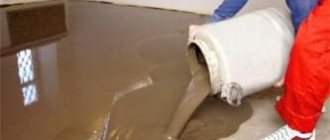
Sand-clay mixture
An inexpensive solution for restoration is made from ordinary building clay and sand. The mixture is quickly prepared and serves as a quick solution to the problem of how to cover the stove so that it does not crack. The mixture is prepared according to the following recipe:
- To obtain a solution, the clay is poured with water at the rate of one part clay to three parts water.
- The clay is infused for 24 hours, then it is mixed and sifted through a sieve with a mesh size of 3x3 mm.
- The solution is allowed to settle and excess water is drained. The remaining solution should have the consistency of thick sour cream.
- River sand is added to the container in a 1 to 1 ratio and mixed with clay until smooth.
Then the mixture is brought to the desired condition - sand is added to it in parts; As a result, there are 2.5 parts of sand for one part of clay. If you plunge a shovel into the container and pull it out, the correct mixture remains in homogeneous clumps. After application and drying, the sand-clay layer remains flexible enough to withstand high temperatures.
Kneading clay Source notperfect.ru
Ready-made adhesive mixtures for stoves and fireplaces
Construction stores offer glue for repairing fireplaces and stoves, eliminating the problem of covering up the stove. There are two options for glue, plastic and hard, with the following composition:
- The filler for all brands of glue is quartz sand.
- Binder: a mixture of fireclay and sand, or heat-resistant aluminosilicate cement and kaolin,
- Mineral plasticizer: fireclay fiber, liquid glass or soapstone flour (furnace or soapstone).
The main advantage of industrially produced glue is its uniform texture, which cannot be achieved at home. Different brands are characterized by different limits of heat resistance, as evidenced by their characteristics: the composition can be heat-resistant, heat-resistant or heat-resistant. The composition and temperature ranges are indicated in the instructions.
The glue is quickly prepared for use and sets quickly, so it is prepared in small portions. Plastic varieties are applied to cracks and cracks, while hard ones are intended for plastering the entire surface.
Grout adhesive Source wp.com
How long does it take to dry?
It is not recommended to use the oven until the solution is completely dry. When using different materials, this period may vary. Using heat-resistant glue as a putty, the layer of solution will dry within a few hours.
It will take more time for the solution of clay and sand to dry and form. In this case, you will be able to use the stove only after a day. Then the brick oven, protected from cracks with mortar, will remain crack-free for a long time.
Therefore, we do not advise you to rush, immediately flooding your Russian stove with a stove bench. Repairing cracks in a furnace is a simple but important job. The choice of material for the solution is a purely individual matter. The main thing is to do the work carefully and responsibly. Then your house will always be light and clean, without the smell of burning and smoke penetrating through the cracks in the walls of the stove.
Sequence of work
The first time the cracks are plastered or covered is no earlier than six months after the stove has been installed. It is necessary to wait for the natural shrinkage and shrinkage of the materials, otherwise the restoration will have to be repeated. Having decided the question of how to coat the stove, it is important to do it correctly. The work consists of the following stages:
- Cracked seams are opened: they are deepened by removing the plaster. This will help fill a larger area with the solution and increase adhesion (quality of adhesion).
Firing the furnace Source blogspot.com
- The prepared surface is treated with a deep penetration primer (it can be replaced with water). Then the stove or fireplace is heated with a small pile of firewood. The flow is an important part of the technology; it dries the surfaces prepared for restoration.
- While the walls remain warm, a base is applied to the working surface: a liquid clay solution. The clay is applied with a paint brush and allowed to dry.
- A reinforcing fine-mesh mesh is laid on top, which is fixed with self-tapping screws. An alternative to mesh is old burlap. It is glued or fastened with nails in the joints between bricks.
- The selected mixture (factory or homemade) is applied in two steps. The thickness of each layer of plaster is 4-5 mm.
- After the plaster has dried, it is rubbed down, the walls are painted with a chalk composition or whitewashed with liquid lime.
Whitewashing a stove with lime Source ytimg.com
Diagnosis of problems
The diagnostics of all surfaces will answer the question why a brick stove is cracking. The worst option would be widening through brick cracks. You can’t do this without the help of a specialist; you may need to re-lay the furnace.
Small cracks in bricks caused by high heat allow you to carry out the work yourself. The cracks need to be filled and the surface re-plastered.
Restoration of a metal stove
Fireplaces and stoves made of metal can also crack. Owners do not always notice cracks on the walls due to their small size, but such a defect is signaled by the smoke that appears in the room during the fire.
In such cases, a welding machine will not always help. The problem is easier to solve with the help of a special putty-sealant, ready-made or made by yourself.
The basis of purchased heat-resistant sealants is silicone; additives determine the properties of the paste:
- Fire-resistant grades contain iron oxide; such compositions have a reddish-brown tint. They are used where the heating is maximum.
Applying sealant Source insales.ru
- Neutral sealants are needed at the joints of brick (concrete) and metal elements. When drying, they lose moisture and alcohol, after which they acquire the necessary strength.
- Acidic compounds are not used on metal surfaces. As they dry, they release acetic acid and start the corrosion process on the metal.
There are recipes for making your own sealant paste. They are quite complex in composition and require precise proportions between ingredients. However, the result is not always acceptable, since the components may contain impurities.
Only high-quality materials Source rusolymp.ru
Rules for grouting
To properly coat the stove with clay, you must follow these step-by-step instructions:
- The surface, cleaned of plaster, is generously moistened with primer or water.
- Using a chisel, knock out the gaps between the bricks.
- The oven is warming up.
- Using a trowel, apply the clay mixture into the cracks and spread it over the entire surface in an even layer. If you don’t have a tool, you can do the smearing by hand. The mixture does not cause irritation or damage to the skin.
- When the surface is dry, another layer of the mixture is sprayed. Particular attention is paid to cracks - there should be a dense layer of mortar between the gaps.
- Using a damp wooden trowel, grout in a circular motion to remove any unevenness.
- The last step is plastering the stove.
The process of sealing with fire-resistant adhesive is carried out according to the same scheme, but includes an additional step. After filling the cracks with plastic material, the entire surface is treated with a hard type of glue so that the stove no longer smokes. It takes half an hour to dry, which can be spent on decorating. It is important to remember that the structure can be used after the solution has completely hardened.
Briefly about the main thing
If cracks appear on the stove, it is important to find out how critical they are and what to do about them. Inspection of the masonry allows you to determine the cause. We can easily eliminate the defect if the cause of the cracks is infrequent or improper use, finishing errors or design flaws. Restoration will not help if a problem with the foundation or an error in the calculations is revealed.
Ready-made and home-made compounds are used for smearing. All of them, from sand-clay mixtures to ready-made adhesive compositions, are capable of qualitatively eliminating defects. To prevent cracks from appearing again, a technique has been developed for applying a plaster layer to the stove; special sealant pastes are used to restore metal surfaces.
Ratings 0
How to make your own clay putty
Mixing the mixture is carried out in several stages.
1. Before mixing clay with sand, it should be soaked in warm water for at least 12 hours.
2. The wet solution should be thoroughly mixed and all lumps formed should be broken up. In this state, the clay combines with sand much better.
3. To prepare the working mixture, it is recommended to take 4 parts clay and 2 parts sand. The last component should be as clean as possible and pre-sifted. The volume of liquid depends on the degree of humidity of all components.
4. If you do not plan to whiten the stove, add lime to it at the stage of mixing the solution. All components are mixed until the consistency of sour cream. The finished mixture is covered with plastic wrap and left for 12 hours.
5. The settled solution is kneaded again. To check if there is enough water in it, take the putty in your palm and roll it into a ball. If it starts to crack when you squeeze it, add more water.
6. The oven should be lightly heated, water should be poured over the cracks, after which you can begin sealing.
7. To prevent the appearance of new cracks in the clay, you can add straw, but a more reliable way is to use a plaster mesh. If you apply a clay solution to a stove lined with such material, you can forget about the cracks for a long time.
Caring for your stove
Caring for the stove Now you know what you can use to coat the stove to prevent it from cracking. You should take care of your stove in a timely manner to prevent the formation of large cracks. Firstly, it is easier to cover up small defects, and secondly, this will help prevent the formation of large defects and ensure the safe operation of your stove.
Like any repair work, repairing cracks in the stove will require time and investment. But anyone can handle this task, because it does not require special qualifications, special tools and materials. The experience gained in sealing cracks on your stove may well be useful in its further operation. And clay for work and a little sand can be found at any time of the year, as a last resort, in a store in your area. And if you are planning to get your own fireplace, then the knowledge gained will be even more useful, because stoves and fireplaces have a lot in common.
To prevent the cast iron stove from cracking
Another common problem with using brick stoves, not purely bath stoves, but heating and cooking stoves, is cracks in the cast iron stove. They are not terrible if the stove is made correctly, but if there are errors in the masonry or design, smoke and carbon monoxide can leak through the crack, which is many times worse.
In principle, a well-cast slab made of high-quality cast iron should not crack, but the trouble is that such things are very rare. However, trouble can be helped. When firing for the first time, you need to slowly heat the stove, avoiding local overheating, and cool it down just as slowly. This can be done by laying bricks on the surface of the cast iron or pouring a good layer of sand. Remove the brick and sand after the stove and stove have cooled completely. These materials distribute heat without allowing large temperature fluctuations, and therefore cracks. Also, a uniformly loaded hob will sit smoothly, without distortions, which can also cause stress and cracks.
Photo
Below are the best real photos of properly plastered stoves:
Tags: putty for stoves, mortar for the stove to prevent cracking, repair of a brick stove, what to put on the stove
Alternative methods
A more radical way to get rid of cracks is to install an aluminum frame or another metal. To do this, you need two metal sheets, scissors for cutting metal, and corners. The size of the sheet is measured based on the height and length of the surface to be repaired, cut out and applied to the oven. The sheet is secured at the top and sides with metal corners. After installation, the frame can be painted.
In addition, you can line the stove surface with ceramic tiles. It can also be attached to the top of the frame, but if the cladding is done poorly, cracks will still appear on the stove, only under the tiles.
Gap sealing technology
At the first stage, the necessary materials are purchased:
- Basalt wool M 100
- Heat-resistant putty, for example, a coating for fireplaces and stoves manufactured by Emelya
- Serpyanka (rolled mesh material).
The internal space of the crack is filled with a heat insulator, sickle tape is glued on top of it, and putty is applied in thin layers. A thick layer will fall off, so it is better to use the material in several passes, waiting for the previous layer to dry in accordance with the manufacturer’s recommendations on the packaging. Each product has a different lifespan.
Instead of putty, heat-resistant tile adhesive can be used, which can be applied in one step. The material (for example, K-77 from the manufacturer Parad) dries for a day and can withstand extreme temperatures of 800˚C (three times the reserve).
For details on how to seal cracks, see the article “Cracks in a Wooden Floor.”
Types of heat-resistant putties
Almost every manufacturer has a heat-resistant product in its assortment intended for repairing and decorating fireplaces and stoves. The most popular compositions are:
- Lugato - heat resistance 1.3 thousand degrees, frost resistance F 75, fast-hardening, gains strength in a day, solution pot life is ½ hour. You can heat the oven the next day; the first start should be slow.
- Sea lines - has a fiberglass filler, can be used to seal cracks independently, without basalt wool. The product can withstand a thousand degrees and dries in just six hours.
- Brozex – the refractory material has a clay base, after dilution it has high plasticity, when cured it retains its shape (non-shrinking), the first heating is possible after three days.
You can choose any composition. Each package contains recommendations for application, drying, and use.
Recommendations for arranging a bathhouse
After purchasing a bathhouse, you should check the thermal insulation and the design of the “pie” of the walls. This is necessary for the normal operation of the building - with large heat losses and lack of insulation in the walls, the bathhouse will be economically ineffective. With a long warm-up (entering the mode), there will be excessive fuel consumption and a short period of use.
Article on the topic: How to create a fence in the Klondike
Additionally, the arrangement of the bathhouse is described in the video:
With thin brick walls (half a brick, brick without filling with a heat insulator), in winter the structure will look like an icy monolithic block, which is very difficult to warm up during periodic operation. Even in summer there will be an overconsumption of firewood. Therefore, the typical design of these buildings should look like this:
- External load-bearing frame – load-bearing brick wall
- Inner box - made of wood with an inner layer of basalt wool or extruded polystyrene foam
- Cladding - decking, lining, deck boards, panels, block house are traditionally used.
The wooden frame made of timber is attached to the load-bearing wall with brackets to provide an air gap of 15 cm. Moreover, the ventilation of the inter-wall and attic space must be connected. The insulation in the frame gratings is covered on both sides:
- From the inside of the room with foil rolled materials (for example, Penoizol)
- Outside, between the brick and the mineral wool waterproofing membrane.
Exactly the same cake is needed on the ceiling of the steam room and washing room. The passage of the pipe is insulated with basalt wool; a special structure is made in the attic in the form of a box filled with mineral wool, expanded clay, and sand.