Let's consider which blocks are suitable for the foundation of a bathhouse, how to properly prepare the area, as well as what are the laying rules and the main difficulties or errors that may arise during the work.
Types of material
Most often, the base for a bathhouse is made from 4 types of materials:
- FBS;
- aerated concrete;
- foam blocks;
- gas silicate.
Each of them has its own pros and cons, as well as the types of soil for which it can be used.
FBS 20x20x40
This type of material has 2 subtypes:
- Monolithic. Can be used for a strip or columnar base. They have high strength and density. Most often used in the construction of low-rise residential buildings.
- Hollow ones are an analogue of the first option, but in their “body” there are special voids.
They are needed to make a kind of formwork from these blocks. Reinforcement is installed inside the holes and then filled with concrete. This type of blocks allows you to arrange various types of communications. More expensive than the first option, but after the concrete hardens, a more durable base is obtained.
Reference. The advantages of FBS are high strength, durability and resistance to low temperature, moisture, and soils with high acidity.
Disadvantages include excessive weight, which requires special equipment for installation, and if the blocks are connected incorrectly, the foundation may sag.
Foam blocks
Foam blocks are a construction material that is obtained by foaming concrete with special substances or using a chemical reaction. There are 2 subtypes of this building material, which differ in their manufacturing method:
Autoclaved. They are made from cement, gypsum, fly ash (can be replaced by sand), lime and gas-forming materials.
For hardening, an autoclave is used, which, at a temperature of 40° and high pressure, allows the material to be saturated with gas.- Non-autoclave. This is an analogue of the previous method, but hardening occurs naturally, which makes the material less strong, but cheaper. Most often produced using the artisanal method.
The advantages of this material are:
- small sizes relative to FBS, which is why they can be laid by hand, but they are larger than bricks, so the installation process is accelerated;
- light weight;
- low cost;
- vapor permeability;
- environmental friendliness;
- This material can be nailed or cut with a wood saw, which is why it is easy to process.
The disadvantages include:
- Low load-bearing capacity (but it is sufficient for the construction of a bathhouse), as well as the ability to absorb moisture. Because of this, foam blocks require external finishing with materials that will not allow water to pass through, since when wet for a long time, this type of block quickly collapses.
- Also, after construction, foam blocks can shrink (especially non-autoclaved ones), which is why it is necessary to finish the walls and foundation taking into account this drawback.
Expanded clay concrete
Expanded clay concrete blocks consist of cement, sand, water and expanded clay (light baked clay rocks in the form of pieces of gravel).
Pros:
- This material is lighter and cheaper than brick, which speeds up the work process.
- Another advantage is the lack of shrinkage and ease of finishing.
The disadvantages include:
- frost resistance up to 100 cycles;
- hygroscopicity (strongly absorbs water), which is why this material is not recommended for bath structures, but if you finish it with moisture-proof coatings, you can make a base for a sauna that will not be inferior in characteristics to other blocks;
- The size of expanded clay concrete products may vary, which makes it more difficult to select blocks by size.
Note! A supporting structure from such parts can only be made on soils with low groundwater levels, and additional waterproofing will also be required when installing the base.
Gas silicate
Gas silicate blocks are an analogue of aerated concrete products, but their composition is dominated by quartz sand, lime and water ground to a powder state, and concrete is used only as an additional additive. The composition also includes an aluminum suspension (sometimes powder), which, when entering a chemical reaction with lime, forms gas bubbles.
The disadvantage of this type of blocks is their hygroscopicity and low ductility. The advantages include resistance to chemical attack and mechanical damage, low weight, and good strength.
Do-it-yourself foundation for a bathhouse made of blocks
By independently constructing a block base for a bathhouse, the developer has the opportunity to verify the correctness of the decision made, evaluate the advantages of the design, as well as a number of the following positive aspects:
- carrying out work without the use of special equipment when using small-sized blocks;
- increased pace of construction activities;
The bathhouse is not a heavy building, so you don’t have to build a monolithic foundation for it
- the possibility of reducing the estimated cost of foundation work;
- high load-bearing capacity of block construction;
- no need to mix large volumes of concrete;
- formation of the building base without the use of reinforcement cages;
- ease of installation activities.
To carry out construction activities, concrete elements in the shape of a parallelepiped, as well as reinforced concrete products of various sizes reinforced with steel reinforcement, can be used. You should begin constructing the supporting structure on your own after completing all the necessary calculations and selecting the design option.
Tools and consumables
In order to make a base from block building materials, you may need:
waterproofing materials (liquid or in rolls);- fittings;
- shovels;
- concrete mixer or construction mixer;
- perforator;
- pegs;
- thread or rope;
- grinder or gas cutter;
- saw for porous blocks;
- buckets;
- building level;
- trowel, spatula or trowel.
Features of the Russian steam room
The human body temperature in any environment is no more than 400. This is achieved by the fact that when the ambient temperature rises, a person sweats and releases excess heat with moisture into the surrounding air. Optimal parameters for health - a combination of temperature and humidity - can only be maintained in a Russian bath, and only if it is properly designed and built. “The bathhouse is the second mother,” is written on the base of a wooden sculpture by an unknown artist.
Sculpture “Bathhouse - the second mother”
A bathhouse is not the cheapest pleasure, and if you order it “turnkey”, the amount may turn out to be prohibitive. Therefore, we are going to build a bathhouse with our own hands. This is quite an affordable business if you have some of the skills of a strong housewife: be able to lay bricks and work with wood, be able to read a drawing and calculate the necessary materials.
Rules for arranging a supporting structure
Advice. When arranging a foundation made of block materials, it is recommended to use FBS, since they are the most durable and are also manufactured specifically for these purposes.
You need to decide on the type of foundation: make a strip of blocks or put the bathhouse on a columnar foundation.
The first option is more expensive and takes more time, but the base will be more durable. The second is used for lightweight buildings, consumes less resources, and also makes it possible to isolate the building from melt water.
Preparing the area
To begin work on the selected site you will need:
- Remove all bushes, trees and other plants, as well as their roots.
- Dig up 15-20 cm of soil at the approximate location of the future bathhouse.
- Move it beyond the foundation boundary.
- Smooth out all uneven surfaces (fill holes with soil and dig up mounds with a shovel).
Axle breakdown
In order to break the axes of the future foundation, you will need:
Take pegs and a thick thread (or rope).- Using these tools, make one of the sides of the foundation.
- After this, using the rule for constructing Egyptian triangles, make right angles for the base - for this, equal marks are made on the thread (12 pieces).
- Using the marked cord, make a right triangle with an aspect ratio of 3:4:5.
- Connect all the corners together to get the final dotted line for the foundation.
- Check the diagonals to understand the symmetry of the resulting rectangle.
Base structure
To arrange the foundation you will need:
- Along the perimeter of the figure that was created before, make markings for the pillars, starting from the corners. The distance between the two parts of the base should not exceed 100-150 cm, and in some cases it is recommended to take a smaller step so that the lower crowns of the bath do not sag.
- Dig holes depending on the depth to which the pillars will be buried. If the soil is not heaving, then 40-50 cm is enough, and for moving soil this value corresponds to 50% of the freezing depth (for example, if it freezes at 120 cm, then you need to dig at 60 cm).
- For each hole, if it will be dug more than 1 meter, it is recommended to make wooden supports so that the walls do not crumble.
- In width, for pillars 50x50 cm, a hole of 60x60 cm is required.
- You should make a small reserve of depth, since you need to put sand and crushed stone at the bottom of the hole to make a drainage pad.
- After compaction, you need to waterproof the blocks from the soil, for example, with roofing felt.
The principle of laying blocks
The blocks must be laid so that the upper rims do not coincide with the lower ones (in a checkerboard pattern). During the installation process you will need:
Make cement mortar.- Add special additives or coating mastic to it so that you can more conveniently coat all the cracks and joints.
- At the time of laying, the blocks are fastened together with cement, similar to brickwork.
In some cases, reinforcement is used, which is inserted inside the blocks into special holes, which are then filled with concrete.
Important! If the base is made of hygroscopic blocks, then careful waterproofing is required on all sides of the column.
Installation of formwork
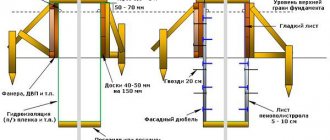
To create formwork with your own hands, edged boards with a thickness of 25-40 mm are used.
There are other materials, but wood is more accessible, cheaper and easier to work with. In addition, after completion of the work, the boards can be used for other purposes.
The thickness of the boards directly depends on the height of the tape.
The formwork is assembled in stages:
- Assembly of shields. The height is 5-10 cm greater than the height of the tape; the length of the boards is determined by the length of the walls or the size of the boards.
- Installation of shields in the trench. They are fastened together by support strips that determine the thickness of the future tape. On the outside, the shields are reinforced with supports that prevent the mass of concrete from pushing the walls of the formwork outward.
- If the boards are low (up to 20 cm), supports can be omitted, securing the walls from the outside with pegs.
NOTE! When assembling the boards, gaps between the boards should not be larger than 3 mm (ideally, there should be no gaps at all). If gaps appear, they are filled with tow or slats. The installed formwork is a structure whose internal space is the exact shape of a concrete strip
After assembly, all dimensions should be checked to eliminate the possibility of errors.
The installed formwork is a structure whose interior is the exact shape of a concrete strip. After assembly, all dimensions should be checked to eliminate the possibility of errors.
Nothing can be corrected subsequently, so the assembly process must be monitored with the utmost care.
Possible difficulties and errors
During the installation process of the base, the following difficulties and errors may occur:
- if you make a sand cushion incorrectly, the pillar may sag or begin to be washed away by groundwater, which will cause the bathhouse to begin to warp, and part of the base may burst;
- after the solution has hardened, the remaining voids must be sealed with cement so that the strength of the pillars does not decrease;
- it is necessary to carefully check the evenness of the base, since the entire building may become skewed, and also plan out the communications so that later you do not have to dismantle the walls or foundation;
- with poor waterproofing, some types of blocks increase their mass due to the collected water, which can cause the pillar to subsidence;
- Due to wetness, the block base can quickly break, so all cracks must be carefully sealed with waterproofing materials.
Excavation
The first stage of excavation work is the removal of the top layer with simultaneous leveling (leveling) of the site. For this purpose, it is best to use a bulldozer, although for small buildings located on a flat area, manual preparation is also allowed.
The prepared area is carefully marked using wooden pegs. They are stuck at corner and intermediate points that define the contours of the future trench. After marking is completed, a trench is dug to the calculated depth.
The excavated soil is transported off-site or stored nearby for later use.
Transportable baths from SK "Stroyudacha"
A mobile sauna made of timber is a useful structure both for a summer cottage during the summer holidays, and for a suburban area where a family lives year-round. Comfortable and compact buildings will be a pleasant addition and will decorate the site. Their size is small, but this does not prevent you from enjoying bath procedures in comfort. It is worth noting that such a bathhouse can be easily transported. And how useful it will be during outdoor recreation!
See the finished projects on the website, where their cost and equipment are also indicated. Any questions? Contact us by phone numbers listed in the “Contacts” section.
conclusions
In the end, I would like to say some conclusion about the block foundation for a bathhouse. As we have already said, such a basis has both advantages and disadvantages. However, we can say with confidence that foundation blocks are the best solution if there is a need to install the foundation as soon as possible. Such situations do occur, so it is always worth considering existing options.
In addition, a block foundation will be an excellent solution if construction takes place in rather difficult conditions associated with not the best soil and other factors. In this situation, blocks will again be the best solution.
At the same time, when it comes to the price issue, the blocks often end up far behind the classic options for constructing a foundation. Accordingly, in most cases, this choice depends precisely on the price tag for the material, since in certain conditions the purchase of blocks may simply be an unprofitable solution.
Strip base device
It is also not difficult to build a strip foundation for a bathhouse if all technological processes are followed. True, this process will take more time and more costs will be required, but the effectiveness of such a foundation is much greater, especially for areas with problematic and loose soils. If the future bathhouse will be built from bricks or foam concrete blocks, then only a foundation of this type should be built for it.
- The construction of the supporting structure of the foundation begins with markings.
- When all the outlines are made, the corners are marked and the geometry is checked, a layer of waterproofing cushion is arranged and formwork is erected for the future foundation.
- You can prepare concrete yourself or order it from a factory. Keep in mind that if you mix the solution yourself, it is advisable to initially measure your strength, since given the amount of material required, it will be difficult to mix it by hand precisely because of the large volume.
- When preparing cement concrete mortar, remember that the ratio of gravel and sand should be 2:1, and cement and water 3:1.
- If you will be laying the foundation in winter or early spring, use only warm water at sub-zero temperatures.
- Follow the sequence when mixing: dry materials (cement, sand) are mixed initially. The second stage is adding gravel and only then water.
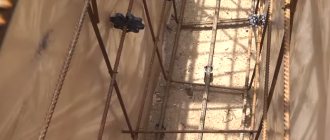
The correct foundation for a bathhouse can be poured in several different ways, but in any case, do not forget that a metal skeleton welded from reinforcing bars should be placed inside the solution that you will pour into the formwork.