The opening and door may be in different stages of readiness before starting work, so those who have something ready may skip unnecessary instructions.
General stages of installing doors in a bathhouse
The service life of doors largely depends on correct installation.
The entrance door is made of materials:
- tree;
- glass;
- metal.
The wooden panel is attached to the frame. Before installing the box, you need to cut grooves in the openings on the side and top. After installing the frame, install the threshold. The next step is attaching the fittings. After this, the canvas is fixed.
To install the glass sheet, you must first install the box in the opening, after which hinges or other mechanisms are installed. The final stage is hanging the glass and securing the handle.
Metal blocks are mounted in the same sequence as wooden ones. That is, first prepare the opening, after which the frame is installed. Next, the voids are filled with foam. The final stage is the canvas and accessories.
Preparing the doorway
Preparation will not take much time, since during the construction of the building all dimensions and geometric evenness have already been made.
But, if the installation is carried out in a log house, then you need to cut out the opening. At the same time, the connection between the logs weakens. A log building shrinks, so the opening must be made large for the block. The reserve is at least 10 cm.
For the strength of the logs, it is necessary to fasten them with a vertical wooden beam. This is done in 2 methods:
- Spikes are cut out at the end of the log, onto which a vertical beam is placed. Grooves of the appropriate size are cut into it.
- One common vertical recess is cut out in the opening, into which the timber is inserted.
If the opening is larger than the frame by more than 2 cm, then it is narrowed using a board. You should remember about the platbands, which cover 4 cm. If the level shows curvature vertically, horizontally, this is corrected.
Box assembly
The frame is assembled separately on a flat horizontal surface.
There are 2 options:
- Purchased block for installation in a bathhouse in the opening. In this case, the box is assembled according to the instruction manual. The parts are fully prepared for connection. Fastenings for this are included in the kit.
- If you create the frame yourself, its parts must be trimmed at 450. To do this, use a hacksaw and a meter to measure the length and width. The box is made 2 cm smaller than the opening.
Further actions are carried out with the door and the frame installed in the opening.
Installation of hinges
The hinges are installed as follows:
- stepping back 20 cm from the top beam of the frame, the first hinge will be placed;
- second (middle) - 30 cm down from the top loop;
- the lower loop is located 20 cm up from the threshold (if there is one).
If there is no threshold, then you need to measure from the floor, the installation of which has already been completed.
There are 3 types of installed hinges:
- External invoices are fixed with self-tapping screws according to the markings made in advance. Sometimes the question arises of how to attach an arrow hinge to a wooden bath door. It is fixed only at the top and bottom. It performs a decorative function. The arrow is capable of holding heavy oak sheets and not deforming.
- Screw-in - for glass panels. The frame has hinges already installed.
- Mortise - for them you will need to make recesses in the frame. This is so that there is no gap when closing the door.
The recess is made with a depth of 2.2-2.7 mm, depending on the thickness of the loop flag.
Installing a box in an opening: methods of attaching to a wall
Door frame installation methods:
- Using polyurethane foam. Place the box and secure it with wooden pegs. Using a level, you need to level the plane vertically and horizontally. After proper installation, the gap between the wall and the frame is filled with polyurethane foam. The foam expands as it dries. To prevent deformation, spacers are placed at 10 o'clock. After drying, the spacers are removed, the foam is cut off, and the pegs are knocked out. The box is held in place only thanks to the foam.
- Using staples, direct hangers. Suspensions for fixing elements of the metal frame of drywall are fixed with the middle part to the outside of the box with self-tapping screws. In this case, the ends go onto the wall from both sides. They are secured with dowel nails. If the ends stick out, cut them off. Before fixing the frame with hangers, it is installed on wooden wedges and measured with a level for evenness. The hangers are screwed to the box in advance. The remaining gaps are filled with foam and spacers are installed overnight.
- Using anchors. Through holes are drilled in the frame. Anchors are inserted into them and fixed in the wall. The anchors can be inserted in several places and then masked with a plug. Or you can insert them hidden under the hinges, the platinum for the lock. Before fixing the frame with anchor bolts, the frame is placed on wooden pegs and leveled. The gaps are filled with foam and spacers are installed. After drying, the pegs can be left or removed.
Installation of platbands
Platbands are placed last. Markings are made on the frame. The platbands themselves must be cut at the connecting places (corner parts) by 450. The cut is made in the following order: left, top, right part of the part.
The platbands are secured with headless nails or flat pins. During fixation, you need to check whether there is an obstacle to opening/closing the canvas.
Method No. 2. Circular casing made of timber
Installing doors in a log house using the second method can also be done with your own hands. The principle of its implementation is not much different from the first. All you need to do is install the blank under the box, following the rules mentioned above.
In other words, it is necessary to install bars around the entire perimeter of the opening. They can be fastened to each other in several ways:
- tongue and groove method;
- self-tapping screws;
- nails.
In addition, it is possible to install the casing without the use of fasteners. To do this, you need to fit the bars as tightly as possible to each other.
It should be noted that in most cases, the construction of log houses is carried out according to this principle. The pressure created by the weight of building materials is quite sufficient for the stability of the structure. The bars must be installed by surprise.
How to make and why you need a pigtail
The edge is made so that during the use of the bathhouse, as well as during shrinkage, there is no distortion of the doors.
When building a bathhouse from a log house, a gap of 10 cm remains between the lintel and the opening, and 6 cm on the sides.
To create a frame, you need to make holes for self-tapping screws. Two on the ceiling and on the threshold, 3 on the sides. Use timber. Holes are made in it for the same screws. The beam should be adjacent to the walls and ceiling. There should be a gap of 10 and, accordingly, 6 cm between the timber and the frame.
After fixing the timber to the walls, the remaining gaps are covered with tow. It will last at least three years. After this, it is removed and the places are filled with foam.
Hinges
Another very popular type of canopy. There are many varieties of them, but the principle of operation is the same. The hinge is similar to two doors that are connected to each other by a hinge. The products are durable and wear-resistant. Each canopy can withstand a weight of 20-25 kg. Another advantage is their wide opening angle: the door on such canopies opens 165 degrees.
Hinges for glass doors are used when installing swing-type systems. They can be hidden, practically unnoticeable and quite difficult to hack, as well as semi-hidden. Their variety is four-ball canopies, which are fixed in three planes. They are in demand for interior and furniture doors. There can be hinges for glass doors without drilling, hidden or semi-overlay.
We install a door in a log bathhouse
The entrance to the bathhouse is a metal door or a heavy canvas of beams. But in the room itself they install an accordion door (locker room) or a compartment. Sometimes you can find an interior book.
Installation of the structure is carried out in the following sequence:
- They create a pigtail. It will serve as a guarantee of the service life of the door and will prevent the logs from loosening.
- Install the box in accordance with all the rules for proper installation. The use of a level and plumb lines is mandatory.
- After fixing the canopies, the canvas is mounted.
- Fastening platbands.
- The last step is fixing the handles.
The opening can be tied with timber using screws or “tenon-to-groove”.
General requirements for canopies
The main difference and advantage of glass models is their transparency. Such structures are installed at the entrance to country houses, shopping and office centers. Glass systems are popular in apartments; they are suitable for bathrooms, baths and saunas. The products are also in demand in furniture production. Loops are the main element that holds the transparent fabric. Of course they must be strong.
But besides this, they are subject to the following requirements:
- External attractiveness. Since glass doors come without a frame, if the door is completely transparent, the hinges must not be too large and look nice from any side. The fittings should not visually weigh down the canvas, otherwise the whole meaning of the design will be lost.
- Protection. Metal elements should not scratch the sash. To do this, pads made of polymer materials are usually installed under the canopies. Also, additional glue can be used for maximum fixation.
- Possibility of mounting without holes. If the door leaf has a frame made of plastic, wood or metal, then there are no problems with fixing the fittings. In the case of frameless models, awnings are sometimes secured using clamps. In this case, no holes are drilled.
For the manufacture of doors, the most durable types of glass are used, such as triplex or tempered material, but they also do not like drilling after processing. All technological holes for canopies are made in the doors at the stage of their production, in the conditions of the enterprise. This reduces the risk of material cracking. To make holes, special drills are used that are coated with diamond dust, as well as cooling lubricant.
Installation of glass doors
Installing a glass door in a bathhouse with your own hands requires following the following rules:
- do not skimp on gaskets - cardboard, slats;
- Apply tape around the perimeter of the glass to avoid chipping;
- The glass sheet is installed by 2 people.
Glass is a fragile material, so the question arises of how to properly install a glass door in a steam room. This will require a little more time and effort. Care and consistency must be observed.
Proceed step by step:
- install the frame - before installation, remove the bar from it (on the back side);
- the frame must be fixed with wooden pegs and leveled;
- the box is secured with screws;
- hang the canvas, first using spacers;
- install the handle.
If the glass panel is without a frame:
- Before installation, remove all fittings from the canvas.
- You will need wooden supports that will create a gap from the floor of 10-20 cm. Spacers create a gap between the frame and the canvas of 10 mm.
- Carefully install the door and align the gaps.
- Places for hinges are marked on the frame and mounted.
- Glass is mounted in the hinges using gaskets.
- The last step is to install the handle and magnetic shutter.
Installation of glass doors is carried out step by step, carefully, with an assistant.
What tools will be needed for installation?
When deciding how to make a doorway and insert a door, first of all you need to decide on the tools necessary for this work. They must be at hand at all times. This will allow installation to be completed as quickly as possible. To carry out the work you will need:
- chainsaw or electric saw with a bar;
- hammer;
- perforator;
- circular saw or manual milling machine;
- chisel;
- construction measuring instruments: level (preferably laser), tape measure and square.
As a rule, searching for tools will not take much time, because all of them, one way or another, were used during the installation of the log house. Having prepared everything you need and understood how to install the door correctly, you can begin work.
When to cut openings?
There are only three options:
Cut a blank frame, cut out openings after shrinkage;
Cut the frame taking them into account, carry out casing after shrinkage;
Cut the log house taking into account the openings and carry out the casing immediately.
Each method has its pros and cons.
Solid log house without windows and doors
One of the most controversial options, as it has a number of pros and cons that balance each other.
The log house is made in the form of a blind box. It will perfectly hold the geometry and shrink evenly along the entire height of the wall. When designing openings, you can achieve maximum accuracy, since they are cut out only after the object has settled on the foundation. Holes for future windows and doors are marked in place, for a specific structure.
The disadvantages include greater consumption of material, which leads to higher prices already at the stage of purchasing logs. The lack of standard window and door openings forces us to resolve the issue of organizing the ventilation of the facility. Without passages, air exchange in the interior of the log house becomes difficult. The log house simply will not dry, and fungus may form because of this.
The craftsmen who cut the log house will not be able to immediately install structures for filling the openings, which means that they will have to return to this work after a while and overpay the team for visiting the site.
A blind log house is an additional complication in the felling process. Once a certain height of the wall is reached, getting inside the object becomes problematic. It is necessary to organize technological passages or come up with additional auxiliary structures.
This method for log and inset structures would be the best case scenario. But for the customer and the builder it is extremely costly and difficult to implement. Maintenance of the log house during shrinkage turns into a separate quest.
Log house with openings, but without casing
One of the most common solutions due to the price-quality ratio.
Window and door openings are immediately included in the project and implemented at the time of cutting the log house. The log is calculated and purchased taking them into account, which reduces the cost.
It is impossible to leave the opening completely without casing during shrinkage. Therefore, after designing the future locations of windows and doors, rough casing is done. A groove is cut into the vertical ends of the opening into which a guide block is inserted. The casing box is attached to this block.
Rough casing is necessary to maintain the geometry of the opening during shrinkage. The guide bar prevents and/or minimizes the horizontal movement of logs and does not interfere with the shrinkage of the log house, that is, the vertical movement of logs. During operation, the jamb prevents direct pressure from the logs on the window or door structure and is responsible for maintaining rigidity in the horizontal plane.
Even the installed rough frame does not always allow maintaining the ideal geometry of the opening, so during shrinkage these places are reinforced with installation logs. This procedure is almost mandatory for doorways and large windows.
In log buildings, where windows and doors are marked and decorated immediately, the issue of ventilation of the object during the period of shrinkage is automatically resolved; there is no need to spend additional money on organizing ventilation. The question of passers-by also disappears. Construction of a log house at the last stage, moving inside, as well as subsequent maintenance is not difficult.
It is more difficult to maintain the geometry of the opening - this is one of the main disadvantages of the method. During shrinkage, noticeable changes are possible, which will complicate installation and filling. There is another not so obvious problem. Such a log house is more defenseless and vulnerable to penetration by third parties. If the log house is located on a site without a fence, and there are no guards or residential buildings nearby, then almost anyone can get inside. Installing a protective mesh partially solves this problem.
Log house with openings and finishing casing
The method is alive due to its low cost and speed of execution. But in fact, it turns out to be Russian roulette. A finishing frame installed in a newly completed log house, followed by filling of the openings, often fails and needs to be redone. Moreover, it is necessary to redo not only the casing itself, but also the windows and doors.
The installed casing partially saves from changing the geometry of the openings, but cannot guarantee 100% success. As a result of shrinkage, the dimensions and shape may change, which is usually corrected during the installation stage. If windows and doors are inserted immediately, then during the process of shrinkage and geometry changes, they may also be damaged.
The advantages of this method include low cost, as well as speed of work. The client receives a full range of design and filling of openings immediately, using the same construction team.
Useful tips
The very first piece of advice from experienced craftsmen is not to take on too complex projects or door designs. If you don’t have confidence in your abilities or lack experience, it is better to choose a simpler and more reliable door design option.
You cannot work with unprepared material. This applies to wood. Fresh pine can dry out and reduce the transverse size by 10%. This means that gaps up to 1 cm wide may appear in the door, which is unacceptable. It is necessary to properly dry and condition the boards.
During work, safety precautions should be observed. Power tools are dangerous, especially when working with wood. It is necessary to use personal protective equipment, glasses, and sleeves should not hang down. Gloves should not be used, especially when performing machine work (for example, when cutting wood on a circular saw). Hands can slip, which often leads to injury.
It is necessary to work with a sharp, well-threaded tool. High quality processing cannot be achieved using unprepared equipment. It is recommended to have sandpaper on hand so that you can sharpen the cutting edges at any time.
Mortise hinges
Drilled or mortise hinges are a more reliable installation method and should be chosen when it comes to massive panels. For them, at the stage of cutting glass before it is tempered, all the necessary holes are made. Making them yourself in canvas is quite problematic: at the slightest stress, the material can burst. If the awnings are fixed in this way, then the rest of the fittings (lock, handle) will have a similar fastening. This is the best option for doors that have a frame and glass inserts, entrance products, and panels with a thickness of more than 10 mm.
The main advantages of this fastening method:
- the mounting location is clearly defined;
- fixation is the most durable and reliable;
- the load is distributed evenly across the canopies;
- there cannot be any displacement of the loops.
The disadvantages of mortise fittings include the fact that it is difficult to install it yourself; you cannot make a hole without a special tool. If the holes need to be large, then they can be made on a machine. In the case when the blade cracks during the drilling process, but there is no way to fix it. Therefore, all holes for installing mortise fittings must be provided by the seller (manufacturer) of the door.
Material
Having understood what dimensions of the entrance door to the bathhouse are suitable, you need to choose the material from which they will be made. For this, the following can be used: wood, durable glass, plastic.
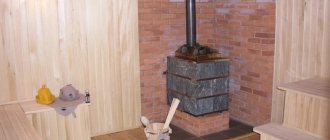
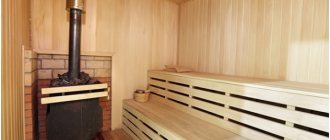
Solid wood
Our ancestors used wood for this purpose. And today, despite the development of technologies for the production of various materials, wood remains quite in demand.
One of the most popular types of wood is linden. It is affordable, durable, and has good aesthetic characteristics. Products made from ash are often found. Manufacturers of wooden structures value this wood for its excellent performance qualities.
Wooden door to the steam roomSource remont.castorama.ru
Some manufacturers offer bath doors made of oak in different sizes. This option is considered one of the most durable and reliable, but at the same time expensive. In addition, a feature of oak is its significant weight, which also scares off potential buyers.
Glass
For the production of doors for baths and steam rooms, special heavy-duty tempered glass is used.
When choosing a product from this material, you need to pay attention not only to the size of the bath doors, but also to the thickness of the glass itself, the degree of its heat resistance, the model and the absence of any mechanical damage on the surface.. Usually the height of such a door is 1.6-1.7 meters
Width - within 60-80 cm. The thickness of the glass should be no less than 8 cm. If it is thinner, it may deform or burst over time.
Typically the height of such a door is 1.6-1.7 meters. Width - within 60-80 cm. The thickness of the glass should be no less than 8 cm. If it is thinner, it may deform or burst over time.
The following types of glass doors are usually offered for steam rooms:
- completely transparent or slightly tinted designs;
- frosted glass products;
- options with a thematic image or engraved design.
Door to the steam room made of tempered glassSource derdomus.ru
In order for the material to withstand mechanical loads and overheating up to 300 degrees, it is subjected to a fire polishing process.
The advantages of a glass door include:
- ease of care;
- ease of opening;
- resistance to high temperature and high humidity;
- safety in use;
- large selection (shape, shade, texture);
- the ability to apply a drawing;
- ability to retain heat due to high-quality joining and the use of silicone seal;
- the ability to choose the optimal size of the door for the bathhouse;
- affordable price.
When choosing a glass door, you need to consider some points:
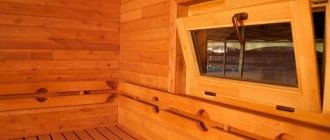
- In the sauna, a tempered glass door is attached to a frame made of wood (aspen, linden). To protect the wood surface, veneering or lamination can be additionally used.
- For a Turkish steam room, you can choose a door made of frosted glass mounted on an aluminum frame. This metal is not afraid of interaction with water and condensate.
Hinged glass door to the steam roomSource podmoskovie.info
Plastic
This material is not very common in baths. Based on the characteristics of plastic, it can be used in some bathhouses:
- Tambour. This room is not heated, so the temperature inside is practically no different from the temperature outside. At the same time, a plastic door can become a good barrier to the penetration of wind and frost. Therefore, a door made of this material is well suited for an entrance vestibule.
- Waiting room. Even if the bathhouse is heated, the air temperature in the dressing room is usually 25-30 degrees. Plastic will easily withstand such values. It also responds well to high humidity. If a room is not heated for a long time in winter, the air temperature in it can drop significantly. Due to such changes, natural wood can become unusable over time, which cannot be said about plastic. Such a door can serve in the dressing room for a very long time, performing its functions efficiently. The only thing a plastic door needs is periodic lubrication of the seal and adjustment of the fittings.
- Shower or washroom. There will always be high humidity in this room. And water negatively affects the condition of the wood. But plastic will feel great in such conditions.
- Steam room. This room is characterized by high air temperature and humidity. From such exposure, a PVC door will quickly become unusable. Therefore, here you need to choose a door made of glass or wood.
PVC bath doorSource birzhaplus.ru
Where can I buy
Companies offering doors for baths and saunas also have various types of fittings in their assortment.
Share on social networks
Sana, we need to take stainless hinges. Brass, stainless steel, or at least coated (chrome plating, galvanized) And in your case, the advice is to replace
I can only say from my own experience: I changed the hinges on the front door, but it was not very heavy, the position of the hinges had to be changed, but several months have passed - the flight is normal. It seems to me that the heavier the door, the more correct it is to put the hinges not in the same place, but in the nearest undamaged one. But a light door doesn’t matter.
Anton, it’s hard to tell from the photo how heavy the door is. As Anna wrote above, the weight of the door affects the decision. I would advise gluing, maybe not with epoxy, but just plain PVA. And if you twist it in the same place, then for reliability you can tighten it with several screws in a place perpendicular to the crack. Or, it’s better to twist it nearby, your second option is more reliable.
By sending a message, you consent to the collection and processing of personal data. Privacy Policy.
Source
Door hinge insertion
Precise cutting of door hinges
Precise insertion of door hinges begins with marking the door leaf. To do this, measure 20 cm from each edge of the door where the hinges will be installed.
Since we will cut the door hinges with an ordinary chisel, we should take into account some features of this method so that the hinges “sit” as accurately as possible. And since the doors that we often have to work with are laminated, accuracy when inserting is of considerable importance. This will be discussed below.
Installation of door hinges in photo examples
Naturally, the top of the hinge will coincide with the mark on top of the door leaf, and the bottom on the bottom. Moreover, when you measure 20 cm from the edges of the canvas, indicate with arrows which direction the loop will move, so as not to get confused.
Then we apply a loop along the edge of the mark and, with a sharpened pencil, outline it in fact; we will make an inset along the intended contour, because the loop map usually does not have strict geometry, and if inset in fact it will fit like a glove.
In order not to confuse the loops later, we make a mark on the back of each loop with a marker.
Since we will insert the hinges with a chisel and there is a risk of it moving during work, we need to make guides for it. To do this, use a wallpaper knife to carefully cut the loop outline mark.
Then we use a chisel to sample the cut area and get a recess step from which our chisel will no longer slip.
Next, we make a horizontal mark for the recess we need.
Then, using a chisel along the edge (place the chisel with its sharpened side towards the selected area) and a hammer, we go around the contour, going deeper into the thickness of the loop map and make a selection for fitting the loop.
Moreover, the hinge should not sit flush, but have a protrusion of half a millimeter (both on the door and the frame frame), this is done to allow for additional adjustment during the installation of the door.
Then we put our loop in the groove and use an awl to make a marking for the screws, and move it slightly to the side so that the screws press the card tightly to the edges.
We use a 3 mm drill to drill out a place for the screws so that the wood does not crack when screwing.
We put the hinges in the grooves and screw them on. The door is ready, it's time for the door frame.
We measure the hinges on the door leaf from top to bottom (sometimes they shift), write down the exact dimensions, add 3 mm each and make a mark on the frame frame.
The only difference is that all the marks are now from the top of the loop.
We repeat the entire process described above, your hinges will be embedded perfectly, all that remains is to assemble the frame and install the door.
Inset door hinges | Video explanation
Now installing door hinges manually will not be difficult for you.
Adviсe
Experts have prepared several useful recommendations.
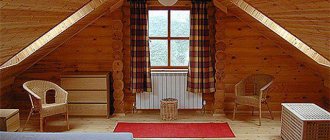
To ensure maximum comfort in your bath room, you should pay attention to some recommendations from experienced professionals. For example, it is better to install a sauna on the south side, since in winter, when you sometimes want to take a steam bath, it will be easier to get to the entrance due to the fastest snow melting on the side closer to the south
In addition, it will be preferable if the windows face west, since in the evening the room will be illuminated by rays for much longer. Also, for constant air circulation and excellent heat maintenance, it is recommended to build a bathhouse from wooden logs. When building a foundation, it is better to give preference to a strip structure, since, having the highest strength, it can withstand not only light, compact structures, but also massive structures. Under no circumstances should you coat the wood with varnish or paint, otherwise an unpleasant odor will be released.
Kinds
Wooden doors are classified depending on their design and location. Each variety has characteristics, strengths and weaknesses.
Massive
These are structures made of several boards fixed with glue. After joining, a solid shield is obtained, which is leveled with a thicknesser and covered with decorative compounds. Massive doors are the most expensive.
Advantages:
- high strength;
- environmental friendliness;
- good heat and sound insulation;
- attractive look.
Flaws:
- Heavy weight. The canvas must be secured with additional fasteners.
- High price.
The remaining disadvantages relate to the wood itself - low resistance to moisture, expansion and drying out when the temperature changes.
To protect wood you need to use special impregnations.
Paneled
These got their name from the paneled inserts. More often it is made of pine, which is sheathed with MDF, veneer, and varnished. Advantages:
- light weight;
- attractive appearance;
- durability, reliability;
- resistance to temperature changes;
- possibility of replacement and restoration of individual elements.
There are no serious shortcomings, but manufacturers often use low-quality raw materials to reduce the cost of the production process and do not comply with technology.
typesetting
This is a type of paneled canvas. They have the same advantages and disadvantages. Stacked structures are assembled from individual blocks of the same or different sizes, which are fixed with glue or tongue-and-groove joints.
Frame
The structure is a rectangular frame made of wooden boards, inside of which there is a cellular seal. The frame is sheathed with MDF sheets and other materials:
- Veneer - thin plates of natural wood. They have a natural woody structure. To make veneer last longer, it must be coated with impact-resistant varnish.
- Laminate is a coating consisting of thick paper, which is covered with a protective layer on top.
- Eco-veneer is a modern substitute for natural veneer. This is a film made from natural ingredients.
- PVC is a plastic covering of different colors.
Classification by location
Depending on the location, there are two types of paintings:
- Interior - simple canvases without locks.
- Entrance doors have a complex system of locks. Made from several layers of wood.
Entrance doors are heavy and require more fasteners to install them.
Cutting and designing an opening in a log wall
- Before proceeding with this operation, it is necessary to temporarily secure even beams to the wall near the places where the opening was cut. This will prevent the wall logs from moving.
- Using a level or plumb line, draw the outlines of the opening in the wall. For our door they will be equal to the following values: width - 940 mm, height - 2090 mm. This takes into account the gaps between the door and casing frames (10 mm on both sides), and the fit of the casing posts into the tenon of the log wall. The lower level of the opening begins at half the diameter of the crown of the bathhouse frame, following the embedded crown.
- Using a chainsaw, we cut out the opening from top to bottom. Using an ax, we chop the upper and lower logs to the drawn horizontal lines.
- Next, using a chainsaw and a chisel, we cut out vertical spikes in the wall logs on each side of the opening with dimensions: width 60 mm, height 40 mm, symmetrically relative to the central axis. In the vertical posts of the casing, we select the appropriate longitudinal grooves and grooves for the upper spacer beams. We prepare a threshold with grooves for vertical tenons and quarters for planting vertical casing posts in them.
- We insert the threshold into the spikes, press it to the bottom plane of the opening and give it a horizontal position. Securely fasten with self-tapping screws.
- We place the vertical post at an angle at a quarter of the threshold and, using a hammer or an ax, drive it into the threshold and the tenons of the opening.
- We install the upper spacer bar into the grooves of the racks and hammer it into the grooves until it stops.
- We secure all connecting connections with self-tapping screws: in the corners, along the length, in the grooves, in the tenons, etc.
- So, the casing is ready, and the upper spacer beam has a gap between it and the cut opening. It is made specially and serves to compensate for the shrinkage of the bath. Now you can begin installing the door to enter the steam room.