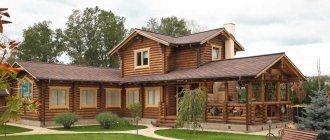
Since ancient times, the bathhouse has been a favorite vacation spot for Russian people. In ancient times, it was used not only for washing, but also for special events. Today, every owner of a plot of land also does not mind becoming the owner of his own bathhouse, where he can relax and escape from everyday worries.
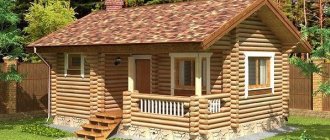
Baths can be different: from very small and ready-made barrel baths (advantages and features of barrel baths) to large baths. If you have a medium-sized plot, and you are going to go to the bathhouse not alone, but with a group, then pay attention to the 5x6 m bathhouse project.
Preparatory stage
Choosing material
Based on this fact, we will select building materials:
- Brick. For laying walls, you can use hollow ceramic models, which have reduced thermal conductivity. At the same time, the structure itself turns out to be quite heavy, although very durable. The choice in favor of brick should be made only when we are not limited in finances, since we will have to spend additional money on insulation.
- Porous concrete. They are distinguished by good thermal insulation qualities and relatively low weight. Well suited for the construction of structural walls. In addition, the advantage is the relatively simple installation: if you have mastered the technology of bricklaying, then you can handle foam concrete or aerated concrete blocks.
Photo of a foam concrete structure at the construction stage
It is this option that we will focus on in this article.
Create a project
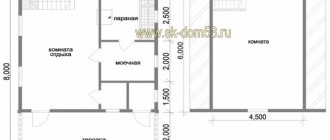
Since our building area can be quite large, the 6x5 m bath plan allows us to accommodate several rooms.
As a rule, these are the following premises:
- Steam room – approximately 5m2. This area is quite enough for comfortable accommodation, and it is easier to heat.
- Shower room - 5-6 m2. A separate passage to the dressing room is required, and a separate passage to the steam room.
- Dressing room (locker room, rest room) – from 15 to 20 m.
- You can also slightly reduce the size of the dressing room by placing an open porch or terrace.
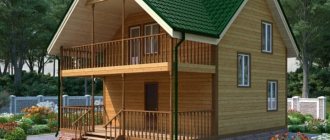
- The layout of a 5 by 6 m bathhouse in a two-story version most often includes an attic. The attic floor houses either a recreation room with a balcony or several guest beds.
Naturally, this is only an approximate option: you can plan the premises in the way that suits you!
Bathhouse layout 6 by 5 meters with a small terrace
Conclusion
Construction of a 5x6 m bathhouse is a very ambitious undertaking that requires considerable financial investment. However, if you have the necessary skills and do not lack free time, then it is quite possible to implement such a plan alone (see also the article “3 by 3 by 5 bathhouse - three-fifths of the market, if we talk about independent construction”).
Well, the video in this article will help you choose the right materials, design the building and plan the work.
Did you like the article? Subscribe to our Yandex.Zen channel
Choosing material
The service life of the building and indoor comfort depend on what the bathhouse is made of. The following materials are most often used for its construction:
- brick;
- tree;
- foam concrete;
- aerated concrete;
- wood concrete (wood concrete).
A brick bathhouse is considered one of the most durable buildings due to the strength and frost resistance of this material. Calculations, which are confirmed by GOSTs, show that, taking into account all the subtleties of construction, such a building can stand without repairing the facade for up to a hundred years. Large two-story buildings can be built from brick, since this material is resistant to natural disasters, aesthetically pleasing and environmentally friendly.
Bathhouses made of lightweight (cellular) concrete are usually cheap and quickly erected. To make foam blocks, a cement-sand mixture with a foaming agent is used, which allows them to be produced directly on the construction site. It has air in its structure (40–80%), as a result it is light in weight. This indicator allows you to save on the foundation.
Arbolite, or wood concrete, is a mixture of cement and organic filler. The disadvantages include its ability to absorb moisture (75–85%). However, if the block is immersed in water and then removed, the liquid will flow out of the pores and the wood concrete will dry quickly. This property allows the use of wood concrete in the construction of a bathhouse, despite the high humidity of these rooms. According to its characteristics, the material resembles wood, but at the same time it does not rot, does not crack and is completely resistant to combustion. In addition, mold never appears on arbolite walls.
Wood is one of the traditional materials for building baths. The Russian bathhouse was originally built from logs (a felled tree cleared of branches, bark and twigs). A beam is the same log, only sawn on two or four sides; has a square or rectangle in cross section. They have unique properties: they absorb steam while maintaining temperature and humidity. It takes from six months to two years for the tree to completely shrink. A frame bath is the lightest and most inexpensive, even cheaper than one made from foam blocks. For its construction, sawn timber and boards are most often used.
Advantages and disadvantages of a gable roof in a bathhouse
Before installing a gable roof, you need to study its functional disadvantages and advantages. This will avoid unpleasant surprises in the future.
Among the main advantages of a roof with two slopes are:
- Good thermal insulation of the ceiling of the bath room
- The space between the ceiling and the roof can be converted into an attic. It is convenient to store brooms, washcloths and other bath accessories.
- When building a gable roof, complex technological solutions are not required.
- If the structure is installed correctly, it will not require repairs or additional maintenance for a long time. After all, precipitation will not accumulate on the roof. Snow can be easily removed from it with a long stick, shovel or special device. And the rain will easily roll off the surface on its own.
- The appearance of the building with two slopes looks the most comfortable and neat.
In addition to the functional and useful advantages, a gable roof has one drawback.
And if the project plans for a large bathhouse, it will require a lot of material. This can significantly hit your budget.
Important! The angle of inclination and height of the roof will depend on the size of the bathhouse.
Construction
Laying the foundation
Since a bathhouse made from 6x5 timber turns out to be quite large, the base for it must be made appropriate:
- The ideal option is a strip foundation. To do this, we dig a trench up to 60 cm deep and 40 cm wide along the perimeter of the future building.
- If we plan to install a heavy stove (cast iron or brick), then we need to lay a separate support under it.
- We fill the trench with a sand and gravel cushion, lay reinforcement and install the formwork.
- We pour concrete into the formwork. You can prepare it yourself, or you can order it from a company specializing in this type of building materials. The second option is a little more expensive from a financial point of view, but it saves significant time.
- We leave special channels for communications.
- We lay wooden beams impregnated with a water-repellent composition on top of the poured base - they will serve as the basis for constructing the walls.
Tape base with trim crown
Construction of load-bearing structures
Do-it-yourself installation of bathhouse walls made of timber is carried out according to the principle of the designer:
- We place the first crown on the base, the corners of which are connected either into half a tree or into a “warm corner” (shown in the diagram below). Six-meter beams don’t even need to be cut to length!
- We attach a strip of sealant – jute tape – to the upper part of the crown.
Corner decoration
- We install the second crown on top, matching the profile of the beams. We connect the parts using wooden dowels, driving them into pre-drilled sockets.
- We gradually increase the height of the structure, laying crown after crown.
- We cut out window and door openings in the walls or lay them in separately.
Intercrown insulation
In the upper part we install beams for the ceiling. We attach the ceiling sheathing, attic floor boards and rafter system to them. We nail the sheathing to the rafters and install the roofing material, having previously laid one or two layers of waterproofing.
Also at this stage we install communications, which will then be hidden under the casing.
Finishing
Next, the instructions for building baths from timber provide for the structure to stand for final shrinkage. As a rule, shrinkage takes from several months (if dry glued raw materials were used) to one and a half tapes (when erected from raw logs or timber).
Caulked cracks to sheathing
After installation, we proceed to sheathing and insulation:
- We caulk large cracks on the outside using sealing material.
- From the inside, we fill the walls with sheathing, in the cells of which we install heat-resistant heat-insulating material. We place the thickest layer of heat insulation in the steam room.
- We fix a foil film on top of the thermal insulation, which not only reflects thermal radiation, but also serves as a vapor barrier.
- As decorative cladding we use lining treated with a moisture-proofing compound. You can decorate the dressing room and attic using other materials, but you should still avoid using plastic.
Internal insulation
After completing the work, we connect plumbing fixtures, install lamps, sockets, etc. We separately install the stove for the bath (if a portable version is used).
Types of gable roofs for baths
Before erecting a roof in a bathhouse, you should decide on its type. After all, you need to choose a simple, but at the same time reliable design. Two types of coatings are considered popular:
- attic;
- roofless.
The design of the roof and the period of use of the bath depend on them.
Important! If you plan to use the bathhouse throughout the year, it is better to give preference to a gable roof with an attic. Because it holds heat well.
In summer baths, a covering without an attic is usually used. But they provide for the installation of a water tank, which can be heated under the sun's rays. This type of roof is the easiest to construct.
Getting to know the finished projects
To obtain maximum comfort, special attention should be paid to the design. The 5x6 bathhouse is medium in size and highly functional, as it can accommodate several rooms.
The main ones are a sink, a steam room and a relaxation room.
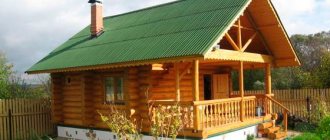
This 5x6 bathhouse layout is the simplest, but here you can place everything you need for a good rest. For a small family it is an ideal option. The next project of a 5 by 6 bathhouse differs favorably from the previous one. There is a spacious veranda here. This is the same terrace, only closed. Usually it has large window frames, is insulated and can be used even in winter. The location of a metal or stone stove involves simultaneous heating of several rooms.
Two-story bathhouse. Buildings are becoming fashionable where a complete bath complex is located on the ground floor, and living quarters are located on the second floor. In addition, the construction of such a bathhouse is more economical than the construction of a two-story building.
Layout of a two-story bathhouse
A 5x6 bathhouse with an attic is the best option in terms of saving space. Downstairs there are rooms for ablutions and leisure. The top floor is used as a relaxation room after bath procedures.
The project of a bathhouse with a terrace attracts many. You can place a table and chairs on the outdoor terrace. This will give you the opportunity to relax in the fresh air in the summer after visiting the steam room.
Layout of a bathhouse with a terrace
How to make a gable roof for a bathhouse with your own hands
The work of building a gable roof with your own hands should be carried out in stages. The installation of each element does not require special skills; the main thing is that you need to carefully monitor the quality connection of the elements.
To build a roof for a 5*5 m bathhouse with your own hands, you will need the following materials and tools:
- corrugated sheeting or metal tiles;
- waterproofing material;
- slats – 2*5 cm;
- for sheathing: uncut boards or plywood;
- screws, bolts and washers;
- bars – 5*5 cm;
- metal plates – 2 mm thick;
- metal corners;
- edged boards 3 m long – 2*10 cm;
- unedged boards for intermediate support of rafters;
- spruce or pine boards – 5*15 cm;
- antiseptic for wood impregnation;
- screwdriver;
- knife;
- self-tapping screws;
- hacksaw for metal;
- metal profile scissors
- roulette;
- hammer;
- jigsaw;
- Bulgarian;
- stapler
The entire stage of work can be divided into the following important steps:
- To build a proper roof with your own hands, you first need to install a Mauerlat. The walls on which it will be laid must be waterproofed with roofing felt. For fastening, holes should be made in the timber, and bolts should be used as fastening tools.
- The second step is to install the rafters at the designed angle. Using metal plates, you need to fasten the rafter legs together, then nail the tie. First, you should install the outer trusses, and then stretch a rope between them; it is along this rope that you can easily check the evenness of the further construction.
- To maintain the vertical position of the structure before the sheathing, it must be supported with temporary beams.
- It is necessary to install waterproofing. To do this, strips of material are laid overlapping each other, secured with nails or a stapler.
- Then the sheathing is nailed to the rafter legs.
- You need to install the bottom sheathing yourself, then install the roofing. Strips and sheets must be laid with an overlap of 15-20 cm.
- The final stage of the work is the construction of the chimney.
After the roof of the bathhouse is made, it is necessary to check the main components of the “skeleton”; it is important that the technology is performed correctly.
Log bathhouse 5x6 (sauna made from hand-cut logs): description
A log bathhouse of 5x6 meters is one of the least in demand. A bathhouse of this size is ordered a single number of times during the construction season, probably 15-20 times less often than log houses 6x4 or 5x3 meters. An explanation for this fact must be psychological rather than technical. The fact is that the traditional length of lumber, both logs in the blank and edged (timber, board) is 6 meters. The equipment is configured for this length; trucks used to transport lumber have a length that is a multiple of 6 meters. Therefore, when building bathhouses and houses made of wood, people are guided by the size of 6 meters. Accordingly, they either build a log bathhouse 6x6 meters, or obviously smaller, 3x4, 5x3, 6x4, etc.
We have the opportunity to cut bathhouse logs directly on logging plots, therefore we are not limited to a length of 6 meters, either more or less. When cutting a 6x5 log house, we do not have tails of logs a meter long and we do not write them off as consumables. Therefore, a log house of a 5x6 bathhouse costs exactly as much as a log house with an internal size of 30 square meters should cost. The cost of a log house is calculated, first of all, based on its square footage. If we compare the price per square meter of area, then for a 5x6 log house it is the same as for a 6x6 or 6x4 log house.
In terms of internal layout capabilities, a 5x6 meter log bathhouse is one of the most convenient. If you install the internal fifth wall so that it divides the space into rectangles of 4x5 and 2x5 meters (in fact, you need to move the wall so that 2 meters remain in the cleanliness of the steam room after finishing, that is, the rough width of the room is 210-215 cm), you get a convenient dimensions of a relaxation room, a large steam room, a separate toilet and a separate shower. In this case, the entrance to the log house is made directly into the rest room. If it is necessary to use a log bathhouse in winter as a living space, we recommend combining a toilet and shower, and instead of a separate bathroom, make a dressing room that cuts off cold air at the entrance to the bathhouse.
As standard, a 5x6 log bathhouse, like loghouses of other sizes, is installed on a columnar foundation made of solid sand-concrete blocks 20x20x40 cm. However, according to the practice of recent years, especially after the flood in the spring of 2013, for large loghouses we cannot unequivocally recommend installing a bathhouse on columns. The optimal price-quality ratio is a foundation based on screw piles. You can find out more about this type of foundation on the specialized website, which is our structural division. The recommended installation scheme for screw piles and components (heads, channel) under a 6x5 bathhouse frame is presented on the page dedicated to pile-screw foundations.
A 6x5 sauna is convenient for simultaneous use by a group of 3-5 people. A large recreation room leaves space for a table, sofa, TV, etc. At the same time, the dimensions of the relaxation room do not “infringe” on the steam room, where the L-shaped design of the beds fits with the ability for two people to lie down on the upper tier at once. The maximum number of “seated” places with this arrangement of beds is three, plus one separate “lying” one.
Installation features
There are many options for roof trusses and their attachment to the walls of a building. Which one to choose depends on the parameters of the bathhouse and the future roof, as well as on the experience and skill of the performers. Let's look at the simplest and most common methods that will help even beginners understand this issue.
Rafter structures for roofs with one slope
How to make a pitched roof on a bathhouse with your own hands depends on the size and shape of the box. When the walls end at the same horizontal level, to install a slope, it is necessary to install vertical posts on one of them and tie them along the top with a purlin made of thick timber. The rafters will be laid on it and on the upper crown of the opposite wall or the Mauerlat attached to it.
If a more spacious attic is needed above the bathhouse, racks are installed on both walls, raising the roof to the desired height. Then the gables and side walls of the attic are covered with wood or other material.
Note! If the overlapped span is more than 4-4.5 meters, additional vertical supports must be installed under each rafter.
Tips and tricks
In order to build a gable roof with your own hands with high quality, you need to take into account several recommendations before starting work. They will help to avoid mistakes during construction and increase the service life of the bath:
- Before installation work, you need to carefully study the process of building a roof with your own hands. This will save you from unnecessary expenses and actions.
- To help the gable roof get rid of precipitation, you can make a drain on each side.
- Basalt mineral wool is the most popular roof insulation. It holds heat well and does not contain harmful impurities. When building a roof with your own hands, it can be laid in two layers in a checkerboard pattern.
- Polystyrene foam should not be used for insulation, as it emits phenol vapors, which are hazardous to health.
- Do-it-yourself roof assembly can be done on the ground or in a log house. The second option is preferable, since special equipment will be required to lift the structure from the ground.
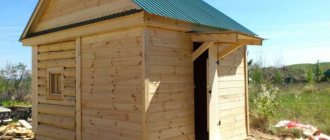
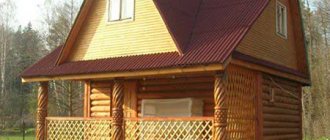
Do-it-yourself options for bathhouses with a gable roof can be seen in the photo:
Owner reviews
The article would not be complete and not very correct if I had not collected for you reviews from the owners of these roofs. I have been sent letters more than once with questions and advice about this roof, and I have put them together for you. I opted for a gable roof because I wanted to organize a full-fledged attic space.
Leave your review in the comments and we will add it to the table!
Read and analyze, and the choice is yours.
| User name or nickname | For or against | Opinion |
| Stanislav Kravchuk | Against | I chose a gable roof for my bathhouse. If you do it, it will be a thorough one, but with a pitched roof there are only problems, it’s on a barn. |
| Cherie | Against | I generally don’t understand people who build pitched roofs for their bathhouses. Well, for starters, it’s not at all beautiful, and secondly, it’s not safe. I have several acquaintances with such roofs, I know what I’m talking about. |
| Anton | Behind | You just need to do it normally, then the pitched roof copes with its functions perfectly. But the fact that the gable is more practical and convenient is yes. |
| Evgeniya | Behind | Any roof will do, as long as snow does not accumulate on it. |
| Alexander | Pros and cons | The optimal solution for small buildings, such as a barn or bathhouse, or as an extension to a house. In all other cases, I would choose a gable roof! |
| Foreman | Behind | An excellent roof option, but there are several features. If the roof slope is less than 14 degrees, then corrugated sheeting should be laid; if the slope is more than 15 degrees, then metal tiles can be laid. If the slope is less than 15 degrees, then water will collect in the grooves of the metal tile, and subsequently dirt and mud. |
Reset organization
Without solving the issue of collecting and disposing of sewage, it is impossible to create a bathroom in a bathhouse. The most reliable and safest in terms of sanitary standards is the construction of stationary septic tanks outside the bathhouse area. They are sealed wells of the required capacity, in which the discharged mass is accumulated and subsequently pumped out by sewer trucks.
In the toilet itself, a standard connection of the toilet bowl to the sewer pipe is provided using standard elements. Next, the pipe is laid in a trench with a slope to ensure gravity flow of liquid (at least 2 mm per meter of length). The depth of its installation must exceed the depth of winter freezing of the soil.
The sewer pipe is connected to a sealed storage tank. A septic tank, as a rule, is made of reinforced concrete well rings with a diameter of 0.9-1.2 m with reliable waterproofing of the joints on the outside. The bottom of the well is filled with concrete 20-30 cm thick and reinforced with steel rods. The top of the septic tank is covered with a concrete slab with a hole for a hatch.
Sewerage diagram for a toilet in a bathhouse with a septic tank and ventilation
When constructing an attached toilet, a cesspool is often used for drainage. The main requirement for it is the tightness of the bottom and walls. It can be made by pouring concrete, from sand-lime brick followed by plaster, in the form of a metal or plastic container. The construction of an attached bathroom begins with digging this hole and arranging it. The advantage of this method is that there is no need to lay sewer pipes.
nuance! When planning storage tanks of any design, it should be remembered that feces tend to decompose, releasing substances harmful to the human body.
To eliminate the risk of poisoning, it is necessary to provide a ventilation duct for the outflow of gases from the storage tanks, and the outlet should be raised above the roof of the bathhouse.