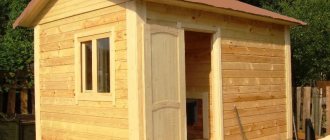
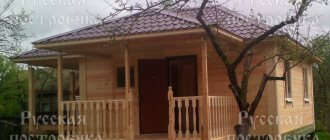
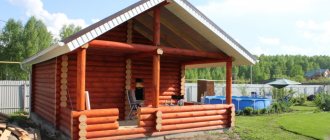
A bathhouse in a country house or on the site of a country house is no longer a dream, but a necessity. The owners of private housing construction develop a construction project in such a way that it includes all the necessary buildings - a garage, a barn, a bathhouse, a pavilion. Therefore, the construction of a bathhouse from timber has recently been rapidly developing and popularizing. But since the land plots are mostly small, the owners choose smaller bathhouse designs, for example, a 100 x 100 bathhouse (beam cross-section) measuring 3 x 3 m with a ceiling height of 2 m. Even in such a small building both a steam room and a shower room will fit , and a rest room. All operations must be regulated by SNiP 31-02-2001. In larger projects, a bathhouse is built from 150 x 150 timber with additional rooms that improve the comfort and functionality of using the building.
You will need
| Construction materials | Units and quantities | Drawing |
| Portland cement grade M 400 | 150-160 kg | |
| Beam with a section of 150 x 150 mm | 3.5-4.0 m3 | |
| Edged board 50 x 100 mm | 0.3-0.4 m3 | |
| Rail with a cross section of 20 x 50 mm | 25-26 linear meters | |
| Lining | 0.5-0.6 m3 | |
| Edged board 25 mm | 0.3-0.4 m3 | |
| Fireclay bricks | 500-550 units | |
| Andulin roofing | 10-11 m2 | |
| Concrete blocks | 30-35 units |
It is also necessary to prepare in advance insulation, nails, electrical wiring and its components, self-tapping screws of different lengths and diameters, corners for assembling the rafter structure, fittings, plastic or wooden windows and entrance, as well as internal doors. In addition, if you plan to connect the water supply to the bathhouse, then you need to think about organizing a sewerage system. For our do-it-yourself timber bathhouse project, plumbing and sewerage were not developed.
Location and size of the bath
To choose the right location for the bathhouse from scratch, look at the diagrams recommended by SNiP.
The size of the bath should be calculated from the following criteria:
- the size of the steam room, which is determined based on the number of people in it at the same time. For two, 3x1.5 m with a height of 2 m will be enough. For four, you will need to increase the dimensions to 2x4 m.
- size of the washing compartment. It is determined from a similar calculation: 2x2 - for two, 4x2 - for four. If you plan to install a hot tub, the dimensions will need to be adjusted to suit the size of the hot tub.
- But the locker room and rest room are calculated based on personal preferences. This could be just a locker room with a bench, or it could be a large relaxation room with a fireplace, massage table, billiards, etc.
Video instruction
How to lay timber and raise the walls of a bathhouse:
Procurement of building materials, cost and estimate:
We build a timber bathhouse ourselves - steps from the foundation to the roofing work:
Any construction of a bathhouse made of timber can be divided into specific stages:
- Pouring the foundation.
- Construction of a timber frame.
- Installation of rafters and roofing.
- Plank flooring.
- Installation of windows and doors.
- Laying electrical wiring, installing lamps and installing other electrical equipment.
- Decoration of internal walls, finishing work on external walls.
Stage 1. Pouring the foundation
The best option to build a bathhouse from timber with your own hands is a concrete base.
Pouring the base
Tool you will need
- Entrenching tool.
- Wooden stakes or fittings, cord, tape measure, level.
- Building material for formwork assembly.
- Reinforcing bars and binding wire for concrete reinforcement.
- Factory-mixed concrete or concrete mixer, shovel, container for preparing mortar, cement, crushed stone, water, sand.
- Waterproofing materials.
The area should be leveled and the perimeter of the foundation should be marked using pegs and a cord. If we are building a bathhouse from small timber, then the foundation will be shallow, and a trench for it can be dug with a shovel. Trench depth – up to 50 cm.
Next, the formwork is installed, the reinforced frame is knitted, the concrete is prepared according to a standard recipe, and the solution is poured into the formwork. While the mixture hardens (about 2 weeks), the foundation is covered with roofing felt.
Stage 2. Trimming and walls of the timber bathhouse
| Construction Operations | How to do |
| Foundation marking | We mark the contours of the base according to dimensions 3 x 3 m. For the internal partition, the foundation is not poured. Pegs are driven into the corners and the cord is pulled. |
| Reinforcement | The reinforced frame is knitted from rods with a diameter of 12-14 mm; knitting wire with a diameter of 2-3 mm is used to connect the longitudinal and transverse rods. The distance from the frame to any surfaces of the trench is 5-7 cm. |
| Pouring concrete | On clay soil there is no need to assemble the formwork - you can pour the solution into the trench right away. The solution is given 14 days to harden. |
| Columnar base for furnace | Economy designs for baths made of profiled timber include a stove that will be built between the steam room and the relaxation room, so that the heat gets into two rooms at once. The base for the stove is buried to the level of soil freezing, the sand cushion under the foundation is 20-30 cm thick. In addition to sand insulation, you can use sheets of foam plastic 2-3 cm thick. The foam prevents the soil from swelling, and the foundation will be stationary. |
| Base waterproofing | The upper part of the base must be protected from moisture. To do this, the concrete surface is covered with two layers of roofing material or thick polyethylene. |
The beams will be connected like this: the ends - half a tree, the corners - a paw.
- It is recommended to saturate the first two rows of beams with antiseptics and fire retardants, and then lay them on roofing felt laid in two or three layers. The lower beam must have markings for the windows and doors of a bathhouse that has not yet been built. The corner connections of the timber are additionally fastened, using dowels or corners. When constructing a 3 x 3 m bathhouse, intermediate pins will not be needed.
- Next, floor beams are laid for the flooring. The distance between the beams is 1.3-1.5 m.
- The gaps between the beams are insulated with tow, flax, jute or more modern thermal insulation materials, for example, tape.
- If, however, there is a need to install intermediate dowels, then they are fastened every 1 m. The dowels can be wooden or metal. At the corners of windows and doors, pins are attached at a distance of 0.2 m from the edge of the opening.
- After building the walls, the ceiling is installed. The beams for it are mounted in two rows from the top edge of the wall, the approximate height of the ceiling that a do-it-yourself log bathhouse will have is 2 m. The beams need to be cut into half a tree; for a small bathhouse in our project, two beams for the ceiling will be enough.
- The remaining two rows of wall beams are laid on the ceiling beams. These two rows should be secured especially firmly, since the last beam will serve as the Mauerlat in the rafter system.
- Before arranging the roof, you need to make at least a temporary ceiling - it can be covered with any boards, since upon completion of the roofing work they will be removed and a permanent ceiling will be installed.
The main problem when building a bathhouse from timber with your own hands is to bring the frame of the bathhouse under the roof so that the rest of the work can be carried out not in the rain and wind, but in a protected room.
Stage 3. Roof
Arrangement schemes are available for single- or double-slope roofs. If we are building a bathhouse from small timber with our own hands (three by three meters), then a lean-to sloping roof option is better suited.
The design of a pitched roof on a bathhouse
Under a pitched roof, the ceiling is immediately made permanent and insulated with foam plastic. The characteristics of the heat insulator are shown in the table below:
| Brand of foam boards | Density, kg/m3 | Compressive strength at 10% deformation, ≥ MPa | Flexural strength, ≥ MPa | Thermal conductivity of dry foam at 25±50С, ≤ W/(m•K) | Foam humidity, ≤%, | Burning time, ≤ seconds | Moisture absorption per day, ≤% | Service life, years (minimum – maximum) |
| PSB – S 15 | 10-11 | 0,05 | 0:07 | 0,037 | 1 | 3 | 1 | 20-50 |
| PSB – S 25 | 15-16 | 0,1 | 0,18 | 0,035 | 1 | 3 | 1 | 20-50 |
| PSB – S 25 F | 16-17 | 0,12 | 0,2 | 0,037 | 1 | 3 | 1 | 20-50 |
| PSB – S 35 | 25-27 | 0,16 | 0,25 | 0,033 | 1 | 3 | 1 | 20-50 |
| PSB – S 50 | 35-37 | 0,16 | 0,3 | 0,041 | 1 | 3 | 1 | 20-50 |
The ceiling is insulated step by step as follows:
- Boards up to 20 mm thick are attached to the beams from below.
- Foam is attached to the boards.
- Boards are also laid on top of the beams.
When building a gable roof, you can install a temporary ceiling, and you can insulate the permanent structure later. It is necessary to build walls, build a rafter system and lay the roof before the onset of frost. Over the winter, the building will shrink and the moisture content of the materials will remain at a constant level.
Video instruction
Ceiling insulation with foam plastic:
Stage 4. Flooring
If you are using bathhouse projects made from profiled timber, floor joists do not need to be installed. The beams are laid in increments of 1 m, and edged boards 30-40 mm thick are laid on them. It is recommended to make a slope on the floor towards the water drainage at 2-30. There is no need to install a sewage system because:
- A shallow foundation will allow runoff to quickly soak into the soil.
- A small log house made from timber with your own hands means minimal water consumption.
Bathroom flooring diagram
Video instructions
How to lay boards on the floor of a bathhouse:
Stage 5. Laying electrical wiring
- After calculating the total power of all electrical appliances, you need to add a reserve of 2-3 kW.
- Electrical cables are divided into categories according to the cross-section of the cores. For example, 0.5 mm2 can withstand ≈ 2.5 kW load. It is better to buy proven, licensed products, since a fake can have a wide variation in power and cross-section indicators. For complete peace of mind, it is better to buy a cable with a margin of these parameters, for example, with a cross-section of 1 mm2 rather than 0.75 mm2.
- It is imperative to arrange general grounding - high humidity and high temperature pose a danger to the operation of the bathhouse. Grounding is done simply and quickly: you need to drive a steel rod with a diameter of 16-20 mm into the ground, the immersion depth is 1 m. A bolt is welded onto the rod, and a grounding cable is connected to it.
- All electrical cables in the bathhouse must be protected by a metal casing - corrugated or solid. The casing will help prevent fire and will also serve as protection against rodents.
- Before laying the cable, draw up a small guide for yourself in the form of a diagram or plan for the location of sockets, lighting fixtures, and other electrical equipment.
- After this, markings are drawn on the walls, holes for fastenings are drilled, and wiring is installed.
Safe grounding
Video instructions
Do-it-yourself wiring in the bathhouse:
Stage 6. More about windows and doors
It is not easy to make doors and windows for a bathhouse yourself - you will need a woodworking machine, experience working on it, and design drawings with exact dimensions. It’s easier to purchase factory-made products, and PVC windows will also be appropriate in a bathhouse. Doors can be wooden, MDF or PVC. Steps for installation of structures:
- Both door and window openings are leveled - sawed, planed, etc.
- Before installing the products, it is necessary to assemble special wooden boxes for them - you will need boards 5 x 15 cm. The frames are assembled on nails, inserting it into the opening, you need to leave a gap of 30-40 mm at the top - the log house may begin to shrink.
- In the openings of doors or windows, wooden frames are also attached to nails or self-tapping screws. The upper gap is insulated with polyurethane foam or traditional thermal insulation materials.
Video instruction
How to install windows in a wooden bathhouse:
Installation of metal-plastic windows
Stage 7. Set of frame and fastening of lining strips
Lining is traditionally used to decorate the walls of steam rooms and shower rooms. For the recreation room, it is allowed to work with any building materials - plywood, OSB, fiberboard, chipboard, plastic or MDF. It’s more difficult to work with lining, so let’s look at this step in more detail:
- For the supporting frame you will need slats with a cross section of 20 x 50 mm.
- First, the outer slats are attached to the wall, a cord is stretched between them, and frame slats are attached along it in increments of 400-500 mm.
- The difference in height between the ceiling and the floor surface in the corners of the bathhouse is eliminated. Discrepancies are leveled by adjusting the lining strips from below and above. It is necessary to leave gaps of 10-20 mm between the lining strips and the floor and ceiling. Subsequently, the gaps will be closed by the baseboards. Ceiling plinths should be attached to the lining, and not to the ceiling boards, otherwise, when the bath shrinks, the lining may bend.
- To install the strips, nails 150 mm long are suitable; they are driven into the grooves of the strips.
Frame diagram for a set of lining strips
Any building materials are suitable for exterior decoration. If you are building a cheap and small bathhouse, then it makes no sense to use expensive cladding. Window and door openings, as well as internal door openings, must be covered with platbands. The availability of cheap and beautiful materials on the market allows you to choose any finish.
Video instruction
Internal thermal insulation of the bath, interior decoration and wall protection:
Advantages
It is impossible not to dwell on a number of features and even advantages of frame baths:
- An important distinguishing feature is that frame baths have a low cost. There is no other way to build a bathhouse from new high-quality materials that would require fewer resources.
- For buildings in the economy version, frame baths have a fairly aesthetic appearance with decent characteristics in terms of resistance to squalls and even hurricane winds.
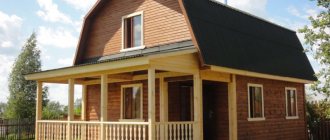
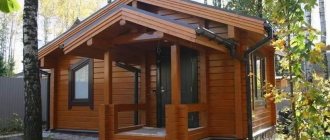
Design and layout of a frame bathhouse measuring 6x3 m
Despite the fact that bathhouses have a high level of fire hazard, all timber undergoes deep treatment with compounds that protect the structure from direct exposure to fire flames.The construction of a frame bath can be completed in the shortest possible time. For example, a building measuring 6x5 or 6x6 m is erected in 5-9 days.
Detailed layout of a 5x6 m bathhouse with a terraceAt a time when the construction of a house has been completed, and the happy owners who have recently moved into it want to quickly invite friends to visit and take a steam bath in the bathhouse, the construction of a frame bathhouse is what is needed.
Anyone can build such a structure themselves without any special skills. A do-it-yourself frame bathhouse is a great way to not only save a decent amount of money on installation, but also gain irreplaceable experience, as well as personally control the quality of construction at all its stages. Frame baths have a very lightweight structure, which makes it possible to avoid the labor-intensive work associated with pouring a strip foundation. In addition, low weight also means virtually no shrinkage. Construction can be carried out at any time of the year, and finishing work can begin immediately after installing the frame of the external and internal walls.
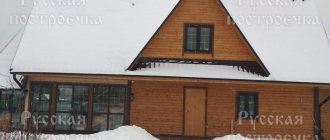
Ready-made project of a frame bath lined with woodFinishing work in frame baths is easy even for beginners. The owner of the house can use any finishing material; he does not need to know how to plaster, as if it were a bathhouse made of blocks or bricks; he does not need to seal the cracks with moss, as when working with a log house. There is a whole range of economy-class finishing materials for budget construction. There are options for people who are not suitable for an economy class building. The construction of the frame is carried out with building materials already prepared in advance by the manufacturer. During installation, you will not need to measure the exact dimensions of the rafters or crossbars dozens of times, since it will be enough to assemble the structure from ready-made parts according to the drawings.
If building a frame bathhouse with your own hands is still beyond your capabilities, then there are many options for ready-made turnkey bathhouses from manufacturers.
So, for example, a turnkey frame bathhouse 6x3 m will cost its new owner about 140 thousand rubles, bathhouses measuring 6x5 m cost from 240 thousand rubles. But for these funds the customer will receive a ready-to-use structure within 2 weeks.
Bath equipment
Bake . Perhaps this is the most important part of the bathhouse. Stove options are varied, from complex stone and brick ones to homemade metal ones.
- The stove is installed on a foundation specially made for it.
- The distance from the stove of wooden structures must be at least 200mm. The wall in places of approach must be protected by special means, for example, a sheet of felt soaked in clay and covered with a reflective metal shield.
- The chimney is made of metal. Its passage through the ceiling and roof should only be through specially prepared openings filled with insulating materials.
The connection of metal parts of the stove and chimney to wooden structures is strictly prohibited.
- For the heater, use only stones that can withstand high temperatures with sudden changes.
Water supply in the bathhouse is carried out in two ways. The first is the connection of a water pipe from the source, and its installation into the building through the embedded casings left in the foundation. Further, it is possible to connect a shower, font, etc. In this case, hot water can be provided by connecting a special heat exchanger to the chimney. The second method is to install tanks for cold and hot water, which will be heated by the stove.
Drainage is carried out through PVC pipes installed on fittings under the bathhouse floor.
Lighting and electrical equipment. All electrical wiring in the bathhouse must be made of cable whose characteristics allow it to function at high temperatures. In addition, be sure to lay it only in a metal hose. All lighting sources must be protected by special bulbs with high-temperature and moisture-proof characteristics. Ideally, you need to install a step-down transformer at 36V.
Interesting: DIY plumbing in a private house
Roof installation
So, what other improvements were made?
Special supports were installed. So that later, when we cover the facade, the plane of the front wall will be ready for covering the facade.
Plus, these supports strengthen the front part of the roof.
There will be quite a lot of snow lying on the roof. And according to calculations, a cube of snow weighs 800 kg closer to spring. That is, on the pediment this load can reach three tons.
Therefore, we made supports for two purposes: to level the façade and to further strengthen the roof.
We laid the film down and made it slightly slouchy.
As a good idea, you need to place a galvanized steel drip under the film so that the condensate that will accumulate on the film flows down this drip.
But my attic is cold, so in my case this is not practical.
First we rolled out the first roll of film, closer to the edge of the roof. Then the second one overlapped it by 15 cm. And the bars were already nailed on top, you can see them in the picture above.
Counter-lattice
It serves to provide a ventilation gap. Otherwise, condensation will form in the space between the film and the main lathing, which will run horizontally on top of the counter-lattice.
If there is no air circulation, the board will rot.