In order for the floor covering to serve for a long time and be durable, the floorboards not to creak or bend underfoot, you must first correctly calculate all the design parameters, including at what distance to lay the floor joists. The correctness of this calculation will determine not only the durability of the floor covering, but also the amount of material used for it, and therefore the cost of the work.
Selection of wooden blocks
Why is the spacing between floor joists so important? The distance chosen between natural wood blocks directly affects the strength of the future structure.
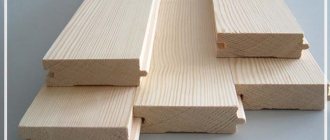
When choosing a timber, such as in the photo, take into account the following points:
- As practice shows, bars for joists should be chosen exclusively from coniferous wood, which has a low cost - this is material from pine, spruce, and fir. When there may be high air humidity in the room, it is better to purchase larch products. Despite the fact that their price is higher, they are not subject to rotting.
- To save money, buy lumber of lower grades, the moisture content of which is no more than 20 percent.
- The bars must be selected exclusively with a rectangular cross-section. In addition, their height should exceed the width by about 1.5 - 2 times. Thanks to this shape and cross-section parameters, the logs can withstand significant loads.
- The dimensions of the bars are chosen taking into account the size of the span, or rather the gap between the wooden elements of the lower trim. You should also take into account the thickness of the thermal insulation material used. If the pitch of the floor lag is 70 centimeters with a room span of 2, 3, 4, 5.6 meters, the cross-section of the products should be 11x6, 15x8, 18x10, 20x15, 22x18 centimeters, respectively.
- In the case where the span width has an intermediate value, you should choose the most approximate option, taking into account the safety margin.
- When buying timber, you need to carefully inspect it so that the material does not have defects. Before calculating the floor lag, you need to take into account a margin of 10-15% (read: “How to calculate the floor lag - possible options”).
Before use, the wood is treated with an antiseptic that protects it from fungi, mold and harmful insects. On the bottom side, the composition should be applied 2 times, but before placing the second layer, you need to give the first 4-5 hours to dry.
Calculation features
Without going into formulas, laboratory calculations and experiments, an experienced installer, carpenter, or laying master is immediately guided by the laws of physics and the savvy developed over years of successful activity. After all, he is faced with the task of making sure that the house, when “legalized” (if it is a country house, without the owner’s registration), does not have any claims from local representatives of government agencies and structures, who will certainly conduct a full-fledged fire-technical examination and cadastral-legal support, so that issue a conclusion on the suitability of the house for year-round use.
Let's explain this with a specific example. So, the house has been built or reconstructed (the plan has been changed). The owner can go two ways: either “insulate” with tiles on expanded clay concrete, or build full-fledged wooden floors. In the second case, for example, the following estimate will help: boards with a section of 4 by 16 cm, logs with a section of 12 by 12 cm. For the floor of the first floor, as well as for basements where a load-bearing subfloor (foundation) already exists, the thickness of the logs is not plays a significant role. The same applies to reinforced concrete interfloor slabs. In general, you can do without lags if the task is not to lay insulation between pieces of wood and reinforced concrete, for example, when a heating cable for underfloor heating is embedded in the screed.
There is a universal recommendation that cannot be violated: a board height of 2 cm will require a distance between beams of 30 cm. For 2.5 cm of the same height, the span distance will increase to 4 dm; for 3 cm - 5 dm of span, for 4 cm take 6 dm. For a 5 cm distance it is already 1 m. Large distances between beams are not practiced in private country construction. The calculation was made for empty rooms, but under heavy load these parameters are noticeably recalculated. The goal is a 3-4 times safety margin; only this rule will ensure the reliability and durability of the floors.
Previously, logs were often used to arrange floors. It must be turned, cylindered and calibrated: constant diameter along the entire length, smoothness, eliminating deviations of the boards. Strict requirements for logs eliminate vibrations even of a tongue-and-groove flooring board.
Today, logs are being actively pushed out of circulation - timber is more often used for joists.
A modern floor satisfies several requirements at once:
- perfectly horizontal flooring;
- additional protection from extraneous sounds;
- ventilation (microcirculation) under the plank floor;
- the purpose of the space under the floor for electrical connections and plumbing;
- additional protection from cold in winter and heat in summer;
- speed of dismantling old and installing new elements when they are deformed.
The timber material will be spruce, pine or fir. The flooring in the bathhouse will require hardwood - it better resists waterlogging and the gradual destruction (rotting) associated with it. Larch, although much more expensive, will last longer. Logs are a material that does not require high quality and ideal appearance: they are hidden under the flooring after the flooring has been installed. The cross-section of timber timber is chosen to be square or rectangular: in the latter option, the thickness of the beam is 1.5 times higher than its width. The beam does not “lie”, but stands on its edge.
For beams, building materials of the 2nd and 3rd grades are taken; the water content by weight in the wood should not be more than 18-20%. This type of wood is classified as wood with natural moisture content. The cross-section of the beam must be rectangular and not square when it is placed between floors without a reinforced concrete supporting floor. This ratio in the cross-section of the beam allows for maximum safety for the owner and occupants of the building, achieving high resistance to possible deflection from increased load.
If you try to imagine more clearly how the decision made will be translated into practice, it turns out that for a living room with heavy furniture and a rich interior, the span between the joists, calculated according to the previous scheme, should be 5-10 cm less than in the bedroom, where heavy items are only a bedroom set and a wardrobe. For the corridor this figure is less - by the same amount as for the bedroom interior.
Some owners of country houses install a wardrobe and poufs in the corridor, but this does not mean that the rest of the load on the remaining area occupied by something is the same: as a rule, little additional pieces of furniture are kept in the corridor, since the corridor is a non-residential space. Consequently, the floor in the corridor does not require major reinforcement, as in living rooms.
Determining the step between adjacent joists
When installing logs on the floor, the distance is determined taking into account the thickness of the finishing coating. Initially, it is planned to lay the wooden floor on joists, and all dimensions are calculated. For example, if thick, durable boards are chosen for the flooring, timber can be used relatively rarely. In the case when the products for laying the floor are thin, then they need to be placed more often.
The table clearly demonstrates how the thickness of the floor board and the distance between the floor joists depend on each other. For example, the product has a thickness of 20, 24, 30, 35, 40.45 or 50 millimeters, then the installation step of the beams should be 30, 40 and 50, 60, 70, 80 and 100 centimeters.
Calculations will help you find out more precisely the distance between the floor joists:
- Let's say the length of the room is 11 meters, and the width of the bars is 15 centimeters. If boards of 25 mm thickness are chosen for the floor, then the lag pitch for the floor made of boards should be 40-50 centimeters or an average of 45 centimeters.
- If the number of lags is designated as x (an unknown value), in this case their width is 0.15x.
- The first wooden products should be installed at a distance of 3 centimeters from the walls, so the step between all elements is equal to the formula 0.45∙(x-1).
- The following equation will help you calculate the distance between the floor joists, in which the length of the room is equal to the width of the bars plus the gap between the joists plus the deviation from the walls. If we substitute the digital values, then we get the following equation with the unknown: 11=0.15x+0.45(x-1)+0.06. Having solved it, you can find out that x (number of lags) = 18.98. Rounding the result, we get 19.
- The total distance between all the bars will be: 11-0.06-19∙0.15=8.09 meters. This value must be divided by the number of steps: 8.09: (19-1) = 0.449. Thus, the distance between the floor joists under the board should be 44.9 centimeters.
Tabular data
Analysis of statistics and calculations based on data on the load capacity of coniferous wood (averaged) made it possible to compile a table of distances between joists and derive a relationship between the thickness of the flooring boards (slabs) and the pitch of the supporting beams.
Important: if the room’s traffic is increased or heavy furniture (equipment) is planned to be installed, adjustments must be made. At the same time, the thickness of the floorboard increases, as does the cross-section of the beams, and the size between the joists decreases.
To install a floor on a solid (reinforced concrete slab) base, the minimum permissible section of the beams and the maximum distance between them are taken. When creating a deck in a frame or wooden house, not only the payload on the deck is taken into account, but also the dead weight of the structure - beams, rough decking, heat, sound and waterproofing, and finishing.
Installation of a frame on wooden floors
Logs on wooden floors of houses are arranged as follows:
- The beams need to be attached to the strapping beams, or rather to their sidewalls.
- The horizontal position of the lags is checked using a control rod; you can omit the use of linings.
- For fixation, screws with a diameter of 6 millimeters are used. It is necessary that fasteners exceed the width of the beams by 2-2.5 times.
- Next, holes are drilled in the joists and beams, and then the wooden products will not crack. The diameter of the drill should be 2.5 millimeters smaller than that of the screws.
- If the beams are located far from one another, it is necessary to install double logs. To do this, one row of bars is attached to the beams, and on top of them the next, but with a smaller step.
What are they needed for?
Properly installed beams and the distance between them ensure sufficient ventilation of the underground space of the house.
Laying wooden beams as lathing under the future floor allows you to strengthen the entire floor structure as a whole. In addition, noise and heat insulation materials are placed in the distance between the joists, which greatly improves the characteristics of the floor.
What methods are there for joining floor boards together?
Properly installed beams and the distance between them ensure sufficient ventilation of the underground space of the house, which means that the wood will not rot over time. Especially if the building is located on an area with high groundwater. How to properly install logs and calculate the optimal distance between the sheathing beams is discussed below.
Fixing the timber to the ground
Joist floors can be installed both on the floors of the building and on the ground.
The sequence of actions is as follows:
- The soil is leveled by hand and compacted. You can use a large log for these purposes - a 5-centimeter thick board is nailed to it from below and, together with a partner, it is moved along the ground and eventually compacted the soil. The board should be taken slightly larger than the cross-section of the log.
- Then the supports for the joists are marked. If the bottom frame beams are chosen as the basis for the frames, the markings can be applied directly to the beams. When the support is a grillage covered with roofing felt on top, marks will have to be made on the material.
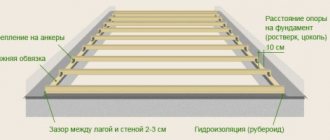
- The gap between the first wooden elements and the walls should be 3 centimeters.
Before installing the pillars for the supports, you need to create a foundation for them. It is equipped either for each element, or poured under a whole row. The minimum parameters of the foundation for columns under logs are 40x40 centimeters with a height of 20 centimeters, and 5 centimeters of them should protrude from the ground.
How to install correctly?
The specialist uses construction script calculators, or, knowing SNiP, calculates all the necessary parameters for flooring and beams on his own. A beginner, as a rule, uses safety considerations: he can easily increase the thickness of the boards by 1.5 times, underestimating the value of the span between the beams. By increasing the cost of installing the floor, the consumer will significantly save on its repair and maintenance: this “investment” will be beneficial here. This approach is often followed by people who, in their old age, do not need hasty repair sessions; they want to live a calm and measured life.
Before fixing the beams, they are aligned using a level gauge. Then, placing the pieces of timber “on their side”, with those closest to the walls being laid at a distance of 10-30 cm. Next, dividing the remaining distance between them by the selected span, their number is calculated. If the master did not fit into this size a little, and instead of the last two spans, say, 50 cm, the result was one of 90, then it is better not to save money and place a piece of timber approximately in the middle that “does not fit” into this gap.
As a result, the last two beams fit into approximately equal spans compared to the remaining gaps. If you are faced with such a non-standard calculation plan in your opinion, then before fixing the lags, move them proportionally; the uniformity of the location is no less important: the centers of mass of the structure will not shift.
An example calculation is specified as follows.
- The length of the room is 9 m.
- The thickness of the board is 2.5 cm.
- The distance between the logs is 22.35 cm.
This distance is taken between the extreme edges of adjacent beams, and not between their centers. For boards, for example, under 40 mm, an appropriate recalculation is made depending on other characteristics of the room finished in the future. The minimum permissible distance between the lags is not defined - reducing the value of this parameter is generally not critical. A thicker board is suitable for the garage.
However, be sure that you cannot drive or park the car on a wooden floor: it is mounted at a level several centimeters lower than the lower edges and edges of the opening doors of the car. This is necessary to prevent accidental collision of the car wheels with such a floor.
But laying a wooden floor, for example, on a balcony is subject to general rules that are valid for rooms - it is only important that the balcony slab itself and the support under it can withstand the load (the maximum limit is calculated according to SNiP standards for low- and high-rise buildings).
It is not recommended to use chipboard for flooring - natural wood is much stronger than glued and compressed sawdust. In addition, manufacturers' savings on the quality of glue have completely transformed chipboard and OSB into low-strength, unreliable building materials. It is used only in places where there is no additional load (walls and partitions, ceiling). However, for beams on a foundation or reinforced concrete floor, you can use laminated veneer lumber. The use of polycarbonate, in general, is not justified for floors: its strength is too low, and it is noticeably more expensive. Polycarbonate is only suitable for insulation (for example, cellular), or, say, for the roofs of gazebos, but not for the floor.
Minor errors in calculations will not reduce the strength of the floor. If you don’t want to count again, then purchase timber with a reserve. Being laid more “frequently”, it will only create the basis for additional reliability, but the installed floor, with timely painting, sanding of old layers of paint and additional priming before subsequent painting sessions, will serve you for a long time - a lifetime.
Foundation structure
Foundation creation technology:
- From the mark on the strapping beams, 20 centimeters are laid on both sides.
- A string is pulled between the marks.
- Similar work should be done in a plane that is perpendicular to the joists. This must be done to mark the corners of the posts installed at the intersection of the laces.
- After the stakes are driven into the corners, the cords are removed.
- If the foundation is arranged under a number of supporting elements, only the outermost ones are marked with cords.
- At the marked place, remove the top layer of soil, tamp it down, pour in a layer of crushed stone and compact it.
- Install the foundation formwork with a height of 10 centimeters. Polyethylene film is placed in the pits to waterproof the concrete.
- The foundation is strengthened with a frame made of 8 mm reinforcement, laying it just below the center of the concrete layer being created.
- Then a solution is poured, the composition is similar to that used for the foundation of the building. It will take several days for it to set.
- Next comes a waterproofing layer of pieces of roofing material measuring 40x40 centimeters. The material is placed directly on the solution.
- Bricks of a grade of at least m-100 are laid out in height in two rows, while the top one must be mounted perpendicular to the length of the beam. They are placed on a sand-cement mortar.
- Waterproofing is laid on top of the bricks, and soundproofing gaskets are fixed on top.
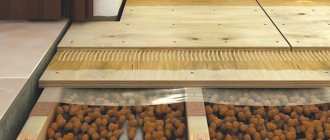
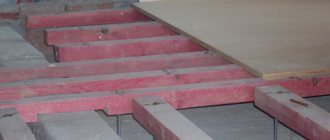
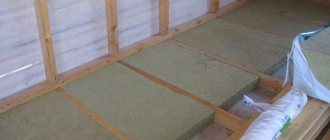
Floor insulation
Warming is also a very important stage. Below, on one and the other side of the wooden logs, support bars 50 × 50 or 30 × 50 mm are nailed.
Next, a roll is laid on the block, which is an unedged low-grade board; its thickness should be 25 mm. Before laying, such boards are treated with a special antiseptic composition to protect the floor from rodents and insects. Self-tapping screws are used to attach the knurling to the bars.
Insulation
Next, a waterproofing membrane with a throughput capacity of no more than 800 g/m is laid on the created bead. It will protect the heat insulator from exposure to moisture. Afterwards, a heat insulator is mounted on the laid waterproofing layer. Considering that today there is a large assortment of insulating materials on the market, there will be no problems with the choice, but you should understand that not every one of them can be used to insulate a wooden floor.
Installation of beams
First, the lighthouse logs located first from the wall are laid. They are attached with a two-meter interval from each other. It is necessary to check the horizontal laying of elements in relation to the ground and one element to another. In the case when the logs are located unevenly, the areas that protrude are removed with a plane, and pads are placed under the sagging parts (for more details: “Arrangement of a wooden floor on logs - laying technology”).
Then intermediate logs are mounted, attaching them to the supports using corners and screws. The fasteners should enter the tree 4-5 centimeters. The other side of the corner is fixed to the support with dowels.
Consequences of errors in calculation
Diagram of the arrangement of a wooden interfloor ceiling.
What happens if you choose the wrong cross-section of the joists and the step between them? When installing floors on a concrete base, the most important parameter will be the pitch between the joists, which determines the behavior of the finishing coating. A chipboard board mounted on joists installed with a larger gap than allowed may sag or break, ceramic tiles may crack, and boards may sag. In any case, the floors will require redoing.
More unpleasant consequences come from errors in calculating the required number of logs used as interfloor coverings. If a larger number of joists or a larger cross-section is used than indicated in erroneous calculations, the strength of the entire structure is significantly reduced, which can lead to irreversible deformations and complete destruction of the floors.
How else can you calculate the size and number of elements for installing a floor using joists?
Not everyone is able to perform the calculation on their own. In this case, you can use alternative options. There are various ways to find the required values, each of which deserves attention
Online calculators and computer programs
Many users turn to online calculators and specialized programs in this case. To calculate the lag parameters, their number and step, you just need to fill in the corresponding cells. The program will display the final value.
PHOTO: itemy.ru Online calculators simplify calculations
Average tables
There are many reference tables containing information relevant to users. In them you can find the recommended cross-sectional dimensions depending on the span length. Based on the selected lag parameters, the pitch between the panels to be laid is selected. The obtained values are averaged and do not allow us to estimate the real load on the supporting elements.
PHOTO: expertbrusa.ru Average tables can be useful
What to consider when making calculations: initial data
To correctly calculate the required number of lags, the following values will be required:
Attention! This data is sufficient to calculate the maximum pitch between the logs and the cross-sectional dimensions of each element.
PHOTO: smetadoma.com Room dimensions - initial data
Material requirements
The best option is to buy ready-made timber. It will already meet all the requirements for density and reliability. Despite this, it is possible to make the timber yourself. The process of forming the product will not take much time, but will require high-quality materials. The wood must have a certain moisture level - 18 or 20%. If this value is higher, the structure of the entire floor will soon deform. This will happen immediately after the wood dries.
As a rule, most buyers choose pine. This material is characterized by increased resistance to all kinds of influences and is quite durable. Fir and spruce are also often used. In general, quality is not considered the main criterion when choosing materials. You can buy both the second and third grade of wood. The whole thing will form a strong structure.
Note! In cases where the repair budget is small, you can use simple boards. They are often fastened together with self-tapping screws. They are placed on the edge.
When installation of beams that are too long is required, a special lock-type connection is used. You can also join the material end to end. In the place where the beams are attached, specialists install a stable support. Small brick pillars often serve as such support.
Types of control systems
Adjustable logs are mounted using various fasteners, which we will discuss in more detail.
Plastic bolts
Adjustable plastic supports for joists are sold complete with fasteners. It contains plastic bolts and fasteners. Assembling joist structures using these adjusting fasteners is surprisingly simple:
- Holes are made in the joists for installing adjusting screws in half-meter increments.
- Bolt threads are cut into these holes.
- Bolts are screwed into the prepared threaded holes.
- The logs are installed with a distance of 50-60 cm from each other.
- The holes on the joists must correspond to the holes on the concrete base, onto which special fasteners are installed.
- Rotation of the polymer bolt adjusts the joists and levels the base. After obtaining a flat surface, excess parts of the bolts are removed with a chisel.
The plastic support allows them to be installed both with joists and under plywood floors, which are laid directly on concrete without the use of wooden joists. Fasteners are mounted into plywood and onto the surface of the base in the same way.
Holes are made on the plywood in 50 cm increments into which the flanges are secured.
A threaded flange regulates the height of the slabs.
Using plastic bolts is convenient, but not all hardware stores can find such fasteners, so anchors are used.
Adjustment with anchors
If wedge anchors are used to change the height of the base under the logs, then it contains a couple more washers and nuts. In such logs with a cross-section of 50x50 mm, holes are made for fasteners with a distance of 50 cm.
Washers are inserted into the anchors inserted into the prepared holes and nuts are screwed on.
The holes made on the bars must have a secret niche with a diameter of 20 mm and a depth of 10 mm, into which fasteners are driven so that they do not touch the flooring over the subfloor joists made of plywood.
After this, the logs are placed on the anchors so that the prepared nuts with a washer on the log are on the side of the concrete base. Rotating the nut will allow you to adjust the height of the joist. The upper fastening nut is designed to secure the lag.
After installation is completed, excess parts of the anchors are cut off. To do this, use a grinder or a hacksaw.
In a similar way, anchors are used to adjust the plywood base without the use of joists. The technology has some differences. For example, support nuts are embedded at the required level before laying the plywood sheets.
Adjustment with studs
Installation of an adjustable floor on studs is similar to installation of anchor adjustment systems. A stud is added to the anchor set. A pin is used with a diameter of 8 mm. The remaining fasteners (anchor, nuts and washers) are selected to match the size of the stud.
Holes are drilled in the base and anchors are installed in them. A pin is screwed into the anchor. A nut is installed on the stud and a washer is put on it. The upper nut serves as a clamp for the beam. As in other cases, excess pins are trimmed.
The use of the stud is made difficult by the use of anchors. Installing anchors takes the most time because it is the most difficult part of the job. Due to the hollow structure of the floor slab, the sleeve may fall into it. Therefore, it is advised not to push it too far into the floor slab. In addition, the reinforced floor slab system can also become problematic areas for anchor installation.
Adjustment by corners
The use of corner fasteners is possible. They are fixed to the concrete base with dowels. Corners are selected as necessary to raise the floor above the concrete base, but with a cross-section of at least 50x50 mm. It is more profitable to use corners if the anchor system holds less well due to a weak base.
Fasteners are installed along the line with an interval of half a meter. A block with a previously checked and set level is fixed into the installed corners. At least a couple of people are needed for installation.
To give strength, similar corners are installed on the other side of the wooden blocks.
Attachment to base
When the owners of a private house or apartment need to replace or install floors from scratch, the log structure will be universal for any type of foundation. It is perfect for such types of base as:
In order to choose one of the types, it is necessary to take into account the operational features of the finished surface. The only thing that remains virtually unchanged is the installation principle. All technology is suitable for any base.
Wooden base
Installation of joists under wooden floors can be performed in a wide variety of buildings. This could be a house made of brick, wood or reinforced concrete panels. This type of foundation requires a competent approach and consideration of climatic conditions.
You can use plywood or OSB boards as the base. This configuration allows you to deploy special insulation in free space:
If you have insulation material, you should take care of waterproofing.
The first stage of installation is taking measurements and applying markings. Having prepared all the necessary tools, you can gradually install the logs. Professional advice: a beginner should never rush. Correcting errors will significantly prolong the floor installation process.
Installation starts from the edge of the room. Using metal squares, you can speed up work and also make the structure as stable as possible. When adjusting one end of the joist, you need to follow the marks on the wall. If you do not tighten the screws of the outer beams, they can be adjusted relative to the plane in the future.
After installing the end products, you should tighten the threads or rope. The rest of the beams are installed on them.
After fixing the products, you need to lay out all the thermal insulation along with waterproofing materials.