Wooden floors on joists are one of the oldest methods of flooring and the only one used in the northern regions of our country. Modern materials have only improved ancient technologies, due to which the scope of applications has significantly expanded and performance indicators have improved. Before proceeding directly to the consideration of various options, you should familiarize yourself a little with the engineering requirements for calculations.
Installation of wooden floors on joists
Reasons for the popularity of log structures
General recommendations
Make sure the wood is dried and treated with antiseptic or bitumen.
This will significantly extend the service life of the structure. When the humidity is more than 20%, the tree can become warped, compromising the integrity of the structure. Boards brought from a warehouse should lie at room temperature for several days. This is especially true during the winter season. It is not recommended to lay the floor when the air humidity is less than 60%. You should not saw or plane boards in the room where the floor is being installed. Sawdust can cause rot.
Use the rule after installation. Lay it across the beams, remove gaps, leveling the height. This is easy to do with the help of special modern adjustable fasteners that have appeared on the construction market. The floor is laid only after all leveling procedures.
The smaller the pitch, the longer the floor will last. However, the main indicator of durability is the material of the coating and base. The most durable wood is larch.
The installation of beams is usually carried out along the window, i.e. across the room. The floor boards are then placed along the length of the room, i.e. from the window. However, this is just a recommendation and a matter of taste.
A board is attached to each beam. Holes for screws should be drilled in advance to avoid delamination.
The most common option for the space between the joists is from 50 to 56 cm. As a rule, it does not exceed a distance of 69 cm.
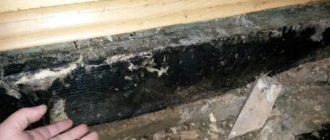
Removing joists and wooden floors is quite simple. It is necessary to remove all the furniture from the room, remove the baseboards, and open the boards or sheets of chipboard. After inspection, the old boards are replaced with new ones. The logs themselves can be partially replaced. Simply cut out a piece of rotten wood and install a new one.
Don't forget to use a protective impregnation on new boards. Check the ends of the beams for rot, and inspect the base insulation, if any. Repairing the floor can be a reason to insulate your home.
Attaching the floor board
An example of laying a tongue and groove board using a clamp and wedges.
So, all you have to do is attach the floor board to the joists. Here you need to follow some recommendations and then your wooden floor will be reliable, strong and stable under maximum load.
- Boards are attached to wooden beams using nails, the length of which is twice the width of the board.
- Before you start laying the boards, you need to prepare holes for fasteners by drilling. It is important to make the holes 1-2 mm smaller than the thickness of the nail. This will prevent the floorboard from splitting.
- Ideally, the length of the boards will clearly fit into the parameters of your room and you will not have to splice the floorboards. But if, nevertheless, it was not possible to find a board of the required length, then the two boards need to be joined directly on one of the floors. This will prevent the floorboard from bending over time.
- It is necessary to attach floor boards to all joists.
- The finished floor covering must be treated with a special varnish or drying oil.
- We cover the joints between the wall and the floor with a beautiful wooden plinth or batten.
Important: the boards can be secured to the beams with self-tapping screws either at an angle of 45 degrees, or with subsequent treatment of the caps with a special sealant. And when laying floor boards, do not forget to leave 1 cm between the walls and the floor covering.
Floor joists: dimensions, installation
As a floor joist, you can use timber of grade 2 or 3.
Joists are long beams of a certain cross-section and made of various materials. In construction, you can use a support made of metal, plastic, reinforced concrete or a compound containing synthetic resin. However, most often craftsmen use wood logs due to their reasonable cost and fairly good technical characteristics.
Wooden floor joists can be made from various softwoods or from more moisture-resistant larch. The latter is considered the strongest and most durable material for making timber.
Important: grade 2 or 3 timber can be used as a floor joist. This will not affect the quality of the wood floor lathing in any way. But you need to pay special attention to the moisture content of the board. Since material with a moisture content above 20% is at risk of shrinking and drying out during its service life. Is it necessary to talk about what will happen to the floor then?
Wood selection
Unplaned boards or timber made of deciduous or coniferous trees can be used under the logs.
Coniferous trees are cheaper, the most affordable are spruce and pine.
Coniferous timber
This material has sufficient strength, but is more susceptible to the destructive effects of a humid environment than hardwood. It would be justified to use pine needle material in heated, dry rooms.
Hardwood flooring is more expensive due to the higher price of the material. But a structure made from such wood has good biostability and is much better resistant to rotting processes.
The main disadvantage of this material is its low bending strength, so it is necessary to use logs made of deciduous trees with caution when large loads on the floor are planned. It is not recommended to use soft-leaved trees - linden and poplar.
Siberian larch combines all the beneficial properties for lags. This coniferous tree is not afraid of moisture and has good strength, which only increases over time. Even when building materials from Siberian larch are used in a bathhouse, the structure will last for several decades without loss of performance.
Siberian larch timber
Higher costs for such material are paid off due to its durability.
Wood moisture content
An important parameter of wood used in construction is humidity. It should not exceed 20%, the optimal value is within 12%.
There are several ways to determine the degree of saturation of wood fibers with water.
Visual method
The simplest, but not accurate, methods for determining the moisture content of a material can be:
- by sound when struck with a hammer: dry timber is louder;
- milling timber: when drilling, material that is too saturated with water leaves a wet halo around the hole, if it is overdried it smokes, but with normal humidity there are no traces left.
- removing thin shavings with a plane: the shavings of raw wood crumple, while those of dried wood, suitable for use, break and crumble.
- chemical pencil - on too wet wood, a line drawn with a pencil along a fresh cut will turn blue.
Knowing the type of wood, experienced carvers can determine the degree of its saturation with moisture by color, weight or transverse and longitudinal cracks.
Defective timber with high humidity
Calculation method
This method is based on weighing a test section of timber, before and after drying. The algorithm is as follows:
- At a distance of at least 30 cm from the end of the block, a segment up to 2 cm wide is cut out.
- The thoroughly cleaned section is weighed on an accurate scale, with an error of up to hundredths of a gram, and the resulting value is recorded.
- A piece of timber is placed in a dryer (chamber or oven) with a constant temperature within 100°C.
- After 5 hours, the sample is weighed and the result is recorded.
- Subsequent measurements are taken at intervals of 1-2 hours until there is no change in weight readings.
Next, the absolute humidity of the material under study is calculated using the formula:
W = (m – m0) × M0 × 100%,
where m and m0 are the mass of the test section before and after complete drying, respectively.
Using an electronic device
For instrumental, most accurate determination of wood moisture content, electronic moisture meters are used.
They can take measurements of any type of wood in various conditions. The principle is based on the dependence of the electrical conductivity of the material on the degree of saturation with moisture.
Needle moisture meter for wood
Contact (needle) and non-contact moisture meters are more often used in everyday life.
In the first version, the needles of the device are inserted into the wood and the moisture content is measured at this point, the readings are displayed on the indicator. Using the temperature correction table, updated wood moisture content results are determined.
Non-contact moisture meters analyze the dielectric constant of wood, based on which the percentage of moisture it contains is determined. The readings of these devices are not affected by the temperature of the wood and the surrounding air, so temperature correction is not required.
Using in practice knowledge about the moisture content of the timber from which the base for the floor is mounted is very important. Wood dried to normal values has significantly higher performance qualities:
- strength;
- resistance to decay;
- durability.
Structures made from damp wood create a greater likelihood of subsequent deformation, which can lead to damage to the flooring.
Floor deformation on wet timber
What are they needed for?
Properly installed beams and the distance between them ensure sufficient ventilation of the underground space of the house
Laying wooden beams as lathing under the future floor allows you to strengthen the entire floor structure as a whole. In addition, noise and heat insulation materials are placed in the distance between the joists, which greatly improves the characteristics of the floor.
Properly installed beams and the distance between them ensure sufficient ventilation of the underground space of the house, which means that the wood will not rot over time. Especially if the building is located on an area with high groundwater. How to properly install logs and calculate the optimal distance between the sheathing beams is discussed below.
Installation of beams
First, the lighthouse logs located first from the wall are laid. They are attached with a two-meter interval from each other. It is necessary to check the horizontal laying of elements in relation to the ground and one element to another. In the case when the logs are located unevenly, the areas that protrude are removed with a plane, and pads are placed under the sagging parts (for more details: “Arrangement of a wooden floor on logs - laying technology”).
Then intermediate logs are mounted, attaching them to the supports using corners and screws. The fasteners should enter the tree 4-5 centimeters. The other side of the corner is fixed to the support with dowels.
Material for making logs
Logs can be made of metal or reinforced concrete, but these materials are used extremely rarely. More often you can find plastic logs, which are the easiest and fastest to install. But the undisputed leader among materials for logs is wood - thanks to its low price.
Timber is used as lag
. in its absence, hewn logs will do. Another option is boards sewn together in pairs, approximately corresponding in the end to the required cross-section of the timber, which are installed on the edge. Before installing wooden logs, they must be thoroughly dried and coated with a special antiseptic or bitumen, as well as a fire-fighting compound. Such actions will significantly extend the service life of the entire floor structure.
Features of the materials used
Wood moisture content should not exceed 20%
Purely theoretically, logs can be made from almost any material:
- metal; plastic; wood; compound.
But the fairly high price of most of the above building materials makes them uncompetitive in comparison with wood. That is why, as a rule, a thick board or timber is used to assemble a wooden frame. But this material also has one significant drawback - hygroscopicity.
Therefore, when choosing beams for flooring, it is advisable to choose only the type of wood that is less susceptible to rotting and deformation. Which wood should you choose?
Larch would be the best option, but it is quite expensive. A more affordable alternative would be pine or spruce. At the same time, resin pockets and minor defects on the timber do not in any way affect its technical performance.
But do not forget that the material must be durable and resistant to deformation. Based on this, it follows that you cannot save on the strength of the lags. The moisture content of the wood should not exceed 20%, otherwise, during the drying of the wooden frame, the logs will bend, which will affect the horizontalness of the laid finishing coating.
Table of the ratio of the cross section of the logs with the length of the span between them
Calculation of the optimal cross-section (thickness) of the joists for the subfloor is carried out taking into account the following parameters:
- Maximum floor load; Span width between adjacent support points.
Important! To assemble a wooden frame, logs with a rectangular cross-section are used. In this case, the larger side of the beam should be located vertically. Thus, the floors acquire greater rigidity, which reduces the possibility of deformation to a minimum.
To understand what the cross-section of a beam should be for different spans, consider the typical dimensions of beams for flooring in residential premises:
Span, mSection, cm210x6315x8417x10520x14
In other words, the calculation of the optimal section is determined by the following expression: the height of the beam should exceed the width by approximately 1.5 times. However, there are some nuances here that are worth knowing about.
The greater thickness of the board inevitably affects its price. To reduce the cost of purchasing logs with a large cross-section, in the process of arranging a wooden frame under the beams, you can make supports from concrete or bricks. If the supports are placed at intervals of approximately 1 m, the thickness of the beam can be reduced by half.
In some cases, the thickness of the joists is determined by the type of material from which they are made. Very often, when arranging the floor of the second floor of a high-rise building, reinforced concrete floors are used as beams. The optimal thickness of metal elements is determined by its bending strength.
What should be taken into account when making calculations?
When performing the calculation, the following factors are taken into account:
- thickness of the flooring material (chipboard, boards, etc.);
- approximate step between floor joists;
- expected specific maximum load on the floor.
All these parameters will determine the cross-section of boards, timber and other lumber used to construct the floor.
When calculating what distance should be between the floor joists, it should be remembered that the outermost joists cannot be placed further than 30 millimeters from the walls; an allowance must be made for this in the calculations.
As a result of calculations, the result is usually not a whole number, but it should always be rounded up so that the actual number of lags does not turn out to be less than the calculated one. Otherwise, the strength of the floor structure may not be sufficient, especially considering that such savings will be completely insignificant compared to the likely risk.
The cheapest floor joists can be found at sawmills, followed by online construction stores.
When it comes to floor installation, it is not recommended to save too much. The logs must have not only a suitable cross-section, but also sufficient density. If you make the lag step for a floor made of boards too large, the boards will begin to sag and “play.” Likewise, if the distance between the joists for an OSB floor is made greater than acceptable, then the slabs will begin to crumble and crack.
Professional advice on choosing lags
Coniferous wood should be used for logs.
Larch logs
If possible, materials should be impregnated with antiseptics. These are very effective means for protecting wood not only from fungi, but also from many pests.
wood antiseptic
Antiseptic for wood
Antiseptic
Always select joists with a safety margin, especially in cases where the installation method involves bending loads. It must be remembered that correcting mistakes made during the construction of flooring always costs much more than carrying out the work with high-quality materials and in compliance with recommended technologies.
Logs from boards
Choose your joist boards carefully. They must be absolutely healthy without signs of rot. The presence of through cracks and rotten knots is completely prohibited. If there are large healthy through knots, then you need to install the joists in such a way that there is a stop under them.
When attaching the logs, do not allow the possibility of wobbling.
Fix the joists firmly
Most loose joists cause very unpleasant squeaks in the flooring while walking. To eliminate such phenomena, you will have to remove floor coverings; this is time-consuming and expensive; it is not always possible to keep the dismantled materials in a condition suitable for reuse.
Section and dimensions of the logs
The reliability of the structure will depend not only on the choice of material, but also on how to choose floor joists, calculating them correctly. Even before purchasing a timber, you need to calculate its length and cross-section:
- The length of the floor joists must correspond to the dimensions of the room in which the floor will be installed, but at the same time be 20-30 mm less in order to prevent deformation from temperature changes.
- For the logs, rectangular beams with an aspect ratio of 1.5 x 2 are used. If the floor rests on wooden floor beams, then the cross-section of the logs will depend on the length of the span between adjacent elements on which the logs will rest.
When insulating the floor
In the case of insulating the floor with heat-insulating material, it is necessary to leave a ventilation gap between the insulation and the finishing coating, which has a thickness of at least 2 cm, and even better - 3-4 cm. Therefore, the timber in this case must be taken taking into account this addition to the ventilation gap.
When installing joists on the ground
And if the logs rest directly on the ground, then you will need to additionally take into account the thickness of the knurling, which is laid on the cranial bars attached to the logs. It is best to buy timber whose cross-section has some margin.
If the floor is laid over an earthen base, then you can save on expensive large-section timber. It can be replaced with thinner timber, laid over shorter spans, and supported on brick pillars dug into the ground. The distance between the pillars should be 120 cm, and they themselves are made of red brick, since silicate brick can only be used in cases where the aquifer is deeper than two meters.
Of course, reinforced concrete or metal floor joists will have a smaller cross-section, because they are much stronger than wood and bend less.
How to strengthen genital lags
Reinforcement of the joist system is carried out to increase the safety margin or strengthen its individual sections if they are damaged.
There are several options for strengthening:
- installation of one or more additional supports under the beam, first leveling the system in a horizontal plane using a jack;
- installation of wooden or metal plates on one or both sides of the beam, fastened with bolts and washers;
- replacing the damaged area with a prosthesis made of a metal rod or channel;
A modern way to strengthen the beams is to reinforce the timber with carbon fiber, fixed with epoxy glue.
Reinforcement of beams with carbon fiber
Carbon fiber is glued in several layers until the required rigidity of the beam is achieved. Light weight, which does not burden the structure, and ease of operation make this material popular.
Technical characteristics of logs and requirements for their installation
Logs are distinguished from beams by their smaller size and mobility. If beams cannot be moved after installation, and repairs are very long and labor-intensive, then logs are a mobile architectural element. They are much easier to install and, if necessary, repairs are carried out faster.
Distance between joists
Optimal section proportions
Before you start building a floor, you need to study the requirements of regulatory documents for the size of the joists and the distance between them, taking into account the thickness of the floorboards.
Table of lag sections at a pitch of 70 cm
- Distance between joist supports
- Linear dimensions of logs
| 200 cm | 110×660 mm |
| 300 cm | 150×80 mm |
| 400 cm | 180×100 mm |
| 500 cm | 200×150 mm |
| 600 cm | 220×180 mm |
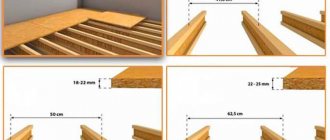
Table of distance between joists depending on the thickness of the board
- Thickness of pine floorboard, mm
- Distance between adjacent joists, cm
| 20 | 30 |
| 25 | 40 |
| 30 | 50 |
| 35 | 60 |
| 40 | 70 |
| 45 | 80 |
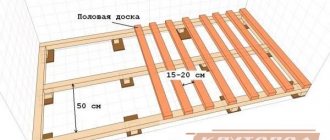
In order to learn how to independently make calculations based on tables, it will be useful to consider a simple example. Initial data: the length of the room is 10 m, take a floorboard 30 mm thick.
floorboard
Lags
Batten
Calculation method
According to the table, with such a thickness of the board, the distance between the logs is 50 cm; with a room length of 10 m, 20 logs will be needed. The distance between the logs and the walls cannot exceed 30 cm. This means that we will have to increase their number by one piece, the distance between the others will decrease to 45 centimeters.
Important note. During calculations, all roundings should be done only downwards, thus creating an additional margin of safety.
There is no need to calculate dimensions and distances accurate to the millimeter; no one takes such measurements. By the way, during construction, the vast majority of architectural elements and structures are measured in centimeters, the greatest accuracy is half a centimeter. Millimeters are almost never used during measurements.
Floor joists
A wooden beam of rectangular cross-section can be used as a log
What can an error in calculations lead to?
What could be the consequences of incorrectly selecting the cross-section of the lags and calculating the distance between them? If the floors are laid on a concrete base, then the most important thing in this case will be the size of the step between the lags, which directly affects the behavior of the floor covering. If you attach a chipboard board to joists that are installed too sparsely, it can sag and even break. If ceramic tiles are placed on top, they will crack or fall out. The boards will simply “walk” and sag. Any of these options will require rework.
It will be much more serious to make a mistake at what distance the floor joists are placed, which at the same time serve as elements of interfloor ceilings. If in this case an insufficient number of such load-bearing elements is installed, the strength of the building structure itself will decrease, which is fraught with the most serious consequences - from irreversible deformations to complete destruction of the floors.
Do you have experience installing joists? Do you do calculations or just use tables? Write about it in the comments.
Advice from construction experts
It is necessary to build a support at the boundaries of the joints of the boards
It is recommended that the installed type of structure be solid and not consist of many sections, due to this the load-bearing capacity of the entire floor as a whole increases. It is necessary to build a support at the junction point. In general, it is best to secure the support in the form of a pillar. Usually the logs are connected using galvanized plates.
It is imperative to take into account the distance between the floor joists. Among experienced builders, the space used between two or more beams is designated as a pitch. Typically, the pitch size is directly related to the thickness of the black decking. The smaller the sectional size of the floor covering, the narrower the step between all the beams.
Using a special table located above, you can follow a certain sequence. If you use boards of increased thickness, then the distance will also increase proportionally.
Since a coating such as plywood is a resistant material, in this case the step must be increased. With a thickness of 20 mm, the step will be 42 cm. Each laid sheet should be secured to different logs. Do not forget about securing the edges and the center; in this case, you can extend to half the board. For all the details and useful tips on laying wooden floors, watch this video:
Everyone knows that logs are made from coniferous trees, because their resin content provides protection from moisture penetration and service life.
In order for the flooring on joists to be installed correctly in complex operational areas, it is necessary to use trees such as larch, because this type of wood has high moisture resistance.
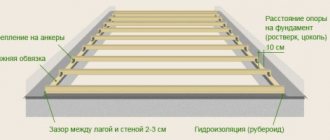
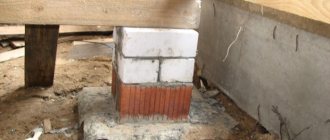
Foundation structure
Foundation creation technology:
- From the mark on the strapping beams, 20 centimeters are laid on both sides.
- A string is pulled between the marks.
- Similar work should be done in a plane that is perpendicular to the joists. This must be done to mark the corners of the posts installed at the intersection of the laces.
- After the stakes are driven into the corners, the cords are removed.
- If the foundation is arranged under a number of supporting elements, only the outermost ones are marked with cords.
- At the marked place, remove the top layer of soil, tamp it down, pour in a layer of crushed stone and compact it.
- Install the foundation formwork with a height of 10 centimeters. Polyethylene film is placed in the pits to waterproof the concrete.
- The foundation is strengthened with a frame made of 8 mm reinforcement, laying it just below the center of the concrete layer being created.
- Then a solution is poured, the composition is similar to that used for the foundation of the building. It will take several days for it to set.
- Next comes a waterproofing layer of pieces of roofing material measuring 40x40 centimeters. The material is placed directly on the solution.
- Bricks of a grade of at least m-100 are laid out in height in two rows, while the top one must be mounted perpendicular to the length of the beam. They are placed on a sand-cement mortar.
- Waterproofing is laid on top of the bricks, and soundproofing gaskets are fixed on top.
Installing floors on joists
Now let's take a closer look at how the floor is installed on joists.
Preparations for work involve more than just purchasing materials. This also includes purchasing the necessary tools and processing the base with materials. Let's talk about everything in detail and in order.
There is nothing special here; almost everything can be found at any home craftsman. The rest can be purchased, rented or found from friends.
Table 1. Required tools
- Tool, photo
- Description
| Roulette | When setting lags, accuracy and consistency are important. It is necessary to check the distance between them, otherwise problems may arise with the installation of the rough coating and its operation. If the distance is too large, the floor will sag. You can add other marking tools to the tape measure: a carpenter's square, a long ruler (guide) and a pencil. |
| Hand saw for wood | Both the joists and the flooring material will need to be adjusted to the required dimensions. In many cases, a hand tool will be sufficient. Even if you plan not to use it, you should still have it in reserve. |
| Electric jigsaw | While you can cut bars and boards with hand tools, this will not work with sheet material. For plywood, and even more so OSB boards, you cannot do without a power tool. It must have a powerful motor and a convenient cutting guidance system so that the work proceeds quickly and accurately. Advice! Buy several replacement wood files, as they may burn out during intensive use. Do not buy cheap consumables from Chinese manufacturers, as they are extremely unreliable. Pay a little extra and take products from the same Bosch company. |
| Stationery knife | This tool is an indispensable assistant for any installation work. In our case, it will be useful when laying mineral wool for insulation. |
| Hammer | The hammer drill is also extremely versatile and comes in handy almost always. It will be useful to us when we need to permanently tie the logs to the base with anchors. |
| Spray | In certain cases, both the base and the logs themselves are recommended to be treated with special impregnations. They can be applied with a brush or roller, but it is most convenient and quick to do this with a sprayer. This device also allows you to significantly save fluid consumption. |
| Screwdriver | The flooring is securely attached to the joists. Self-tapping screws, or less often nails, are used for this. In the first case, you will not be able to do without a screwdriver. It is worth purchasing a tool with good traction so that it can cope with wrapping long hardware without any problems. |
Additionally, you may need other tools, for example: a hammer, a nail puller, a steel knife, etc. Here everyone looks for themselves, depending on the situation.
Table 2. Required materials
Materials, photosDescription
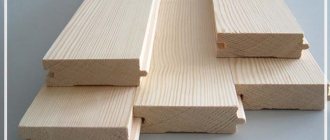
| Wooden beam | Logs, as already mentioned, are durable boards or beams. It is worth purchasing clean lumber, with good geometry and a polished surface. The choice must be made responsibly. When purchasing, check each beam for curvature and select the best material. This will not cost you anything except the extra five minutes spent, but this will speed up your work many times over. For joists, it is best to take wood that is resistant to moisture. These include affordable pine. |
| Flooring | We will consider plywood as a priority, since this is the material that is used most often than others. The standard sheet size is 1525*1525 mm. The thickness is selected individually, but you should not buy material thinner than 16 mm, as it will sag significantly under load. The optimal thickness would be 20 mm - with this type of flooring, the distance between the joists can be safely made 50 cm. |
| Biological wood treatment | Floor joists can begin to rot over time, especially if there is a risk of moisture getting inside. Also, wood-boring insects can settle in the tree, which in a short time will render the entire system unusable. To maximize their service life, the wood must be treated with an antiseptic and biocidal composition. Impregnation with fire retardants to protect against fire will not hurt either. |
| Antiseptic primer | Mold can also appear on concrete foundations. Of course, it will not rot like wood, but only multiplying microorganisms will begin to enter the air you breathe, which is unpleasant and harmful. Therefore, before installing a lag floor, it is worth treating the base. |
| Polyurethane foam | Concrete floor slabs may contain severe surface damage. There may be joints on them if a concrete screed has not yet been made. All this significantly reduces the level of sound and heat insulation. We will fix the problem using polyurethane foam. By the way, it’s worth purchasing a special pistol for it. |
| Wood screws | We will connect the flooring with the joists using self-tapping screws. Usually oxidized (black) ones are used, but you can also use galvanized ones - they are much more reliable and are not subject to oxidation. The amount of fasteners is difficult to calculate, so buy it in packs. |
Again, we have named only the main consumables; you may need something else. Everything is decided directly on site.
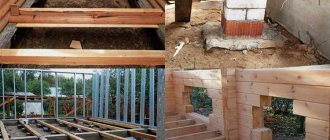
So, let's get straight to the workflow. We start by preparing the foundation.
Step 1 – wet the concrete
We start by inspecting the concrete floor for damage. As you can see, we had several holes like this in our slab. Under no circumstances should you leave them, we fill everything with foam.
In order for the foam to adhere well to the concrete surface, it must first be moistened, which is what the master in the photo does. Water from the sprayer is sprayed inside the holes and along the edges from above.
Why do this? The fact is that polyurethane foam hardens and gains strength by coming into contact with moisture contained in the air, that is, water is the catalyst for the process, which means we thus enhance the effect and accelerate it.
Step 2 - filling the cavities with foam
Immediately after applying water, fill the holes with foam. Please note that professional material is used. It has low secondary expansion and is consumed much more economically. So if you have a lot of work, buy a foam gun and use it. It’s more convenient and cheaper in the end.
Advice! After use, the gun must be purged with a special cleaner that is screwed onto it instead of foam.
Step 3 – dry cleaning
After all the procedures described above, the floor should be cleaned of dirt and dust. For this we use a brush, or better yet, a construction vacuum cleaner. Cleaning is necessary for the next stage.
Step 4 – priming
Next, the concrete must be treated with antiseptic primer. We do this with the tools you have. Do not skimp on the composition, as it should be enough for high-quality impregnation.
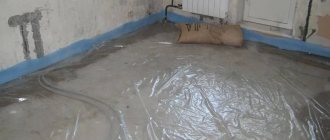
Step 5 – work with communications
Now the craftsmen are strengthening the previously laid pipes through which the coolant will circulate from the boiler to the heating radiators. The pipes are laid around the perimeter of the room so that they do not interfere with the installation of the joists. If this is not possible, then it is necessary to accurately calculate the position of each element so that later there are no intersections with communications.
Please note that the craftsmen fix the pipes using special clips. They lay a thermal insulating tape (penofol) under them so that all the heat during the winter season is reflected upward, and the concrete, which is unnecessary in this case, does not heat up.
Step 6 – treatment of timber with impregnations
We have already written about the need to treat logs to prevent their premature damage by microorganisms and insects. This procedure is performed at this stage. Everything is done outside so that the material dries quickly and the master does not inhale the chemicals.
After processing, the wood needs to dry. The instructions on the impregnation packaging will tell you the exact time.
Determining the dimensions
No less attention should be paid to the size of the selected logs. The fact is that this directly affects the reliability of the floor structure. Before you go to the store to buy timber, you need to accurately calculate its thickness and length.
How to calculate the length?
Determining the length of the varnish is quite simple. Attention must be paid to the direction of installation. All you need to do is measure the length or width of the room in which you are going to lay the floor. It is best to choose floor bars that are not of exact dimensions, but 2.5-3 cm less than this value. By not reaching the calculated value, you can prevent deformation of the structure when it begins to be exposed to temperature changes.
It is best if the floor joists are made of solid lumber. However, this is not always possible to achieve, since in some cases the length or width of the room differs from the dimensions of the timber. If it so happens that the beams are not long enough, then the problem is solved by merging the two elements. This operation is performed in half a tree; in some cases, galvanized overlays may be needed.
In principle, the operation of merging two bars is not so complicated. However, you must be sure of its strong connection, and this is only possible if you follow the following rules:
- A support must be installed at the splice location you choose. It is best if this is a reference column;
- When merging two adjacent joists, care must be taken to ensure that their merging points are slightly offset from each other.
Log laying technology
The method of laying floors on joists varies somewhat for different types of base. In any case, if you strictly follow the further instructions with the photo, you can organize a warm, durable and high-quality coating at home.
How to lay logs on the ground
When building a private house, you can begin laying the floor on joists on the ground base during the laying of load-bearing structures, or during interior finishing.
The sequence of actions is as follows:
- The ground under the floors must be thoroughly compacted using the end of a wide log or a vibrating plate.
- A layer of granite chips 5 cm thick should be poured on top of the soil, which will serve as drainage, after which it should also be compacted.
- We install wooden formwork under the support posts, which we fill with a layer of cement mortar reinforced with mesh. Thus, we organize the foundation for the pillars.
- When the concrete hardens, it needs to be covered with a layer of roofing material and the columns removed from the brick.
- The upper part of the columns must be insulated with two layers of roofing material and covered with bitumen mastic.
- The logs should be secured to the resulting posts.
- Between the joists for laying the subfloor, cranial bars are installed.
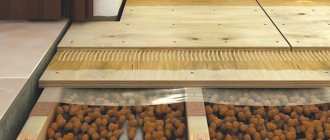
- An economical unedged board will serve as a subfloor. It should not be fixed to the joists; let it lie freely.
- Roofing felt or plastic film is laid on top of the boards to protect against moisture, and the material should extend 15-20 cm onto the walls.
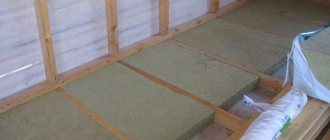
- The next layer can be laid with any selected insulation. This can be polystyrene foam, mineral wool, expanded clay or any other insulating material.
- A vapor barrier layer is laid between the finishing coating and the insulating layer.
If a double-sided membrane is used as a vapor barrier, then the finishing floor can be laid directly on it. However, all other materials for vapor barrier provide a distance of 2 cm or more to the finishing floor.
Method of laying joists on a wooden floor
Since wood floor joists are thick rectangular logs, in some cases it is possible to lay the finished floor directly on them. However, this is only possible if they are perfectly level and spaced no more than 80 cm from each other. In all other cases, logs will be needed under the covering.
The first lag is fixed 20-30 cm from the wall, controlling the level of it and all subsequent beams relative to the horizon. The joists must be firmly fixed to the joists for the floor to be secure.
Before laying the insulation, you need to attach cranial blocks for the subfloor to the joists. Expanded clay, polystyrene foam, mineral wool and other materials can be placed on this flooring. The method of laying insulation is similar to that described above.
How to lay joists on concrete
The advantage of this masonry method is its simplicity and speed. Knowing how to lay joists on a concrete floor, you can solve several problems at once - leveling, insulating the floor and protecting the apartment from noise from the lower floors. In general, making a floor on joists in an apartment with your own hands will not be difficult.
The list of tools for working with such a base includes: a hammer drill, anchors, dowels and screws for wood with a diameter of 6 mm. In addition, a hammer, plane, hacksaw and building level will come in handy.
To fix the joists to the concrete floor, use either self-tapping screws or anchor bolts. The latter fix the bars much more firmly, although they are much more expensive.
Before laying logs on a concrete floor, the base must be treated with a primer mixture and covered with a protective film or roofing felt. Impregnation of wood to protect against rot, fire and insects is highly recommended.
The concrete base may have significant level fluctuations. In this case, the horizontality of the beams can be adjusted with special plywood pads or pegs. A more technologically advanced adjustable floor on joists can be made by evenly tightening the screws at the base of the joists (for more details: “How to make adjustable floors on joists with your own hands”).
The sequence of work looks like this:
- The screed must be free of debris and dust, after which it must be treated with a primer and left to dry completely.
- A layer of waterproofing must be laid on the concrete with an overlap of 15-20 cm on the wall. The seams between individual sections of rolled material, laid with an overlap of 15 cm, are sealed with tape.
- Prepared logs should be placed over the entire area of the room. The gap between the outer bars and the walls should be no more than 20-30 cm, and all other logs should be evenly distributed over the entire area, usually 30-80 cm from each other.
- The outermost logs are secured first, and a thread is pulled between them as a level beacon.
- Short joists can be built end to end, keeping in mind the displacement of seams in adjacent joists. If the cross-section of the beam is large, the logs should be connected halfway across the tree.
- Holes should be drilled in the floor and joists for fastenings, and then dowels or spacers should be inserted under the anchors.
- Next, the logs are fixed with bolts or self-tapping screws. There should be 2-3 anchors per lag, fixed 60-80 cm from each other.
- Before final fixation, check the horizontal position of the lags, after which the fastenings are screwed to the end.
- Insulation can be placed in the spaces between the joists.
- The last layer before the finishing coat is a vapor barrier.
After laying the logs in compliance with the technology, all that remains is to make the base for the finishing coating, be it laminate, parquet or tiles.
Thus, in essence, laying a floor along joists is not a very difficult process, and almost every strong man can cope with it. In addition, this coating allows you to significantly save on repairs.
Fixing the timber to the ground
Joist floors can be installed both on the floors of the building and on the ground.
The sequence of actions is as follows:
- The soil is leveled by hand and compacted. You can use a large log for these purposes - a 5-centimeter thick board is nailed to it from below and, together with a partner, it is moved along the ground and eventually compacted the soil. The board should be taken slightly larger than the cross-section of the log.
- Then the supports for the joists are marked. If the bottom frame beams are chosen as the basis for the frames, the markings can be applied directly to the beams. When the support is a grillage covered with roofing felt on top, marks will have to be made on the material.
- The gap between the first wooden elements and the walls should be 3 centimeters.
Before installing the pillars for the supports, you need to create a foundation for them. It is equipped either for each element, or poured under a whole row. The minimum parameters of the foundation for columns under logs are 40x40 centimeters with a height of 20 centimeters, and 5 centimeters of them should protrude from the ground.
Adjustable joists
You can also find ready-made adjustable logs on sale, which already have holes for plastic bushings. Such materials cost more than traditional ones, but the speed of their installation is much higher.
Experienced craftsmen do not recommend rigidly attaching either traditional or adjustable joists to the base of the floor. In this case, the noise level in the room increases significantly, and the structure quickly loses its performance characteristics. But it’s also not worth laying them on insulating material. The best option is to lay it on a hard surface without securing it. In this case, the insulation layer should be located in the gaps between the joists. This will significantly increase the strength and durability of the subfloor and the final floor covering.
Floor subfloor options
These types of floors can be installed on a wooden or concrete base or on the ground. Each option has its own technological features, which must be kept in mind during work. As for the specific purpose of the premises, taking this parameter into account, the base of the floor and its operational characteristics are selected. The technology of the device itself remains almost unchanged. There are, of course, options for warm and cold floors, but these features also have a common construction algorithm.
Advantages of flooring on joists
- The load on the base, be it a foundation or floors, is distributed as evenly as possible.
- The floor structure on logs has increased noise and heat insulation properties.
- A space is created that can be successfully used for laying communications.
- It is possible to level the floor surface or raise it to the required level without much difficulty and additional costs.
- Installation of the structure is carried out quite quickly, does not require experience or specific skills, allows you to reduce the amount of building materials used and, therefore, reduce the cost of the project as a whole. At the same time, floors on logs are quite durable and can withstand loads of up to 5 tons per sq.m.
Date: August 6, 2021
Basic requirements for floors
The size of the floor beams is determined by the intensity of the load per m2 of floor
The construction of logs for arranging a subfloor must have very high strength. Only in this case does it not deform under the influence of static and dynamic loads created by the finishing coating (laminate, ceramic tiles, solid boards, parquet), furniture, equipment and people. The size of the floor beams is determined by the intensity of the load on the m2 of the floor, which is created during its operation.
The calculation is performed in accordance with the following defining parameters:
- When arranging a wooden frame for attic floors, the floor must withstand a weight of 105 kg/m2; When finishing rough foundations on interfloor and basement floors, wooden floors should not deform even with a load of 210 kg/m2.
Based on the nuances described above, a calculation is made, according to which the main dimensions of the lags are accurately determined:
- section; length; thickness; width.
It is very important that the necessary parameters are observed, otherwise, due to the large static load, the wooden sheathing and floor board will begin to sag. This is fraught with complete destruction of both the rough and final coating.