Logs are lathing elements for flooring. They are necessary for the final floor structure to be of high quality: smooth and strong. Strengthening and leveling the floor surface without joists is very problematic. An unreinforced covering will sag under the influence of heavy furniture, and the floor itself will creak and vibrate when walked on it. Floor joists are almost always installed. How is their size selected and installation done?
What are lags for?
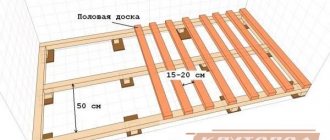
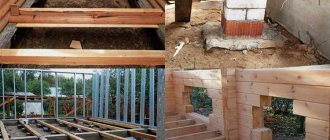
With most floor installation methods, the classic and often used one remains the option of using a structure made of logs. These are transverse supports that serve as a base on which the rough or finished finishing flooring is laid.
Purpose of the log:
- uniform distribution of load on the base base;
- reducing the deflection of the flooring;
- ventilation of the underground space.
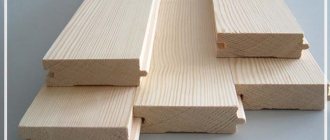
The most popular material for logs is wooden beams or boards.
Timber and floor board
Tabular data
Analysis of statistics and calculations based on data on the load capacity of coniferous wood (averaged) made it possible to compile a table of distances between joists and derive a relationship between the thickness of the flooring boards (slabs) and the pitch of the supporting beams.
Important: if the room’s traffic is increased or heavy furniture (equipment) is planned to be installed, adjustments must be made. At the same time, the thickness of the floorboard increases, as does the cross-section of the beams, and the size between the joists decreases.
To install a floor on a solid (reinforced concrete slab) base, the minimum permissible section of the beams and the maximum distance between them are taken. When creating a deck in a frame or wooden house, not only the payload on the deck is taken into account, but also the dead weight of the structure - beams, rough decking, heat, sound and waterproofing, and finishing.
Log functions and requirements for them
Useful functions of the lag subbase:
- hiding utility lines;
- leveling level differences, achieving a flat horizontal surface for flooring;
- convenience in insulation - uniform placement of insulation into the cells without increasing the thickness of the base;
- sound insulation.
The structure of the floor on beams has sufficient rigidity for increased loads and laying of massive material.
Advantages of timber lag foundation:
- ease of repair of individual areas;
- maintaining the integrity of the flooring under seasonal influences of the external environment due to the same deformation properties of wooden elements - timber and flooring;
- insignificant load on supporting structures due to the lightness of the material;
- relatively low price of wooden beams.
With these positive qualities, it is worth considering that the lag structure reduces the height of the room.
Approximate indicators for reducing the height of a room
The log system refers to capital structures, and regardless of whether logs from boards are used or timber is used, the requirements for wood are:
- solidity;
- low resinity;
- absence of bark;
- low knotiness;
- lack of longitudinal-transverse curvature.
It is allowed to have a small number of healthy knots in the wood, fused with the base and not rotting.
The design features of the planned flooring system in a particular room and the type of flooring used determine the choice of logs - from timber or boards. Timber is used more often.
Important - the wood must undergo heat treatment (drying) in a drying chamber.
Online calculators
To simplify calculations, you can use an online calculator. However, to enter data into it, you must first determine the cross-section of the timber, the thickness of the flooring and what pitch of the floor joist is accepted.
Attention: in this calculator there is a distinction between the concepts of “subfloor” and “floorboard”. This refers to a two-layer plank flooring, in which subfloor boards are first laid at intervals of 2 cm (to compensate for temperature and humidity deformation), and then a flooring is created from floorboards and they undergo finishing treatment (varnishing, painting).
Wood selection
Unplaned boards or timber made of deciduous or coniferous trees can be used under the logs.
Coniferous trees are cheaper, the most affordable are spruce and pine.
Coniferous timber
This material has sufficient strength, but is more susceptible to the destructive effects of a humid environment than hardwood. It would be justified to use pine needle material in heated, dry rooms.
Hardwood flooring is more expensive due to the higher price of the material. But a structure made from such wood has good biostability and is much better resistant to rotting processes.
The main disadvantage of this material is its low bending strength, so it is necessary to use logs made of deciduous trees with caution when large loads on the floor are planned. It is not recommended to use soft-leaved trees - linden and poplar.
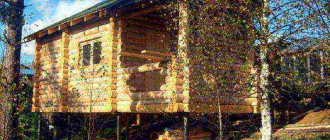
Siberian larch combines all the beneficial properties for lags. This coniferous tree is not afraid of moisture and has good strength, which only increases over time. Even when building materials from Siberian larch are used in a bathhouse, the structure will last for several decades without loss of performance.
Siberian larch timber
Higher costs for such material are paid off due to its durability.
Wood moisture content
An important parameter of wood used in construction is humidity. It should not exceed 20%, the optimal value is within 12%.
There are several ways to determine the degree of saturation of wood fibers with water.
Visual method
The simplest, but not accurate, methods for determining the moisture content of a material can be:
- by sound when struck with a hammer: dry timber is louder;
- milling timber: when drilling, material that is too saturated with water leaves a wet halo around the hole, if it is overdried it smokes, but with normal humidity there are no traces left.
- removing thin shavings with a plane: the shavings of raw wood crumple, while those of dried wood, suitable for use, break and crumble.
- chemical pencil - on too wet wood, a line drawn with a pencil along a fresh cut will turn blue.
Knowing the type of wood, experienced carvers can determine the degree of its saturation with moisture by color, weight or transverse and longitudinal cracks.
Defective timber with high humidity
Calculation method
This method is based on weighing a test section of timber, before and after drying. The algorithm is as follows:
- At a distance of at least 30 cm from the end of the block, a segment up to 2 cm wide is cut out.
- The thoroughly cleaned section is weighed on an accurate scale, with an error of up to hundredths of a gram, and the resulting value is recorded.
- A piece of timber is placed in a dryer (chamber or oven) with a constant temperature within 100°C.
- After 5 hours, the sample is weighed and the result is recorded.
- Subsequent measurements are taken at intervals of 1-2 hours until there is no change in weight readings.
Next, the absolute humidity of the material under study is calculated using the formula:
W = (m – m0) × M0 × 100%,
where m and m0 are the mass of the test section before and after complete drying, respectively.
Using an electronic device
For instrumental, most accurate determination of wood moisture content, electronic moisture meters are used.
They can take measurements of any type of wood in various conditions. The principle is based on the dependence of the electrical conductivity of the material on the degree of saturation with moisture.
Needle moisture meter for wood
Contact (needle) and non-contact moisture meters are more often used in everyday life.
In the first version, the needles of the device are inserted into the wood and the moisture content is measured at this point, the readings are displayed on the indicator. Using the temperature correction table, updated wood moisture content results are determined.
Non-contact moisture meters analyze the dielectric constant of wood, based on which the percentage of moisture it contains is determined. The readings of these devices are not affected by the temperature of the wood and the surrounding air, so temperature correction is not required.
Using in practice knowledge about the moisture content of the timber from which the base for the floor is mounted is very important. Wood dried to normal values has significantly higher performance qualities:
- strength;
- resistance to decay;
- durability.
Structures made from damp wood create a greater likelihood of subsequent deformation, which can lead to damage to the flooring.
Floor deformation on wet timber
Useful tips
There are a number of tricks to make laying plank flooring easier:
- The boards should be positioned so that the rings face in different directions.
- For convenience, the boards should be numbered before laying.
- Nails should be driven into the wood at an angle.
- To ensure a tight fit of the floorboards, a bracket is driven into the joist at a distance of 6 cm from the outer board. The distance between the board and the bracket is filled with a lath, after which a wedge is driven between the bracket and the lath. Then the boards are pressed tighter and can be secured with nails.
- Then the bracket and the batten are removed and further laying of the boards begins according to a similar procedure.
- The last remaining board should be leveled with a plane and installed with glue and nails.
- Gaps near the walls are masked with baseboards.
Floor joist dimensions
Given the relative simplicity of installation of logs, it is necessary to carefully approach the preparatory stage associated with calculating the parameters of the beam and marking for its installation. The quality of the flooring, the reliability of its operation, and durability depend on this.
The basic data for the calculation are:
- Purpose and dimensions of the room.
- The type of base on which the beams are laid (screed, supports, foundation grillages).
- The location of the logs is one-sided or in the form of a lattice.
In corridors and walk-through rooms, it is better to mount the frame in the transverse direction to the movement. This will allow you to use a smaller beam.
Standard sizes
There are standard averaged values that are accepted for calculating the cross-section of the logs and the distance between them, in proportion to the span length.
Tables of ratios
These data can be used for refined calculations of the step between lags.
How to calculate size and section
To correctly calculate what size timber should be used for floor joists, you need to measure the dimensions of the room and choose the direction of laying the joists - along or across,
To compensate for seasonal expansion of the tree, the length of solid bars or a prefabricated structure is taken several centimeters less than the distance between the walls, perpendicular to which they are laid.
The choice of cross-section or thickness of timber is influenced by:
- wood material;
- thickness of the future flooring;
- distances between spans or beam support points;
- indoor traffic intensity;
- possible loads on the flooring.
For residential premises, the nominal value is taken to be a load of 300 kg/m2.
If the length of the room is less than 2 m, you can use logs with a cross section of 100 × 50 mm.
The optimal beam is considered to be one whose supporting edge is 1.5-2 times its width.
Standard timber
The advice is to choose logs with a margin in cross-section, taking into account the thickness of the insulation and the load.
Select pitch between joists
When making a more precise calculation of inter-lag distances, the height of the flooring and the load on it must be taken into account. The recommendations indicated in the table are given for empty rooms, therefore it is necessary to make appropriate amendments, depending on the specific conditions:
- In rooms with furniture (bedrooms, living rooms), with the same thickness of the flooring, the given walking distances are reduced by 5-10 cm.
- The thinner the flooring, the smaller the step.
Example. If the floorboard is 2 cm thick, then the distance between adjacent beams should not be more than 30 cm. For each increase in the thickness of the coating by 5 mm, the step can be increased by 10 cm.
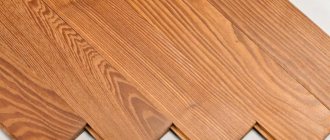
Attaching the floor board
An example of laying a tongue and groove board using a clamp and wedges.
So, all you have to do is attach the floor board to the joists. Here you need to follow some recommendations and then your wooden floor will be reliable, strong and stable under maximum load.
- Boards are attached to wooden beams using nails, the length of which is twice the width of the board.
- Before you start laying the boards, you need to prepare holes for fasteners by drilling. It is important to make the holes 1-2 mm smaller than the thickness of the nail. This will prevent the floorboard from splitting.
- Ideally, the length of the boards will clearly fit into the parameters of your room and you will not have to splice the floorboards. But if, nevertheless, it was not possible to find a board of the required length, then the two boards need to be joined directly on one of the floors. This will prevent the floorboard from bending over time.
- It is necessary to attach floor boards to all joists.
- The finished floor covering must be treated with a special varnish or drying oil.
- We cover the joints between the wall and the floor with a beautiful wooden plinth or batten.
Important: the boards can be secured to the beams with self-tapping screws either at an angle of 45 degrees, or with subsequent treatment of the caps with a special sealant. And when laying floor boards, do not forget to leave 1 cm between the walls and the floor covering.
Installing floor joists
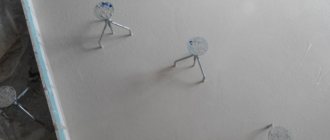
Despite the fact that logs, most often, do not directly interact with the external environment, wood is a material that requires protection, therefore, before installation, the timber must undergo antiseptic and fire-resistant treatment.
Preliminary antiseptic treatment of timber
The best strength of the joist structure for all types of foundations is achieved by installing the beam on the edge.
Various methods of installing lags also have some peculiarities of performing this work.
Installation on wooden floors
The most common type of flooring in a home is the ceiling on load-bearing beams. The construction of wooden logs on such load-bearing elements is considered very reliable for the entire floor. The method of fastening the beams depends on the type of beams:
- Rectangular or square.
- Round.
The evenness of the floor is achieved by leveling the beams themselves or by using joists.
Attaching to beams
If it is not possible to align the beams exactly, the beam is attached to their side. This method provides the best leveling of the entire structure horizontally, without the use of adjusting supports or pads.
Lateral attachment to beams
1 - Bearing beam.
2 - Lags.
3 - Self-tapping screws.
The timber is attached to the beams with self-tapping screws, a length 2.5 times greater than its width.
Laying across beams
Good rigidity of the system is obtained by laying the logs across the wooden floor.
The sequence of laying such a base is:
- bars are laid on opposite sides of the ceiling;
- each of the bars is leveled horizontally;
- the bars are aligned with each other in the same plane by placing wooden wedges or metal plates under one of them;
- the remaining crossbars are laid along a cord stretched between the control logs.
This option makes it possible to use a bursa with a smaller cross-section.
Transverse installation of logs on beams
The beams are connected to the beams with self-tapping screws or using metal corners.
Depending on the type of wooden floor, there are different requirements for the use of insulating materials:
- On the interfloor structure separating residential areas, it is enough to lay sound-absorbing material (this can be a subfloor made of chipboard or OSB) and install a vapor barrier. As a vapor barrier membrane, you can use a polyethylene film, which is attached to the beams with an overlap of 15 cm.
- A “pie” is created on the wooden floor separating the living space from the basement or attic.
Its main function is to cut off the cold coming from unheated rooms or the basement.
Wooden floor pie
The thickness of the insulation layer and insulating materials are selected depending on the specific requirements for the flooring.
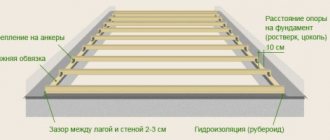
Installation on concrete
When installing joists on a concrete screed, you must adhere to the following sequence:
- Prepare the base - clean it from dust, treat it with a primer.
- Place the waterproofing material with an overlap of at least 15 cm on the walls and between the rolled sheets, and connect the joints tightly with tape.
- Align the logs horizontally, secure them to bars against opposite walls, at a distance of 3-4 cm from the walls.
- Pull the beacon cord between the control logs.
- With a calculated step, lay other beams on the base.
- Drill holes in the concrete for dowels or anchor spacers, at a distance of no more than 70 cm from each other, fix the bars on the screed.
Achieving the correct level of the base along the beacons is done with wooden posts, plastic wedges or the use of bushings that regulate the height of the beams.
Adjustable lags on bushings
Installation on the ground
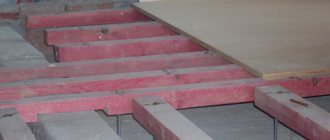
Before the finishing coating, insulation and vapor barrier material is laid between the joists.
As an option, the step-by-step technology for laying lags on a soil base looks like this:
- Compact the soil well and level the base.
- Fill and compact a drainage layer of sand, gravel or granite chips.
- Make a foundation for the support columns - fill the wooden formwork with a layer of concrete, with a reinforced mesh.
- Cover the hardened concrete with roofing felt and lay out support columns from bricks.
- For waterproofing, lay roofing felt (2-3 layers) on the posts and coat with bitumen.
- Place the logs on posts and secure them.
You can install skull blocks between the joists or make a bottom lining for laying the subfloor.
Column mounting
Waterproofing (roofing felt or film) is laid on the rough base and any type of thermal insulation material is laid. The insulation is separated from the finished floor by a vapor barrier membrane.
General recommendations
Make sure the wood is dried and treated with antiseptic or bitumen.
This will significantly extend the service life of the structure. When the humidity is more than 20%, the tree can become warped, compromising the integrity of the structure. Boards brought from a warehouse should lie at room temperature for several days. This is especially true during the winter season. It is not recommended to lay the floor when the air humidity is less than 60%. You should not saw or plane boards in the room where the floor is being installed. Sawdust can cause rot.
Use the rule after installation. Lay it across the beams, remove gaps, leveling the height. This is easy to do with the help of special modern adjustable fasteners that have appeared on the construction market. The floor is laid only after all leveling procedures.
The smaller the pitch, the longer the floor will last. However, the main indicator of durability is the material of the coating and base. The most durable wood is larch.
The installation of beams is usually carried out along the window, i.e. across the room. The floor boards are then placed along the length of the room, i.e. from the window. However, this is just a recommendation and a matter of taste.
A board is attached to each beam. Holes for screws should be drilled in advance to avoid delamination.
The most common option for the space between the joists is from 50 to 56 cm. As a rule, it does not exceed a distance of 69 cm.
Removing joists and wooden floors is quite simple. It is necessary to remove all the furniture from the room, remove the baseboards, and open the boards or sheets of chipboard. After inspection, the old boards are replaced with new ones. The logs themselves can be partially replaced. Simply cut out a piece of rotten wood and install a new one.
Don't forget to use a protective impregnation on new boards. Check the ends of the beams for rot, and inspect the base insulation, if any. Repairing the floor can be a reason to insulate your home.
How to strengthen genital lags
Reinforcement of the joist system is carried out to increase the safety margin or strengthen its individual sections if they are damaged.
There are several options for strengthening:
- installation of one or more additional supports under the beam, first leveling the system in a horizontal plane using a jack;
- installation of wooden or metal plates on one or both sides of the beam, fastened with bolts and washers;
- replacing the damaged area with a prosthesis made of a metal rod or channel;
A modern way to strengthen the beams is to reinforce the timber with carbon fiber, fixed with epoxy glue.
Reinforcement of beams with carbon fiber
Carbon fiber is glued in several layers until the required rigidity of the beam is achieved. Light weight, which does not burden the structure, and ease of operation make this material popular.
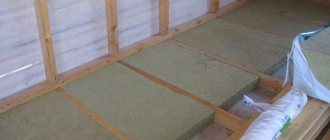
Features of insulation
The frame structure of logs is found not only in wooden houses, but also in many buildings built in the first half or mid-20th century. At that time, this was the most affordable way to quickly build a residential building. Characteristic features of such coatings are good thermal insulation properties. But they also require periodic repair and updating - much more often than concrete floors. Therefore, experts recommend making an additional layer of insulation when planning these works.
In addition, installing joists is one of the effective options for creating a warm base in modern residential buildings, however, due to the reduction in the overall height in the room, it is not always acceptable for standard apartments and houses.
To analyze the feasibility of insulation between joists, let’s consider the features of this technology:
- In most cases, logs are installed on a rough wooden base, thereby forming several separate cells on the surface. Those. the insulation will not be evenly distributed over the entire surface, but will fill only these zones. The difference between the heat transfer coefficients of the beams and the heat insulator can cause uneven temperature distribution on the surface.
- The insulation material should not negatively affect the wooden structural elements. To a greater extent, this relates to its hydrophobicity - moisture absorption. Therefore, the technology of floor insulation using joists provides for increased waterproofing measures.
- Mandatory air gap. It is necessary for the timely removal of water vapor released by wood. To do this, provide for ventilation gaps between the insulation and the upper base of the floor.
Taking into account this specificity, you can begin to select the optimal insulation scheme. To do this, we will consider various design options for the heat-insulating layer.
What to consider when making calculations: initial data
To correctly calculate the required number of lags, the following values will be required:
Attention! This data is sufficient to calculate the maximum pitch between the logs and the cross-sectional dimensions of each element.
PHOTO: smetadoma.com Room dimensions - initial data
Lathing materials
When constructing the flooring, you can use various materials that are offered in hardware stores. The main thing is that they have the necessary strength, a smooth surface and a low coefficient of deformation under load. Similar requirements are met by products made of plastic, metal, wood and reinforced concrete, as well as compounds made from synthetic resins.
If we evaluate all of the above options by cost, then wood can be considered the undisputed leader. Therefore, wooden beams are most often used when constructing the floor.
The material used for flooring is most often made from coniferous wood. As a rule, these are pine, spruce and fir. However, practice has shown that logs made of larch wood are the most practical. This is due to the advantages of the material, which is very durable and resistant to rotting.
As for pine and spruce, they are chosen by owners seeking to save on material.
It is especially worth mentioning the rules for choosing material for making beams. These could even be beams that have resin pockets and small defects. So you can safely purchase second or third grade lumber without worrying about the functionality of the base.
If your financial capabilities are limited, then instead of larch you can choose pine or spruce. Experts recommend not saving by purchasing wetter timber, as this can be fraught with big problems. To make logs, it is necessary to take beams with a moisture content of no higher than 20%. If you do not comply with this requirement, then during operation the wood will dry out and become deformed, and this will require alteration of the flooring.
If you decide to make the sheathing from spruce or pine, then you will have to carry out waterproofing without fail while laying the beams. Logs can be used when laying on any type of foundation, however, in each case, waterproofing will have to be done with some adjustments.
If the logs are placed on a reinforced concrete base, then at the initial stage a layer of foamed polyethylene must be laid.
In a situation where beams are laid on brick posts, polyethylene is used, which is laid between the posts and the ground, as well as between the post and the beam. To protect the space between brick and wood from moisture, you should use roofing felt rather than polyethylene.
Regardless of what type of wood you plan to use for the sheathing, they must be treated with antiseptic compounds before laying. First of all, this applies to those cases when the floor is laid in a wooden private house. Woodworms, which can very quickly damage floor elements and force the owner to undertake repairs earlier, can pose a danger to this structure.