Author: Yuriy Fedorovich Kolesnikov, thermal power engineer
A stove made from car wheel disks can heat a room up to 15-16 square meters. m, heating a bathhouse or becoming an inexpensive, effective cooking device, which is what this article is actually about. Its main advantage is the availability of high-quality material - thick, resistant and durable steel. Boiler steel in sheets and profiles is expensive, and ordinary structural steel in a furnace structure quickly burns out.
The additional advantage of a disk oven can be seen through experience. Take two pieces of metal of approximately the same size and weight: one from simple steel, and the other cut from a wheel rim, and heat it up stronger, at least in the kitchen on gas. The first one will immediately give off the smell of hot iron, and the second one can be heated to orange (about 900 degrees), without feeling anything unpleasant in the air. A furnace made from wheel rims practically does not dry out the air and does not emit harmful fumes into the atmosphere, because the rims for the wheels are made of special steels that are resistant to corrosion. They are, of course, not standardized for heat resistance, but the reserve of resistance that is built into them is quite enough for a wood-coal stove.
Design features of a furnace made from wheel rims
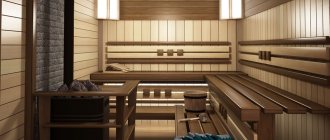
A do-it-yourself sauna stove made from old machine disks is the best option.
Compared to metal store-bought stoves, they are cheap, simple in design and can last no less time than store-bought stoves. Furnace design features:
- Small size.
- Easy to assemble.
- The material used is strong, durable and resistant to damage.
- The round shape of the wheels is the optimal shape for a sauna stove.
- For kindling in the summer, only a couple of logs are required (preference should be given to pre-prepared oak firewood).
- The stove cools down quickly: in winter cold the process of cooling the stove takes approximately 2 hours.
- During the fire, you can wash in the bathhouse, since there is no accumulation of carbon monoxide in this design.
- Possibility to use different materials for heating the bath.
Thanks to the different sizes of wheels, you can choose the size of the future furnace. If you need a sauna stove of decent volume, then the ideal option is a sauna stove made from the disks of any model of truck.
Step-by-step algorithm
The first thing you need for construction is a pair of classic stamped car wheels made of durable metal. The sizes of the disks should be selected to suit your cauldron; option 13 may be suitable, or maybe 15, although a very large design is not needed.
Two stamped white discs
On one of the disks we mark a cutting line, exactly above the round holes, and cut off this circle using a welding machine.
Mark the cutting line
The cut circle will work perfectly as a lid on which you can put pots or a kettle, so don’t rush to throw it away.
The part is cut out
On the second disk, you need to weld the main central hole, which will require a small piece of thick metal.
Preparing the welding machine
We carry out welding work
Then the two disks are placed on top of each other and, using the same welding machine, they are connected into a single structure.
Circular welding process
Welding from all sides
This creates an impressive seam that firmly connects the two discs. To make it more presentable, you can modify it with a grinder, cutting off strongly protruding elements and grinding the edges.
Weld seam
In order for the structure to stand stably at the required level, you will need legs. The legs can be tightly welded to the grill if you are preparing a summer cottage, or you can make the structure detachable. In the second case, the device will be mobile; it can be easily carried in the trunk of a car and, if necessary, assembled. Small pieces of a profile larger in cross-section than the legs themselves can act as fastenings for the legs. These three parts should be welded to the grill on three sides (in this case, a tripod is made).
Leg parts
There is no need for precise calculations here; it is enough to roughly estimate equal distances and weld the necessary parts to the bottom of the grill made of disks at the same angle.
Leg clamps are welded
We also cut out the legs from metal, in particular we use a rectangular profile.
The legs themselves, cut from the profile
It is worth trying on the legs by inserting them into the prepared grooves. If they enter with difficulty, you should process the edges of the parts with a grinder, and then hammer them into the grooves with a hammer.
Legs installed
Next, mark the door that will open directly into the firebox and cut it along the line.
Marking the location of the door
At the next stage, you will have to use your imagination and engineering skills to create a decent hinge for the door. For example, you can make it from one bolt. It is necessary to cut off the cap from it, then select two nuts that are screwed onto it. One nut should be welded to the door, and the second to the wall of the grill. By screwing the bolt onto the threads of both nuts, you get a convenient loop. You can weld any piece of metal of suitable size as a handle.
The door is cut out
You can make two loops using the same bolts, here all the work is done at the discretion of the master.
Loop manufacturing option
To make it easier to transport the grill, you should weld lugs to it on both sides, or at least on one side. Such improvised handles will allow you to comfortably carry the barbecue without fear of getting dirty with soot, soot or dirt.
We weld the handles
For a more uniform smoke output, you can make four even cuts along the diameter of the disk. At this point, work with the hearth to form its shape is completed.
Making cuts from the top
To remove paint from car rims, you should burn the resulting grill on all sides. For final processing, you can use a brush or sandpaper.
Removing paint using improvised means
Then, using heat-resistant paint, you need to paint the structure in a suitable color. Black looks very harmonious.
Paint it black
As you can see, making a grill for a cauldron is quite simple; there are no special tricks here. A simple and convenient design will allow you to install a cauldron and cook pilaf, and if desired, you can make a shish kebab on it using skewers of suitable length.
Ready product
In this simple and uncomplicated way, we create excellent conditions for outdoor recreation, which is accompanied by cooking delicious and healthy food.
What is good about a stove made from rims?
A stove made of wheels is capable of heating a room measuring 15-17 m2. It is used, despite the specifics of the selected materials, not only in the garage, but also to provide heat in other utility rooms and baths. The main advantage of the heating device is the availability and high quality of the material.
The discs are made of durable and thick steel, which ensures long service life. The quality of the wheels is in no way inferior to boiler steel in sheets and profiles.
In addition, a garage oven practically does not dry out the air, and metal does not emit harmful fumes at high temperatures. The environmental friendliness of the material is due to the fact that the discs are made of specialized steel that is resistant to corrosion.
Useful tips
It is important to lay a high-quality seam at the welding site - no defects should be noticeable on it. When working with a welding machine, you cannot try to weld everything at once - the work is done in stages
After welding the parts together, you need to wait until the seam cools down to touch temperature. When assembling the structure, do not forget that for proper operation of the stove it is important to provide the size of the combustion chamber for the type of fuel you plan to use. After completing the work, be sure to test the design and eliminate any identified deficiencies.
Attention! All welding work must be carried out in compliance with safety regulations, wearing protective clothing and a mask. Do not touch parts until they have cooled down
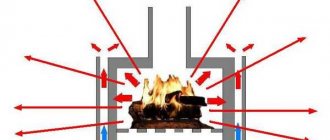
Operating principle of a disk furnace
The operation of a homemade sauna structure made from car rims is based on the following principle: burning fuel transfers heat from the first to the second body. These two rims are welded to each other. The first disk has no bottom, the 2nd one has one. You can put stones in it.
A pipe is installed through both rims to remove products resulting from the fuel combustion process. The 3rd disk has a gas divider made of metal. It takes the place of the bottom. Thanks to the divider, the burned fuel is cleaned, resulting in the stove releasing even more heat.
At the final stage, the temperature of the heated carbon monoxide decreases in the 4th disk. The fourth disk is a tank with a tap built into it, as well as a lid. A homemade sauna stove made from disks works no worse than a factory one. And the service life is much longer.
Materials and equipment for work
When welding a furnace from car wheels, the following list of materials and tools is used:
- rims of a truck or car, 2-4 pieces;
- welding machine;
- welding mask;
- gloves;
- pipe with a diameter of 16 cm, length about 3 meters;
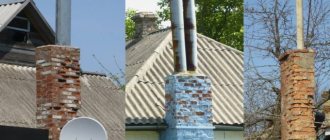
- chimney;
- metal sheets for creating air reflectors;
- metal legs in the amount of 7 pieces;
- hinges and handles to create a door;
- fuel container.
When creating a combination oven or other types of oven, additional materials may be required.
A stove made from discs for a sauna is easy to make. To create it, you need the following construction supplies:
- Metal cutter or grinder.
- Welding machine, electrodes.
- Special elements for protection: leggings for legs, glasses for eyes.
- Two metal pipes 50 cm long, with a thickness of only 5 mm and a diameter of 16 cm.
- Iron sheet 8 mm.
- Large bolts and nuts.
- Fire resistant brick.
- Clay, cement for masonry.
- Iron sheet with a thickness of 8 mm.
- Large sized bolts and nuts.
- Fireproof brick.
- Clay, cement and concrete mortar.
- 4-6 channels.
We suggest you familiarize yourself with: Bath steamers in bags
To create a stove body for a bathhouse, you will need 4 wheel rims, preferably from a truck, for example, from a Kamaz. The diameter of such a furnace is half a meter. The thickness of the stove walls is 1 cm. These dimensions are quite sufficient for heating a small bathhouse.
Preparing tools
If you decide to make a hearth for a cauldron or a regular stove using car wheels, then you need to take care of the availability of tools, among them the following should be highlighted:
- welding machine;
- electric drill;
- chisel;
- sledgehammer;
- disks;
- paint brush;
- ruler;
- grinder;
- hacksaw for metal;
- hammer;
- file;
- pliers;
- roulette
It is noteworthy that almost any of the disk-based models made will be portable, which is very convenient, because this design can be used in a bathhouse or on the street. It is best to use stamped steel disks, the diameter of which varies from 40 to 50 cm. Their height can be 25 cm. The hearth for a cauldron, like a sauna stove, cannot be made of aluminum disks, or those made on the basis aluminum alloys.
Fire safety rules when installing homemade stoves
The oven, made from old car rims, creates heat using infrared radiation. To transform the infrared flux into heat, you will need to make a furnace casing from metal sheets. They are fixed at a distance of 7 to 10 cm from the heater. The same size gap between the floor and the stove.
There are general rules for the safe operation of disk sauna stoves:
- Place a concrete or iron slab on the floor. In this case, this structure must extend beyond the edges of the furnace by more than 60 cm in four directions. This will help eliminate the possibility of a fire if coal or other fuel falls out.
- The chimney and stove made of metal should not touch easily and quickly flammable materials. In this case, it is recommended to use special insulation gaskets.
- Before lighting the stove, be sure to check the draft in the channels. If it is absent, warm up the chimney a little or clean the chimneys and ash pan.
- Liquid firelighters should not be used because they can easily cause fire to be thrown into the room from the firebox.
When creating a stove from car wheels, fire safety rules are a rather sensitive topic. The technology for the production of wheel disks initially did not include their use for other needs, especially as a homemade oven.
To avoid disastrous consequences, it is recommended to cook a stove made from car wheels only with solid fuel.
Scheme of a long-burning furnace.
You can create a completely safe horizontal potbelly stove from disks by adhering to the following rules:
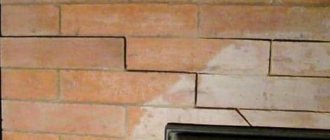
- The weld seam must be smooth and free of defects. Otherwise, smoke will escape through the cracks and fill the room. In addition, during operation there is a risk of failure of an improperly welded stove.
- To improve quality, it is strongly recommended to weld 2 parts at a time.
- After each seam, the welded parts must be given time to resolve residual internal stresses. It will take 3 minutes per kilogram of mass of elements being welded. It is recommended to begin further welding no earlier than when you can touch the metal with your bare hand 3-4 cm from the end of the seam.
- A day after installing the parts, the stove undergoes a test run to resolve residual stresses. This requires at least 3 hours of burning at full power with the air throttle open.
To ensure fire safety, it is necessary to close the oven door tightly, and also place flammable items away. When leaving the room, it is important to completely extinguish the stove and clean the chimney in a timely manner.
Trial fire
A self-made oven must sit for 24 hours so that residual stresses are completely resolved. Then it needs to be tested with a full load of fuel for three hours. The doors - at the firebox and the ash room - must be open.
Carrying out a trial fire
During the first test fire, the internal surfaces of the device are annealed. If minor defects are found on the welding seams - no more than two on one - they should be corrected a day after the stove has cooled. Then the test fire is repeated.
Small oven with grate for food
Scheme of a sauna stove made from KAMAZ rims, drawing
The most complex version of a potbelly stove made from disks with your own hands is considered to be a heating structure for a bathhouse. It is used to create a medium-sized sauna with heated, moist air. The sauna stove is based on a brick firebox.
The structure of the heating system is somewhat more complicated than that of a simple horizontal stove made of disks, but it is quite possible to do it yourself.
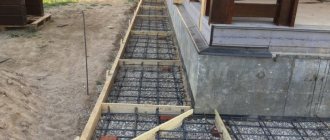
First, a brick firebox is laid. When calculating the dimensions of the masonry and foundation, they are based on the diameter of the wheels. As a rule, ordinary passenger car wheels are used, therefore the dimensions of the firebox are on average 625x625 mm. There should be a cast foundation underneath it.
Functionally, the firebox is divided into 2 parts, so you need to think through the laying in advance. Cold air from the locker room should come from below, and solid fuel materials should be thrown from above.
Drawing of a disk stove for a bathhouse.
After the firebox has been built, welding of the structure begins. It consists of 4 discs. At the bottom, struts and a reflector are installed for uniform and smooth air flow, as well as high-quality heating of the container.
The third disk is welded so that stones can be placed inside, and a metal pipe is installed in the center to remove smoke. The third and second disks are connected by legs to fix the structure. The smoke transmission pipe is attached to the bottom of the third wheel.
An air divider is installed in the second disk on top, which is necessary for heating the water. The divider is mounted on 2 metal legs. The upper disk is a reservoir for supplying warm water. A pipe of a convenient length is attached to it, and a faucet is also mounted.
We invite you to familiarize yourself with: Installing the floor in a bathhouse with your own hands
There is a pipe in the center to remove smoke. The chimney is fixed to the supporting platform with struts. Under the support platform there is a sheet of galvanized iron.
This is a general scheme for welding a furnace from disks. Let's take a closer look at the nuances of creating individual parts of the structure.
Water container
The water tank is made of one wheel. To do this, it is necessary to weld the bottom and the top so that there is a hole in the center corresponding to the diameter of the pipe, the standard is 16 cm. It is also important to make an even and accurately executed seam, otherwise water will leak out of the container, and the reliability of the structure will be called into question.
After welding the container, you need to weld the pipe and check the quality of welding by filling it with water.
For complete and high-quality heating of water and stones, each intermediary disk must contain a divider or reflector. A heater is a container with a pipe in the center to remove smoke. It is necessary to completely weld the bottom, install the pipe and attach the container to the top of the firebox.
A pipe is attached to the third disk - the upper part of the firebox - using casings, and an air divider is installed inside to heat the tank.
In both cases, metal doors are attached, and a combustion structure is installed between the levels.
Stove assembly
Scheme of the furnace in production.
Assembling the stove should begin with laying the firebox and welding the elements. First, the internal parts of the structure are installed - a divider and an air reflector, then the bottoms are welded to the structures for water and stones.
Then the smoke exhaust pipes are installed, after which the remaining elements are attached to each other. After complete assembly of the structure, it is necessary to carry out a mandatory test run of the furnace.
A properly welded stove will not allow smoke to pass through and will ensure uniform heating of the containers. High-quality masonry will ensure constant air circulation, which promotes rapid heating and long burning.
It is best to use wheels from KAMAZ or other trucks to install a sauna stove. This will lead to a significant increase in service life.
The meaning of the design is the vertical arrangement of the disks on top of each other. Fastening is done by welding.
The design includes the following parts:
- The first disk is the firebox, where the fuel is placed.
- The second disk is a heater.
- The third is the heat exchanger.
- The fourth is a container for heating water.
Sometimes metal legs are added to the structure for stability of the stove structure.
To create a stove from disks for a bath, it is recommended to first prepare the material: thoroughly clean the machine disks from rust, dust, dirt, and paint residues. For this, sanding paper is used. After bringing the disks into proper condition, you can begin to build the structure.
Water container
To create the last, upper part of the oven, you need a pair of car wheels. This compartment is designed to heat water.
Important! The tank must be sealed.
A grinder is used to cut out the central plates for fastening. Only the rims are left. After cutting out the central part, the remaining rims are firmly welded.
Cover the surface of the second tank with a lid. You can use a damper. For greater safety, it is recommended to weld the lid, leaving a small hole for pouring water. A metal plate is placed at the bottom of the tank.
When all welding activities are completed, holes need to be cut at the top and base of the tank for a chimney that will stretch across the entire tank. A thin tube is mounted on the sides, at the bottom level, always at an angle. It is closed with a tap designed to drain hot water.
The tank should be carefully checked for any cracks or holes through which water can leak. If defects are detected, they can be easily eliminated by welding.
Manufacturing methods
Despite the simplicity of the design, to make a stove from disks you need to have skills in working with a welding machine, a grinder and some knowledge in the field of creating metal products.
Welding method
The most common way to create a metal picnic stove is welding. In order to make a quality product, you must follow the instructions:
- Using a grinder, you need to make a symmetrical cutout on one of the disks from the side of the mounting bolts. Its dimensions correspond to the diameter of the cauldron at a distance of 2/3 of the height. The countdown is from the top of the convex part of the bottom. Planting in the oven at this depth will ensure uniform heating of the entire volume of the container and removal from the heat without unnecessary effort.
- Next, you should prepare the discs for welding. To do this: remove paint residues, rust, clean the surfaces to be welded, and chamfer.
- After this, the stove structure is assembled on a flat surface in the following sequence:
- the lower disk is installed with the convex side down;
- a second one is attached to it on top, but with the convex side up;
- both elements must be secured by welding;
- the third disk is installed on the second with the cutout facing up. It should also be welded in several places;
- final welding of all joints is carried out;
- The slag is removed, the seams are inspected, and defects are eliminated. The seams are being cleaned. The seat under the cauldron is cleaned especially carefully;
- at a height of 200 mm from the bottom of the oven, the contours of the damper are marked with chalk. Its dimensions are 180 x 200 mm;
- The damper is made from the cut blank. Tubes are welded on the short side. Hinges are inserted into them, which are then mounted to the furnace casing. To hide the unevenness of the cut, eliminate inevitable gaps, add rigidity, and maintain the aesthetics of the appearance, you can weld a rod around the perimeter;
- the handle and latch are welded in place;
- On the side opposite the damper, a hole for the chimney is marked and cut in the upper disk. The chimney pipe is installed, fixed with welded points, then scalded in a circle.
Cutting a circle from a disk
We carry out welding work
Discs need to be welded on all sides
The seam should look like this
Preparing the fittings for the legs
We weld the clamps for the legs
Installing the legs
We weld the handles
Marking the location of the door
Making and attaching door hinges
Removing the paint layer
Paint it black
Adjusting disks to size
With this method, the entire structure becomes detachable, there are no rigid connections. This can be achieved by spreading out the outer rim of one wheel and settling the other - the result will be a tight butt joint. The operation is carried out using a hammer. A technological hole is cut in the lower disk for loading fuel. With this manufacturing option, the performance of the furnace deteriorates: it will become “gluttonous”, and heat transfer will decrease. To fully maintain performance characteristics, the side hole does not need to be cut. Firewood will be loaded through the top cutout, but to do this you will have to remove the cauldron each time.
This furnace design is more technologically advanced. It is collapsible and less labor-intensive to implement. However, significant disadvantages are low efficiency, increased consumption of solid fuel, and poor traction.
A variation of the technique is the use of a combined method. This is a compromise option for creating a furnace, combining the main advantages of welding and the method of fitting disks. There is no need to weld them together, they are inserted one into the other. The butt joint is borrowed from the fitting method. Only the damper and handles are made by welding. For greater rigidity, it would not be superfluous to provide fasteners for fastening the sections together.
Take two car rims
Cut out the central part
Trying on to see if the elements fit
Making a sealed structure using a hammer
Cutting a hole for supplying firewood
Ready
DIY sauna stove made from wheel rims
A homemade oven made from car wheels does not require any special skills to make, and even novice home craftsmen can handle the process. The main thing in the process is to strictly follow the instructions and observe basic rules of personal safety. Below we will look at the process of making a stove for a cauldron, a homemade barbecue and a device for heating a bathhouse.
We suggest you read: How to make a template for timber
Stove for cauldron
It is better to begin work on the production of a stove from car disks for a cauldron by preparing the necessary materials and tools. For work we will need:
- Roulette;
- Sandpaper;
- Wrenches of various diameters;
- 100 cm rectangular pipes;
- 3 bolts and three nuts for them. It is better to take large bolts, they will be easier to work with;
- 4 nuts, size 10;
- Wire with a diameter of at least 4 mm;
- Grinder with metal discs;
- Welding machine and electrodes for it;
- Personal protective equipment (mask, gloves, protective apron);
- 2 car wheels.
Old car wheels can be found in garage cooperatives or tire shops, where they will give you them for practically nothing
It is worth choosing the diameter of car rims depending on what size cauldron you plan to use. If the pot is small, then small wheels from a passenger car with a 13 or 14 radius are quite suitable. If you are going to cook dishes on the stove for a large company, then it is better to give preference to truck wheels.
The furnace manufacturing process begins with the processing of the wheel rims themselves. Used wheels have a corresponding appearance: the metal darkens, the paint on the surface has peeled off in places, and areas of rust may appear. To prepare the discs, it is necessary to sand the entire surface with sandpaper. Painted discs should be heated well over a fire and treated with a solvent.
1. Hob.
We install one of the disks on the ground with the mounts facing up. We make markings on the surface in the form of a circle (you can use bolt holes as guides). Using a grinder, cut out an even circle along the mark. The disk is used to create a cooking surface that will hold the cauldron over the stove. The cut hole must be sanded using sandpaper, which will help avoid injury in the future.
2. Manufacturing of the furnace body.
We take the second disk and install it on the ground with the fasteners down. We install the part prepared in the first step onto the disk so that the round hole is on top. We weld both disks together along the seam, clean the seam with sandpaper.
3. Door.
In the lower part of the stove we cut out a rectangular hole, the dimensions of which will be convenient for placing fuel inside the stove. Don't make the hole too close to the bottom; there needs to be room to hold the coals. We process the hole with sandpaper and weld two large bolts to it, and two nuts to the cut metal part. We weld a third bolt to the cut metal, which will act as a door. We weld the door onto the bolts.
There is no need to make an additional hole for air supply, since the door can handle these functions perfectly
4. Handles.
To make the stove more mobile, you can slightly modernize the design. We bend thick wire into handles and weld it on both sides of the stove.
5. Legs.
We cut the rectangular pipe into 3 equal parts. The length of one part is about 30 centimeters. Turn the oven upside down and weld the legs to it at a slight angle. The angle will make the structure as stable as possible. You can also weld a sheet steel patch to the bottom, which will prevent coals from falling onto the ground in the future.
The legs will raise the stove, which will increase its convenience for cooking
6. Appearance.
The finished cauldron stove can be decorated with heat-resistant enamel. It is advisable to give preference to dark colors, as bright colors will quickly lose their shade and traces of burning will appear on the surface.
Water container
How to assemble a potbelly stove body
So, you will need 4 disks, but three of them will need to be worked in a special way.
In the disk that will be below, you need to cut a hole and make a removable tray for removing the ashes
In the side of the disk you need to cut out a half ring with a grinder, as shown in the photo. This half ring will become the basis for the pallet
Measure the inside of the disk, make a template and cut a piece of thick sheet metal along it to create a circle that can then be welded to the half ring
To easily remove the tray, you need to attach a handle to it. Even an ordinary door or any other suitable metal bracket will do. It can be secured by welding or bolts, whichever is more convenient for you.
The second disk is installed on the lower one with the rim down, there is no need to redo anything, and ash will then spill into the tray through the ventilation holes
But in the third element, the rim needs to be cut so that the disk turns into a metal ring. Its task is simply to make the firebox higher so that fuel can be refueled
Three discs are installed in this sequence: first the one with the tray, then the usual one without changes with the holes down, and finally the ring
The final, fourth disk must be placed with the holes facing up, then all the small ventilation passages will need to be welded and only the axial one will be left, to which the exhaust pipe will be attached. The entire structure must be fastened by welding, making continuous seams. This is where you can practice with a welding machine.
The furnace body is ready, you just need to make a few additions.
Bottom line
Creating a furnace from car wheels is a complex and time-consuming process. The base material is not standardized for welding, and therefore the use of such furnaces if assembled poorly can be dangerous. Furnaces of this type must operate on solid fuel materials, and only experienced welders can create them.
In general, creating a stove from car wheels is an economical and quick option for heating a garage or bathhouse. What type of stoves do you consider the safest? Share your opinion in the comments!
Tags: disk, KAMAZ, stove, hand, yours
« Previous entry
The stove is a friend on a hike and in the country
Don’t be lazy - spend 3-4 hours of free time and become the owner of an amazing and very functional stove made from wheel rims. Its advantages are obvious:
- light;
- portable;
- heats up quickly and releases heat;
- budget;
- any fuel is suitable for it;
- does not burn out.
A mobile stove made from old wheel rims will become indispensable for use in a bathhouse. And if you build a stove with a place for a cauldron, the device will be a great addition to outdoor gatherings or meetings with friends in the country. By placing a cauldron on it, you can safely prepare delicious soup or porridge, and by removing the cauldron and placing a grate on top, you will get excellent kebabs.