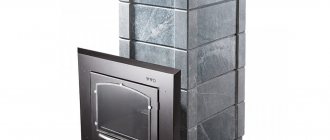
Of all the homemade stove devices and designs, the stove made from a cast iron bathtub is best suited for a home steam room. It cannot be said that a homemade heater made from an old cast iron has an elegant design or is very easy to maintain. You can’t argue with this, the homemade product doesn’t look as impressive as modern cast iron boilers, but it heats just as well, and in the construction of a bathhouse, a stove from a bathtub will cost an order of magnitude cheaper than a heater made from industrial cast iron.
Why build stoves from a bathtub
At first glance, the idea of a homemade cast iron heater looks quite unusual and strange. Why make a stove from a cast-iron bathtub with your own hands, if you can buy a factory-made steel boiler-stove. In fact, there is a rational grain in such an undertaking:
- Any metal specialist will confirm that thick-walled cast iron is ideal for arranging stoves, fireplaces, and boilers of a wide variety of designs and models;
- A good cast-iron boiler costs fabulous money, while building a stove from an old bathtub will take a maximum of a couple of thousand rubles and several days of work;
- The semicircular cross-section and shape of the bathtub body are ideal for organizing the combustion process; there are no stagnant zones or sharp corners leading to local overheating of the bowl walls.
It is clear that the bowl body should not have cracks, metal chips or through corrosion. Due to poor workability, fragility and low ductility, cast iron is quite difficult to process, cut and weld in the makeshift conditions of a garage or cottage. Therefore, in order to make a stove from a bathtub with your own hands, some practice will be required. At the very least, it will take quite a long time to select the mode to electric weld the cast-iron walls of the furnace.
Advantages of using cast iron
This type of metal is rightfully considered one of the best stove materials. Its main advantages include:
- Environmental safety. When heated, it does not emit harmful substances.
- Resistant to temperature changes. An outdoor stove made of brick may begin to crumble after just a few years.
- High thermal conductivity. A fireplace made of cast iron will warm up a room much faster than one built from other materials.
- Strength. Cast iron is the leader among metals in terms of strength. Even steel stoves are less reliable.
- Ease of use.
- Fire safety.
The disadvantages of cast iron that are worth paying attention to are brittleness and susceptibility to corrosion. In the first case, unnecessary mechanical influences should be avoided; in the second, the surface should be treated with special solutions.
A homemade cast iron structure will not turn out very beautiful, so it is recommended to cover it with brick or stone.
Preparing a cast iron bathtub body for remodeling
The first stage of building a heater, regardless of its design and size, always begins with removing layers of old paint, limescale, rust, and all the debris that has accumulated on its surface over decades of use.
Some craftsmen recommend burning the body on wood in the open air. The stove is placed on bricks and a small fire is lit. It will take a long time to heat the cast iron bowl, at least 2-3 hours, until the remaining contaminants burn out. In this way, it is possible to get rid of ingrained odors and at the same time “reveal” the surface from layers of lime and rust.
Cutting the bathtub
It is best to saw the bathtub outdoors, after turning it upside down. Cast iron is a brittle metal, so the procedure requires care. The cutting is done with a grinder. Buy several cutting discs at once. We make markings, and then lightly cut the enamel along the line so that when a full cut is made, chips do not form. We saw through the cast iron at a slight angle and make sure that the tool does not heat up. We take breaks. To prevent the halves of the sawn tub from pinching the disk at the final stage of cutting, place supports made of wood or brick along the edges of the cut.
Bathroom cutting is done with a grinder
Cutting the cast iron bathtub body into blanks
Cutting cast iron, especially thin-walled, is quite difficult; the material itself is soft and low-plasticity, and with the slightest overload or excess pressure it can crack in the most inappropriate place.
The body is cut in the following sequence:
- The cutting line is marked on the enamel surface;
- Using an electric drill and a thin drill, drill through holes in the corners, at the break points of the marking line. On a rounded surface, drilling is performed every 4-5 cm;
- A metal hacksaw is passed along the completed markings with a file or a sharpened blade in order to remove the enamel and prevent chipping of the coating;
- The last stage is the most critical. The cast iron bath is placed on a flat, absolutely flat surface and cut with a grinder along the marking line.
Advice!
Usually, to avoid punctures, the body is cut along the contour, leaving several jumpers of a couple of centimeters connecting the two parts of the cast-iron bathtub. Next, you need to additionally secure each half of the bowl, trim the bridges to half the thickness, and carefully break them with a sharpened slotted screwdriver and a hammer.
The remains of the lintels are cut around the stone or removed with a grinder. It is worth remembering that when cutting cast iron, a huge amount of black metal dust is formed, which can eat into the skin of your hands like soot. Therefore, before you start making your own stove from a cast iron bathtub, you need to stock up on respirators and protective clothing.
Preparing tools
You will need tools for metal processing and masonry construction. To cut a cast iron bathtub, sand its edges, and make holes for fasteners, you will need:
- laser level, plumb line, tape measure, marker - for marking;
- grinder with a set of circles (for cutting metal - 125 mm in diameter and 1 mm thick, for grinding);
- files with coarse and fine notches, sandpaper;
- electric drill, drills 9-11 mm;
- hammer, pliers, metal cutters.
In addition to metal parts, there will be brickwork at the base of the structure, so you will need a nozzle for mixing cement mortar, a container for it, a trowel, and a spatula.
If you do not use an angle grinder all the time, you can rent it
Options for building a heater
For heating and heating a bath, you can use three types of stoves based on a cast-iron body from an old bath:
- Classic two-chamber stove with a closed firebox and heater;
- Fireplace stove with screen;
- A dome stove is the most complex and interesting to make with your own hands.
The decision about which type of cast iron bath stove to use in the steam room is made based on the size of the bath and the heating method. For example, cast iron fireplace stoves are great for a sauna, while a classic two-section stove can be used for heating a sauna room and even cooking.
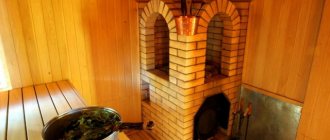
Furnace No. 1
This version of the stove is capable of heating a bathhouse of 7 square meters. m to 80 degrees in just a couple of hours. To build a stove you will need scrap metal: a cast iron bath, a gas cylinder and a metal drum from a conveyor belt with a diameter of 40 cm. The drum can be replaced with a gas cylinder or pipe - this will be the combustion chamber. The sequence of work is as follows:
- A concrete foundation is being poured for the future furnace.
- The end of the bathtub is cut off.
- We make a combustion chamber: holes are drilled at the bottom of the drum. A box is welded to cover the holes and serve as an ash pit.
- We put the door on the firebox. You can use this spare part from an old stove.
- A gas cylinder is welded vertically at the opposite end of the drum.
- Now the resulting structure is placed in the bath.
Brickwork around the bathtub - A chimney pipe is welded to the cylinder.
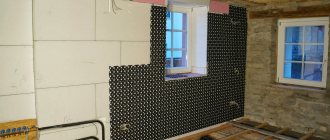
- Lay the foundation with bricks to the height of the bathtub. Clay mortar is used for binding.
- After the masonry has dried, it is decorated with ceramic tiles. Tile adhesive is selected that is heat-resistant.
- Stones with a fraction of 7 to 15 cm are poured into the bathtub. Granite or pink quartzite. The stones quickly gain temperature and give off heat for a long time. Quartzite releases chemical compounds into the air that normalize blood pressure and metabolism. This bathtub can hold approximately 350 kg of stones. Bathhouse technologists claim that this number of stones is enough for a bathhouse of 10 square meters. m.
Advice. If you weld a flat metal platform to the cylinder, you will get a stove for heating the kettle.
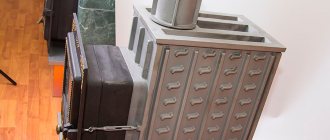
Cast iron heater for a large steam room
Ideally, if you have experience and skills in working with metal, you can try to build a two-dome stove from an old bathtub, as in the video. In this case, to make a real cast-iron firebox, you will need a full-size bathtub, at least 180-190 cm long.
The basis of such a stove for a sauna made of a cast iron bath is a whole body with the short side or “back” cut off. The bowl is laid upside down on a base lined with fireclay bricks on vermiculite cardboard. The design of the stove does not provide for a blower or grate; the firewood is laid out in layers directly on a heat-resistant base.
In terms of design and operating principle, a cast iron stove from a large bathtub is almost identical to a Russian stove. The chimney or pipe for removing combustion products is located directly at the loading window of the furnace. Firewood laid out in a woodpile burns in layers, and the hot combustion products go around the cast-iron roof of the stove along a horseshoe-shaped path and are removed through the chimney in the front part of the firebox.
For your information! To seal the joint between the body and the heat-resistant fireclay base, asbestos tapes, basalt cardboard and heat-resistant sealant are used.
The cast iron bathtub is lined with red brick walls. The remaining space between the ceramic lining and the cast iron body is filled with foam glass granules. The upper plane is covered with a metal sheet. Thanks to the enormous weight of the cast-iron body and brick shielding, the entire structure heats no worse than a real Russian stove. According to reviews from owners, heat and smoldering coals in a cast-iron combustion chamber are retained for 24 hours.
List of required materials
Several items made of cast iron (if not, then stainless steel will do):
- cast iron bathtub “old school”;
- grate;
- stove with burners or metal sheet (5 mm or thicker);
- door (beautiful forged or just standard).
Other metal elements needed include corners for fixing the grate, fastening bolts with nuts, a chain-link mesh to reinforce the clay layer, and a pipe for making a chimney (diameter from 100 mm to 120 mm).
Ready-made oven doors
The masonry is made of refractory bricks, fastening the rows with clay-sand mortar. The amount of brick depends on the size of the structure. If you plan to finish the device externally with ceramics, you should purchase tiles and heat-resistant adhesive, as well as heat-resistant sealant. Don’t forget about protective equipment – thick clothing, goggles or a mask, work gloves.
Simple dome stove
If we are talking about heating a room of up to 10 m2, then instead of an uneconomical fireplace, you can try to build a stove with your own hands from a single-dome cast-iron bathtub.
To make a firebox you will need half a standard length cast iron bath. As in the previous version, a massive body is used to arrange the combustion vault, but in this case the dimensions of the combustion chamber are half as large, which means it warms up faster.
The combustion chamber is also not provided with a grate, so such a stove has to be lit using a small woodpile placed deep in the firebox. After the wood burns out and draft appears, you can fill the chamber to half its volume. This is no longer possible, cast iron is not a brick, so the roof of the stove may crack if it overheats.
Stage No. 4: finishing
Here I had two tasks:
- Insulate the stove structure even more;
- Decorate the building, making it an excellent addition to the country interior.
And I started:
- I mixed a solution of clay and sand in a ratio of one to two;
The composition of clay and sand tolerates high temperatures well
You can also add some lime to the mix. This will reduce the risk of cracks appearing during the hardening of the finishing layer.
- I covered the cooking compartment with a steel mesh , the mesh size of which is 20 mm, and fixed its edges to the brickwork using self-tapping screws and plastic dowels. Now the clay plaster applied on top will not slide down the smooth cast-iron surface, and when it dries, it will have sufficient strength;
- By this time, the mixed mixture had reached the desired consistency, and using a spatula I applied the first finishing layer , which I did not smooth;
The first layer is ready and drying
- After the clay had set, I completed the final finishing , then moistened the spatula and carefully leveled the created coating. In total, my cladding was approximately 70 mm thick;
- After hardening I whitewashed the fur coat , adding to the similarity of the appearance of the structure with ancient stoves.
Oven after whitewashing
Also, in the future, I also want to cover the brickwork with ceramic tiles, but in order to save money, I don’t want to specifically purchase expensive materials for this. Therefore, I’m waiting for the time to renovate the bathroom at the dacha to use the ceramics removed from its walls.
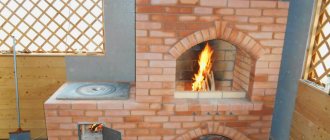
Fireplace stoves made from cast iron baths
Of course, it is not necessary to build a stove from a bathtub onto half the wall of the bathhouse. For a small steam room, you can get by with a small fireplace loading the hearth from the dressing room.
To make a small stove from a bathtub with your own hands, you can adapt the third part of the body of a standard bowl or use one of the small-sized models with a length of 120-130 cm.
For your information! Cast iron bathtub bodies are ideal for making fireplaces, including fireplace stoves for saunas. If the chimney assembly technology and heater design are followed, such a stove will heat no worse than an industrial model.
The cut off rear part of the body is installed on a foundation made of heat-resistant bricks or blocks. The area for laying firewood must be covered with a stainless steel sheet, and the place for firewood must be pushed to the maximum depth inside the housing. During the combustion of fuel, hot gases will flow around the wall or former bottom of the cast iron bath, thereby increasing the efficiency of the furnace.
The depth of a standard cast-iron bathtub ranges from 40 to 60 cm, so the fireplace body can easily fit into the wall between the steam room and the dressing room. The back side of the body must be sheathed with metal, covered with a fine-mesh stainless steel mesh, and the backfill of the future heater can be laid.
Why do you need a foundation?
Having cut the main part of the future stove into two identical fragments, you can begin building the foundation. It is the main stabilizing element of the structure. Without a solid cement foundation, regular shrinkage will occur (do not forget about the weight of the metal) into the soil, which can render the brickwork unusable.
The technology for constructing a concrete base may be different. A small stand can be built without additional supports; to build a tall one, you will have to put together a blind area. The main purpose of the blind area is to give the concrete base an even shape.
Diagram of a concrete foundation with a blind area
The classic version of a cast iron bath stove
One of the most popular models is considered to be a two-section combustion chamber, made according to a standard design with a firebox, ash pit, ash pan and a hot chamber, where, in fact, most of the released heat is collected.
The design of the oven consists of two sections - upper and lower, each of which is equipped with its own door. To make one stove, one full-size cast iron bath, 180 cm long, is consumed. The body is cut into two halves, which are connected to each other along the contour of the side. A sheet of steel with a thickness of at least 10 mm is laid between the sections. A steel pipe for the chimney is welded into this sheet, which is discharged through the location of the drain hole in the bottom of the cast-iron bath.
Technological process
Now that the source material is ready, we determine the design features of the furnace being built, the installation location, and begin construction.
Creating a foundation and installing sheets
To build a furnace, the foundation can be made as a strip foundation by digging a trench around the perimeter of the future structure. But given the large weight of the font and the bricks with which the outer part will be laid, it would be better to make a monolithic foundation.
Step-by-step instruction:
- Let's mark the selected location. The marking boundaries should be 10–15 cm larger than the area of the future structure.
- We will dig a pit to a depth of 30–40 cm.
- We will construct a sand and gravel base. To do this, cover the bottom evenly with crushed stone, then with sand. Let's moisten and compact all this.
- We will build formwork around the perimeter of the pit. The height of the future foundation is no more than 30 cm from the ground.
- Using scrap metal, we reinforce the internal cavity of the pit. We connect metal products inside the pit with wire.
- Fill the inner cavity of the pit with concrete. Using the level rule, we make the top layer horizontal.
- Let the foundation dry completely.
After pouring concrete into the foundation, you need to let it dry for several days.
While the frame hardens, we will select the required sheet profile for the partition. Its thickness must be at least 4 mm. The main requirement for a sheet is its straightness. If it has any defects, it will be impossible to install the upper part of the stove evenly.
Apply the sheet to the outline of the upper part of the sawn bathtub and draw it. Let's cut out the future partition. Mark and cut a hole for the chimney pipe. It is placed opposite the drain hole of the second half of the font.
After the foundation hardens, we will prepare the installation site. To do this, we will lay out several brick stops that will support the side walls of the bathtub. Let's install the font on the foundation. For the bottom of the oven, you must use the half that does not have a drain hole. If the bathtub is not very stable, then we will put temporary supports around the perimeter. Let's make them from timber.
Before installing the sheet, it is necessary to degrease the surfaces that will be in contact. After this, you need to apply sealant to the upper surface of the bathtub. The sealant used must be heat resistant. The use of other adhesives will compromise the tightness of the joint. It is this surface that will be exposed to high temperatures.
Chimney pipe
We have already cut a hole in the steel sheet for the chimney. Now let's do the same in the bathroom. Considering the high strength and fragility of cast iron, this work is no less important than cutting:
- Around the drain hole we will mark the diameter of the future chimney. On a steel sheet, this size corresponded to the diameter of the pipe. In the upper half of the stove, a hole for the chimney is cut out 1–2 cm larger than the outer diameter of the pipe.
- We carefully drill holes along the intended circle line, pausing to allow the cutting surfaces to cool. Drilling should be done as tightly as possible.
- Slowly, using a good quality small diameter cutting disc, connect the holes with slits.
- Use a file to clean out the unevenness of the cut line.
It is important to cut the hole for the chimney as carefully as possible.
Now let's weld the pipe to the sheet. The length of the pipe must exceed the structure of the stove assembly by at least 1 m. When carrying out welding work, we control the verticality of the future chimney. It is important to remember safety measures: use a working machine, protective clothing and special glasses or a welder’s shield.
Before installing the second half of the font, degrease the joint surfaces and apply heat-resistant sealant. Lift the top half upside down over the chimney and place it in this position on a steel sheet. Align the edges of the lower and upper parts, remove excess sealant with a rag. Allow the assembled structure to dry.
To create greater structural rigidity, we fasten the two halves of the bathtub in adjacent surfaces with bolted connections. Drill holes for bolts carefully, remembering the fragility of the material. Seal the gap between the chimney pipe and the hole in the upper half of the stove with sealant. If there is a large gap, make a metal sealing ring.
Lattice
Now we install the grates on the bottom of the future furnace. They are made of cast iron or high carbon steel. The surest solution would be to install a cast-iron grate, which will be slightly wider in width than the lower part of the bathtub. If necessary, adjust the size of the grate so that the grates are installed at a height of 10–15 cm.
The best solution for the bottom of the oven would be a cast iron grate
In the case when the grate size is smaller than desired, it is necessary to weld a couple of corners at the desired height and install grate bars on them. It is better to carry out welding work in the lower part of the furnace before assembling the entire structure. Therefore, ensure that the grate is the correct size for the grate before installing the sheet on the bottom half of the font.
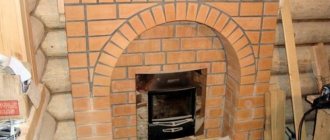
Masonry
In this form, the oven can already fulfill its functional purpose. But a large amount of heat is transferred through the external walls and is not used. In addition, the appearance of such a design does not give positive emotions.
Let's start finishing work. Let's start with brick laying. The brick must be solid, solid red. We lay out the bottom row the width of a brick. Using the terminology of masons - a poke. Then, laying bricks around the perimeter, we will make half-brick masonry. Each subsequent row should be staggered. The solution used is supplemented with lime to eliminate the possibility of cracks.
If necessary, we will strengthen the rigidity of the furnace structure with internal brickwork and remove temporary supports. When laying the lower front part of the stove, we will fix the prepared door with the frame into the masonry itself.
For greater functionality, the stove must be lined with bricks
Usually there are two such doors: the upper one for storing firewood, and the lower one for adjusting the draft. We will finish the laying at the height of the first half of the bathtub.
Decor
To preserve heat in the brazier and improve the appearance, we will finish the upper part of the structure with several layers of sand-clay mixture. This mixture must be prepared in advance. It is best to soak the clay in a bucket two weeks before use. Periodically add water and stir. Before use, add sand and a small amount of lime.
We will cover the upper part of the stove with a metal mesh, firmly fixing it at the edges. Apply the first thick layer of the mixture, and after drying, apply a finishing layer. The resulting thickness should be 6–8 cm. Roughness and unevenness will be rubbed off. Let's whitewash the top part of the structure.
To increase the cooking capabilities of the new unit, we will cut a damper out of metal. Its size should match the end of the fryer. The thickness of the damper is made small - 0.5–1 mm. We weld the handle to the damper and paint it, along with the doors of the lower half of the stove, with black fireproof paint in several layers. This will give contrast.
This is useful: what paint is best for a barbecue.
Our oven is ready for use. Let's start cooking food in the fresh air and evaluate the possibilities of its use.
Features of furnace assembly
The two sections are connected to each other only mechanically; any attempt to weld or glue the cast iron halves will lead to destruction of the structure. To assemble, the furnace parts are placed on top of each other, holes for M10 bolts are drilled around the perimeter and connected using spring washers. The joint line between the steel sheet and the edge of the upper chamber is sealed with heat-resistant fireplace sealant.
In the bottom part of the lower compartment, which is also the firebox, a window for the grille is cut out. The grate bars are made from an ordinary square pipe 20 mm thick. The front walls of the upper and lower chambers are cut out of sheet steel with a thickness of at least 5 mm; doors and latches are also made from it.
The design is very simple, the only thing you need to pay attention to when assembling a stove from a cast iron bath with your own hands is welding. All parts are hung and installed on the body by welding.
For your information! Welding work must be carried out only with direct current, with specialized electrodes of the UONI13-55 type.
The walls of a cast-iron bathtub are quite thick, so you will have to spend several hours choosing the appropriate operating mode. The seam looks like it was soldered, but the strength of such a connection is sufficient to withstand any thermal loads.
Stage No. 2: cutting the cast iron font
I would like to warn you right away that this process is very labor-intensive, requiring great patience and caution , since during its implementation you can break the instrument and tear the disc, as a result of which there is a high probability of serious injuries to people nearby.
In my execution it looked like this:
Schematic instructions for sawing a cast iron bathtub
- To begin with, I laid the bathtub on the ground upside down for ease of further operations;
If you cut containers indoors, be sure to cover the walls and furniture with plastic film or old rags, otherwise cast iron dust will settle on them, which is almost impossible to remove.
- Strictly in the middle I drew a straight line with a marker , marking the location of the cut;
The cutting line should be strictly in the middle
- Next, strictly following the applied markings, using a grinder, I carefully made a cut into the enamel layer , the depth of which, as a rule, ranges from 1.5 to 2.5 mm. If you immediately start sawing the cast iron itself, then chips will form on the enamel covering it;
Scheme of cutting the enamel layer
- Now I moved on to sawing the font itself and did it slowly, regularly giving the tool rest. Believe me, the price of haste here can be very high; the saved 20-30 minutes will not replace your burnt angle grinder.
Other uses
An old bathtub can serve well the owner of a country house or cottage, you just need to show a little imagination. Often, an old plumbing device is used in the following ways:
- Swimming pool for children. The usual inflatable pool is not the most practical thing; it can easily be replaced with a bathtub, not forgetting to install drainage at the drainage point; subsequently, such a pool can easily be transformed into an artificial reservoir.
- Design element. If you combine a flower bed and a table, then such an item can be safely placed on the terrace and admire the lush blooms in any weather.
Table for a creative person Source pinterest.ca
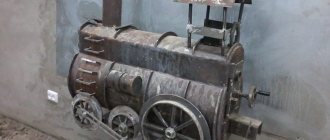
For those who like to cook. The streamlined shape is ideal for creating a barbecue or stove; You can also get a mini-cellar or hiding place.
When a bath doesn't spoil the view Source pinterest.com
Compost container. The bathtub is equipped with a reliable, tight-fitting lid to prevent unpleasant odors from spreading.
An alternative to a compost bin Source gjcleverley.com