Purpose
If the firebox door is made external, such a stove can be completely covered with a stone layer, protecting people from burns. But the main purpose of nets with stones is heat accumulation and gradual and constant heating of the steam room and the entire sauna room.
The second important purpose of a grid with selected and correctly placed stones is the ability to quickly raise the temperature in the steam room by splashing several ladles of aromatic infusions of herbs, pine needles or kvass onto the heater and create a unique atmosphere of a Russian bathhouse.
Advantages of locating a furnace with an external fuel channel
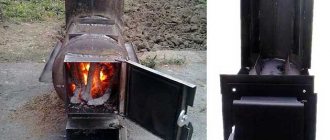
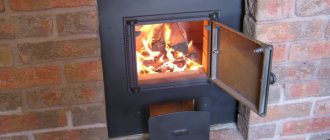
Sauna stoves with an external fuel channel can be made of cast iron or steel. The design of this device differs from a conventional furnace for heating a bath precisely in the presence of a remote firebox, which can be removable - in heavy cast iron versions of products, or have an integral structure - in steel models. Thanks to this configuration of the stove, the combustion chamber door is moved into the room adjacent to the steam room or even outside.
Moving the furnace firebox into the dressing room provides many advantages during operation:
- When the stove is fired, two rooms are heated at once - the steam room and the dressing room.
- It becomes possible to add firewood, constantly supporting the combustion process while the steam room is in use.
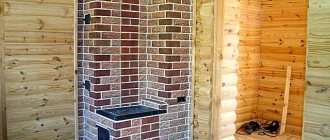
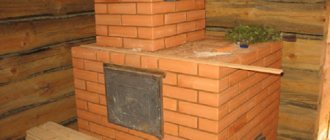
- Since there will be no need to open and close the firebox door from the steam room side, the stove can be protected with a safety barrier (brick screen), which will eliminate the risk of burn injuries during water procedures.
- Garbage, which is often brought into the room along with firewood, will not get into the steam room.
- It becomes possible to place a niche next to the firebox for drying firewood, which, of course, cannot be done in a steam room.
- It ensures that clean air is maintained in the steam room, since when the door is opened to add firewood, gaseous products of wood combustion can enter the room in small quantities.
- The absence of a firebox door in a steam room will significantly save the free space of the room, and so, as a rule, it will not be too voluminous. Therefore, it becomes possible to install the heating device in a convenient location on the wall dividing the room.
However, it must be taken into account that modern factory-made appliances are equipped with a glass cooling system installed in the combustion door. Therefore, the waiting room will not warm up properly. And in order for heat to flow more intensely into the dressing room, you will have to open the combustion chamber door slightly - this factor must also be taken into account when choosing a place to install the stove. If the device cannot be installed so that the open door does not interfere with free passage, then in winter this room will require additional heating.
Prices for a stove in a bathhouse
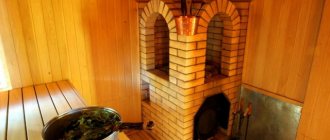
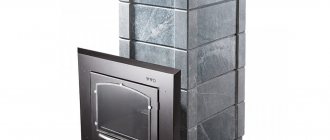
sauna stove As an example, the design of the Termofor Kalina Inox BSE anthracite NV PRA stove
The remote fuel channel can be rectangular, or have a narrowed shape near the firebox. Panoramic heat-resistant glass installed in the door not only allows you to control the fuel combustion process, but also gives the design an aesthetically pleasing appearance to the fireplace. If the dressing room is used as a relaxation room, then you can install chairs in front of this “fireplace” and, while relaxing after visiting the steam room, admire the play of the flames.
The system that cools the glass also performs the function of cleaning it, so soot does not accumulate on the inner surface, and it always remains transparent.
Installing a stove with the combustion channel removed to the dressing room provides a lot of operational advantages. The disadvantages are minor, and the most significant of them is more worries when installing the device.
The fuel channel of a sauna stove can even be taken outside. This is usually done in the following cases:
- When the steam room and dressing room have a very small area.
- If the stove is planned to be heated with coal, which traditionally leaves a lot of dirt behind, and its combustion products are quite toxic.
- In the case when the bathhouse is used for commercial purposes, that is, it is temporarily rented out to strangers. And its owner acts as a stoker, who does not disturb clients with his presence at all.
In some cases, this option is also used - the firebox window is generally placed outside
In other cases, a stove installed in this way will be extremely inconvenient to operate, especially in winter. Agree, there is little joy when you have to jump out into the street in order to add firewood to the firebox.
The only advantages of moving the furnace of a sauna stove outside are the absence of garbage in the premises and the fact that the fuel does not have to be brought inside the sauna.
Kinds
They are divided according to several characteristics:
- According to the configuration of the structures themselves, they can be round for installation on the chimney pipe. Rectangular or oval, repeating the configuration of the stove itself, when installing a mesh on top or completely covering the entire surface with stones;
- Based on performance materials. You might like a mesh made from twisted rods, all kinds of shapes made by a blacksmith, from which a beautiful container for the stone is assembled. A simple mesh can be made from steel rods and strips of sheet metal, or from a large cross-section pipe with cavities cut out in it for beauty and steam release;
- Heaters can be made of a closed type. In such devices, the stone is placed in a closed container, in which a door is made for storing and servicing the stones. This mesh allows you to keep heated, moist air in the steam room longer, but the temperature cannot be raised above 1000. The wood consumption for this design is higher than that of competitors;
- Open-type meshes accumulate less heat, but can easily heat the atmosphere of a steam room over 1000 and the wood consumption of such stoves is less. This design is carried out with the external laying of stone from the outside in a certain sequence; with its help, you can install a mesh both on the chimney pipe and on the stove body.
Additional wood processing
Fire safety standards require wood to be treated with special impregnations to reduce its flammability. But many people know that impregnations are not particularly useful, especially in a bathhouse, where high temperatures are deliberately planned, at which chemicals will begin to be released into the air and poison a person’s lungs. This is not the result you want to get from visiting a bathhouse.
However, not the entire bathhouse has a high temperature; as a rule, only the steam room. Therefore, in order to avoid fires in other parts of the room from sparks, for example, in the chimney area, experts advise treating the wood with fire retardants at least there.
Important! It will not be possible to treat wood once and forget it for the entire time it is used in the house. You can do a small check: if the wood chips ignite with a match, then it’s time to renew the impregnation
On average, the frequency is once every two years.
Step-by-step instructions for installing a metal stove are as follows:
- Having chosen a place to install the stove, we dismantle the old floor, taking 10 - 15 cm more than the bottom of the stove on each side;
- We dig a hole half a meter deep, compact the bottom and pour a thin layer of sand and crushed stone into it;
- We lay out plastic film to waterproof the slab (double layer);
- We cut out a frame from the road mesh, which is 5 cm smaller in width than the hole, and place it on stands made of pieces of reinforcement resting on the floor, tied to the mesh with wire;
- Fill the hole with concrete. Formwork from boards on top will make the edges smoother and raise the level of the slab. Horizontalness can be checked using a level;
- As soon as the slab hardens, we cover its surface with roofing felt, consisting of two layers, and then 1-2 layers of fireclay bricks so that the base level is equal to the floor level. It happens that the base rises above the floor by 5 - 10 cm;
- After the brick has cooled and hardened, we install the stove according to the design;
- We install an adapter in the wall with welded plates that protect the wall near the chimney;
- We weld the chimney pipe to the adapter;
- On the outside of the bathhouse, we weld another part of the pipe and cover it with a special nozzle to prevent the ingress of precipitation and debris;
- We also install a chimney there;
- We protect the slab from three walls with facing or fire-resistant bricks;
- We line the stove itself with bricks;
- We fill the tank with water, lay the stones;
- Making the first test firebox;
- We control that there are no smoke leaks in places of welding and connections, water leakage from the tank onto the stones or into the firebox, etc.
Selection criteria and prices
There are no special recommendations in this matter. It all depends on the capabilities and desires of the bathhouse owners. But you should pay close attention to some features:
- Thickness of mesh parts. Pay attention to the thickness of the parts. If stones are completely placed into an openwork, albeit beautiful structure, at a high heating temperature and under heavy weight, the mesh may become deformed and lose its attractive appearance;
- The material from which the mesh is made. For such structures it is better to use heat-resistant, alloy steel or stainless steel. If black steel is used, surfaces must be painted with a paint that can withstand high temperatures and be resistant to stones during installation and maintenance;
- Manufacturer and price. In stores you can find nets from unknown manufacturers for 700 rubles, but such a design will not last long and reliably, just look at the coating of the parts and their thickness. You shouldn’t chase cheapness; it’s better to choose based on price-quality ratio. Normal meshes of sufficient volume will cost at least 1,500 rubles and more.
If you have some skills in performing electric welding and plumbing work, it is better to make a reliable mesh for the heater with your own hands.
A few important points
The size of the mesh cells should be 3-5 mm. You should not use cells that are too small; gases must pass unhindered.
Metal grid
Be sure to draw a sketch. To do this, take all the necessary measurements as accurately as possible.
Pay special attention to this work. The sketch will help determine the required amount of material, the exact dimensions of the parts that you will need to make in order to assemble a high-quality and aesthetic design
If you do not have experience in such work, make a life-size model of the structure from thick cardboard. This will allow you to clarify all the dimensions, and the parts of the layout will be excellent patterns when creating your spark arrestor.
Prepare sheet steel, galvanized or stainless steel (thickness 0.6 - 1 mm). Determine the size of the sheet based on the dimensions of the sketch. You will also need a mesh made of stainless or galvanized wire with a mesh size of 3-5 mm.
This material will be perfectly complemented by the following publications:
- Review of chimneys for stoves made of various materials
- Rules for installing chimneys: we lead the chimney pipe through the wall
Making a mesh for stones with your own hands
As an example, consider the process of manufacturing a mesh for arranging a chimney pipe on a steel stove. The height of the square structure is 780 mm, with wall dimensions of 300 mm. Such a mesh for a sauna stove can only serve as an addition to the main heater and as a decorative finish for the steel hood pipe.
Materials and tools
To work you will need to prepare:
- welding machine with special clothing and protective equipment for the welder;
- a grinder with a set of cutting discs and a cleaning stone;
- a set of metalwork tools;
- corner with shelf size 40 mm - 4 parts of 780 mm and 8 of 220 mm;
- steel bar with a diameter of 12-14 mm, a length of 770 mm - 12 pieces and 4 pieces - 280 mm;
- electrodes for welding structural steel;
- fire-resistant primer, paint, solvent, brush.
Size calculation
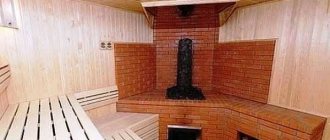
The best option that ensures optimal heat transfer and heat accumulation is a mesh that covers all surfaces of the stove from the bottom to the top shelf. This design allows you to get light, aromatic steam in the steam room.
Size examples
It is a mistake to think that if you simply lay the stones like a slide, you can get good steam quality and ensure the normal accumulation of heat by the stones. The higher the base layer of the stone is, the lower its heating level will be. Stones located above the surface of the hot stove wall receive heat from neighboring stones.
But they first accumulate heat and only then begin to release it. Therefore, for optimal heating of high-lying stones, the stove will require more burning time, which means that the preparation time for the steam room and the consumption of firewood increases. The calculations are very complex; you will need to know the coefficients for different materials and carry out calculations.
Experienced stove makers advise carrying out the calculation simply, based on the rule - for every 1 m2 of steam room, you will need to make a grid for stones with a volume of 1 m3.
Manufacturing instructions
It’s easy to make a mesh on the pipe of the sauna stove, which we will install, and attach it to the top of the heater. To do this you will need to perform several simple operations:
- use a grinder to cut blanks from corners and rods;
- We collect short parts from the corner into squares. We weld one with the shelves inward, and the second, with the shelves outward;
- We connect the blank bottom of the mesh with the shelves facing outward to the stand parts. We set each one on a square and first grab it in several places;
- We join and grab the pillar parts with the upper square. Tacks must be reliable;
- We mark the installation locations of the rods, there will be 3 of them on each side. We install them on the inside of the corners and grab the parts;
- Having marked the middle height, we install stiffening ribs from the rod on the inside and secure them;
- After making sure that the structure is assembled correctly, we completely weld all the connections;
- we clean the seams with a grinder; you can use files to sharpen the structure in inconvenient places;
- After soaking a rag in solvent, degrease all surfaces and lay down a layer of heat-resistant primer. After the layer has dried, paint the structure with heat-resistant paint.
Our design for installation on a steel chimney pipe is ready. All that remains is to install it after the paint has dried.
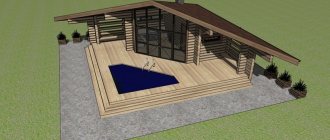
How to build a stove with an open heater in a bathhouse
The design of a stove with an open type of heater is simple to implement. Its dimensions are 102 by 62 cm. This is enough to obtain a functional family steam room with steam and heat in nine square meters of bathhouse.
In this embodiment, lining is not performed, so the stove is built from high-quality M150 brick, achieving very thin seams.
This option is not expensive, but also short-lived - the seams are restored every two years, lubricating them with fresh mortar. The stones are placed on a slab located above the furnace firebox. The stove can be metal or cast iron.
This furnace has two design options:
- with a remote container or located at the top;
- with water heating from a pipe laid through the firebox.
Each construction process begins with preparatory work.
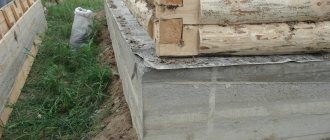
Since a brick stove weighs more than 500 kilograms, and during its operation the bathhouse floor may sag, it is necessary to build a foundation for the device.
Foundation
Step-by-step instructions for constructing a foundation for a furnace:
- Knowing the dimensions of the oven, they draw markings on the ground with a margin of half a brick.
- Dig a pit with a depth of 0.5 to one meter.
- Avoid being too close to the base of the bathhouse itself. If the ground moves, friction will become a destructive force for the stove and the bathhouse itself. A distance of 5 centimeters is allowed. Upon completion of the work, the gaps are sealed with river sand.
- The bottom of the pit is leveled and compacted.
- The choice of binding solution is dictated by the quality of the soil: if it is dry, then prepare a lime-cement mortar (6:1) with a certain amount of river sand. To prepare a lime binder mixture, sand and lime are mixed (2:1). Cement mortar is made by mixing sand and cement (3:1).
- 10 centimeters of sand and crushed stone are placed alternately at the bottom of the pit. Then they are compacted.
- Waterproofing material is placed on top, placing the film higher on the walls.
- Pour the mixture into the pit and leave until completely hardened. This will take about a week.
- After the surface has hardened, a freshly prepared liquid solution is poured onto it, which will spread strictly horizontally.
The stage of laying the furnace begins after 14 days, when the base of the furnace is completely dry. The solution is prepared from lime, clay and sand (1:1:4).
Building a brick oven with your own hands
The fuel part is lined with refractory bricks and equipped with a grate, the rest is made of ordinary red brick.
The masonry of all sauna stoves has the same technology, but in each case the seams are made responsibly. The tightness of the seams is the key to preventing harmful carbon monoxide from entering the room.
Work order:
- Before laying the furnace, a waterproofing sheet made of roofing material is placed on the prepared base in two layers measuring 5 centimeters larger than the dimensions of the foundation.
- To prevent the brick from drawing moisture out of the binder mixture, it is saturated with water before use, immersed in it for 1-3 minutes.
- Prepare a homogeneous and viscous masonry mortar from sand and clay, taken in equal quantities.
- The mortar is placed on the entire plane of the brick in a thin layer to create a sealed, filled joint of no more than 3 mm. Three-millimeter wire guides between the planes will ensure a high-quality seam. After pressing, the wire is removed and excess mixture is removed from both sides.
- When completing each row of the furnace, check the angle values.
- Bandaging (displacement) of bricks in the next new row is required.
Important! You cannot use heat-resistant and ordinary bricks next to each other, since the different heat capacities of these materials threaten the rapid destruction of the furnace.
Recommendations
Important points:
- Constantly monitor dressing rules.
- The thickness of the solution layer is about 10 mm.
- Seal the seams of the oven to ensure tightness.
- Check the horizontal and vertical levels every two rows.
- It is permissible to use a cement mixture when laying the bottom line; the temperature below is not too high, and the cement will strengthen the structure itself and protect the furnace from moisture.
- After laying two lines, install a blower and continue continuous laying.
- After erecting the walls of the blower, install the door and cover it with a grate, which will be the bottom of the firebox.
- Provide an ash pit (mobile or stationary).
- Build a combustion chamber 0.6 meters high. This is enough to create the highest possible temperature at the top of the flame.
- The required furnace firing depth is 80 cm.
- The dimensions of the space for stone backfill for the bathhouse are determined at the rate of 60 kg for each square meter of the steam room.
At the next stage, the fittings are installed: hinges, grilles, doors. When installing the doors, pieces of two-millimeter wire are placed in the seams. Continue laying from the door.
Grid installation
The mesh we make is even easier to install than it is to manufacture. To do this, drill holes for self-tapping screws in the corner shelves, 1 on each side. Then we mark and drill holes in the oven lid with a drill smaller than the diameter of the self-tapping screw. If the surface is uneven, you can lay a layer of paranite or asbestos, install a mesh and secure it with self-tapping screws to the stove.
All that remains is to install the chimney pipe, connect it to the outlet pipe, and you can proceed to the final operation.
Method of laying stones
The mesh for the heater stove must be filled in a certain sequence. Having prepared the stones, they will need to be sorted by size. Carefully place large stones in the bottom row and gradually fill the grid, reducing the size of the stones with each row. This arrangement will ensure uniform heating of the stone, regardless of the distance of the rows from the heated walls of the furnace.
Example of laying stones
Now all that remains is to light the first load of wood in the stove and open all the doors, windows and gate valves. When the stones burn out during a test run, they emit a large amount of smoke, so it is necessary to ensure sufficient ventilation and not be in the steam room yourself. After frying the stones, you can heat the bathhouse, go to the steam room and enjoy the aromatic steam by throwing several ladlefuls of meadow herb infusion onto the hot stones in a net.