Lining is one of the most popular finishing materials. It is environmentally friendly, durable, and has beautiful external characteristics. You can install lining slats using different fastening devices. But the most convenient and reliable of them is the clamper. What kind of hardware is this, what are its advantages and disadvantages, how to install it - you will learn about this from our article.
What is a kleimer?
A clamp or clamp is a fastening bracket. It is made from a special type of steel – spring. Can also be produced from galvanized metal. Belongs to the hardware category of building materials. Designed for hidden fastening of elements. When using a clamp, connecting and fastening parts are not visible from the outside of the material.
Kleimer is a German word. Translated from the original language, klammer means “bracket, clip, clamp, clamp.” Used for various purposes:
- fastening different types of lining;
- installation of seam roofing;
- fixing deck boards;
- fastening siding, plastic panels;
- fastening MDF and other panels.
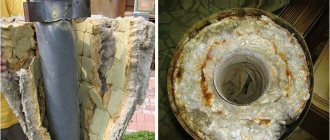
Previously, nails or screws were used to fasten lining, boards, baseboards and other finishing options. This type of fixation had a lot of disadvantages. The most important of them - on the surface @ [email protected] ???U?)??U?'??U????U` [email protected] `???U? was subject to corrosion over time. As a result, it became less reliable, and unaesthetic rusty streaks appeared on the material. For this reason, nails and screws were replaced by a hidden and reliable fastening - a clamp.
Combined fastener
The use of all possible types of fasteners is relevant in cases where the geometry of the room plays against the builder. A large number of protrusions, inclined surfaces, recesses or niches in the walls can become a problem for attaching the lining to clamps. In such cases, it is possible to use traditional lining fasteners.
A common problem is the finishing of door or window openings. Often there is not enough space on the door jamb to place a clamp, or the lining lamella has to be cut lengthwise. In such cases, two solutions are possible: fastening with screws and nails or modifying the clamp.
Self-tapping fasteners can be hidden under plastic plugs; galvanized nails will not be visible under the lining sheet on the adjacent wall. In addition, special corners made of plastic or MDF are available for sale - their function is similar to the function of a plinth, only for hard-to-reach or problem areas - external or indirect corners, recesses.
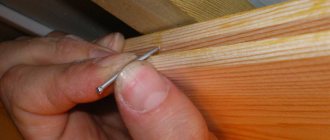
Modifying the clamp involves bending the tongue to the side. In this way, you can move the fasteners beyond the wall to an adjacent one. Often, in such cases, part of the clamp is cut off with a hacksaw or metal scissors. It is important during the modification process not to damage the integrity of the clamp - it may break. It should only be bent at right angles.
Peculiarities
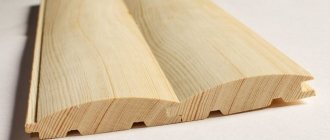
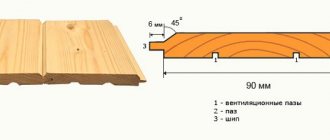
The clamp is ideal for fastening lining. Its configuration and design are made in such a way that the lining is securely fixed to the sheathing. The fastening form factor is perfectly combined with the shape of the lamellas, which have a special tongue-and-groove system.
The bracket is attached to the sheathing or rough base using two holes. To fix it on different surfaces, different types of fasteners are used:
- self-tapping screws;
- screws;
- nails.
Deep hooks on the brackets help strengthen the board. There are models that are additionally equipped with spike hooks. They serve to strengthen the fixation of the material and give additional strength to the fasteners.
Today, all kinds of clamps for lining are produced: sizes, models, materials can be different. This allows you to select hardware building materials for different types of work.
What to choose
What is better for attaching wooden, PVC or MDF lining? It’s worth starting with the characteristics of the room and the weight of the materials. To ensure maximum strength - definitely clamps. This is an expensive fastener for lining, which ensures durable installation of even heavy wooden lining in problem areas.
Traditional fasteners are only relevant for those rooms that do not require perfect interior design, but the overall style of the house must be consistent. Also, traditional fasteners are indispensable for finishing problem areas.
Types of clamps
All types of clamps are made of spring steel or galvanized iron. But they differ in purpose:
- for fastening plastic;
- special - for work on building facades: when laying tiles, porcelain stoneware slabs;
- for fixing lining and other wood facing materials.
Clasp clips may vary in size. Height is the main parameter by which hardware is selected. The parameter is the distance from the base to the clamping tail. The height of the staples is divided into 6 types. Each of them is designed for use with certain types of materials:
- No. 1. Used when working with lining and plastic panels.
- No. 2. Used for fixing lining, panels and MDF.
- No. 3. Clamps for eurolining and chipboard.
- No. 4. Most often used for eurolining.
- No. 5. Ideal for linden and aspen lining.
- No. 6. The largest type of brackets for linden and aspen lining, as well as for block houses.
Among all those listed, this is the most popular clasp for lining. The dimensions and configuration of the hardware are well suited for almost all types of lining. Clamps for eurolining are selected separately: the size is 4 mm, and for a block house – 6 mm. For plastic panels and thin lining, it is advisable to purchase staples 2-3 mm high.
There is one more parameter - the thickness of the plate. It can be different - 0.2 mm, 0.3 mm or 0.4 mm.
Nuances of assembling various designs
When it comes to assembling furniture, you need to take into account that it will not be possible to connect elements of different products in the same way - the installation of furniture structures requires special fasteners, fittings and a set of tools.
There are certain nuances in the assembly process itself - you need to know them in order to work quickly, accurately and accurately. Floor installation of a bed is significantly different from the assembly of wall cabinets; the connection of upholstered furniture parts and the installation of a built-in compartment are carried out completely differently. Some nuances and recommendations for assembling various furniture: a chest of drawers with drawers is an example of simple prefabricated furniture with a minimum number of fasteners. You need to install drawer guides on the side panels. Pour a little glue into the blind holes in the sidewalls and ends of the stiffener flanges, insert the dowels and easily hammer them in, connecting the elements, and then attach the confirmations. The top cover is fixed with dowels and minifixes - a pin in the cover, an eccentric in the sidewall, then the confirmations are screwed in until they stop. The next stage is to nail the back wall, having previously checked the diagonal, assemble the drawers, install guides on them, screw the handles into the prepared holes; standard sleeping bed. After checking the presence of all structural parts, the base is assembled - the transverse and longitudinal beams of the frame are connected with euroscrews (confirmations) or self-tapping screws. A cross beam is fixed in the center, the lamellas are installed in specially prepared grooves. The side walls of the frame are secured with dowels and plugs. The remaining elements of the bed are fixed with bolts, the legs are screwed in, if there are any, and the mattress is placed in the base box. The double model is assembled according to the same principle; bed with lifting mechanism. The standard model consists of a frame (base), a lifting mechanism, a mattress and internal drawers. You will need a screwdriver with a full set of attachments, a screwdriver, a wrench, euro screws with countersunk heads and an internal hexagon, a tape measure and a level. Assembly diagram: connecting three drawers and headboard parts with brackets, corners or ties with screws. In the upper part of the drawers, shelves, corners, a lifting mechanism are mounted - a gas shock absorber (cylinder upwards) is secured with nuts with a stopper, handles and a limiter for the mattress are installed; Stationary cabinets are the easiest furniture to assemble. Sequence of actions: connecting the shelves with the side panels using confirmations and screwdrivers, installing the back wall made of fiberboard, for which furniture nails or a furniture stapler with staples are used. After assembling the box, check the same level of diagonals and compliance with the right angle between the elements. The next step is hanging, adjusting the facades, then all that remains is to install the shelves. If the model has drawers or roll-out shelves, guides for them are installed first; sliding body - a stationary sliding wardrobe with a plinth begins to be assembled by screwing the plinth to the bottom with minifixes and dowels, and then driving in support nails
The body is also assembled on minifixes and duplicate dowels; it is important to check the correspondence of opposite holes. Next, fix the back wall (nails, staples, installation in a groove), check the diagonal and angle
After this, you need to install shelf supports, guides for drawers, install shelves and a bar. If the cabinet is without a base and trim in the lower rear part, the plinth is dismantled; sliding door system – used for all coupe models. Built-in products do not have side walls and are often made without a roof or bottom. Installation consists of attaching shelves to the walls of the room and installing a sliding system. First, install stoppers and limiters, secure the upper guide rail, there is no need to screw the lower one. The door panel is inserted into both guides into the far grooves, the second leaf into the near grooves, and adjustments are made. After this, you can fix the bottom rail and glue the sealing brushes; elements of a kitchen set are complex installation; a full set of tools, diverse fasteners, and special fittings are required. Assembly begins with the preparation of the lower sections - the bottom is connected to the side walls with euroscrews, the planks are installed under the tabletop, the back wall made of fiberboard is secured (stapler, nails in increments of up to 10 mm), and the legs are fixed with self-tapping screws. This is followed by installation of hinges in the mounting slots, hanging of hinged facades, and adjustment. Drawers are assembled using the same principle. After screeding the “bottoms,” the tabletop is installed, checking the horizontal level with a building level.
Advantages
Claymers are in constant demand in the construction market. This is due to the following advantages of construction hardware:
- Simplicity of design. Even a beginner in construction can figure it out. Installation is very simple and does not require high professional skills.
- No mechanical impact. When fixing, you do not need to hit it with a hammer, use a screwdriver or other construction tools to install the lining. This eliminates the possibility of damaging the slats. Cracks, chips, and delamination of the material during fastening are excluded.
- Selection of models. A wide range allows you to choose a bracket that is suitable for a specific material.
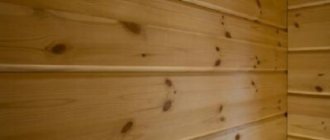
- Neat appearance of the canvas. On the front surface, the fastening of the lining to the clamps is completely invisible. The result of the work is a neat, seamless fabric that is not externally damaged by fasteners.
- Strong fixation. The brackets securely fix the slats. Due to this, the coating does not shift or deform during operation.
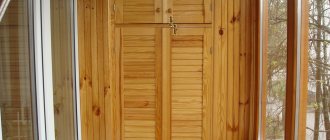
- Resistance to the external environment. The staples withstand the aggressive action of environmental factors, including high humidity. Therefore, they can be used for external construction work, as well as for internal cladding of baths and saunas.
- Inexpensive price. The cost of clamps is low compared to other types of hardware. This makes repairs less expensive.
To the listed advantages you can add versatility. The design of the brackets allows them to be mounted on any surface: wood, cinder block, concrete, cement, lathing.
Advantages and disadvantages
The advantages of clampers include:
- high installation strength. Each element is capable of carrying a load of up to 25 kg;
- high attractiveness of the finished canvas - hidden elements are absolutely not visible from the outside, the covering looks clean and neat;
- cladding elements are not subject to destruction. Conventional fasteners often rust, chip off pieces of the edge, or develop cracks in the face. Kleimers are completely devoid of these shortcomings;
- The manufacturing material is galvanized steel, which allows the use of hardware even in wet rooms (baths or saunas);
- simplicity, ease of installation;
- the covering on the clamps easily tolerates mechanical loads;
- reuse is possible - if necessary, the casing can be disassembled and the clamps can be used in another place.
Flaws:
- a wooden support system (lathing or solid flooring) is required for use;
- each type of cladding or attached elements requires its own type of hardware;
- searching for suitable clamps does not always give successful results.
Despite some disadvantages, clamps are highly rated by specialists and home craftsmen. Installation of sheathing or cladding with their help is quick and efficient, which makes you put up with a certain number of negative qualities.
How to choose clamps for lining
Before choosing a clamp for lining, you need to know a few simple criteria that will help you buy high-quality hardware material.
- Bracket size. The basic rule is to accurately select the dimensions of the clamps for the lining. It should ideally match the type and width of the lining being fixed.
- Coating integrity. This applies to galvanized staples. There should be no scratches or cracks on the surface. Otherwise, corrosion will quickly damage the metal.
When purchasing, it is important to correctly calculate the number of screws or other fastening accessories. Everything is simple here - 2 screws per 1 clamp. If you save money and buy 1 fastener each, the finishing material will not be firmly fixed and will eventually become deformed.
In addition, you need to calculate the number of clasps themselves. The calculations are simple: about 20 staples are needed per 1 m2. When calculating, you need to take into account that the step between hardware on a flat surface is 45 cm, in the extreme zones - 35 cm, and in the corners it is the smallest - 25 cm. Do not forget also that the consumption of hardware also depends on the length of the form factor of the finishing material. The longer the length, the larger the step between the clamps, the fewer of them there will be in number.
Questions and answers
Almost all inexperienced people have some questions.
We will answer them in advance so that users do not waste time searching for the necessary information:
If the number of panels is unknown, but the sheathing area is known, how to calculate the number of clamps?
In such cases, average indicators are used. The accepted consumption is 100 pieces per 5 m2 (for regular clips) or 150 pieces per 7.5 m2 (for reinforced hardware). It must be remembered that these are average values and provide only an approximate result. In addition, the increased consumption of elements at the transition points of planes is not taken into account here.
Is it possible to change the size of the clamps yourself if you couldn’t find the right number?
In principle, it is possible. However, you will have to spend some time with each element separately. This job can be done if only a few fasteners are needed. However, for large sheathing panels this solution to the problem is not suitable; you need to look for clamps of the required size.
What is the best way to attach clips, with screws or nails?
Nails are faster, screws are stronger. If you have to work with small screws, you will first have to find bits that ideally fit the cross-shaped slot of the head, otherwise each screw will have to be screwed in for a long time and not always successfully.
Is it possible to reduce the number of clips per panel if the paneling is quite light and rigid?
Can. However, the determining factor here is the pitch of the sheathing. If you skip one strip, you may find that the trim is not securely attached. You can install the clamps in a checkerboard pattern - for example, one panel is attached to all even planks, and the next to all odd ones, etc.
How long does it take to install using clamps?
It is impossible to give a definite answer here. In each case, the duration of the work is influenced by several factors - the quality of materials, the availability of skills, working conditions, etc. it is necessary to take into account that hidden installation may require more time than through installation. The goal here is not to speed up the work, but to achieve a better result.
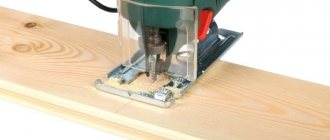
Installation features
The process of installing clamps is not complicated. The bracket can be easily inserted into the standard grooves of the material. Then it is attached with nails or self-tapping screws to the frame.
For work you will need the following tools:
- level;
- screwdriver;
- roulette;
- marker;
- square;
- hammer;
- screwdriver
Installation of brackets on the lining consists of several stages.
The scheme of work is as follows: Preparing the base
The surface is leveled: protruding parts are removed, and cracks, chips and depressions are sealed with a special sand-cement mixture. The leveled area is then checked with a level or laser.
If necessary, lathing is used for leveling.
To form it, a wooden or metal frame is used with a pitch of no more than 0.5 mm. Antiseptic treatment and marking
The surface is treated with an antiseptic composition.
Then you need to wait until the material dries completely. After this, a marker is used to mark the places where the clamps will be installed. If the lath is mounted vertically, the bracket is mounted, retreating the width of the lamella from the adjacent wall. When fastening the lamellas horizontally, only 2-3 mm are given off, which will be needed to screw in the self-tapping screw. Installation
It is important to pay special attention to the installation of the first clamp. The quality and appearance of the finish will depend on how correctly it is installed. Fasteners and lamellas are installed alternately. In this case, it is necessary to ensure that the planks are placed parallel to each other, and the clamps are mounted correctly. For installation, it is better to choose self-tapping screws or dowels. Nails are the worst option and are only used on wood sheathing.
Installation is done according to the following scheme:
- Secure the first hardware.
- Secure the remaining staples in the row.
- After installing the first row of hardware, install the first rail.
- At the same time, secure the next row of staples.
- Mount the first lamella into the hook of the bracket. Insert the next planks with a groove into the ridge.
- Do not fix the next clamp until the first lamella is completely level.
- Press the end part of the rail with the ridge tightly to the base. At the same time, install a bracket on the back side in the groove and secure it with self-tapping screws.
When performing such installation, it is necessary to check the accuracy of the work from time to time using a level. When the last rail is installed, the metal parts of the fastening are covered with a wooden edge. If dismantling is necessary, it is done in the reverse order.
Pros of use
Fasteners for clamps have become so popular due to the fact that with their help, hidden work on the lining is carried out perfectly.
Advantages of construction fasteners:
- The kleimer holds the parts as tightly as possible.
- It does not damage the surface, and the work is much faster.
- The work happens very quickly, because the master does not spend time adjusting fasteners using metal plates or bent various parts.
- Clamps are sold in different sizes and are easy to match to the required fasteners.
- The material of manufacture can also be different, making it easy to select them according to the load.
- Claypers are especially good because they do not allow the products to become loose, they tightly bind them, gripping them and the part is very securely fastened.
- Fastening with clamps is very economical. There is no need to purchase additional materials for installation.
- To make the staples last much longer, they can be lubricated with anti-corrosion spray or ointment.
- The clamps do not bend and are made from high-strength materials.
Nothing complicated and at the same time incredibly simple and convenient to work with.
Tips for use
A few simple tips will help extend the life of the lining and preserve its attractive external characteristics for a long time:
- Buy hardware from trusted construction stores with quality products and good reviews.
- Do not use liquid sealants for joints, so as not to cause corrosion of hardware.
- After installation is completed, treat the lining with varnish or oil composition.
Clamps are easy to install, inexpensive, provide high structural stability and long service life. For these reasons, fastening lining with clamps has become so popular in our time.
Surface marking
The generally accepted standard is to carry out preliminary marking of the surface that is planned to be tiled.
Depending on how the installation will be carried out, horizontally or vertically, you should use a plumb line or laser level to make marks on the wall
necessary for subsequent even fastening of the sheathing made of bars or profiles.
The aesthetic quality as a whole depends on the quality and responsible performance of work at this stage.
Frame structure
Installation diagram of MDF panels.
If the rough ceiling in the room is made of prefabricated reinforced concrete panels, you must first carry out preparatory work. The rustles between the slabs are cleaned of everything that does not hold well. The aesthetic properties of the rough base are not important, so the easiest way to fill the seams is with polyurethane foam. For wooden plastered floors, it is enough to ensure strong adhesion of the finishing material to the base. If the strength of the plaster is in doubt, it is better to knock it down. After all, during the installation of suspensions, the quality of adhesion will further deteriorate. And this already threatens the strength of the future structure.
Next, you need to apply horizon marks at the corners of the room, i.e. serifs that will be located strictly at the same level. The easiest way to do this is with a laser level. But a regular water level with a tube of sufficient length will work just fine. It is not advisable to use a bubble level on the staff for this; this can lead to significant errors.
Related article: Mint-colored wallpaper in the interior
Scheme of an open slatted ceiling.
Using the marks obtained, we determine the lowest corner of the ceiling of the room. The rough base is rarely horizontal; the discrepancies usually reach several centimeters. We retreat 5 cm from the level of the lowest point of the rough ceiling. At this mark we will make the base of the finished ceiling. Using horizon marks and a tape measure, we transfer the mark for the placement of the future frame to all corners of the room. Using a construction cord, draw a horizontal line around the perimeter of the room at the selected height.
Then you need to make sure that there is no electrical wiring in the room at this level. There are special devices for this. If they are not available, you will have to carefully look for grooves covered by builders using a hammer and chisel. An indirect indication of the position of the electrical wiring is the placement of wiring boxes. It's easiest to start from them.
We fasten the UD profile around the perimeter of the room so that its bottom shelf is flush with the horizontal line. It is attached to a concrete or plaster base with “quick installation” dowels into holes drilled with a hammer drill. For walls with a wooden base, “press washer” screws are suitable for this. Their length is chosen so that the thread enters the wooden base by at least 25 mm.
Next, you need to decide on the direction of installation of the MDF panels. Because The panels have a finite length; it is advisable to choose a direction in which they would not have to be extended. In addition, keep in mind that placing panels along the long side of the room visually lengthens it, and across it shortens it.
Marking of suspended ceiling.
At the locations of future load-bearing rails, draw straight lines on the ceiling. Along the lines, perpendicular to them, we attach straight hangers, also in increments of 30 cm. They are attached to concrete bases with driven dowels, and to wooden bases - with press washers of sufficient length. It is selected in the same way as for attaching the UD profile to the wall.
Related article: Beautiful and comfortable living room 30 sq m: design of a combined space
CD profiles or 25*50 mm wooden slats are inserted across the grooves on the UD profile. They are fixed to the bent legs of straight hangers with LN 9.5 mm self-tapping screws. The extra length of the paws is simply bent upward. It is convenient to lay sheets of polystyrene foam insulation on the bent legs if insulation is being carried out. If necessary, profiles or slats need to be extended using connectors. All lightweight galvanized profiles can be easily cut with metal scissors. If you use wooden slats instead of galvanized profiles, try to find ones that are even and dry, which is not at all easy. Before cladding, you need to lay all the necessary electrical wiring along the frame.