2021
| no comments
However, such a chimney is neither durable nor fireproof, and if you want to get a high-quality result that will please you for many years, you should still use one of the options given above.
Every person who decides to build a bathhouse with his own hands must decide in advance how to install a pipe in the bathhouse through the roof - that is, a chimney. The structure of the chimney, its installation and other nuances will be discussed in this article.
Installing an exhaust pipe structure in a bathhouse does not require any special skills, so this process should not pose any difficulties, and even a novice builder should be able to handle it. The main thing is to be very careful, patient, and not ignore the recommendations of experienced specialists while performing construction work, taking into account all the nuances.
Bath chimney design
Before installing a pipe in a bathhouse, you need to study in detail all the issues relating to the types of chimney pipes, their design and how to properly carry out the installation process, and then operate it.
Only if all these issues are studied can you be absolutely sure that the work done will be of high quality, and the chimney can last as long as possible.
Types of chimneys
Chimneys for a bathhouse are classified according to the following two parameters: According to the material used, chimneys are made of brick and metal. Chimneys made of brick belong to the traditional version, and are distinguished by the fact that they are very long and difficult to install, but the result is a fairly strong and durable structure that has high thermal insulation characteristics.
A bathhouse equipped with a brick hood is best protected from accidental fires. The disadvantages include the fact that due to the presence of irregularities on the inside of the walls, soot accumulates over time, which impairs draft, which requires periodic cleaning of the chimney. Unlike a brick one, it is not difficult to install a metal pipe in a bathhouse through the ceiling and roof. In addition, in this case you will have to spend less financial resources, since the material costs much less. The negative side is that condensation necessarily accumulates on the steel pipe, so thermal insulation of such a chimney is mandatory. According to their placement, chimneys are: The most common is the internal type, the positive quality of which is the possibility of additional heating of the interior of the bathhouse. This significantly reduces the heating time of the bath, and also saves money on fuel. However, the internal type of chimney requires careful and labor-intensive care, in addition, it is difficult to install. The passage of a pipe through the ceiling in a bathhouse of this type involves partial cutting of the ceiling in the bathhouse along with the roof, and further thermal insulation of the pipe. A number of disadvantages include the risk of fire and smoke in the interior of the bathhouse due to the appearance of a crack in the chimney.
The external option for installing a chimney originates from America, and is now becoming more and more popular. This type of chimney means that it is brought outside, which significantly reduces the chance of an uncontrolled fire, and maintenance becomes much easier. The negative aspects include the fact that external installation will require sufficient additional insulation. These measures will help preserve the transferred heat, avoid creating additional heating for the steam room and save some of the fuel.
What is a pipe
The design of the chimney is determined by the material of its manufacture and location. For example, if you plan to install a brick stove, then an exhaust pipe made of ceramic or brick will fit it. For steel furnaces, steel and ceramic pipes can be used.
To better understand how to properly remove a pipe in a bathhouse, you need to keep in mind that there are prefabricated stoves that are easy to maintain, and the installation process does not require special skills. As a rule, composite structures have 2-3 pipes, 2 elbows, a drainage system, gates, tees, adapters and deflectors. This structure is secured with support brackets and clamps. The chimney insulation is a sandwich pipe and an adapter having a larger diameter than the main pipe. The insulation layers in such pipes consist of basalt wool or expanded clay.
Pipe structure and its features
Due to the design features of the chimney, before installing the pipe in the bathhouse through the ceiling, you should familiarize yourself with some of the nuances. Because the temperature in the bathhouse is very high, the bathhouse is made of wood, and sanitary standards must be adhered to, the list of installation work will depend partly on these factors.
The following rules must be observed:
- It is prohibited to use aluminum or asbestos cement pipes as chimney pipes. Suitable: stainless or galvanized steel, ceramics or brick.
- When deciding how to make a pipe through the ceiling in a bathhouse, you need to choose the right thermal insulation material. It must be non-flammable and environmentally friendly. Basalt wool, expanded clay, and reflective foil material are suitable.
- It is worth making sure that all elements of the chimney structure have sufficient clearance with the wooden walls and roof. To ensure the best safety, it is worth taking care of metal cladding of all surfaces surrounding the structure, that is, the stove and boiler. A box for steel pipes is installed in the ceilings, which will subsequently be filled with expanded clay.
- Quite often they use sandwich pipes, which have high fire safety.
- To seal all the cracks between the pipe and the box and obtain a reliable fastening, you can use aluminum tape or foil.
Chimney shape and dimensions
When assembling a chimney, it is very important to adhere to a number of rules that determine its shape and size. Most often, the smoke exhaust pipe is made in the shape of a cylinder. The most important thing is to choose the right diameter and height of the pipe. The diameter of the pipe, as a rule, is determined by the power of the installed furnace. For example, for a square or rectangular stove with a power of up to 3.5 kW, the opening dimensions should be 140 × 140 mm, and for stoves with a power of 7.2 kW - 140 × 270 mm. If the smoke exhaust passage is round, then it must match the size of the hole in the stove or boiler.
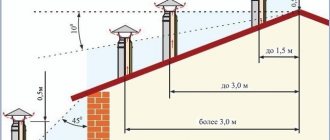
It is worth noting that the pipe area should be 8 cm 2 for each kilowatt of power. This means that for a 20 kW stove, the chimney size should be 160 cm 2, or 140 mm in diameter. The height of the chimney is determined based on the height of the structure and the type of roof. When designing a chimney, it is very important to correctly adjust the height of the pipe above the roof. For example, if the pipe is 150 cm from the ridge, then the height of the pipe should not exceed 50 centimeters. If the distance is between 150 and 300 cm, then the pipe can be flush with the ridge, but if this distance is more than 300 cm, the pipe should barely rise above the ridge. If the roof is flat, then the height of the chimney pipe is 100 cm. It is recommended to carefully fasten the pipe if it rises more than 150 cm above the roof.
Work on installing pipes in a bathhouse
Before you remove the pipe in the bathhouse through the ceiling, you should study the sequence of installation work.
The step-by-step instructions will be as follows:
- Holes measuring 45x45 cm are cut in the ceiling and roof.
- Next, two steel plates of 50 cm each are cut out - with their help the chimney will be fixed.
- Holes for fastening are drilled in the prepared plates in the corners.
- A round hole is made in the center of one of the plates.
- The other plate is intended for fastening to the roof slope; an oval-shaped hole is made in it.
- A galvanized casing is placed on pre-insulated pipes located indoors.
- The ends are closed with rings, and the edges on the outside of the tube are folded.
- The insulated lower end of the smoke exhaust pipe is inserted into the round hole of one of the steel plates, and the non-insulated end is placed on the pipe.
- The steel sheet is fixed to the ceiling, and it is important to ensure that the gaps on all sides are the same.
- Using a pre-welded pipe, the upper pipe is placed on the lower pipe, securing them with a clamp.
- A second steel plate is attached to the inside of the roof.
- The space between the pipe and the wooden elements is covered with clay or filled with expanded clay.
- Where the pipe passes through the roof, a moisture-repellent layer is laid and a seal is laid.
- After this, a cap is placed on the pipe to protect it from precipitation.
Pipe cleaning methods
The degree of blockage of the smoke exhaust passage can be judged by the appearance of smoke and an unpleasant odor inside the room; in addition, draft deteriorates. At this point, it is highly recommended to clean the pipe yourself. Often, to do this, it is enough to heat the stove with a special type of firewood, or resort to using a special tool. There are times when you need to resort to a mechanical cleaning method. You will need a special scraper and a brush with stiff bristles and a link handle. Cleaning the chimney begins from the roof, which entails the entry of a large volume of soot into the room. Therefore, experts advise covering the firebox with a thick cloth, closing all doors and windows, and covering the furniture. There is a simpler cleaning method - with aspen firewood. They generate a lot of heat, which increases draft - the pipe self-cleanses. It is recommended to clean such firewood once a year. Cleaning can also be done with chemicals, but this, of course, can lead to environmental pollution. In this article, we decided on how to make a pipe pass through the ceiling of a bathhouse. This process is very simple, but requires special attention and accuracy from the master. Ignoring shortcomings in construction work often leads to the subsequent entry of smoke into the bathhouse and other troubles. If you nevertheless decide to build a chimney with your own hands, consult with specialists first, so that, having the knowledge gained, you can install the pipe correctly and ensure the subsequent functioning of the bathhouse at the highest level level.[content-egg module=GdeSlon template=compare]
Removing the top layer of soil
How to pass the ceiling in a bathhouse without fire safety: installation of PPU-N from Ferrum
In one of the previous articles, I talked about PPU-N as a ready-made option for a fireproof ceiling passage in a bathhouse.
Yes, you can make a similar design yourself, for this we will need metal polyurethane foam and mineralite, or you can purchase ready-made polyurethane foam-N and install it in the ceiling of the bathhouse. But it also requires a competent approach to installation!
The hole in the ceiling must be finished with finishing, i.e. a vapor barrier must be made (foil on paper), lathing for the lining and the lining itself must be made.
Next, we cover the entire hole with ceramic fiber, wrapping it onto the lining from the side of the steam room and onto the wooden structures on top of the ceiling.
As for the use of ceramic fiber, I have already talked about its advantages more than once. This material can withstand direct fire from a gas burner! This means that it will help make a fireproof floor passage!
After this, you can install PPU-N in the prepared opening.
All that remains is to figure out the filling and sealing of the polyurethane foam inside. The manufacturer himself does not recommend filling PPU-N with insulation inside. This is due to the fact that the sandwich chimney must cool, and blocking will interfere with this. But we must insulate this unit so that steam and heat do not pass from the steam room into the attic
(or second floor).
Source
Which is better, galvanized or stainless steel chimneys?
Traditionally, the main material for constructing a chimney is refractory brick. At present, such chimneys for removing combustion products from a wood-burning stove have not lost their relevance and are unlikely to lose their use. After all, it often happens that the owner of a Russian bathhouse wants only a brick heater, and with it a brick chimney.
But modern industry also offers alternative double-walled sandwich chimneys made of stainless steel or galvanized steel. In this regard, the question reasonably arises of what steel is best to make it from.
It would seem a strange question. After all, everyone knows that stainless steel has incomparable advantages over ordinary steel, including galvanized steel. These include high properties to resist corrosion, high temperatures, and appearance, which is very important when arranging the interior of a bathhouse.
Although galvanized coating allows you to extend the service life of a steel chimney, it is not to the same extent as stainless pipes. Any mechanical damage (scratches, dents, etc.) during installation will negatively affect the durability of the galvanized chimney itself. Damaged areas will become a source of corrosion, eventually rendering the entire pipe completely unusable. And this is the first step towards a fire in the bathhouse.
But there is one drawback of stainless chimneys and components - their high price compared to galvanized steel. For example, according to the Novosibirsk price list, the price of a meter-long thermally insulated sandwich pipe with a diameter of 115×175 mm (insulation thickness 30 mm) made of stainless steel is 1,500 rubles, and of galvanized steel – 1,000 rubles.
The same products from the Voronezh enterprise Ferrum can be purchased at the prices shown in this picture:
As you can see, there is a price difference. But it is not so significant as to refuse to install a stainless steel chimney. And given the excellent performance properties of stainless steel products, you should give preference to it
.
To somehow reduce costs, you can make a combined chimney. So in the steam room with its “extreme conditions” and increased requirements for fire safety, as well as to give it a more respectable appearance, you can use stainless modular elements, and in the attic or outside the bathhouse made of galvanized steel.
However, during installation, difficulties may arise in joining modules made of different materials. Therefore, when purchasing, you should definitely check the possibility of their assembly. Purchasing products from only one manufacturer will provide an additional guarantee of assembly.
How to make a pipe pass through the ceiling - a step-by-step guide from the master
Organizing the correct passage of the chimney through the ceiling is a very important construction operation if a private house, bathhouse or any other building is being built. This is mainly explained by certain fire safety standards that must be observed during these activities: the cause of many fires lies precisely in the violation of these rules during the installation of a chimney.
Basic Rules
When wiring a chimney through the ceiling and roof structure, it is necessary to take into account fire safety rules and regulations, in accordance with SNiP 2.04.05–91. The pipe in a private house and bathhouse must be equipped with a special passage unit.
The rules have the following main provisions:
These rules are mandatory when installing beams, the pitch of which is usually 60 cm. To obtain the required distance between the chimney structure and the ceiling with such a pitch, the use of exclusively insulated pipes will be required. An excellent option in this case is a special sandwich pipe, the design of which includes several layers, including insulation. Typically, furnace outlet pipes have a cross-section of 115-120 cm. If the thickness of the insulating layer of the sandwich pipe is 10 cm, the total diameter reaches 315-320 mm, and the distance reaches 130 mm.
In bathhouses, pipes are usually used, where the thickness of the insulating layer usually reaches 10 cm. In some cases, this figure can be reduced to 5 cm, although experts do not recommend this. The most common type of sandwich pipes are products with a thickness of insulation layer of 35-50 mm: options with 100 mm thermal insulation are usually available at specialized points of sale focused on bathhouse equipment. For chimney pipes without insulation, the minimum distance to combustible material is set at 250 mm.
Standards for clearances from pipes to walls
According to Appendix 16 of SNiP, certain distances between the chimney pipe and combustible material are required:
This appendix specifies the norms for distances between pipes and walls. In this case, the walls must be made of fire-resistant materials: this implies additional measures to insulate them, along with the ceiling. This is done using mineral wool or galvanized sheet steel, covering the insulation on top.
What are the types of passages in the ceiling?
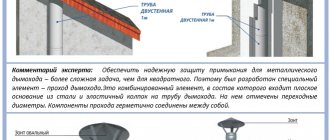
Particular attention is paid to ensuring that the ceiling is reliably protected from fire. The means of protection in this case is to use a cutting of the ceiling, called a passage unit. The passage of a pipe through the ceiling can be done with your own hands; another option is to use a ready-made structure. Industrial products are metal boxes equipped with stainless steel plates (sometimes stainless steel is replaced by galvanized steel). The central part of such a box is equipped with a passage for a sandwich pipe.
Such structures are also assigned support-forming functions for the thermal insulation layer, which fills the gap between the chimney and the ceiling beams. It is important to remember that only stainless steel can be used as a material for passage units in baths. It is prohibited to use galvanizing because when the temperature rises, which is common for steam rooms, it begins to release substances harmful to humans.
Cutting a chimney on the ceiling usually does not cause significant difficulties. First of all, a square opening is cut out in a certain place on the ceiling - it must be between the beams. The sides of this square are made 1-2 cm smaller than the dimensions of the decorative panel of the passage unit. Next comes the mandatory insulation of beams and boards. In some cases, the insulation is padded using metal strips. When installing a chimney pipe in a private home, the product must be fixed in the area where the sandwich pipe will pass through the ceiling. After this, the mounted cutting is raised to the required level. The final stage of this operation is to decorate the edges with thermal insulation, followed by fixing the finished structure using self-tapping screws.
Feed-through units from different manufacturers may have different shapes. In some models, the chimney openings are equipped with a metal cylinder, where the decorative element along the edges can protrude beyond its limits. Sometimes the nodes have outer edges that surround the hole. Similar structures are made from various materials - metal, mineralite, etc. Metal sides have to be additionally covered with thermal insulation. Minerite, unlike metal, itself has good thermal insulation characteristics.
DIY sandbox
The cost of constructing a sandbox is minimal, and children will enjoy it immensely. Of course, you can buy a ready-made structure and simply fill it with sand, but a sandbox made by yourself is much more interesting and convenient.
DIY sandbox
DIY sandbox
DIY sandbox
Preparing the area for ceiling cutting
First, the central point through which the chimney will pass is determined: this is done using a plumb line. After marking, marking is carried out in a certain area and an opening is cut out, which is subsequently decorated on the side of the steam room. Most often, a sheet of stainless or galvanized steel is used for this.
When preparing the area for the chimney, you should consider the following recommendations:
It is best to include the dimensions and location of the stove and chimney in the bathhouse design. This will make it possible to carry out a preliminary calculation of the installation of beam structures, observing the most optimal step between them. If a chimney is installed in an existing building, then the ceiling structure above the stove often undergoes structural changes. This consists of cutting out part of the beam adjacent to the chimney, followed by installing special jumpers.
Installation of a passage in two-story buildings
If we are talking about a two-story building, then upon completion of the transition on the first floor they move to the second. How to install a pipe in a bathhouse through the ceiling in this case?
This procedure can be broken down into the following steps:
Laying waterproofing after the chimney exits to the roof will prevent moisture from entering the attic space, with subsequent flow down the pipe. The passage of a sandwich pipe through the roof is also carried out in compliance with the regulatory provisions of SNiP.
How to install the most fire-hazardous section of a chimney: the passage unit
I will talk about the most fire-hazardous part of the chimney: the cutting of the wall - the cutting of the ceiling, aka the passage unit or passage box. Based on what I know from the Internet and from my own experience, illiterate cutting is the cause of most fires. Especially in the baths.
What does the problem look like?
The chimney pipe passes through the wall or ceiling, heats the unit, the wood is charred and, on the second, third or hundred and third kindling, it ignites. Moreover, it flares up meanly - in the attic or from the street. That is, you are sitting in a room, and at this time a building is burning where you cannot see.
Now about why it turns out this way.
1) The passage unit is passed through not with a sandwich, but with a bare pipe
2) The passage box is filled with sand or earth, and not with expanded clay or mineral wool, or at worst with brick broken into small pieces. For those who don’t really understand why sand or soil is not suitable - a video of making coffee on sand
3) cutting was done without. boxes! Very thrifty fire victims like to do this kind of cutting.
So what? Wrap it in asbestos and ok!
4) Make all the mistakes from the first three points at the same time!
It was a good bathhouse, but the stove was expensive!
This is what the cause of the fire looks like - little by little, day after day, a charred beam, which one day bursts into flames
5) Lack of desire to understand how the tunneling is done.
There are 2 types of penetration: Homemade and industrial and 2 categories: Gost and non-Gost.
Determined by guests and snips. If you are interested in reading guest snips, then please do so
The Internet is full of links to these materials.
What is the trick of the Gostov passage unit?
Here is the link to the Gost guide.
Non-GOST ceiling passage for the chimney.
A box half a meter by half a meter with a hole. The bottom is stainless steel, and it itself is galvanized. There are 3 types (no preference).
A box made of an oval is cut in exactly the same way as a regular box: a square is cut out on the sides not of the oval, but of the flat part, the device is inserted into it and secured with self-tapping screws.
Any of the non-GOST boxes can be mounted in the following ways:
A picture to attract attention: make sure to mount the unit so as not to burn out!
A) Take Minerite or flama and beat the passage, after which it is inserted into the cutout.
All distances are filled with mineral wool or expanded clay
B) A cutout in the ceiling or wall is lined with mineralite from the inside and only then is the passage inserted.
Well, all distances are filled with mineral wool or expanded clay.
Homemade chimney passages. There are Gost ones: a meter by a meter, and there are non-Gost ones - half a meter by half a meter.
Look up and you will see a homemade passage in the previous photo. Industrial inside - there purely for reinsurance.
It’s even easier to trim the cutout on all sides with mineralite or flama, and cover it with “lids” made of flama and mineralite, the main thing is to cut holes in the “lids” for the chimney.
Remember: it is better to go overboard with the installation of the unit than to underdo it.
If it seems that there is not enough thermal protection, definitely add it.
So now the most delicious thing is what you came here for: to see how the cutting unit is installed!
Please note that nowhere inside the wood is coated with thermal protection. But I disassembled my unit in the bathhouse and saw that, despite the expanded clay and mineral wool, there was a little charring of the wood, the penetration was half a meter by half a meter. So I beat it and now I’m calm.
What I advise you to do is line the inside of the cutout with thermal protection, and then insert the box.
Installation of a Gost chimney - pay attention to how huge the hole is. But another passage would not have fit - the diameter of the fireplace is 200mm!
Please note: the bend was necessary so that the wood would not catch fire, and also so that if the chimney stood in a straight line, it would vomit snow, because the angle of the roof is very sharp
Same thing in the photos:
Now let's see what not to do
You can’t just stuff mineral wool into a hole in the wall, like this:
Here's a test video!
If you carefully read everything that is written above, then after watching the video you will find editing errors yourself.
If you haven’t found it, it’s better to re-read everything again, you’ll be safer.
I found a photo of a perfectly made, in my opinion, non-GOST pass-through unit bought in a store. I’m silent about the photo of the pipe, because it’s not related to the topic.
The passage is made on the basis of such a box
It is sewn up not with a stainless steel lid, but with a sheet of mineralite, this is probably at the request of the owner
Or maybe they put a lid on top.
In short, do what you saw, so do it.
Here’s another person who burned down due to a tunnel, as he himself writes
Passage of a round chimney pipe through a wooden ceiling using polyurethane foam of various designs
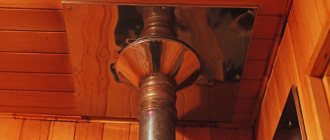
To pass the chimney through wooden structures, you can use a ready-made ceiling-passage assembly (see photo). It is selected based on the outer diameter of the pipe. Before installation, this ceiling passage unit must be prepared: all surfaces that will come into contact with the wood of the ceiling sheathing, and all internal surfaces of the passage box, are lined with thermal insulation.
Factory-made ceiling passage unit. Before use, it must be covered on all sides except the front with heat-insulating material.
Usually basalt wool serves as thermal insulation, but it must be special: it can withstand high temperatures. When purchasing a material, make sure that it is designed for use at temperatures of 800-1000 o C. These materials have a higher cost, but it is unreasonable to skimp on safety. Cheaper options contain binders that sinter at high temperatures, causing the thermal insulation to lose all its properties, and this can lead to a fire. In addition, it is advisable to use foil heat insulator - this will make the structure even safer.
Having insulated the passage unit, prepare a place for its installation. Mark on the ceiling where the chimney will be located. Draw a hole of a suitable size: slightly smaller than the size of the front panel of the pass-through unit in such a way that it is convenient to attach it to the ceiling trim with self-tapping screws. Having cut a hole, cover its edges with the same heat insulator as the pass-through unit, or any other with similar properties. To increase the level of fire safety, metal strips can be strengthened on top of the heat insulator. Insert the prepared passage unit into the finished hole. It can be put on the pipe and installed with it. Having installed this structure in place, secure the panel of the passage unit with self-tapping screws (the holes can be pre-drilled).
Preparation and installation of ceiling penetrations
After checking the vertical installation of the chimney pipe, proceed to complete this stage. The voids remaining in the passage unit are filled with thermal insulation. You can use pieces of the same basalt wool or fill the voids with expanded clay. In theory, you can use sand, but you shouldn’t. It is inferior in terms of thermal insulation properties to both expanded clay and basalt wool, in addition, sooner or later it will end up at the bottom, since there are cracks, and through them grains of sand will fall onto the stove.
Further actions depend on where you led the chimney: to the second floor or to the attic. But the main difference is in aesthetics and the availability of finishing. If you led the chimney pipe into the attic, the passage through the ceiling can be considered complete. If you brought the chimney to the second floor or into the attic, you put a protective metal screen on the pipe, which is now attached to the floor with the same self-tapping screws. After this, you proceed to the next stage - output through the next ceiling (this is if you are on the second floor) or through the roof, if in the attic or attic.
This is what the finished ceiling penetration looks like
The chimney passage through the ceiling may also look like this. This is a ready-to-use option that consists of two boxes. The inner box is made of metal, the outer one is made of heat-resistant material (in this case, mineralite).
Minerite roof passage assembly. It is completely ready to use
There is an air gap between them, ensuring fire safety. According to the manufacturers, the remaining free space between the sandwich pipe and the cutting box does not require filling with a heat insulator. You can leave everything as is, or you can, for greater reliability, still add heat-resistant thermal insulation. In such a case, such as a chimney passing through a wooden ceiling, it is better to be on the safe side than to put out a fire later.
This is how a mineralite assembly for passing through the roof is installed. Just put it on the pipe and inserted it into the prepared method
The passage through the ceiling can be like this (see photo). In this case, sealing the edges of the hole in the ceiling is mandatory (remember, there is thermal insulation around the edge first, metal on top).
The factory aisle assembly may look different. Depending on the shape, the installation method varies slightly
Sandbox construction
Children's sandbox diagram
If a place for the sandbox has been chosen, you can begin the main process. First you need to calculate the dimensions of the structure, choose a shape, and properly prepare the base. The size of the sandbox depends on the age and number of children who will play in it. For three children aged 1-3 years, an area of 1.5x1.5 m is sufficient; for older children, it is recommended to make sandboxes 2x2 m, and standard designs have dimensions of 1.7x1.7 m.
Most often, the sandbox has a rectangular or square shape, but sometimes round and hexagonal designs are found. Here a lot depends on the imagination of the master and his skills; if your experience in such matters is minimal, it is better to stick to the standard square shape. Wood is used as a building material, namely pine boards.
Tools for work
- shovel;
- roulette;
- pegs and rope;
- geotextiles;
- sand;
- tamping;
- timber 50x50 mm;
- hacksaw;
- antiseptic impregnation;
- liquid bitumen;
- sander
Step 1. Site preparation
The selected area is cleared of stones, branches, weeds, and the surface is leveled. If the dimensions of the sandbox are 1.5x1.5 m, then the cleaned area should be 10-15 cm larger on each side - this is necessary for more accurate marking.
Step 2. Marking
Now you will need 4 pegs, a tape measure and a long rope. Visually determine the location of one of the corners of the structure, drive in a peg, draw two perpendicular lines from it, and mark the location of the last corner. A rope is pulled between the pegs and the length of the diagonals inside the markings is checked. They must be absolutely the same.
Step 3. Preparing the base
Inside the fence, a layer of soil is selected to a depth of at least 20-25 cm. The walls of the pit must be leveled so that they are strictly vertical. When all the soil has been removed, the bottom is trimmed and compacted. Sprinkle sifted fine sand on top in a 5 cm layer and compact it well.
Step 4. Making the frame
The timber is sawn into pieces 45 cm long, the lower ends are sharpened, ground, treated with impregnation and coated halfway with liquid bitumen. Now you need to install them at the corners of the perimeter and bury them 15 cm into the soil. The next stage is attaching the boards: they are knocked down in pairs and screwed to the bars with self-tapping screws. You can do it another way: first, completely assemble the frame, and then install it above the pit.
You can stick a sealant between the frame boards
The boards can be narrow or wide, the main thing is that the width of the walls is at least 30 cm. Be sure to treat the surface of each board with a sanding attachment on both sides, then soak it with an antiseptic and dry it. After this, the boards are knocked down into a square box and reinforced at the corners with bars, which on one side should protrude beyond the perimeter of the box by 15 cm.
The frame is reinforced with bars at the corners
Connecting the parts of the sandbox
Reinforcing block in the corner
Step 5. Installation of sides
For the convenience of the child, small sides need to be made around the perimeter of the frame. To do this, take 4 boards 20cm wide, sand them very well, coat them with an antiseptic and cut the edges at an angle of 45 degrees. Lay the boards on top of the walls, align and align the joints, and screw tightly with self-tapping screws. The heads of the screws should be well sunk into the wood so that the child does not get hurt. Sometimes, instead of sides, they make corner benches: they take a board of short length, process it well, lay it on two adjacent walls, stepping back a few centimeters from the corner. After this, the board is nailed on both sides, and the edges protruding beyond the perimeter are cut off.
Step 6. Finishing the structure
Now the sandbox needs to be painted correctly. To do this, choose paints of 2-4 colors, always bright and contrasting. The sides or benches can be not just painted, but painted with ornaments, images of animals, flowers. As soon as the paint has dried, the structure is filled with sand.
Pipe passage through a chimney without a factory passage unit
It is possible to remove the chimney without a passage device. In this case, the edges of the hole in the ceiling are also sealed with a fire-resistant heat insulator, and metal strips are placed on top of it. A protective plate made of non-flammable material is put on the sandwich coming from the oven, in which a hole of a suitable diameter is cut, and holes are drilled along the edges for fasteners. Traditionally this is a sheet of metal. Next, the sandwich is passed into a hole in the ceiling and fixed there using some non-flammable guides. For example, you can use drywall profiles or something similar. The main thing is to securely fasten the pipe and observe the basic rule of fire safety: there must be a distance of at least 36 cm from the edge of the pipe to the flammable material.
You can make a passage through the ceiling with your own hands
Important! When installing and securing the chimney, keep in mind that the pipe changes its size due to thermal expansion. It must be secured so that it can move relative to the roof.
Then the pipe is lined with non-flammable material from below (from the ceiling). From the attic or second floor side, the voids formed in the groove are filled with a heat insulator. The requirements for it are still the same: tolerance to high temperatures. Expanded clay may be the most budget-friendly. Actually, this completes the exit of the chimney pipe through the ceiling.
You can make a passage through the ceiling with your own hands
Selecting a location
- 1 Select a location
- 2 Construction of a sandbox 2.1 Step 1. Site preparation
- 2.2 Step 2. Marking
- 2.3 Step 3. Preparing the base
- 2.4 Step 4. Making the frame
- 2.5 Step 5. Installation of sides
- 2.6 Step 6. Finishing the structure
- 3.1 Step 1. Preparation of material
- 4.1 Video - DIY sandbox
Before you start building a sandbox, you need to find the most suitable place for it, because the comfort and safety of the baby depends on it. There are several rules for sandbox placement:
- the area should be open and level;
- in front of parents;
- closed from prying eyes or at least located at a distance from the street and passers-by;
- There should be no thorny bushes or sharp fences near the sandbox.
DIY sandbox
To protect from the sun, you can place a sandbox under a small strong tree or build a canopy. But you shouldn’t do this under old trees: at any time a heavy branch can fall from a tree onto a child.
Passage through the ceiling of a brick chimney
Brick itself is a good heat insulator; however, for a brick stove, compliance with the rules for passage through flammable materials is also required: there must be a distance of at least 25 cm from the edge of the chimney duct to this material. To ensure this, stove makers make a special penetration on the pipe (see picture) increasing the thickness of the wall of the brick chimney at the point of passage through the ceiling.
Roof passage with brick chimney
If for some reason it is impossible to make such a penetration, you can cut a hole in the ceiling that will be 10 centimeters larger than the size of the chimney on each side. And then repeat the penetration of the round stove through the ceiling:
With this option, the brick pipe is quite reliably insulated (just use heat-resistant heat-insulating materials with a use temperature of 800-1000 o C).
You can bring a brick pipe through the ceiling without special penetration
Blueprints
To build a sandbox with your own hands quickly and easily, all that remains is to provide you with a few drawings. You can build on them and take them as a basis. Adjustments can and should be made.
Drawing of a simple sandbox with dimensions
Sandbox with roof - photo and drawing
Prefabricated sidewall
Drawing of a sandbox with a canopy
Passage through the roof of a brick chimney
The passage of a chimney through the roof must simultaneously solve two not so simple problems: ensure fire safety and tightness. According to fire safety rules, in places where the chimney comes into contact with flammable materials, the temperature of the chimney walls should not be higher than 50 o C. For brick chimneys, this is solved by increasing the thickness of the walls. For this purpose, stove makers lay out a special penetration. There is no single solution here, since much depends on the angle of the roof. That’s why this option is not very popular today - it’s hard to find a person who can competently and safely make such a penetration through the roof.
When a brick pipe passes through the roof, it is surrounded on all sides by a box of additional rafters and cross beams
How is the question resolved then? They simply make a square or rectangular pipe, which is placed between the rafter legs, and transverse beams are installed above and below the pipe. The distance between the pipe and the wooden structural elements is 13-25 cm. If the distance between the rafters is greater, additional ones are installed. In this way, we minimize the damage that we will certainly cause to the hydro- and vapor barrier of the roof: in order to remove the pipe, we will have to violate the integrity of the films and membranes. When installing the chimney, it ends up in a separate box. The films and membranes inside this box are carefully cut. The cut geometry is similar to the geometry of a pipe or box, but smaller than the dimensions of the rafter box. In the corners, the films are cut at an angle (envelope), the edges of the films are folded and fixed with staples or clamping strips to the elements of the rafter system. The edges and entry points of fasteners are sealed with adhesive tapes or sealants. This operation should be carried out carefully - the durability and reliability of the roof depends on it.
There is another option. This is possible if the temperature of the pipe in the roof area is not higher than 50 o C. In this case, the edges of the films can be glued to the pipe with sealants or the same adhesive tapes (trying to seal everything as best as possible). Now there is free space between the rafters and the brick pipe. It is laid with a heat-resistant heat insulator.
Drainage of water from joints
It is most difficult to seal the joint between a brick pipe and a roof if a rigid roofing material is used.
When venting the chimney through the roof, you need to solve the problem of waterproofing. To do this, use a system of two aprons: a lower one and a decorative one.
First, a lower apron is installed around the pipe. It is usually made of tin and consists of four elements: two sides, a top and a bottom. How to do it, see the next video. Everything is told in detail.
A so-called “tie” must be placed under the lower apron. This is a section of roofing material, a sheet of tin or galvanized metal, which will drain water to the drain (the tie should be this long - extend slightly into the drain) if the chimney is located low or into the valley, if it is closer. The following video further demonstrates the technique for installing an internal brick chimney flashing and also shows how to install a tie and external decorative flashing.
In general, as many materials as there are, there are as many ways to install a pass-through unit. Another video that demonstrates another technique for waterproofing a brick pipe. They use modern materials that are produced here.
It is much easier to waterproof the joint between the chimney pipe and the roof if soft tiles or other soft flexible roofing material is used. On a plastered pipe, coated with impregnation for better adhesion, this material is simply bent and trimmed. You can apply a layer of sealant along the edge of the curved roofing material and secure everything using a pressure strip. The place where the roofing material is connected, the pipe and the strip are also treated with sealant. This video demonstrates the technique of sealing a chimney using soft tiles.
Installation technology and roof access
Installation technologies for cutting round and rectangular pipes are different. The fact is that the very shape of the passage unit is changing, which means the technology for carrying out the penetration is changing. The shape of the chimney is determined only by the wishes of the owner. The fact is that soot will not accumulate on a round pipe. In addition, the outer part of such a chimney has a more streamlined shape, which improves the aerodynamic protection of the pipe. But a rectangular pipeline is easier to hide. It is more advantageous from an aesthetic point of view, so it is sometimes used.
Installation of a ceiling passage unit
Round pipes
For round pipes, it will not be possible to make the passage parts yourself, so you will have to use purchased elements. Aluminum-based flanges enjoy well-deserved popularity in the market. A movable silicone or rubber corrugation is attached to the round base using rivets, which is pulled onto the pipe. On the inside and outside, the passage elements are connected to each other, resulting in a reliable and strong connection.
For cases where it is not possible to tighten the connection onto the pipe, there are split flanges that, thanks to special technology, can be wrapped around the pipe and tightened with a minimum gap between the groove and the pipe.
Rectangular pipes
Rectangular pipes are popular for a variety of design projects. In addition, the main cutting parts can be made independently from sheet metal. This:
- Wall profile or internal apron
- Tie
- External apron
All these elements are corners with cuts at the bend. The upper part of the apron is bent inward, so from the corner an element of a wall profile is obtained, which will overlap the adjacent element.
A tie is a triangular flat sheet of metal that protects part of the counter sheathing under the pipeline from soaking.
Scheme for cutting a rectangular pipe
