Date of publication: February 12, 2020
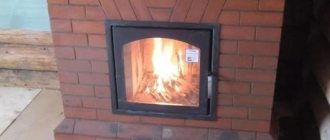
The chimney is the most important part of the heating system in a country house, cottage or country house, as well as in bathhouses. A lot depends on the quality of both the chimney itself and its installation: the fire safety of the entire building, the draft and supply of oxygen required for the operation of the heater, the removal of combustion products and smoke from the room. At the same time, the optimal operation of the heating device itself also depends on the quality of the smoke channel.
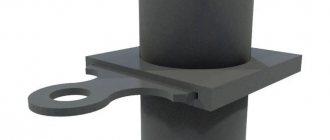
Types of clamps
The chimney clamp differs in purpose.
For wall mounting
It differs in that in the tail part it has a flange with two holes for screwing to the wall.
This clamp is used when the pipe runs close to the wall. And if a large number of pipes are installed outside, a gust of wind will not be able to knock them down.
It is recommended to place one of these wall clamps every two meters to secure the pipe to the wall and maintain stability.
The crimp clamp consists of two parts:
- bolts the pipe
- tighten until the two parts fit tightly around the structure.
Built into the wall
Another type of product for attaching a chimney is one that is mounted deep into the wall. Instead of a flat flange with a threaded hole, it has a long flange.
To place the clamp, you will need a guide on the wall so that the tail is held in place using building materials, plaster or cement.
This type of fastener is used when the pipe is separated away from the sunny side of the wall and a long tail will save the necessary distance.
A wall clamp for a chimney has two parts that wrap around the pipe and are secured with threaded screws to prevent the wind from knocking down the structure outside the house.
For gripping between pipes
There are other types of clamps that perform different functions.
For gripping between pipes, holds and secures connection together.
This type of fastening is used in stainless steel pipes of sandwich systems.
Many brands have edges for using these clamps which, combined with the silicone compound inside, maintain a seal.
The party to such a connection is considered to be:
- odor prevention
- smoke leak
- outlet pressure
Because the stove has a smoke output pressure sensor. Pipes that do not have a clamp may be deformed by an impact during transportation, and will not be ideal for the system, and then the oven will signal a pressure failure on the stove.
Connection to furnace outlet
Failure to use a clamp when the pipe exits the furnace is considered the main failure of many chimneys.
The outlet inlet has a diameter thicker than the pipe itself and therefore does not fit together perfectly.
Typically, this is where you notice the smell of smoke when you turn on the stove.
And due to the fact that the pipes are not yet heated, the smoke comes out through the holes due to incorrect adjustment, between the outlet and the installed pipe.
To avoid these odors, it is recommended to use aluminum tape to surround the junction of these two elements, which have different thicknesses.
Then use a clamp to tighten this connection and avoid the inherent losses that occur when installation is not done properly.
This is a malfunction that causes people to complain about the smell of smoke but not be able to determine where the loss is occurring.
Maintenance of the assembled system
During operation, soot growths may appear on the walls of the sandwich chimney, reducing its cross-sectional area, which can lead to smoke in the room and a fire. Therefore, it is necessary to clean the duct at least twice during the heating season. It is convenient to carry out cleaning through the inspection hatch in the plug; if there is none, you can open the plug completely for these purposes by unfastening the clamp.
The condensate collector also requires regular inspection to ensure timely discharge of accumulated liquid. If the condensate drain is connected to the sewer system, then the condition of the connecting tube must also be examined: clean it if it is clogged and replace it if it fails. To clear a clogged drip line, you can use a thin, strong wire.
Criterias of choice
When choosing a bracket, consider the following factors:
- chimney diameter;
- maximum and average distance from the wall;
- wall material and pipe material.
If the distance from the wall is short, plate wall mounts are chosen; as the clearance increases, you will have to switch to cantilever structures.
A small diameter pipe can be secured with a clamp on a stud; for heavy sandwich structures, a more reliable fastening will be required.
Roof penetrations and pipes for chimneys with a round cross-section
Metal round systems always require additional fixation. Such elements must be fastened with crimp clamps. For every two meters of such a chimney, a bracket is installed that secures them to the wall, and for the tee - another support bracket. Also, special brackets are used to fasten steel pipes.
The chimney pipe passage itself depends on its cross-section and shape, the slope of the roof, as well as the type of roofing material used:
Here is a very detailed video of a chimney with a circular cross-section being installed on the roof:
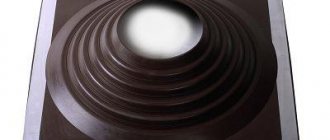
Ready-made soft penetrations for any structures
It is a little more difficult to get around a round pipe than a square one. But for this purpose, today roof penetrations for chimneys are produced in the form of a universal glass or master flush:
What is such a passage? This is a special chimney nozzle in the form of an elastic material made of silicone or EPDM rubber. Both options tolerate temperatures from -74 to +260°C. The penetration itself rests on a steel sheet, well fixed to the roof.
This collar is pulled onto the round pipe using a soap solution, and then coated under the flange with roofing sealant. This penetration is good because it can take any shape, and therefore it does not matter at what angle of the slope it is mounted. The whole process turns out to be much faster and more accurate than in the case of a brick chimney.
What you need to know when installing a chimney
Before installing a chimney above the roof, you need to understand the following design nuances:
Important nuances of installing a chimney on the roof
Pipe material
First of all, before installing a chimney, you need to decide on the material from which it will be made. To help in this matter, I will give a few of the most popular options and briefly talk about their features:
- Red solid brick (grade M150 and higher) . This is a traditional material that allows you to create strong and durable chimneys. The disadvantages include the complexity of installation. In addition, a brick chimney has a lot of weight, as well as a high cost, especially if you take into account the costs of specialist services for its installation;
- Galvanized pipe. This is a cheap and fairly durable material, but it can only be used for gas equipment where the temperature of the gases is low. Otherwise, the structure begins to evaporate toxic zinc oxide;
- Stainless steel pipe . It costs more than galvanizing, but it is more environmentally friendly and durable. Therefore, stainless steel can be used for any chimney. The only thing, keep in mind that this material can heat up to high temperatures, which can cause a fire;
Modular smoke removal systems made of stainless steel - a modern option at an affordable cost
Today, the most optimal, affordable, safe and common type of chimneys are modular stainless steel pipes. Due to their technical characteristics and features, they allow you to create smoke routes of any configuration, length, inside or outside the building, and they also effectively and safely remove combustion products. Modular chimneys are easy and fairly quick to install; if assembled correctly, they can last for decades, and at the same time, they are affordable.
There are a number of rules and requirements that must be followed when installing a chimney in order to guarantee fire and operational safety of both the smoke exhaust route itself and the heating equipment. There are also certain rules for installing and installing a chimney on the roof. Let's look at them in detail in this article.
Exiting the chimney through the ceiling
The choice of design and materials depends on the type of chimney. Let us analyze the rules for organizing work for the main materials of pipelines in detail.
Round metal
The whole process is divided into several stages:
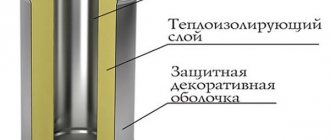
- The most popular today for the manufacture of steel chimneys are double-sided metal sandwich pipes with an internal layer of thermal insulation. For such chimneys, you can easily make a homemade box from tin or buy a ready-made one in a store.
- According to the dimensions of the box, we cut out a cavity in the ceiling, insert the box so that it is securely fixed with its curved edges on the floor of the attic or 2nd floor.
- We insert the pipe into the prepared hole and secure it to the wall with self-tapping screws. Fill the remaining gaps with heat-resistant sealant.
- We fill the entire remaining cavity of the box with insulation. You can use mineral wool, penoizol, polystyrene foam and any other material. The use of asbestos is prohibited in residential premises.
- The thermal insulation layer should protrude slightly beyond the metal sides. All that remains is to cover the surface of the box with decorative wood trim. You can buy a polished stainless steel plate that will decorate your ceiling.
Stages of work on removing a steel chimney through the ceiling
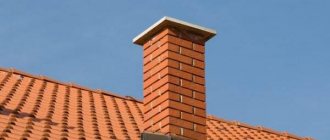
Brick chimney
Here everything is much more complicated:
- Before the floor slab, the mason must fluff the pipe and gradually expand the outer size of the chimney. If you have skills in laying bricks, you can do the job yourself. If not, you will have to hire an experienced stove maker.
- An opening is cut in the slab (ceiling) according to the dimensions of the pipe, even with a small margin. After laying the bricks and the chimney exiting the surface of the ceiling, we cut the slab insulation material to the size of the pipe.
- You can use mineral wool or prepare foam blanks. The main thing is that the thickness of the layer compensates for the high temperature of the exhaust gases and does not allow them to affect the surface of the walls and ceilings.
- Then we lay the blanks around the pipe and secure them with special screws or simply wrap them with tape. The main thing is not to leave large gaps, but to fill small gaps with fire-resistant sealant. Having filled the entire cavity with insulation, we cover it with a layer of decorative finishing.
Scheme of the outlet of a brick chimney through the ceiling and roof of the house
Installation according to external circuit
In the case when a sandwich chimney is installed outside a building, it has one horizontal section of a single pipe, the length of which should be no more than 1 m. It is connected to the stove with a slope towards the vertical channel and is connected to the sandwich, which passes through the wall.
If the wall is built from non-combustible building material, then a metal or asbestos sleeve is installed at the passage point. The gap between it and the surface of the smoke channel is filled with basalt wool or asbestos cord. The tee for connecting the vertical part of the structure should be placed outside the house and a condensate drain should be connected to its lower branch pipe.
The vertical channel is assembled from the bottom up and attached to the wall with brackets every 1.8 - 2 m, each part is fixed with a clamp, and the joint is filled with sealant. A deflector or umbrella must be mounted at the top of the flue.
Sealing with a metal pipe - how to secure it correctly
In addition to elastic penetrations, you can use metal passage pipes, which also help solve the problem of how to attach a chimney to the roof. They can be purchased at construction stores. This element is used to arrange the passage of a chimney through a flat roof. Most often, the pipes are made of alloy steel; they are selected in accordance with the angle of the roof.
Installation of a metal passage pipe is carried out as follows:
- Mark a mark on the roof surface with a marker and cut out a hole of the required size for the chimney to exit onto the roof. For cutting, you can use a grinder or special scissors, retreating 1-2 cm inside the circle.
- Clear the passage for the chimney by removing waterproofing material and insulation. If necessary, cut down elements of the rafter system.
- A fire-resistant material with a hole for the pipe and a size that exceeds the diameter of the chimney by 15-20 cm is fixed on the roof from the attic side.
- Insert the pipe into the hole and connect it to the laid chimney; the joint is tightened with a clamp.
- The pipe is placed on the chimney and fixed to the roof surface using sealant or self-tapping screws.
- The pipe is extended with new segments until the required height is reached.
Kunstkamera
Zhukovsky's blow in the chimneys
The boiler reached operating mode, that is, hot gases flowed through the pipe at the calculated flow rate, then the burner suddenly went out - the fan stopped, the gas continued to move by inertia, and accordingly left behind a vacuum zone.
The boiler was started in violation of the operating schedule, without pre-heating... more detailsPoor quality chimneys
Photo 1. Thermal insulation in the form of soft mineral wool mats with a density of 25 kg/m3 instead of 120 kg/m3 according to the project.
Photo 2. Absence of a condensate trap at the bottom of the vertical gas outlet of the boiler. Photo 3. Foreign objects on the diaphragm of the explosive... more detailsSmoke Leaning Tower of Pisa
Comments on the project The shape of the load-bearing lattice tower does not meet the requirements of SP 43.13330.2012 “Structures of industrial enterprises.
Updated version of SNiP 2.09.03-85.” The use of this design solution (rigid struts in the form of a system of volumetric trusses) is… more details30 meters, Du-500, Du-400, ...
1. The adopted design solutions of the “KM” section do not comply with the requirements of SP 43.13330.2012 “Structures of industrial enterprises.
Updated edition of SNiP 2.09.03-85”: – the shape of the load-bearing exhaust lattice tower does not meet the requirements of paragraphs. 9.4.8, 9.4.11; ... more detailsDestruction of load-bearing belts...
The only reason that can cause tensile stresses in the wall located along the generatrix of the cylindrical surface is water.
When water turns into ice, it increases its volume by 9.05%. Ruptures of seamless pipes, as they look in the photo, are typical for damage caused by ... more details
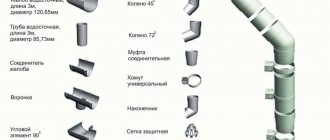
How to secure a chimney pipe to the roof with guy ropes
Important nuances of installing a chimney on the roof
Pipe material
First of all, before installing a chimney, you need to decide on the material from which it will be made. To help in this matter, I will give a few of the most popular options and briefly talk about their features:
- Red solid brick (grade M150 and higher). This is a traditional material that allows you to create strong and durable chimneys. The disadvantages include the complexity of installation. In addition, a brick chimney has a lot of weight, as well as a high cost, especially if you take into account the costs of specialist services for its installation;
- Galvanized pipe. This is a cheap and fairly durable material, but it can only be used for gas equipment where the temperature of the gases is low. Otherwise, the structure begins to evaporate toxic zinc oxide;
- Stainless steel pipe. It costs more than galvanizing, but it is more environmentally friendly and durable. Therefore, stainless steel can be used for any chimney. The only thing, keep in mind that this material can heat up to high temperatures, which can cause a fire;
Sandwich pipe - an inexpensive and reliable solution for a chimney
- Pipe sandwich. This name is due to the fact that the pipe consists of three layers - an outer pipe made of stainless steel or galvanized, then a layer of thermal insulation made of mineral wool, and a thinner stainless pipe. Thanks to this structure, less condensation forms in the chimney. In addition, the design is more fireproof. Therefore, I recommend sandwich chimneys to those who are interested in a relatively inexpensive, durable and safe smoke removal system;
- Ceramic pipes. Ceramics can be recommended to people for whom the durability of the product, rather than the cost, plays a decisive role in their choice. Ceramic chimneys are not afraid of either high temperatures or chemical influences, therefore they are practically eternal. At the same time, installation of a ceramic chimney is quite simple.
Coaxial chimney - a compact and efficient design for a gas boiler
In order for the chimney to be effective, and therefore safe for the heating device itself, it must be correctly positioned relative to the roof ridge. To do this, you must follow the following rules:
- If the pipe is located in the center of the ridge or is located at a distance of no more than one and a half meters from it, its height should be 0.5 m;
- If the chimney is 1.5-3 m away from the ridge, the pipe should be located flush with it;
- If the chimney is more than three meters away from the ridge, the angle of the imaginary line connecting the pipe and the ridge should not exceed 10 degrees.
Diagram of the dependence of the height of the chimney on its location relative to the ridge
Keep in mind that you cannot make the pipe too high, otherwise the temperature of the combustion products will not be enough to warm it up. As a result, draft will deteriorate and condensation will appear.
An equally important point is the passage of the pipe through the roof. The main requirement for this unit is, of course, fire safety.
The fact is that even on the roof the chimney heats up to a very high temperature, which can cause a fire of flammable materials located nearby. This is especially true for metal pipes, including sandwich chimneys, despite the presence of a layer of stone wool.
To ensure fire safety, the pipe must run in an insulated box
To make the outlet fireproof, you first need to position the pipe correctly. It is necessary to ensure a distance of at least 25 cm from it to flammable materials.
In addition, the passage unit must be thermally insulated. To do this, a box made of non-flammable material is installed around the pipe and filled with basalt wool.
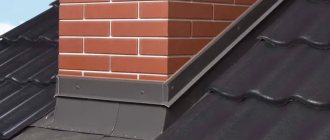
But ensuring fire safety is only half the battle, so the passage unit must be airtight. For sealing, a special element, the so-called passage, is used.
The joint between the roof and the chimney is sealed using a special casing - passage
Sealing a round pipe is easier - after covering the roof, a casing is put on the chimney, which presses it tightly. The apron of the passage is made of soft material, thanks to which it follows the contours of the roofing, even if the roof, for example, is made of metal tiles or corrugated sheets.
The soft apron of the passage follows the contours of the roof made of corrugated sheets or any other material
The joints, as in the previous case, should be treated with sealant. As a result, the waterproofing will be reliable and durable.
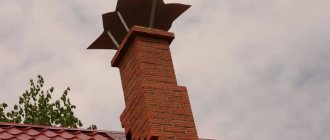
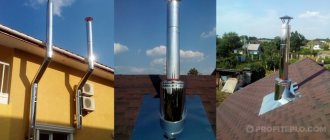
Metal chimneys often need to be mounted on the roof
Fastening
If the chimney is brick or ceramic, then it does not need fastening. If metal pipes are being installed, most often they need to be additionally fixed to the roof. For these purposes, we will need a special set of stretch marks, which includes:
Cladding allows you to increase the durability of a brick chimney
Finishing the pipe
Sandwich pipes do not need lining, but finishing a brick pipe will extend its service life. For these purposes, you can use the same materials as for the walls. The only thing is that they must be non-flammable. Such materials include:
- Profiled sheeting;
- Facing brick;
- Plaster;
- Natural stone, etc.
Finishing the chimney is carried out in the same way as finishing the walls.
Cladding a brick pipe is done in exactly the same way as cladding walls. For example, to cover it with metal siding, you need to attach a sheathing made of profile or timber to the pipe. That's all the main nuances of installing a chimney on the roof that I wanted to share.
The principle of correct installation of sandwich pipes (for smoke, for condensate)
Assembling a chimney from sandwich pipes can be done in two ways:
- Connection “through smoke”. The end of the lower module fits completely into the pipe of the upper module, which ensures unhindered passage of combustion gases.
- “Condensate” connection. This is a more complex assembly scheme. In this case, part of the inner pipe of the upper section is inserted into the lower composite segment, and the outer part - the end of the lower one is inserted into the upper module. This method of installing a gas duct ensures unhindered drainage of condensate and natural precipitation down its surfaces. With this connection option, moisture will not penetrate into the insulation and the pipe will not corrode, however, if the joints are loose, smoke may enter the room.
It would be more correct to combine both assembly schemes so that the inner contour of the pipe is mounted along the condensate, and the outer contour is mounted along the smoke.
Options
Sandwich chimneys are good because they have a modular structure, which allows you to assemble any configuration, with any parameters. Before you go to the store, you need to know the required diameter of the chimney, the height of the pipe and those additional elements that will be needed.
Chimney diameter
When choosing the diameter of a sandwich pipe, a simple rule applies: it cannot be less than the diameter of the boiler outlet pipe. If your outlet pipe is 120 mm, then the internal diameter of the sandwich should be the same or larger. It may be wider, but definitely not smaller, and the narrowing cannot be done along the entire length of the chimney. If the chimney is slightly wider than the pipe, an adapter is purchased, which is placed directly at the boiler outlet, and then the working size comes next.
If you don’t have a boiler yet, but you know its power, you can choose a chimney based on these data:
- boiler power up to 3.5 kW - internal diameter of the sandwich - 80 mm;
- from 3.5 kW to 5.2 kW - at least 95 mm;
- more than 5.2 kW - 110 mm and more.
But it’s better to buy (or at least choose) a boiler, and then decide on the chimney, because many manufacturers insure themselves by making the outlet pipes wider to improve draft.
Installation of a sandwich chimney begins with determining the diameter
Pipe height
The height of the chimney above the roof surface depends on the location of its outlet, but its minimum height should be 5 m. That is, if the height of the house is small, in any case, install the pipe to a height of 5 meters. If the height of the house is above 5 m, then the pipe should rise above the roofing material to the following height:
- Should rise 50 cm above the ridge if it comes out at a distance of less than 150 cm from it.
- If the distance from the ridge to the pipe is more than 300 cm, then the pipe may be lower than the ridge level, but the angle should be no more than 10° (see figure).
- If the chimney exits at a distance of 150 to 300 cm from the ridge, its height can be at the same level as the ridge element or higher.
Under such conditions, normal traction is ensured. The smoke will go away normally regardless of weather conditions. To prevent leaves from getting into the chimney, they install special umbrellas, weather vanes, and in windy places - deflectors, which further improve draft.
Sandwich chimney pipe height
If it is not possible to bring the pipe to such a height, they install a smoke exhauster - a forced draft is obtained. A fan will not be needed all the time, but in some conditions, when natural draft is not enough, forced exhaust saves the situation.