Calculation of basic parameters
At the design stage, it is necessary to determine the height of the chimney and the cross-sectional dimensions of the smoke exhaust duct. The task of the calculation is to ensure optimal traction force. It must be sufficient to ensure that the required amount of air enters the firebox and all combustion products are removed in full, and at the same time not too large so that hot gases have time to give up their heat.
Height
The height of the chimney must be selected taking into account the following requirements:
The ridge of a pitched roof or a flat parapet in windy weather should not create support above the chimney. To do this you need to adhere to the following rules:
If there is a higher building near the house, then the chimney should be erected 0.5 m above its roof.
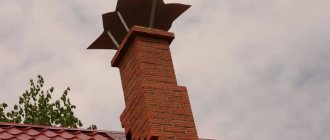
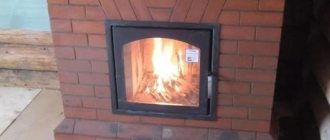
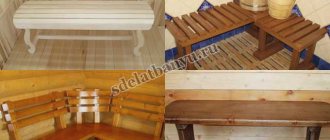
The brick chimney is very neat and fits into any exterior
Section dimensions
If a stove or boiler is connected to the chimney, then the cross-sectional dimensions should be determined depending on the power of the heat generator:
The power of factory-made heat generators is indicated in the passport. If the stove or boiler is homemade, you have to determine this parameter yourself. The calculation is carried out according to the formula:
W = Vt * 0.63 * * 0.8 * E / t,
The chimney can always be decorated if desired
The calorific value E depends on the type of wood and its moisture content. The average values are:
For fireplaces, the calculation is slightly different. Here the cross-sectional area of the chimney depends on the size of the firebox window: F = k * A.
The coefficient K is equal to the following values:
For intermediate height values, the K coefficient can be determined using a special graph.
This graph allows you to determine the K coefficient for intermediate values of pipe height
They tend to make the actual dimensions of the smoke exhaust duct close to the calculated ones. But they are selected taking into account the standard sizes of bricks, blocks or cylindrical parts.
Preparation work, necessary materials and tools for work
- Foundation. If the investment is large (more than 500 cents), then it is necessary to build an additional foundation for it. If the pich is small, it won’t be too heavy.
- Thermal insulation is available for all types of stoves: both large and small.
- Dimokhid. In no case is the dimar liable to contact the beams on the stele. Also, stand between him and all the beams, but approximately the same.
- Pipe. The pipe protrusion is obov'yazkovo guilty but more than half a meter, but not more than a second.
- Rotating the stove. The place to choose is consistent with the information about the pipe and the flame, so that you can wash it over the stove.
If all insurance points are covered, then there are a lot more:
- It is better to stir the stove so that it scorches more of the area. For example, since there are a number of small rooms in the cabin, it is better to spread out not in one of them, but between them, so that everything is scorched.
- If you need to heat one room, then move the stove closer to the wall, rather than against it.
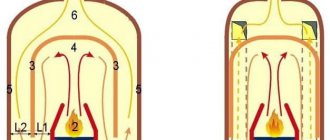
Otter and fluff with smoke channel 140 x 270 mm
Diagram of a brick chimney: 1 - head, 2 - pipe neck, 3 - otter, 4 - metal sheet, 5 - fluff, 6 - roof, 7 - riser, 8 - ceiling.
Depending on the thickness of the seams, the channel size may be 10 mm smaller.
Ottering and fluffing should be done with the expectation that the width and length will increase in each row by a quarter of a brick (60-70 mm). This will mainly depend on the thickness of the seams.
The structure is placed at some distance from the roof of the stove, on which it is planned to base the mounted pipe.
This part of the pipe can be made of several rows of masonry, which are often called the neck of the furnace.
Execution of order
Flushing is a significant expansion of the pipe where it intersects with the attic floor. Flushing prevents rain and snow from entering the attic through the cracks between the pipe and the roof.
In this case, the order will consist of 6 rows:
- The first row is the neck of the pipe, which is made of 5 bricks with chimney dimensions of 140 x 270 mm and outer sides of 510 x 380.
- The second is the beginning of the fluff. External dimensions – 590 x 450 mm. In order to obtain such dimensions, you need to insert fours and halves of building material into the masonry. To limit the size of the channel, plates and crushed bricks, which have a thickness of 30-40 mm, are inserted inside the fluff. The size of the chimney in all rows will remain unchanged.
- The third row measures 650 x 510 mm. Plates of building material, which are 6 cm thick, are inserted inside the masonry.
- The fourth row has dimensions of 710 x 570 mm. Inside you need to insert bricks that have a thickness of 90-100 mm.
- The fifth row is laid exclusively from intact construction material.
- The sixth row is identical to the fifth, but the ligation of the seams must be strictly observed. If the height of the fluff increases, rows 5 and 6 must be alternated.
- Seventh - the beginning of laying a pipe riser of 5 bricks. It is brought 1-2 rows above the roof level.
The otter is placed on a riser with all seams carefully bandaged. This option consists of 9 rows. Each row will protrude forward by 1/4 of the building material. Inside the otter, next to the smoke channel, plates are inserted so thick that they do not increase or decrease the size of the channel.
Performing an otter order
The order of laying out the otter. Each subsequent row protrudes in relation to the previous one by half a brick. The cross-sectional dimensions of the smoke channel passing inside the otter are adjusted by inserting brick plates so that they remain constant along the entire length.
The otter laying is carried out as follows:
- The first row is laid in 5 bricks. He'll be a boner.
- The second increases the length of the masonry with a quarter of the building material protruding on the sides, for which you will need to insert a three-quarter and a half, and place a plate inside.
- The third is placed so that its length remains unchanged, and the width from the bottom increases by half of the given building material in order to form an overhang.
- The fourth row is placed as shown in the figure. The overhang increases from the sides.
- The fifth is placed according to the order.
- The sixth one needs to be laid out so that the overhang lengthens on the sides. Its length and width will be equal to two bricks.
- The seventh completes the installation of the overhang on 3 sides.
- The eighth is placed according to the order. The overhang comes out from the last fourth side.
- The ninth is placed like the eighth, with careful observance of ligation of the seams.
- The tenth performs the installation of a pipe neck of 5 bricks.
After the neck of the pipe is completely laid out, you should proceed to the head, the laying of which will not be difficult, because it is carried out in the same order as the fluffing.
Design
At first glance, it seems that a brick chimney for a heating boiler or fireplace is simply a vertically folded pipe. This impression is deceptive, because in order for the smoke removal system to work correctly, the pipe must be given a certain shape and length. The construction of a brick chimney consists of the following parts:
- Mounted pipe . This term refers to the section of the chimney connected to the firebox of a boiler or fireplace. It starts from the wall of the heating device and ends 5-6 rows before the interfloor ceiling. The laying of the overlay is carried out with the obligatory observance of ligation of the seams between the bricks.
- Fluff . The fluff is the widening of the chimney, starting 5-6 rows before the ceiling and ending after it passes. The laying of the fluff is carried out with the insertion of brick plates, increasing the outer perimeter of the pipe by 250-400 mm.
- Boner . The term "riser" refers to the vertical section of chimney pipe that runs through the attic to the roof of the house. The masonry of the riser is even with spoon, cross or chain ligation of seams.
- Otter . Otter is another widening of a brick chimney that begins immediately after reaching the roof. This part of the pipe is 100 mm wider than the riser on each side, which serves as reliable protection against moisture penetration into the gap between the chimney and the roof.
- Cervix . The flat section of the pipe, starting after the otter and corresponding in size to the riser, is called the neck.
- Header . The brick chimney ends with two rows of masonry made with an extension. This part of the pipe is called the head. A deflector or weather vane is placed on it to protect it from water and debris getting inside the smoke exhaust duct.
Important! To design an effective brick chimney with your own hands, you need to follow three main rules: maintain the same size of the smoke exhaust duct along its entire length, select a cross-section in accordance with the volume of the boiler or furnace firebox, and avoid turns and internal corners.
Material selection
When constructing a chimney, you need to take care of choosing a high-quality material that is suitable for its performance characteristics. Professional stove makers recommend red solid brick.
The width of one brick is 125 mm, taking into account the centimeter seams between it; using this material, a brick chimney of 140x140 mm, 14x270 mm or 270x270 mm is laid out. When inspecting a brick when purchasing, pay attention to the following characteristics:
- Evenness of color . High-quality brick has a uniform, rich red tint. The presence of white deposits and foreign inclusions indicates the presence of lime, low-grade clay and other impurities in the composition.
- Integrity . Strength is the main criterion for choosing material for chimney construction. If cracks and chips are found on the surface of the brick, then most likely it was made without compliance with technology from low-quality raw materials.
Note! Brick is a heat-resistant material that can withstand temperatures of 400-500 degrees, to which the smoke passing inside is heated. To prevent the seams from becoming a weak point of the chimney pipe, use a clay-based solution or special dry mixtures recommended by manufacturers for the construction of stoves. The width of the joints is considered an important criterion for the quality of the masonry; the thinner they are, the better.
Installation sequence
To lay a brick chimney with your own hands requires special knowledge and skills, so most often the construction of a chimney, like a fireplace or stove, is carried out by a professional stove maker.
Experienced craftsmen create complex, functional snake-shaped structures for more efficient heating, and equip air intake ducts and windows. Laying a brick chimney of the simplest design is carried out as follows:
- Under the location of the fireplace, stove or boiler, a foundation is poured that is not connected to the main one. The height of the filler base is calculated based on the weight of the stove and chimney. Usually a thickness of 30-50 cm is sufficient; if necessary, the foundation is reinforced for strengthening .
- After constructing the furnace or installing the heating device, they begin laying the superstructure pipe. The laying is carried out with strict adherence to dressing. To reduce the number of cuts, a spoon dressing scheme is used.
- 5-6 rows before the ceiling they begin to lay out the fluff. In this place, the dimensions of the pipe are expanded by 250-400 mm through the use of brick quarters. They are placed inside the cladding in such a way that the inner surface of the smoke exhaust duct remains smooth. The creation of the fluff occurs in 5 rows, the last of which is laid in solid bricks, observing the dressing.
Important! In the process of making fluff, otter and making the head, you have to cut the brick to obtain the required size. To ensure the smoothness of the inner surface of the smoke exhaust duct, you need to cut carefully and evenly. Experienced kiln craftsmen can chop bricks to the required size in one motion; however, it is easier and faster to use a grinding and cutting machine.
Self-construction of chimneys
The technology for installing a smoke duct has much in common with the installation of a conventional air duct. The difference lies in the presence of more stringent requirements for the operation of the chimney. Therefore, the process of arranging pipes for furnaces requires accurate calculations, selection of building materials, fasteners, refractory putties and other things.
Modular pipe
In the case where the chimney is planned to be laid in the wall of the house, this nuance should be taken into account at the stage of wall construction, otherwise the hole will need to be punched using a jackhammer. It is possible to install a stove duct in an already equipped ventilation duct, but as a result, the fire safety of the smoke exhaust structure will significantly deteriorate.
To implement a hidden pipe scheme, you need to use the services of an experienced architect, since during the operation of the furnace, temperature deformations are possible - the dimensions of the channel increase from the influence of hot gas, thereby exposing the walls to destructive processes.
Chimney sections inside load-bearing structures can be constructed from multilayer blocks. They are placed over the entire surface of the wall, using a temperature-resistant adhesive for fixation. This material is able to level out thermal deformations, thanks to damper gaskets, and thereby ensure the integrity of the building.
The main advantage of this design is that there is no need to insulate the pipe on the roof of the house - the channel will go outside above the roof level inside the gable.
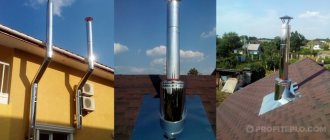
Mounted steel chimney
Installing steel chimneys does not require special skills or a lot of time, so they are often preferred by homeowners, and such structures are relatively inexpensive.
It should be taken into account that:
- Any metal pipe must consist of at least two parts and must be disassembled accordingly. After a few years, the first section burns out from high temperatures, not the entire structure will need to be replaced, but only a section of it.
- Where the chimney will be brought out through the roof and wall, fire-resistant insulation is laid, otherwise the building may catch fire.
- The section of the pipe located in an unheated room must be properly insulated so that cold air masses do not cool the gas and thereby affect the performance of the heating unit. As a result, condensate will not collect on the surface of the pipe and it will not rust.
- It is imperative to waterproof metal pipes using non-combustible materials.
Install the metal shell structure in stages:
- The first elbow is placed on the screen pipe or on the outlet of the furnace air duct.
- The second ring is brought out through the attic into the room and fixed on a fire-resistant spacer.
- Connect both knees.
- The third segment is led out into the attic through a through opening in the roof. The place where the pipe exits to the street is covered with a spherical casing.
Root brick pipe
This type of brick stove chimney will last for many years. The main pipe is installed on a foundation, which is laid separately during the construction of the basement floor.
The installation technology of this chimney is more complex than that of a mounted metal structure. The fact is that the main pipe must withstand the longitudinal load from the weight of the entire unit, so it is laid out from baked bricks.
Features of the structure:
- To build a chimney channel, leave a hole the size of a brick or half a brick. To lay one layer, 4-6 bricks will be enough.
- The layers are laid out so that the bottom joining seam of the row is under the whole brick.
- Before the chimney pipe is brought out through the roof, a special module is made in the place where it passes through the ceiling to shift the axis of the section piercing the roof relative to the axis of the part of the chimney located in the room.
The design of this type is complex, and it is installed when there are no other options.
External chimney
A pipe mounted from metal or asbestos-cement modules is installed along the facade of the building, moving in the direction from bottom to top.
External structures have the following features:
- in the place where the pipe enters the building, a hole is made, through which a horizontal segment of the chimney is then brought out;
- the junction of the horizontal and vertical sections is designed in the form of a tee, one part of which is closed with a plug. This element is used when cleaning the chimney;
- the pipe is attached to the facade using detachable metal clamps. The lower part of the chimney is strengthened with a superstructure specially erected on a separate foundation.
Recommendations
Well, the chimney for the fireplace (stove) was built from brick. But there are some nuances that you should remember and know... we will tell you about them:
- When doing masonry, do not forget about “bandaging” the bricks. This is especially important when halves and quarters are used. This also applies to brick plates.
- Craftsmen can easily chop off a piece of brick that fits in size. But to be sure, it is better to use a special machine (grinding and cutting) for these purposes. She will become your assistant and cut the size of brick that is needed. This is especially important for plates that generate smoke. channel when making an otter or cutting.
- IMPORTANT! The thinner the masonry seams, the greater the strength of the entire chimney structure. Therefore, before cutting off the required part of the brick, measure the location (area) of its installation and then mark the cutting line with a marker on the brick.
The same principle is used to make a brick chimney in a bathhouse.
What does a READY brick chimney look like?
How much will it cost
It is difficult to say definitively how much it will cost to build a brick chimney. It all depends on various factors. If you turn to stove makers, in addition to the cost of consumables, you will have to pay well for their services. And this will double the cost of the chimney.
If you do the masonry yourself, then the cost of the structure will depend only on the purchased materials (brick, cement).
In conclusion, it is worth noting that laying a brick chimney on your own is a long, labor-intensive and responsible process. There is no point in experimenting here. Having absolutely no skills in construction, it is better to entrust this matter to specialists. Since the life and health of you and your loved ones depends on the proper operation of the chimney.
Simplified type
This type of chimney is without otter. It doesn't even have a fluff. To strengthen the structure, a frame is made in the chimney, or more precisely, along its perimeter. Using threaded connections, the frame is attached to the chimney. Make sure it is attached at ceiling level. Then it is fixed. Fixation is carried out to the floor beams. The frame can be fixed with metal plates. You can also use construction reinforcement for this procedure. What exactly you choose is not so important. The main thing is that the chimney is strong and does not wobble. To carry out sealing, metal sheets are used.
Protective aprons are placed in the groove. Before this they are bent. The planes of the groove in this case are slotted. To prevent moisture from entering, all contact areas are treated with sealant. It doesn’t matter what kind of sealant it will be.
If you use already used brick for masonry, plaster the internal channel. Surfaces must be smooth.
Think for yourself which design is most suitable for your premises. You can consult with a specialist.
Only you can decide whether you will entrust the construction to a professional, or whether you will build a brick chimney with your own hands. But in any case, the product must be reliable and safe in order to effectively perform its functions.
How much will it cost
Over the course of three centuries, the brick chimney on the roof has become a visual constant. And a building with such a finish looks, according to subjective assessments, much more attractive.
All that remains is to determine how much compliance with the canons will cost you. If you involve third-party craftsmen, the cost of the work will also be added to the cost of the brick. And she's quite big. In St. Petersburg and the region, for example, laying one brick will cost from 50 to 90 rubles.
The solution, if you prepare it yourself, is free.
Five kilograms of ready-made masonry mixture cost 60-70 rubles. One package is enough for 10-15 rows of pipes with a cross-section of 125 by 250 mm (sixes).
Let's compare the cost of a meter of a metal sandwich pipe with a diameter of 250 mm and a brick pipe with a cross-section of 250 by 250 mm. Just the kind that can be used for installing fireplace chimneys.
Classic version
This device looks like a straight pipe. It has a rectangular cross-section, and sometimes it has a square cross-section. A damper is mounted in the section.
For its construction, fire-resistant bricks are used. Be prepared for the work to be quite challenging. It is very important that the surface is perfectly flat. And make the mortar joints as thin as possible.
It is best to use clay mortar for laying brick chimneys. Ready-made mixtures from a solution are also used for this. First of all, a pipe is built. It's called the nasal one. It needs to be built directly on the stove. Here you need to install a valve.
The pipe expands several rows before it overlaps. This expansion is called fluff. It serves as protection for wooden structural elements from the hot surface of the pipe.
The size of the fluff ranges from twenty to forty-five centimeters. To make it more convenient to expand the brickwork, you can install rods made of metal into it. You can use fittings.
The pipe in the attic will narrow a little. Then, it goes all the way to the roof. However, its dimensions no longer change.
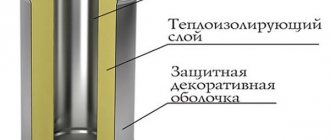
Chimney insulation
External insulation of the chimney is designed to eliminate the main enemy of the chimney - condensation, which forms in the cold season as a result of condensation of water vapor on the internal walls. Firewood contains a particularly large amount of moisture - up to 25% in dry wood and up to 60% in freshly cut wood. Coal does not contain vapors, but since the combustion process uses air from the living room, its humidity can reach 8–10%. Passing through a cold pipe at low speed, steam is deposited in the form of droplets on the inner walls and, mixing with soot, turns into a chemically active acid.
Insulating the chimney pipe avoids the formation of condensation on its internal walls
Three main methods of insulation are used:
- Plastering. The simplest and most accessible method that does not require special skills. It consists of applying several layers of slag-lime mortar to the chimney, which, when hardened, forms a strong protective “coat”. To strengthen the adhesion of the plaster to the masonry, use a metal mesh, securing it to the pipe with anchor nails. After applying 3-4 layers (with drying intervals), the insulated surface is covered with whitewash or lime. As practice has shown, such protection can reduce the heat transfer of a pipe by 20–25%. This method is fast and does not require large financial costs.
- Insulation using wooden boards. You will need boards 30–40 mm thick. A wooden frame is mounted around the entire chimney (from the otter to the cap) and completely sheathed with boards. The wood is protected from above with slate. The distance between the brickwork and the boards (5–7 cm) is filled with any non-flammable insulation - earth, sand or mineral wool. To prevent the insulation from spilling out, the gaps between the boards are covered with plastic film or puttied with sealant. This method is effective in regions of the steppe zone, where dry winds often blow and prolonged rains are rare.
- The third method requires certain expenses. It consists in the fact that the pipe walls are insulated with mineral wool, which is resistant to solar radiation. The best option is basalt wool, which has very low thermal conductivity. A layer of adhesive is applied to the chimney, to which basalt slabs are attached. For good adhesion, the entire insulation mass is fixed with plumbing tape and covered with reinforced polypropylene film. After the glue has completely dried, the cotton wool is covered with grainy facade paint using a painting mesh. Another option is siding or cladding with profiled metal sheets. This pipe insulation allows you to retain up to 50% of the heat inside the chimney duct. And, as a result, ensure the absence of condensation on the internal walls.
Special requirements
We repeat: the advantages are simple - compactness and the ability to build in an existing house without major construction work. But it is not so easy to place a more powerful firebox in a furnace structure of generally the same dimensions; from excessive heat load it will quickly become unusable. If special requirements are not met:
- Furnace foundation.
- Masonry mortars.
- Methods of laying the structure of the furnace.
- The choice and methods of installing stove fittings.
Foundation
The design of the foundation for the rough is shown in Fig. The crushed stone cushion without sand bedding is leveled to the horizon before pouring. Pouring mortar M150 – cement M300 and sand 1:2. The gap between the rubble foundation and the flooring is 30-40 mm. Don't forget to support the cut joists! Leaving their ends hanging is a common but serious mistake. The dimensions of the foundation in plan should protrude onto the contour of the furnace by at least 100-150 mm.
Construction of the furnace foundation - rough
Solutions
To fold the rough, 3 types of solutions are used, see fig. below. The bed on the foundation and the chimney are laid out on lime mortar as it combines sufficient heat and moisture resistance, but the rubble must be laid only on a completely moisture-resistant cement-sand mortar. It is highly advisable to use mountain or ravine sand with rough grains for clay mortar. Ordinary clay - purchased from the oven, guaranteed fat content and, most importantly, purity. Self-excavated clay, brought to the required fat content with sand, is of little use for coarse masonry.
Compositions of masonry mortars for coarse stoves
Masonry
For rough masonry, stove bricks and, if the order (see below) is provided for, fireclay bricks are used; red worker is of the highest quality - light red in color (fully annealed), without burn marks, distortion and swelling. Dry molded brick is absolutely unsuitable. The masonry of the structure is roughly carried out following the trail. rules:
- If you are an inexperienced stove maker, each row of masonry is first laid out dry; detected defects in cutting/chipping bricks are eliminated.
- Before laying on the mortar, each brick is soaked until the release of air bubbles stops. You can’t dump all the bricks into a barrel indiscriminately!
- A 5 mm layer of mortar is applied to the bed and the base of the brick being laid.
- The brick being laid is laid with a smooth movement, slightly tilted, and moved towards the previous one so that there are no air bubbles left in the seam.
- The brick is pressed until the seam comes together to 3 mm; You can't knock!
- Between fireclay and ordinary masonry, the initial seam is 8-10 mm; after pressing – 6 mm.
- The seam between bricks and metal embedded parts (see below) is 10 mm.
- Excess mortar squeezed out of the seam is removed with a trowel (trowel).
- The recesses in the seams found after removing excess mortar are filled with mortar by pressing without transverse movements, but not by rubbing!
Those who prefer to learn visually can watch a video tutorial on laying heating and cooking stoves below:
Video: laying a heating and cooking stove
Accessories
Incorrect oven door installation
Fittings and grates for roughing require cast iron; doors and latches - with an installation skirt and holes in it for diagonal wire whiskers. Welded steel or cast iron fittings with eyes for straight lugs (laid along the corresponding furnace wall) are unsuitable in this case. However, install the doors/latches as in Fig. on the right, in the rough it is impossible; This is not according to stove rules at all. For a Dutch country house with 2.5 bricks in plan, which is heated once or twice a season, it may be fine, but not for a rough one.
It is necessary, firstly, to crimp the mustache (galvanized wire 2-3 mm) with a twist so that it does not move. Press not too tightly at first, place it at the desired angle (at least 12 mm should remain from the far end of the mustache to the inside of the masonry). Then tighten carefully and shake the door/latch slightly. Didn't leave? Good. Then, secondly, you need to tightly wrap the skirt with asbestos cord (or basalt fiber), and only now put it in place. You can also watch the following videos about installing accessories into the oven.
Types of long-burning stoves
If you have planned to build a long-burning stove with your own hands, you have all the tools and you are not afraid of difficulties, then you will certainly need the information from the next section of our review - in it we will talk about the varieties of these stoves.
Potbelly stove
The simplest of all stoves is the potbelly stove. It is an iron stove assembled from an old gas cylinder or from sheet metal. In order to ensure long-term combustion, its internal volume is made very large - this is most easily realized in models made of sheet steel, you just need to select a drawing that is suitable in size.
This stove can operate on wood, coal, or compressed solid fuel. It is easy to use, easy to melt and produces a large amount of heat. It is also characterized by unpretentiousness. If you need a simple stove for your dacha, feel free to choose a potbelly stove - it will be the simplest and most affordable option.
Wood stove fireplace made of brick or stone
This option is good because we can implement long-term combustion in it and work on the design. The network contains drawings of similar stoves with large combustion chambers and afterburners - these are so-called pyrolysis units. They burn not only fuel, but also gases formed during pyrolysis. A brick unit will be bulky, but very effective. Here are its advantages:
- Long-term heat retention through the use of brick or stone;
- Excellent appearance - just find a suitable project and make neat masonry;
- Possibility of working in residential premises, unlike the same “bubafoni”.
The disadvantage is that to assemble such a long-burning stove you will need experience in bricklaying.
Bubafonya stove
The presented long-burning stove has impressive dimensions, runs on wood and has an extremely simple design - depending on the volume, it can burn for up to 20-24 hours, without requiring frequent approaches to laying firewood. To make it, you will need a pair of metal containers with lids (100-200 liter barrels are suitable), pipes for the chimney and air supply, as well as a channel to create a weighted piston.
The “Bubafonya” long-burning stove is most often used for heating non-residential buildings - garages, greenhouses with garden crops growing in them, technical premises and utility rooms. Some craftsmen equip it with heating circuits, which allows them to heat living rooms without the risk of filling them with acrid smoke.
Proper installation of a chimney for a wood-burning fireplace and stove
The peculiarity of firewood as a fuel is the great heat it produces. It follows from this that the temperature of the smoke in a wood-burning sauna stove or fireplace will be high, but uneven. Not every chimney can withstand such prolonged exposure.
Most often, heat-resistant bricks are used to install a chimney for heating devices such as a sauna stove or a fireplace with a wood-burning firebox (see Do-it-yourself chimney).
Making a brick chimney
The correct diagram of a brick chimney in general terms may look like this:
- Most often, a top-mounted pipe is used for a wood-burning sauna stove. That is, it continues the exhaust vent of the stove or fireplace itself. You should know that it is better to do the laying of the interior (indoors) using a clay-sand mortar.
- They start by assembling the base of the pipe - at least 3 rows of bricks. In this case, the internal cross-section of the chimney passage of the bathhouse stove must exactly correspond to the power of the heat generated by the heating device.
You should know: all masonry work on the outside of the building must be done with the addition of cement and water to the solution!
- The method of installing an otter chimney for a wood-burning stove in a bathhouse or fireplace depends primarily on the degree of roof slope. Therefore, in each individual case this process will have its own nuances. The general procedure for street chimney expansion is shown in the figure below.
For better protection against leakage from the outside, you need to make a kind of “apron” of metal around the chimney pipe on the roof of the house or bathhouse. The edges of the leaf bend back and hide under the otter's protrusions.
Apron under otter brick chimney
You should know! To prevent water from stagnating on the otter's ledge, it is necessary to make corner slopes of cement plaster on all four sides.
We make plastering slopes on the otter
- After the external expansion, the main riser is made, as in the attic. For beauty, a brick cap is usually laid out.
- The brick chimney is completed with a cap that protects from environmental influences: wind, precipitation. The shape of the protective umbrella can be different. The best option is a deflector.
A graphic diagram of a brick stove chimney for a house or bathhouse is shown in the figure below.
Scheme of a two-bell chimney
It is the two-bell smoke exhaust system that is optimal for use in large stoves and fireplaces with large wood-burning hearths. It provides more or less uniform heating in the room, and also has a minimum of obstacles to the movement of smoke to the exhaust duct.
Features of a double chimney for a fireplace
Another chimney option is a double pipe. On the outside it is made of brick, and inside there is a metal cylindrical part. If the pipe is made of stainless steel, then this chimney option is suitable for installing a gas boiler.
Combined double smoke exhausts for fireplaces have a number of advantages over brick ones:
- The channel for the movement of smoke has a smooth surface, without obstacles.
- The fire safety of the building as a whole increases.
- The outer part can be laid without fluff.
- The service life of the chimney increases.
- The tightness of the entire chimney is improved.
The figure below shows a diagram of a chimney for a fireplace or gas boiler that has a combined structure.
Fireplace chimney installation diagram
The peculiarity of this design is that it is usually made in a radical design, and not mounted. That is, the chimney itself is located directly next to the heating unit.
- When installing a combined chimney, a foundation is first made, which has a height of at least 30 cm.
- The brickwork of the shaft is done in accordance with the same conditions as when installing a conventional brick chimney.
- Due to the design features of the double channel, the outer shaft is placed vertically without necessarily thickening the walls in the area of the ceiling.
- At the bottom, immediately after the foundation, a niche is made with a door for cleaning.
- A stainless steel metal pipe is assembled from top to bottom in such a way that each subsequent elbow is inserted inside the previous one.
- All joints of the internal part of the combined chimney are treated with a sealant with a heat resistance of at least 1000°C declared by the manufacturer.
Make it yourself or order it
Tips for choosing
At the beginning of the 20th century, when gas and electric heating were unavailable, stone and brick stoves were widespread. There were many good styling professionals, much more than there are now.
If you decide to order a fireplace or stove and seek the help of a specialist, be sure to pay attention to his professionalism. To do this, it would be a good idea to look at the documents confirming his qualifications and familiarize himself with the portfolio of works.
A poorly constructed chimney is life-threatening. Insufficient draft will lead to the formation of dangerous carbon monoxide, which kills more than one and a half million people every year. In addition, the occurrence of backdraft can lead to fire. Even if a disaster can be avoided, the chimney will still have to be rebuilt, and this is a double expense.
If you decide to make a chimney yourself, carefully read all the requirements of building codes and fire safety.
The chimney can be of 3 types:
Mounted. Here the oven serves as the base. The minimum thickness of the furnace walls is 2 bricks.
Root. Located on a separate foundation. The smoke outlet pipe of the boiler or stove is connected to the chimney through a connecting transfer hose.
Wall. It is a channel in a load-bearing wall.
Whatever chimney you choose, I personally recommend that when choosing to install it yourself, do not neglect the advice and supervision of a specialist. I repeat - an incorrectly laid chimney will inevitably lead to tragedy.
By the way, for a metal stove you don’t need a brick pipe - an ordinary iron one is enough.
Building regulations
The installation of chimneys for private houses and baths is regulated by the following building codes:
- SP 7.13130.2013 “Fire safety requirements”;
- SNiP 41-01-2003 - “Air conditioning, ventilation, heating”;
- VDPO - “Rules for production work, repair of smoke ducts and furnaces.”
Fire safety requirements for chimneys
The fire safety requirements for chimneys come down to the following main points.
- The wall thickness of the outlet pipe must be at least 120mm;
- Between the inner layer of the roofing pie and the chimney, a fire-prevention retreat must be provided - at least 130 mm;
- When using combustible insulation in the attic floor structure, it is necessary to organize protection in the form of sand backfill;
- The fluff must end at least 70 mm from the upper and lower boundaries of the overlap;
- The distance from the inner surface of the hot chimney to the combustible ceiling structures (fireproof cutting) must be 500 mm or more;
- The walls of the furnace retreat from the combustible structural elements by at least 250 mm;
- The distance between the upper edge of the furnace and the roof slab is 350 mm for intermittently fired furnaces and 1 m for continuous furnaces. This condition applies to a stove made of three rows of bricks. If there are 2 rows, the distances need to be increased by one and a half times;
- You cannot connect two heat sources to one chimney system.
The traction force is ensured by the correctly selected pipe cross-section and its height. The cross-section of smoke ducts made of brick is calculated based on the power of the heating device.
The height of the chimney pipe is calculated using special programs and formulas, but there is one rule - the elevation of the chimney above the ridge should be less than 500 mm (if the distance from the chimney to the ridge is less than 3 m).
In a vertical brick chimney, draft is generated by convection.
A prerequisite for the occurrence of an upward flow is the temperature difference between the ambient air and the exhaust combustion products: the greater it is, the stronger the thrust.
Therefore, for the normal functioning of the chimney, it is important to take care of its insulation. I’ll tell you how to arrange the insulation a little later.
What mortar is used for masonry
When working, a stove maker can use different masonry mixtures:
- A clay-sand mortar is used to lay red brick. Its proportions are 1:2. If the clay is very oily, then 3-4 volume fractions of sand are added.
- When installing refractory blocks, a masonry mortar of refractory clay, fireclay and sand is mixed. The mixture proportion is 1:1:2.
- To install a chimney in the attic, you can use a cement-lime-sand mixture in a ratio of 1:1:2.
- For the roof cap, you can use a cement-sand mixture in a ratio of 1:2.
The solution for laying a stove chimney after mixing it with water should have a creamy consistency.
Masonry rules
The cross-section of the structure must be a multiple of the dimensions of the bricks. The thickness of the outer pipe walls of mounted structures must be at least half a brick. For greater stability, the thickness of the external walls of the bottom of the main structures should be equal to a whole brick with a transition at the top to half a block.
Air ducts inside the structure should be placed in a vertical direction. Hogs cannot be mounted horizontally at the level of the attic floors. This is required by fire safety regulations.
Each stove must be equipped with its own chimney. Rarely does a project allow two heating devices to be connected to one channel. They should have a single-level arrangement, with a height cut of 75 cm or more.
When installing two heating devices (or a stove and an exhaust network), two channels can be connected in one riser. Their sizes remain the same. However, the installation of a two-channel chimney with a half-brick to half-brick channel cross-section is done in incomplete blocks. Five whole and two ¾ bricks are placed in each row. In this case, reliable ligation of the masonry is achieved.
Basic parameters of chimneys
The purpose of the chimney system is to remove combustion products from the combustion chamber outside the room and create draft to support the combustion process.
Based on the functions, corresponding design requirements are put forward:
ensuring fire safety
Particular attention is paid to safe distances to the walls of the room and areas of passage through ceilings and partitions; correct choice of pipe height. It provides the necessary draft and safe removal of combustion products
The minimum permissible height is 5 m; the thickness of the chimney walls and insulation must provide reliable protection against the high temperature of exhaust gases and overcooling of the duct at low outside temperatures; there should be no obstacles to the gas flow in the channel - unevenness, excessive bends, blockages, etc. The dimensions of the channel must be sufficient for the passage of gases; the chimney duct must be reliably sealed. The penetration of smoke into the room can lead to human poisoning; the construction material must be resistant to high temperatures and the aggressive effects of gas, as well as the presence of a temperature gradient (from the inside and outside); From above, the chimney must be reliably protected from precipitation.
In addition to specific requirements, the chimney structure must comply with general building codes. It must have sufficient mechanical strength and durability.
We recommend reading: What SNiPs and standards exist for the construction of private houses
Design features
In order to ensure reliable operation of the chimney, it is made up of several main parts:
- Internal chimney. It extends from the surface of the stove almost to the ceiling. Its upper border is usually located 4-6 rows of bricks below the ceiling. In this area, a valve is provided to regulate the draft and holes for cleaning the channel.
- Fluff or ceiling cutting. It is designed to allow the pipe to pass safely through the ceiling. To do this, the thickness of the chimney walls increases, while the internal channel has unchanged dimensions. The neck of the fluff starts 5-6 bricks below the ceiling.
- Riser or external chimney. This is the section of the pipe from the fluff to the roof, i.e. the part of the chimney that crosses the attic space.
- Otter - enlargement of the chimney walls for the passage of the roof. This element prevents moisture from entering the room in the gap between the pipe and the roof. The walls of the otter are at least 10 cm thicker than the riser.
- Chimney neck. This is the part of the chimney above the roof.
- Header. This final element includes a deflector (thickening of the walls) and a protective cap to prevent precipitation from entering the channel.
The indigenous type of brick chimney additionally includes an individual foundation. The pipe location must be vertical. Horizontal sections are allowed only when strictly necessary, and their total length should not exceed 90-100 cm.
Selection of channel section
The most important parameter of any chimney is the internal cross-section of the channel. The excretory capacity and traction depend on it. As the furnace power increases, the cross-sectional area of the pipe also increases. The following combination of power and chimney size is recommended:
- no more than 3.4-3.6 kW – 14x14 cm, i.e. half-brick masonry;
- 3.6-5.3 kW – 14x22 cm;
- 5.3-6.9 kW – 20x27 cm;
- more than 7 kW – 27x27 cm, i.e. in 2 bricks.
The furnace power can be calculated using the formula W=Vx0.63x0.8xQ/T (kW), where:
- V is the volume of the fuel chamber (cubic m);
- Q is the thermal conductivity of the fuel (kWh/cubic meter);
- T is the burning time of one load of the firebox.
Determining the height of the chimney
The second most important parameter of a chimney pipe is its height. It must be at least 5 m from the stove grate to the upper edge of the chimney head. This parameter is adjusted taking into account the height of the house and the roof structure, because... the pipe must extend outside to a safe distance.
The above-roof part of the chimney (neck and head) rises to a strictly standardized height:
- in the case of a flat roof - at least 1 m;
- for a gable roof - when the distance from the ridge is less than 1.5 m - 0.5 m above the ridge; at a distance of 1.5-3 m - not lower than the level of the ridge; at a greater distance, the pipe cut forms an angle with the ridge of no more than 10 degrees with respect to the horizon.
When making a roof from a material capable of fire, the roof top is raised at least 1.5 m from the roof surface. If there is a taller building in the immediate vicinity, the chimney pipe rises 0.5 m above the ridge of this building.
System calculation rules
The purpose of their implementation is to select the optimal height and cross-section of the gas exhaust channel to ensure effective traction. The last characteristic is very important. If possible, it is best to have professional calculations done. If not, you can use averages. There are three main sizes that are widely used:
- Six. This is a square-shaped pipe having a row of six blocks. The dimensions of the internal channel are 250x250 mm. Used for Russian stoves and fireplaces, where minimal resistance to the flow of heated gases is required.
- Five. The chimney with a rectangular cross-section is formed by five elements. Section 125x250 mm. It is used for heating and cooking-heating devices.
- Four. A structure made of four bricks in a row. Size - 125x125 mm. Installed for low-power solid fuel boilers and kitchen stoves.
When choosing the height of a future structure, the following standards should be taken into account:
- If the roof covering is fire hazardous, the structure is placed at least 150 cm above it. For non-flammable materials, this value is 50 cm.
- The minimum distance between the grate head and the grate is 500 cm.
- When constructing a chimney on a ridge or at a distance of no more than 150 cm from it, the height of the part is 50 cm above the roof level.
- When installing a structure at a distance of 150 to 300 cm from the ridge part, its length is equal to the height of the ridge.
- If the structure is further than 300 cm from the ridge, it is allowed to be built below it. But the line drawn conditionally through the ridge and deflector should have a slope of 10°.
Types of brick chimneys
Depending on the design features, chimneys can be:
Mounted (for furnaces). In this case, the brick pipe for the chimney is laid in half a brick and rests on a base in the form of a stove masonry. Thus, the chimney serves as a continuation of the stove. This design is the most common. With this type of masonry, the inside of the chimney has a rectangular shape, which leads to the formation of vortex flows at the corners of the pipe. This phenomenon significantly reduces cravings. A way out may be to treat (plaster) the corners inside the pipe with a special compound.
Indigenous. This design is a free-standing chimney, which is connected to a stove or heating boiler using a pipe. In the upper part, such brick chimneys can be supplemented with an asbestos section with a cross-section in the range of 150-250 mm.
Prefabricated. The chimney is made up of individual concrete elements assembled together.
Wall ones. The pipe becomes a continuation of the thermal channels laid in the internal walls of the building
Please note that it is better not to install chimneys of this type in external walls, since carbon monoxide in them will cool too quickly and settle on the walls, contributing to the accumulation of condensation and soot and reducing draft.
What is fluff?
To do this, let’s recall all the parts of a brick kiln:
- the main chimney pipe is laid out from the stove;
- not reaching the floor slab, we begin to form the neck of the furnace, which is essentially the beginning of the fluff;
- fluffing is a slight increase in the outer section of the pipe to prevent strong heating of wooden and other floor surfaces and walls;
- after exiting the ceiling, the chimney is reduced to its previous dimensions and discharged onto the roof;
- 7 layers of blocks before the pipe exits the roof, we begin to lay out the “otter”, a small extension of the outer pipe. This design prevents water from getting inside the chimney:
- above this part we form a neck with the same outer section as the main chimney;
- several rows before the top, we begin to form the head of the brick pipe, on which we install a protective cap.
Chimney diagram with elements
For presentation and general understanding, let’s post a photograph (a diagram showing the location of the fluff and the “otter”):
Recommendations for choosing bricks
Mostly red blocks are used. But one should not confuse and use porous fire-resistant bricks or hollow blocks for laying the chimney; the place of such materials is to construct the inner layer of the combustion chamber.
Separately, we note that for the construction of furnaces, a ready-made or home-made solution based on refractory or fireclay clay is used. The joints must be filled completely, without leaving even minor voids.
Bricks must withstand exposure to precipitation, temperature changes and strong winds. Let us present the necessary characteristics of such blocks.
| Minimum level of compressive strength. | 300-500. |
| Moisture absorption percentage. | From 7%. |
| Minimum value of frost resistance cycles. | F100. |
| The magnitude of the weight value from the volume of the material. | 2.1 g/cm3. |
Let's look at step-by-step instructions for self-construction of an “otter”, fluff of basic sizes.