Real, Russian 6 by 6 baths have become so firmly established in the life of modern people that today there are practically no people left who have never visited a steam room in their lives.
That being said, 6x6 public bathhouses are sometimes not the best location, so why not build a 6x6 bathhouse building yourself? This is especially true for those who have a large country house-sauna 6x6 or a compact, cozy cottage.
There are many projects for bath buildings, which differ in:
- Sizes;
- Construction materials;
- Functional features.
Where does the design of an 8 by 8 bathhouse begin? Contrary to popular belief, it should start with motivation, and real bath brooms will do this role perfectly. Their aroma will make your head spin and force you to take on construction every day with triple strength.
Dimensions
Before you start designing a 6 by 8 or 9 by 4 bath complex, you should determine exactly how much space can be allocated for such a building.
Attention! A small bathhouse built next to a huge country house and a large bathhouse adjacent to a modest residential building, less than 6x8, look equally strange.
Of course, the larger the area of the bathhouse building, the more useful premises it can accommodate. Therefore, if opportunities allow, it is better to choose a 7x7 bath house project or a larger bath complex project.
6x4, 6x6, 6x7, 6x8, 6x9, 6x10, 6x12
It seems that the baths, ranging in size from 4 by 8 to 6 by 8, are not a very spacious structure. However, having studied the designs of such buildings, you can see that there is a steam room (sauna), a relaxation room, and even a covered veranda.
This building can simultaneously accommodate six people without any problems; if necessary, this figure can be increased to 8.
A distinctive feature of this project is the equipped veranda (19.1 sq.m.), which turns an ordinary bathing holiday into a comfortable and pleasant pastime.
From the veranda, through a small dressing room, visitors enter a relaxation room (10.3 sq.m.), from which you can go to a shower room (4.8 sq.m.), followed by a transition to a cozy sauna (4.8 sq.m. ).
Important! It is worth noting that such a design for a 6x6 log bathhouse can easily be adjusted to any needs of the customer, and can quickly be adapted to new sizes, for example, to a 6x8 bath house. If it is necessary to enlarge the steam room, then the required meters are simply taken away from the shower room.
A similar situation exists with the 5x9 bathhouse project. It can also be remodeled to increase or decrease the number of rooms (build a 6x9 bath house).
In this case, the project plans:
- Porch (2 sq.m.);
- Tambour (3.3 sq.m.);
- Recreation room (8.4 sq.m.);
- Steam room or sauna (4.6 sq.m.);
- Shower room (5.4 sq.m.);
- Bathroom (1.9 sq.m.).
As it becomes clear, the area of the sauna can be increased by reducing the size of the shower.
Information. The porch planned at the design stage can be easily converted into a small terrace.
By the way, if financial and other possibilities allow, then a 6x4 bathhouse can be increased to a 6x7 size in order to equip it with a small, but no less cozy pool with an area of 3.2 sq.m.
At the same time, the size of the steam room and the rest room not only does not decrease, but even increases.
A bathhouse with a 6 by 6 veranda is a good option for those owners who are strictly limited by the size of their land plot, but want to make the most of their free square meters.
In this case, the bath structure can have different sizes, for example, 4 by 10, 6 by 6 meters, 7x9 or 8x8.
This two-story 6x6 bathhouse is a guest house combined with a steam room.
The first floor is traditionally reserved for a 6 by 6 bathhouse, and on the second there is a relaxation room.
The capacity of the building is 6-8 people, of course, the number of invited guests can be increased if a slight territorial constraint does not bother anyone.
Attention! For a 2-story attic-type building, a very strong foundation should be poured.
Another project that quite often attracts attention is the 6x12 bathhouse project, just like the 6x9. Its main advantage is the presence of its own swimming pool (22.9 sq.m.) on the territory of the bathhouse building.
In addition to this, the project includes:
- Recreation room (19.9 sq.m.);
- Steam room (6.7 sq.m.);
- Shower room (6.7 sq.m.);
- Tambour or locker room (4.6 sq.m.);
- Porch (4.6 sq.m.).
4x7, 5x7, 7x7, 7x9
A bathhouse measuring 4x8, 4x7 or 5x7 is standardly equipped with an open terrace or veranda, but in this case the porch serves as an additional extension.
Such a decorative element gives the entire structure a slightly fabulous look, which is especially true if the bathhouse is built from timber or logs.
In addition to a neat and, if desired by customers, functional porch, such a bathhouse contains:
- Cozy lounge (14 sq.m.);
- Spacious steam room (5.1 sq.m.);
- Shower room (2.9 sq.m.);
- Bathroom (1.8 sq.m.).
Important! Increasing the capacity of a steam room is very simple: just install two-tier wooden benches in it.
In the 5 by 8 project, a small vestibule (2.3 sq.m.) is also planned, which rather acts as a locker room than a full-fledged room. In a 3 by 8 bathhouse, the porch can be removed and the vestibule made a little larger. If we are talking about a large 8x8 bathhouse project, then all the necessary premises will freely fit in it.
In turn, 7x4, 7 by 7, 7x8 baths are also usually supplemented with functional open or closed areas. But since the total area of the project is larger than in the previous version, the terraces (verandas) can play a completely different role here.
For example, in the project below, such sites are assigned the function of additional recreation space. They place furniture such as a table and chairs.
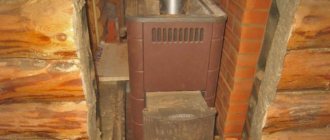
In addition, such a 7x7 and even 6x6 bathhouse is equipped with an enclosed relaxation room, steam room, washing room and boiler room. It is from the boiler room that the stove is fired, and firewood is also stored here.
The 7 by 8 bathhouse project, proposed for consideration below, brings the bathhouse building closer to the status of a guest house (10x10).
The thing is that it provides space for a small kitchen area and a comfortable sleeping place, and this allows guests who have stayed too long to sleep quite comfortably.
In addition, there is:
- Steam room (8.7 m2);
- Shower room (3.8 m2);
- Bathroom (3.4 m2);
- Entrance hall (5.8 m2);
- Terrace (13.8 m2).
It is noteworthy that in the warm season, it is the terrace that is assigned the functional task of the relaxation room, since it is unlikely that any of the vacationers in a 6 by 6 bathhouse will want to sit indoors when there is a beautiful, landscaped, open area nearby.
3x9, 9x4, 5x9, 9x9
What reasons may influence the decision of land owners to refuse to build their own bathhouse 6x6, 3 by 9, 7 by 4 or 8x10?
In fact, there are no such reasons, since in the absence of the financial ability to pay for the expensive construction of a wooden bathhouse building, it is possible to build the same 6x6 structure from blocks.
For small plots of land (up to 30 m2), projects of small baths 7x5 or smaller are created, which can either be built separately or attached to an existing residential building.
One of these compact projects, built separately from a country house, is a 3x9, 4x9 or 6x9 bath complex.
Usually in such 9x6 projects absolutely everything is provided. A small terrace serves as the entrance to the bathhouse, where in turn the following are located:
- Dressing room (5 sq.m.);
- Recreation room (8 sq.m.);
- Steam room (4.34 sq.m.);
- Shower room (4 sq.m.);
- Utility room (4.7 sq.m.).
Information. Windows located in the recreation room, shower room and utility room are responsible for high-quality ventilation of the building up to 10x10. In the latter, by the way, you can store firewood, bath brooms and bath equipment (tubs, ladles).
At the same time, the standard design of a 9x9 bathhouse differs little in functionality from previous proposals, however, the area of each of the premises in this case increases noticeably. A 6 x 10 bathhouse is also a good and functional option.
So, for example, the rest room acquires full dimensions (about 20 sq.m.), which allows up to 6 people to easily accommodate it. The size of the steam room also increases, reaching 8.41 sq.m. An 8x8 bathhouse, by the way, will have the same set of rooms, but fewer people will be able to steam in it.
In the proposed version there was also room for:
- Verandas (16.86 sq.m.);
- Separate bathroom (6.87 sq.m. and 1.59 sq.m.);
- Pantry (7.91 sq.m.);
- Changing rooms (3.25 sq.m.).
10x3, 4x10, 10x10
Baths, which have a slightly unusual, rectangular shape (as opposed to standard square ones up to 9x9), are traditionally combined with a terrace. As a result, cozy or, conversely, unusual projects with dimensions of 10x3 and 10x4 are born.
The main material of construction is logs or profiled timber. The total area of the project is about 40 m2.
The volume of the 4x6 terrace allows you to easily install garden furniture and additional sun loungers on it. Thanks to this, the usual bathing holiday takes on slightly different forms.
The area of the rest room is 2x4, the washing room and the steam room occupy rooms of the same size (2x2).
In turn, the 10x10 bathhouse project is noticeably different from previous proposals, since it involves the creation of a larger number of unusual rooms.
For example, if you equip a bath building with a full-fledged kitchen, then the entire building will be able to cope even with the functional tasks of a guest house.
In this case, the relaxation room should be furnished with such furniture that is not only comfortable to rest on after visiting the steam room, but also allows you to get a good night's sleep.
So, in such a 10x10 bath you can place:
- Kitchen (25 sq.m.);
- Rest room (25 sq.m.);
- Hall or corridor (18 sq.m.);
- Steam room (17.5 sq.m.);
- Bathroom (4.5 sq.m.).
In addition, if you attach a canopy to the bathhouse, you can get a good open parking lot where guests can safely leave their personal cars.
Do-it-yourself brick bath: step-by-step instructions
As already mentioned, brick baths are reliable and durable buildings that have a long service life. But in order for the bathhouse to truly delight you for many years, it is important to choose the right material for construction.
Solid clay (red) or silicate (white) bricks are perfect for laying walls. They have a high level of heat resistance and are slightly susceptible to mechanical stress. Clay bricks are more durable, but they are more expensive. To save money, you can use hollow bricks to install partitions; they are cheaper and lighter in weight.
The bright scarlet color of the brick indicates that it has not been in the oven long enough. A violet-brown color, on the contrary, indicates that the building material was overexposed in the oven. Such violations of brick manufacturing technology lead to the material becoming fragile and unreliable. Such bricks are not suitable for building a bathhouse.
After the materials have been selected, you can begin building a brick bathhouse.
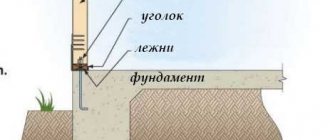
Step 1: Installing the Foundation
As already mentioned, a brick bathhouse is a heavy building that requires a high-quality foundation. You cannot save on the foundation and limit yourself to a lightweight option, since such an approach will lead to the building quickly collapsing.
For the construction of a brick bathhouse, a strip foundation is best suited. It must be buried at least 1 m, the depth depends on the type of soil.
First you need to dig a pit, cover it with a 15-20 cm layer of sand, water it and compact it. The top of the sand is covered with a 10 cm layer of crushed stone, followed by sand again.
Afterwards you need to make the formwork, install the reinforcement cage, prepare the drain holes and fill it with cement mortar.
For thermal insulation, it is necessary to cover the base with two layers of roofing felt.
A more complex option would be a pile foundation. But in some cases you cannot do without it, for example, if you are going to build a bathhouse on a slope.
Step 2. Construction of walls
Wall masonry can be continuous and lightweight. In the first case, the bricks are laid in several rows (at least two), without voids. The second option involves the construction of two brick walls, between which there will be voids filled with heat-insulating material, for example, basalt wool.
With continuous masonry, the walls are more durable. But for a bathhouse, the second option is often chosen, because it provides sufficient strength, the walls put less pressure on the foundation, and building a bathhouse is cheaper because brick consumption is reduced.
As already mentioned, it is better to build external walls, as well as the basement, from solid bricks, and internal partitions from hollow bricks.
Laying walls should start from the corners. For the work you will need a mortar, which is made from sand and cement. You need to apply the mortar in a layer of 2 cm and lay the bricks in the corners in several layers.
Below are diagrams for laying corners with bricks:
Next you can move on to laying the walls. Please note that the first row must be completely laid out over the entire foundation, even if you plan to do lightweight masonry.
From the second row you can make lightweight masonry; you need to start the rows of walls with the outer bricks. When laying, the material must be wetted, especially if construction is carried out in hot weather.
Bricks must be laid strictly in rows. Broken bricks should not be used for the construction of supporting structures.
When laying walls, you need to ensure that all seams are even. They should not be too thick or thin, the recommended width is 1-1.2 cm.
Don't forget to leave door and window openings.
With a lightweight type of masonry, you need to cover the empty space with heat-insulating materials: a mixture of sawdust, light slag, fluff lime, mineral wool, etc.
You can make external insulation of the bathhouse with polystyrene foam, but in this case you will need to do external finishing.
Step 3. Roof installation
The roof for a bathhouse can be made single- or gable, depending on personal preferences and the chosen project. Most often they make a gable roof.
To install it, you need to make a mauerlat, attach a rafter system to it, cover it with lathing and roofing material.
We talked in more detail about how to make a roof in a bathhouse with your own hands in another article.
Step 4. Interior and exterior decoration
For interior decoration, lining is traditionally used - this is the best material with many advantages. The sink can be covered with ceramic tiles.
It is not necessary to do external finishing, of course, if you have not done external insulation. If you are still going to do the finishing, you can plaster the walls with cement-lime mortar, cover them with siding, etc.
Now you know how to build a brick bathhouse with your own hands. With this the main work is completed, you can move on to arranging the furniture and operating the bathhouse.
A brick bathhouse is a reliable and strong building that will serve you for many years. But in order for the bathhouse to be comfortable and practical, it is important to choose the right project. At the stage of drawing up a project, there is no need to rush; it is important to correctly draw up a drawing, indicate all the sizes and locations of partitions, doors, windows, and think through ventilation, lighting, water supply and drainage systems.
Material
Today there are three options for building materials on the market, of which 6x6 baths are most often built:
- Log or profiled timber;
- Block;
- Brick.
Attention! It is strictly prohibited to erect a bath structure from synthetic materials!
From a log
What first comes to mind when it comes to material made from natural wood? Of course, this is a unique woody smell that no aromatic oil or stick can completely imitate.
Moreover, all log buildings have the following characteristics:
- Environmental friendliness;
- Practicality;
- Aesthetic appeal.
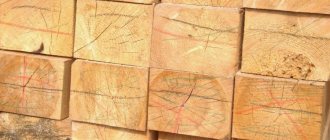
However, not all trees will be equally useful if they are used to build the walls of a future steam room.
For example, oak is a very durable tree; therefore, prolonged exposure to moisture on an oak log will invariably lead to the loss of its original shape. Simply put, the tree will “bend out”.
In turn, coniferous trees (spruce, larch) are absolutely not suitable for arranging a steam room. The contact of hot air with wood will most definitely lead to the appearance of resin “tears”, which is not good both from an aesthetic and practical point of view.
But deciduous trees such as linden or aspen are perfect for building a bathhouse. Logs from them begin to emit a subtle aroma when heated, for which all Russian baths are so famous.
Important! Choose only well-dried logs for construction. Otherwise, after a certain amount of time you will have to observe a distortion of the bath.
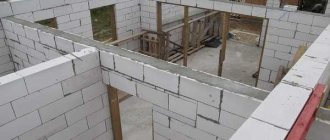
From blocks
Block is a rather unique building material from which both residential and non-residential premises can be built.
However, in order for a bathhouse built from a block to be practically no different in functionality from wooden buildings, the following points should be taken into account:
- The blocks are hygroscopic, that is, they have the ability to quickly absorb moisture;
- A bathhouse built from such material should be provided with good vapor and heat insulation.
Simply put, in order for a steam room made from a block not to collapse after a couple of years from constant freezing cycles, it needs to be properly insulated from the inside. Only after this can you not be afraid to go to the bathhouse at least every day.
At the same time, expanded clay concrete blocks are an environmentally friendly building material that, when heated, does not emit substances hazardous to human health.
And the lightness of each “brick” and its small dimensions (40x30x24 cm) make it possible to use a minimum number of people during construction.
Brick baths: advantages and disadvantages
Brick buildings have the following advantages:
- environmental friendliness. When making bricks, no harmful substances are used that will be released when heated. Brick is a safe material;
- fire safety. Brick does not burn; according to this indicator, it is many times safer than wood;
- rot resistance. Brick baths are not damaged by fungus and other harmful microorganisms;
- no shrinkage. There is no need to wait months for the building to shrink; you can move on to the interior decoration of the bathhouse immediately after completion of construction;
- ease of construction. The process of laying bricks is quite simple and even a theoretician can do it;
- the ability to erect structures of any shape and configuration. When working with brick, you can give the building any shape;
- affordable price. Most believe that a wooden sauna is much cheaper than a brick sauna. This is true if you use new expensive bricks for construction, but if you choose a cheaper one, then the construction will be cheaper;
- long service life. A brick building can last much longer (up to 150 years) than a wooden building.
Despite the many advantages of brick, it also has disadvantages:
- hygroscopicity. Over time, the brick absorbs water, so it is necessary to do hydro- and vapor barrier;
- high thermal conductivity. It is equally important to ensure high-quality thermal insulation, otherwise you will need a lot of fuel and time to heat up the steam room;
- the need to make a high-quality foundation. If a regular lightweight foundation is suitable for a wooden bathhouse, then a more reliable option is needed for a brick one.
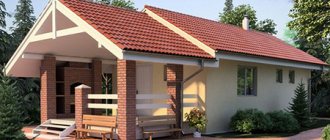
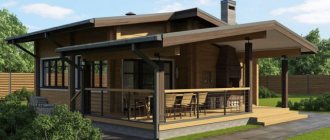
With veranda
Of course, a bathhouse with a veranda will never compare with an ordinary bathhouse building. After all, this is a more comfortable and more functional room in which, if desired, you can combine absolutely everything.
For example, by choosing a corner project, you can, in conditions of limited space, gain access to both the steam room and the residential building. In this case, the bathhouse is simply attached to the house; in front, the entire structure is complemented by a glazed veranda.
Now neither autumn slush nor winter blizzards will interfere with a relaxing holiday in your own sauna.
No less interesting is the project that involves placing a swimming pool on the veranda. But since such a “sophistication” requires a lot of financial investments, which not everyone can afford, in the warm season you can limit yourself to installing a regular portable pool.
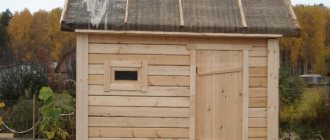
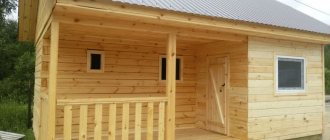
Up to 30 m2
Many owners of country houses still have not acquired a bathhouse for only one simple reason: they are sure that there is not enough space on the site for a large building.
Perhaps there really are few free square meters, but even on them you can easily build a small, compact steam room. In this case, you should focus on the dimensions 3x4 or 4x4.
If the area of the land allows, you can take a closer look at the design of a bathhouse with a veranda measuring 7.6x5.4. In this case, the owner receives:
- Rest room (about 14 sq.m.);
- Steam room (5.5 sq.m.);
- Shower room (about 6 sq.m.);
- Veranda (9 sq.m.).
One of the walls of the veranda is blank, this makes staying on the site more comfortable. There is a window in the rest room.