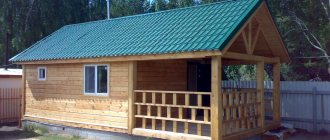
How to build a 3x4 frame bathhouse with your own hands. I present to you a detailed working photo project for the construction of an inexpensive and easy-to-make wooden frame bathhouse with a gable roof.
This frame bathhouse will be built on a strip foundation with a poured concrete floor.
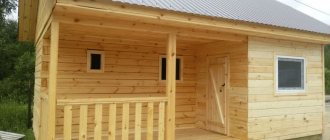
Our foundation principle will be the same as shown in the photo.
Our foundation slab will be 440*340 cm and with a total diagonal of 556 cm.
Do-it-yourself 3x4 frame bathhouse: we make it for many years
The process of bath procedures is the most accessible way to improve muscle tone and improve your well-being.
That is why those people who have an empty piece of territory make a bathhouse on it. For those people who want to build such a building on their own, frame types of steam rooms are well suited. In this article we will look at how to build a 3x3 frame bathhouse with your own hands, as well as similar modifications, but with dimensions of 3*4 and 3*5.
Components of a steam room
Peculiarities
A 4 x 3 meter bathhouse is ideal for a family of 4 people and guests. Before starting the construction of walls, you should select the appropriate site and prepare the necessary communications.
Often a bathhouse is built as an additional extension to a house, and there are a number of good reasons for this.
- proximity to a communications center (water, sewerage);
- thermal conductivity factor, when one of the walls of the bathhouse is an integral part of the house;
- comfort when from home, without going outside, you can go straight into the room.
Any bathhouse consists of several blocks:
- steam room;
- shower room;
- bathroom;
- dressing room;
- restroom.
The main material for building a bathhouse is logs. It is necessary to take into account the fact that the thickness of the material in this case will reduce the area of the premises.
Building a 3x4 m bathhouse with your own hands is not difficult, you don’t need to have experience, it’s only important to get the design documentation right
The advantages of such baths
Since ancient times, our great-grandfathers built baths from chopped wood. But over time, this time-tested technology has lost its relevance. The fact is that modern construction methods are much more affordable in terms of cost and time, and in terms of quality characteristics they are in no way inferior.
The most popular technology today is frame construction.
We bring to your attention the main advantages of this method:
- Construction in a short time;
- Possibility of construction at any time of the year;
- No shrinkage;
- Low cost of construction and operation;
- Possibility of masking electrical equipment and communications;
- Many options for exterior and interior decoration.
Important points
Before starting all construction work, the design of a 3x4 frame bathhouse (and any other as well) must contain a number of technological and construction solutions.
- Thermal insulation. High-quality measures for sealing and insulating the bath will guarantee good air exchange. For these works, fiberglass or mineral wool is most often used, because they have excellent characteristics;
- Vapor barrier. The main disadvantage of frame construction is the appearance of condensation. This is explained by the fact that moisture penetrates into the frame through cracks during rains and snowfalls. Therefore, in order to avoid such a phenomenon, you need to carry out this stage of work well.
A good solution would be to use a vapor barrier film or glassine; they are placed between the layer of inner cladding and insulation. Experts do not recommend using roofing material, since when heated it emits an unpleasant odor;
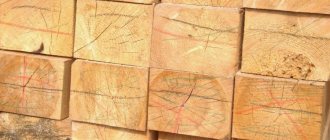
- Choosing the right wood. Only good dried boards are suitable for construction work. Aspen, larch and linden are ideal for these tasks.
They have a low thermal conductivity and are almost not deformed. The lining itself must be without flaws and of the highest quality.
Foiled mineral wool
Construction process
If you have already decided on the construction site, then you need to do a soil analysis. Then, on the construction plan, decide where the stove, chimney, ventilation will be installed and decide what material to use for the roof.
A well-thought-out project for a 3x5 frame bath is at least half the battle, so you need to be attentive to the details. It is quite possible that you will like our project under consideration.
Making the foundation
Due to the fact that such a building is light in weight, the base can be built according to a simplified scheme. A completely acceptable option is a columnar base containing asbestos-cement pipes filled with concrete.
We present for you the sequence of work to create it:
- Purchase of asbestos-cement pipes, they have a length of forty meters and a diameter of ten centimeters;
- Drilling a well. It will be enough to make it with a depth of one and a half meters and a diameter of twenty centimeters;
- A pipe is taken and cut in half, then inserted into the well and covered with sand;
- A solution is prepared consisting of cement, sand, small crushed stone and water;
- The resulting mixture is poured into pipes.
Photo of the foundation creation process
The initial stage of building any frame bathhouse is its piping. For these works you will need 100*50 mm boards, which must be treated in advance with antiseptic agents. First, we mark the walls, and then proceed to lining along the outer contours.
The boards are fastened with nails, and the base is framed with supports. The lower and upper trims are made of boards; in order to lay the roofing material, the lower one must be cut off from the foundation.
The construction instructions indicate the need to periodically monitor the horizontal level using a spirit level. If deviations are detected, then roofing felt pads are placed in several layers. The racks are installed taking into account the fact that in the future it will be necessary to carry out work on cladding and thermal insulation.
Important. To give strength to the structure, the logs and trim are secured using previously walled metal plates. At the very end, the binding is treated with a solution that prevents rotting and deformation.
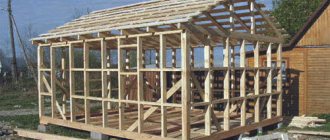
Construction of walls
At this stage of construction, the distance between the axes is very important and this parameter should be equal to 0.6 meters in the event that the opening does not fit with the rest of the walls. Otherwise, the gap should be taken 0.4. As for the interval between the racks, it is selected depending on the dimensions of the doors and windows of the bathhouse.
Important. Master bath attendants strongly advise constructing an additional rack at the place where the frame is attached to the lintels or wall. After fastening, the corners of the frame are checked with a construction angle for the presence of an angle of 90 degrees.
Frame bathhouse 3x4 - master plan
The assembly begins with the formation of the corner - first, the wall is assembled, which will later be connected to the binding. After this, verticality is checked and temporary struts are attached.
Next, other frames are installed at right angles, and all strapping is secured using boards nailed. The sheathing process begins after the installation of the frame.
Roofing and finishing
The work on creating the roof is done as usual, the only wish for it is good ventilation. As for finishing work, there is room for your imagination to run wild.
Externally you can use:
- Decorative tiles;
- Plaster;
- Pine or spruce boards;
- Block house;
- Siding.
Before this work, hydro- and heat-insulating materials are applied to the wall. For interior work, it is best to use lining, but do not cover it with varnishes and paints, since when heated they can release harmful substances. OSB sheets are used for the subfloor.
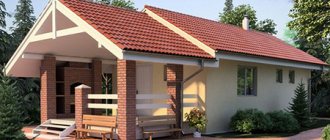
In this article, we looked at the construction processes of typical bathhouse projects with dimensions of 3*3, 3*4, 3*5 meters. A self-made 3 by 3 frame bathhouse will become a “paradise” of your dacha or cottage, thanks to which you can take care of your health (see also the article “Building a foundation for a bathhouse with your own hands - types and features of application”).
Appearance of the finished bath
Where to begin
Before you start creating a frame bath project, you need to decide on some important points that will allow you to plan everything more productively:
The steam room can be either built-in or free-standing, so you need to decide how it will look in your bath. Decide on a place to build
This is important to do at the initial stage of construction, since building a bathhouse involves laying the necessary communications. Often, the owner chooses a place for a bathhouse in accordance with the convenience of installing utility lines from the house there, so as not to complicate his life with autonomous circuits. Find out the type of soil in the area you have chosen for the bathhouse
Accordingly, you will need to choose a suitable foundation. Consider such points as, for example, the number of floors, the presence or absence of a veranda (terrace), attic (attic). As for the internal filling of the bathhouse, it is important to determine in advance the place for the heater stove, since the location and structure of the chimneys and ventilation outlets depends on this. Decide on the type of future roof. It can vary not only in appearance, but also in accordance with the structure of the roof. The massiveness of the floors and rafters depends on the choice of roofing.
Experts say that after determining the above-mentioned main nuances, you can begin to work on drawing up an individual project for a frame bath or choosing a project from a photo. As construction progresses, you will adjust your design, but the more accurate it is initially, the fewer problems will arise during the process.
If this stage seems too complicated for you, you have the opportunity to order a frame bathhouse project inexpensively from specialists. On the pages of the websites of specialized companies, there are many options for already developed frame bathhouse projects in the photo. If none of them suits you, the companies will give you the opportunity to order a unique project in accordance with your tastes and preferences.
Advantages and disadvantages of the structure
Many summer residents associate a bathhouse with a massive structure made of a wooden frame or brick. In this case, the structure will be beautiful, emphasizing the wealth of the owner, but extremely expensive. In addition, the construction period will be extended. Experts recommend paying attention to the frame-panel option.
Advantages of the technology:
- Low cost.
- No need for a massive foundation.
- The low thermal conductivity of the walls allows you to heat the room faster.
- Communications are carried out inside the walls, which improves aesthetics.
- There is no shrinkage after construction.
- The materials are environmentally friendly and safe.
- The work can be done without any construction skills.
- Construction does not require the use of special equipment.
- Finishing is carried out in various options.
- There are no wet finishing methods, which makes it possible to work in almost any weather.
The technology is gaining popularity. Its main advantage is cost. The construction of a frame bath will cost 2-3 times less than the construction of a log house and brick walls. Installation is easy to do yourself, even alone if you are planning a small project. Judging by the reviews of the owners, all conditions for a comfortable stay have been created in frame baths.
However, there are also disadvantages:
- Fungus is the main enemy. Since the building is not monolithic, but consists of many parts, there are gaps between them. Outside air leaks through them, causing condensation to form. The result is increased humidity at the joints and the appearance of mold. But there is a solution to the problem - high-quality insulation of joints and treatment of wood with an antiseptic.
- Using cheap polystyrene foam as insulation is a fire hazard.
- You cannot use wood with even a slight excess of moisture, since then the gaps at the joints will increase when it dries out.
All shortcomings can be resolved, but you will have to purchase high-quality materials. The construction of frame baths should be carried out strictly following the technology, then problems will not arise. The fire hazard of insulation is a controversial issue. Only a brick building with minimal finishing can be considered safe.
Washing
The area of the washing compartment must be calculated based on 1 m/sq. per person. Of course, if you wish, you can either increase or decrease the area of this room. The size of the sink can be planned in principle to any size at the owner’s request), but from practice it is recommended to make this room no more than 2 meters. A larger sink would simply not be practical. With this layout, it is possible to additionally install benches for placing bath accessories.
It is imperative to install ventilation in this compartment. Install vents or a full window.
To ensure that the room is well ventilated, some builders think about the placement of ventilation in the floor and ceiling, so there will be a constant flow of fresh air in the room with good circulation
This is very important in order to get rid of dampness and in the case of wooden floors to prevent rotting of the wood. If the decoration is made of ceramic tiles, then a window will be quite enough
Project design
The project allows you to document ideas, decide on size and materials, and also calculate the amount of building materials and budget. Owners should choose the size of a frame-panel bathhouse based on the number of people in the family and the availability of free space on the site. The latter is often in short supply, especially in dacha cooperatives.
For a small area, a standard 3x4 bathhouse design is suitable. But it should be remembered that a comfortable stay in it is possible only for two people at the same time. Therefore, for large families it is advisable to take a closer look at 4x5 or 4x6 projects. The sizes can be any at the discretion of the owner. The main thing is that there is a place to build. A small 3x4 bathhouse with a single room for a steam room, changing room and shower is not very convenient. Therefore, it is advisable to divide it into several rooms, albeit small ones.
Heating is usually done with a wood-burning stove, which is made of brick or cast iron. Does it make sense to connect gas heating? Some owners do this to make it easier to control the temperature.
A building for economic purposes, including a bathhouse, which is erected on a land plot, is subject to state registration. To do this, you need to contact Rosreestr after construction is completed and enter information into the Unified State Registration Register.
Design
The dressing room is equipped in a variety of interior styles. Recently, the Finnish style has been in fashion; now Hellenistic motifs are very often used. But high-tech and modern are also often used. Modern materials allow you to decorate the rest room in accordance with the wishes of your own imagination. Often in such rooms you can find marble, expensive wood species or custom-made furniture.
Russian-style baths have not gone out of fashion and occupy the lion's share of the market. Stoves made of stone and brick can also often be found in a wide variety of households; this material remains the main one when contact with high temperatures occurs.
A lot of attention is paid to tiles, from super-expensive clinker tiles to cheap Chinese ones. Tiles are a durable material, there are a huge number of different tiles on the market, there is plenty to choose from
Another material that has recently been actively conquering the market is porcelain stoneware. This artificial stone is much stronger than ceramic tiles and is fired at higher temperatures. This is one of the reasons why porcelain tiles are in great demand.
Foundation options for different soils
Increased strength from the base is not needed due to the light weight of the frame structure. But the foundation must be of high quality and match the type of soil underneath it.
You cannot make a shallow foundation on soft soil - this will lead to inevitable shrinkage. Therefore, it is important to choose the right type of base.
Wooden or timber type
Solid soil and a light bathhouse design measuring 3x4 allow the construction of a structure on a wooden foundation. This type is ideal for clay soil, which does not suffer from excess moisture, but has seasonal mobility.
For the foundation, hard wood is used, preferably oak. It is treated with an antiseptic or covered with dust and moisture-proof materials: resin or oil with wax.
The wood should be as dry as possible before installation. After installation, the beams are secured on the sides with stakes.
Light sauna on a block foundation
A small bathhouse, when installed inside a heavy stove, can be placed on a base made of blocks. But this type of foundation is effective only with a shallow layer of soil freezing in winter.
To form the foundation, you need to install gas silicate blocks around the perimeter of the walls and secure them with soil. In this case, the blocks are set strictly according to level. Deviations are excluded.
Columnar option
Suitable for soil with an uneven structure and high groundwater levels, where a foundation of increased depth is being built. For reliable fastening, pipes are driven into the ground, on which the building is placed. No equipment is needed for the work. The tools you will need are: mound, cement, plastic or asbestos pipes.
Construction order:
- Level the ground and mark the installation points for the pillars.
- Drill holes up to 50 cm deep. Waterproof the bottom with polyethylene.
- Pour concrete and install the pipe at a depth of about 30 cm.
- Wait until it hardens and fill the pipe with concrete to the end.
A grillage is formed on top of pillars made of hard wood or metal. An economical and effective option for a frame bath on soft soil.
Pile-screw frame
When building a frame bathhouse with your own hands, its massive structure when built on deeply frozen soil requires the formation of a pile-screw foundation. Piles are driven below the freezing depth - to solid ground. The tying of the piles, as with the columnar type, is done with wood or metal.
Tape base
The heaving and reliable soil allows you to form a strip foundation for construction. It's easy and quick to build. The main thing is to complete the entire pouring of concrete at once to form a monolith.
Procedure:
- Forming a trench with a perimeter the size of the walls, 40 cm wide and 50 cm deep.
- Fill the bottom of the trench with 15-20 cm of soil. For better compaction, moisten it with water.
- Install formwork 50 cm high and 30 cm wide.
- Reinforce the foundation base. The reinforcement is tied together rather than welded together.
- Pour concrete.
To prevent concrete from deteriorating under the influence of moisture, it must be protected. Waterproofing is done with roofing felt or thick film. But it’s better to first add a waterproofing agent to the solution - it’s more reliable.
Floor installation
The floor is formed with 5x5 bars, which are secured to the joists with self-tapping screws. Subfloor boards are laid on top. Then install waterproofing in the form of a film or roofing material and insulation - mineral wool. The thickness of the thermal insulation is at least 10 cm. Waterproofing in the form of glassine is also placed under the final finishing so as not to spoil the mineral wool.
Features of installing the floor in the washing room:
- Remove soil around the perimeter of the floor to a depth of 50 cm.
- Fill the pit with sand and gravel 10 cm thick. This will avoid creating a pit.
- The logs are formed from asbestos pipes, which are filled with concrete when forming the foundation. This prevents possible movement of the joists.
- Form a subfloor. A gap of 5-7 mm is left between the boards to install rubber gaskets.
- Next, hydro- and thermal insulation with the formation of a fine finish after installing the walls.
Construction according to this option allows the floor in the washing room to dry faster. This extends the life of the wood.
Making walls
Before installing walls, you need to decide on the location of doors and windows. In a small bathhouse, racks are formed at the corners of the building. On the front and rear walls, which are longer, additional racks are installed in the middle. But they can be displaced due to the way windows and doors are installed.
Step-by-step procedure for constructing walls:
- Install corner posts. In a vertical position, they are first fixed temporarily with slats, but strictly according to the level.
- Place vertical racks on the sides. The lower parts of the side posts are secured with metal corners. Then this is the procedure for the front and back walls.
- Additional reinforcing elements are installed in the form of beams. Boxes for windows and doors are formed according to size. There is only one door. There are one or two windows for the locker room. Small in size to prevent heat loss. The purpose of windows is ventilation.
- All connections are reinforced with metal corners. It is recommended to use self-tapping screws instead of nails - it’s more reliable.
- In the same way, the bases of the walls inside the bathhouse are formed according to their availability.
- After the frame of the walls is formed, they are sheathed. Lining or OSB boards are suitable as cladding.
After covering the external walls, insulation is installed. To form the frame, a 10x10 cm beam is usually used, so the insulation should not be thinner. How to build a frame bathhouse with good insulation is to use mineral wool. Inexpensive material that is easy to seal cracks. They must be carefully closed; there should be no gaps. If you miss some connection without insulation, this will lead to a rapid loss of temperature inside the bath.
The vapor barrier is made of foil. The minimum thickness is 40 microns. The foil joints are connected with tape. The order of installation is from top to bottom in stripes. A stapler is used to secure it to the wood, but glue can also be used.
The template will make it easier to install the rafters. It is made of light boards and placed next to the installation site of each rafter. It is easy to avoid mistakes with such a system.
Instructions for forming the roof:
- Assembly is carried out on the ground for ease of operation and manufacturing accuracy. Then the finished structure is raised.
- Each part is installed in its own place above the central beam. Places must be marked in advance with a bright pencil.
- The roof must have ventilation holes. A sheathing is installed between the rafters and the counter-batten.
- It is easier to cover the gables with OSB boards - this will form a solid element.
Slate is the best roof covering. Roofing felt is not recommended because it tears quickly and easily. You can use metal tiles, it’s more aesthetically pleasing. But when it rains, metallic tapping will be heard.
Materials
Materials are prepared in advance so that there is no need to purchase them in addition. For any frame bath you need:
Material for creating a frame. Often a beam with a cross section of 100x150 mm is chosen for it. Crossbars and slopes are created from 80x80 mm timber. The rafter system is erected from 150x150 mm timber. The finishing coating is made from soft tiles
It is important to choose a material that does not place a large load on the frame walls. For this reason, you should not pay attention to ceramic tiles. The sheathing of the roof and walls is created from 20 mm slats. OSB panels are used to cover the walls. They are also laid as a base under soft tiles.
An edged board treated with antibacterial and fire-resistant compounds is suitable for the floor. Imitation of timber is often used for external cladding, and lining for internal cladding. The frame bath is insulated with mineral wool with fire-resistant properties. The thickness of the layer depends on the climatic conditions of the region.
It is best to choose basalt wool with a thickness of 15-25 cm.
Important! It is better not to use polyurethane foam for insulation. At high temperatures it begins to melt
In addition, this material is flammable.
You will also need to prepare nails and screws of various lengths. Given the high humidity inside the bathhouse, galvanized fasteners should be used.
Interior decoration
Before carrying out interior finishing work, windows and doors are installed. It is important to seal all joints during installation to avoid drafts, especially in the cold season. Acrylic sealant is suitable for this.
Tips for interior decoration:
- Painting walls indoors is prohibited. Paintwork materials will release toxic chemicals when exposed to high temperatures. And the smell will be unpleasant.
- In the steam room, the vapor barrier must be made of foil. Glassine is suitable for other rooms.
- The minimum ceiling height is 2.2 m.
- The joints between the walls and the ceiling must be properly insulated. You can seal them with sealant.
- It is advisable to complete the final finishing with clapboard made of linden or other types of wood with a pleasant smell. There is no need to save money here, especially for a steam room.
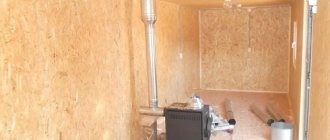
Installation of the stove is carried out according to the instructions, observing fire safety rules. The boiler is placed in the dressing room, and only its back wall should protrude into the steam room. The boiler is made from brick. If you don’t have the skills to install it, you can purchase a ready-made boiler.
High-quality ventilation is the key to a good microclimate. The steam room must be ventilated through an asbestos pipe with a diameter of about 12 cm. The pipe is routed to the attic.
When building a frame bathhouse with your own hands, the main thing is to show your imagination. A budget project does not mean simple and ugly. In the hands of a business person, everything takes on a beautiful appearance. In the future, the walls can be decorated and the area around can be improved.
Results
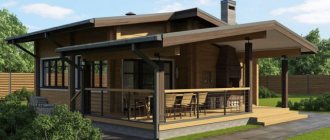
In this article, we looked at the construction processes of typical bathhouse projects with dimensions of 3*3, 3*4, 3*5 meters. A self-made 3 by 3 frame bathhouse will become a “paradise” of your dacha or cottage, thanks to which you can take care of your health (see also the article “Building a foundation for a bathhouse with your own hands - types and features of application”).
Appearance of the finished bath
In the video presented in this article you will find additional information on this topic.
Source
Project of a frame bath 3x4 m
A strip or column foundation is sufficient for such a building. The structure practically does not shrink due to its lightness, so for the base of a small frame bath you need to purchase only well-dried timber measuring 20x20 cm for the racks and a board. Drawings of the most simple and low-cost baths can be seen below.
The advantages of frame baths also include the absence of deformation, the ability to make utility lines hidden, and a variety of finishing materials. A building with a square area of 12 m2 also retains heat perfectly, like a log house.
To ensure that your bathhouse lasts a long time and does not require repairs, you need to pay attention to the following points:
- the frame must be located on a flat surface;
- you should not choose the cheapest thermal insulation;
- the wood must be of high quality, not thin and carefully treated with antiseptics;
- if the frame is in doubt about its instability, it must be strengthened with struts.
Frame baths are not afraid of shrinkage, since the material is quite elastic and is not afraid of shrinkage. The upper sections of the base rest on supporting, well-waterproofed beams. It is better if they are made of oak, larch or hornbeam. To connect the wooden belt and the foundation, I use anchors made of reinforcement (1.4-1.6 cm) with hooks buried in concrete up to 20 cm. On the other side there should be threads for a nut.
Corner joints, as a rule, are made “under the paw” and secured with anchors. Next, the outer racks (10x15 cm) are placed vertically and secured using jibs. The thickness of the racks should correspond to the thickness of the insulation.
For buildings 3x4 m, it is permissible to install struts on corner posts.
If the bathhouse is two-story, it is better to install struts in each span. The pitch of the frame posts is 0.6-0.8 m. They are attached to the support beam using steel brackets. The beams must have a cross-section of at least 5x15 cm.