Wood, being an environmentally friendly material, not only effectively retains heat, but also gives the air in the room a special aroma.
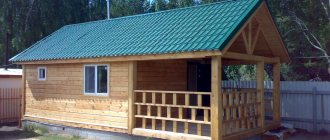
DIY sauna log house
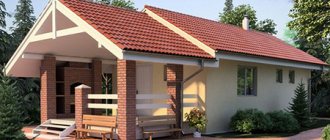
Log bathhouse 4x6 m
To build a wooden bathhouse, you must first prepare the timber.
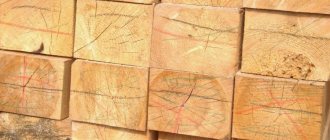
Stage 1. Preparation of round timber
Preparation of round timber
Preparing the log
Attention! To determine the quality of logs (you can refuse low-grade sawlogs at any time), you need to know about the ideal harvesting conditions, which we will consider below.
Round timber must be harvested at sub-zero temperatures, that is, in winter. It is at this time that the amount of moisture in the wood is minimized, therefore, during drying the material will deform and crack less.
In order to ensure the durability of the log house, certain sections of logs (the so-called butt logs) are used during construction. These sections start from the rhizome and end at the crown. Such butt logs are denser (which compares favorably with the tops) and there are practically no knots in them. Selection criteria also include the round shape and degree of curvature of the trunk. In both cases, a defect is an error exceeding 1 cm per linear meter.
Harvesting logs for a log house
Butt logs
Attention! If the length is, for example, 5 m, and the error exceeds 5 cm, then the log can be safely rejected.
The same applies to diameter. For example, the diameter of the base of the log is 35 cm, while the top is 25 cm or less. Such round timber is categorically not recommended for use in construction.
Logs for a log house
Finally, pay attention to the type of wood. Ideally, coniferous trees (spruce, larch, etc.) should be used for a bathhouse. Larch is characterized by resistance to moisture, although in extreme cases you can resort to the “pine-spruce” combination, in which the first few crowns are erected from pine. And if only spruce is used in construction, then the material must be treated several times with an antiseptic.
Perform further actions in accordance with the previously drawn up project. You can create such a project yourself, find it on the Internet, or order it from specialists. It is with the help of this document that you can calculate the required amount of consumables, determine the area and shape of the base.
Only here you will find:
- Detailed projects.
Projects for bathhouses and log houses from “Royal Cedar” contain documents that allow you to save: cutting maps for wall materials (cedar, pine, larch) and specifications for all lumber. Cutting cards mean a 15% saving in logs, assembly according to masonry plans means a 20% reduction in construction time.
- Affordable prices.
We are manufacturers and do not work with intermediaries. Therefore, you can buy a log bathhouse from us at a price from the manufacturer. Customers pay only for the material and the work of our craftsmen; wages for intermediaries and resellers are not included in the construction budget!
- Transparent estimates.
We prepare detailed estimates based on data from the project: cutting maps and specifications. The estimate shows how much the entire log bathhouse costs. How many cubes of logs of the selected diameter are needed for construction? How much lumber and antiseptic will be required? You will see the answers to these questions in our estimate.
- Exclusivity.
It is not so easy to build a log bathhouse with an attic and a veranda from large-diameter logs. Only real master carpenters can work with large round timber. These are the specialists who work for us. We built the first calibrated log house of a cedar bath with a diameter of 500 mm in 2002.
The number of our clients is constantly growing, which eloquently indicates that our bathhouses and log cabins are good not only at the very beginning, but also during operation. Over the years of the company's activity, we have built more than 200 hand-cut bathhouses in Russia and abroad.
Stage 2. Timber processing
Processing logs for scraping
Processing a log for scraping
Step 1. After the consumables have been delivered to you (or you have cut and delivered them yourself), they need 25-30 days to rest.
Step 2. Next, carefully examine and sort through the logs - keep only the highest quality ones, and discard defective or damaged ones.
Step 3. Then start processing. First, peel the bark from the logs (do this carefully so that they do not crack), leaving a little of it on the sides - about a 15-centimeter strip on each side.
Step 4. After processing, place the logs in storage approximately 25 cm from the surface of the ground. You can stack it however you like - in stacks, packs, etc., the main thing is that the distance between the logs is 7-10 cm.
Scheme for preparing logs for building a log house
Log storage
Video - Preparing logs
Why do they trust us?
1. No prepayment.Staged payment for results.
2. We do it on time or for free.Construction is divided into stages with a specified completion date.
3. No hidden fees.The price is final at the contract stage.
4. "Full construction".All work is done by one company.
Stage 3. Construction of the foundation
Let us immediately make a reservation that massive monolithic foundations can be abandoned due to the insignificant weight of the future structure. In order to save money, you can resort to one of two possible lightweight designs, namely:
- strip foundation;
- columnar.
Let's consider each of the options.
Strip foundation
Strip foundation
Marking
Marking
Digging a trench
Formwork and reinforcement
Fill
Ready-made foundation for a bathhouse
To build such a foundation around the entire perimeter, as well as under future walls, dig a trench 40 cm wide and 50 cm deep, lay a “cushion” of sand and gravel on the bottom. Next, lay the reinforcement, build formwork 50 cm high and pour concrete mortar. As a result, the height of the foundation will be approximately 1 m.
Attention! A more specific height depends on the depth of soil freezing in a particular region.
Video - Pouring the foundation
Place strips of sand and crushed stone inside the perimeter. In the future, the strips can be filled with concrete or a wooden floor can be built on them. The choice of one option or another depends on personal preferences and financial capabilities.
Columnar foundation
Drilling
Fittings and pipe for foundation
The pipe and fittings are installed in the hole
Concrete poured into a pipe
Anchor for attaching the bottom trim
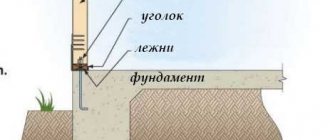
In the case of a columnar base, you will need to build supports. There are two possible options:
- brick;
- from asbestos pipes.
Place supports at the corners of the perimeter, as well as under all walls in 1.5 m increments. Pre-lay a concrete “cushion” under each support. Fix several reinforcement rods in each support so that the latter protrude above the surface by at least 30 cm.
Build formwork 40 cm high, lay reinforcement in it and tie it to rods protruding from the supports. Fill with concrete mortar. After four to five weeks, when the concrete is completely dry, you can begin further work.
Bathhouse foundation
Brick columnar foundation
Is the material suitable for a log steam room?
It is not only possible, but also necessary to build log baths , as they guarantee:
- maximum functionality;
- practicality;
- durability;
- provide an opportunity to gather with loved ones and friends in a warm, sincere atmosphere.
Coniferous trees are considered the best building material, as they emit unique resins and create a unique microclimate with a healing aroma. This wood practically does not crack due to temperature changes.
Deciduous trees such as birch, oak, aspen or linden are excellent for work. They also release elements and aromas that are beneficial to the human body.
The following types of logs are suitable for construction. Let's consider each type separately.
Chopped and planed
These are log houses of a standard shape, which are processed manually .
The top layer (sapwood) is carefully removed, and logs of different sizes in diameter are obtained, in their original form. The properties of reacting to external influences from outside and inside the building are preserved.
Minor roughness and knotiness are acceptable, the cost is inexpensive. It is difficult to assemble this material, since the logs have different diameters, which complicates the work of thermal insulation.
A detailed article about a bathhouse made from chopped logs is here, and from planed logs here.
Rounded
The logs differ from the previous ones in their beautiful, even appearance and size. They are processed on special machines, which additionally give the material a flat, smooth surface. The material becomes less resistant to negative influences, but this can be eliminated by using protective impregnations. This option is more expensive.
Full information about the bathhouse made of rounded logs is at the link.
Carriage
The log has a flattened appearance, is processed on both sides, gives minimal shrinkage and a slight appearance of cracks.
Logs with a diameter of 30 cm or more are suitable for construction; the buildings will be of high quality, warm, and durable. But options of 20-25 cm are possible; a smaller diameter will retain heat worse.
Large, thick logs with a large diameter crack faster and more often than others, but they look very impressive and rich, especially cedar ones. This wood has antibactericidal and medicinal properties and does not harbor insects. Young trees with an average diameter are most suitable for mass use.
Stage 4. Waterproofing the base
Waterproofing strip foundation
Waterproofing a strip foundation with roofing felt
Treat the surface of the foundation with molten bitumen and lay a layer of roofing felt on top. After the bitumen has completely dried, repeat the procedure. As a result, you will have reliable two-layer waterproofing.
Waterproofing with mastic
Additional insulation with roofing felt
Advantages and disadvantages of a log house in a bowl
The main advantages of the log house:
- High strength of the joints of the structure, which ensures its stability.
- Increased thermal insulation of the room, which is created due to the low thermal conductivity of wood and protection from blowing through the corners of the structure.
- Environmentally friendly material.
- Possibility of constructing a building of several floors.
- Decorative appearance.
Multi-storey log houseSource pokter.ru
The disadvantages of a log house in a bowl include:
- The difficulty of manufacturing structural elements and assembling a building without experience. If a log house is made by a person without skill, then such a structure may have cracks, begin to rot, and also crack or fall apart.
- Due to the protruding corners of the structure, it is difficult to carry out external finishing.
- Wood for log houses must be treated with insect repellents, as well as antiseptics (prevent the formation of fungus) and fire retardants (reduce the flammability of the material).
- Protruding parts of the log reduce the useful length of the crown, which increases wood costs. Because of this feature, this type of log house does not require additional insulation of the corners. Therefore, the difference in price when assembling a log house into a bowl or into a claw will be unnoticeable.
The finished building has a smaller usable area due to the thickness of the walls and protruding corners. This should be taken into account when calculating the size of the foundation and the length of the logs.
Why is it difficult to process the external partSource royalwoods.ru
Stage 5. Preparing tools
To work you will need the following equipment:
- chisel;
Chisel - carpenter's axe;
Carpenter's Ax - medium power chainsaw;
- plumb line;
Plumb - level;
Laser level - electric drill;
Cordless drill/driver - mallet;
Wooden mallet - "trait".
Trait (tool)
We will pay special attention to the last tool - the “line”. For manufacturing you will need steel wire with sharpened ends. Bend the wire in half so that it takes the shape of a compass; you can additionally secure the handle. This tool will be needed when marking logs.
Main types of wood for felling and their processing
To know how to cut down a bathhouse, you need to select the appropriate types of wood for production. Most often, coniferous types of wood (pine, spruce, larch) are used for the manufacture of such structures. It is best to choose material from cold regions (for example, Siberia), since in winter the flow of sap along the trunk is least. This reduces the risk of cracks forming when drying the material.
Also, trees that are felled in winter have a higher resin content, which increases its resistance to rot. The diameter of the logs must be at least 21 cm (but not more than 35 cm), and the length of all elements must be approximately the same to simplify processing and assembly. All wood must be smooth and free of knots. The area from the root to the beginning of the crown of a pine tree is best suited for this.
Wood for a log houseSource sm-news.ru
When laying structural elements, it is recommended to make the first 2-3 crowns from larch, as it has high resistance to moisture. When choosing a material, it is not recommended to use crooked trunks or wood with cracks and rot. The bark should be removed with a scraper, as it hardly touches the working surface underneath. After this, you need to let the material dry for 3-4 days. Also, before cutting, the wood is treated with an antiseptic and impregnated with a fire retardant.
Processed wood for a log houseSource im0-tub-ua.yandex.net
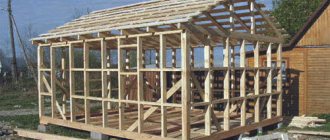
Stage 6. Construction of a log bathhouse
Comparison of Canadian and Russian cutting
There are several assembly technologies:
- Russian assembly;
- Canadian; Canadian cabin
- Norwegian Norwegian cutting Swedish cutting
The first option - Russian felling - is the easiest to perform; even an inexperienced carpenter can handle it. Therefore, we will consider this technology.
Sauna cutting
Step 1. The construction of the log house should be carried out in stages and begin with the frame crown (in other words, from the first). The logs that will serve as the frame crown should be edged to ensure a tight fit to the foundation.
To begin with, we lay the so-called “backing” linden board on the foundation. This can be a beam about 50 - 100 mm thick and at least 150 mm wide. Then we begin to assemble the log house
Mortgage crown
Laying the first crown on the foundation
Step 2. Lay the first pair of logs on top of the waterproofing layer. Place the next pair at an angle of 90ᵒ relative to the first and connect everything into a “cup”.
Chopping into a bowl
Attention! “Cup” is the simplest connection option when constructing log buildings. It is done quite simply: the boundaries of the future “cup” are measured at the bottom of the log, then a recess is marked using a “line”. After checking the dimensions again, the recess is carefully cut out with an ax.
You can use a chainsaw - this will save a lot of time. Although the final finishing of the “cups” will still have to be done with an ax.
How to properly cut a corner in a log house
Log joining
Attention! In the starting crown, the “cups” will not be deep, as a result of which the logs will not come into contact with the base. Therefore, place a lining in the gap that appears - a small piece of board of the required thickness, treated with an antiseptic and covered with insulation.
Step 3. Next, lay the second crown using the thickest logs possible. This is explained by the fact that in the future you will cut sex joists into them. To ensure a tight fit, make a longitudinal groove in the top log, which would be equal to a third of the diameter of the previous log. To draw the boundaries of the groove, place the upper log on the lower one and mark using the “line”.
Attention! The longitudinal groove can be semicircular or triangular. If you have a chainsaw available, you can cut a triangular groove in two to three minutes. But remember: logs with such a groove will not fit tightly together, which will negatively affect the thermal insulation properties of the walls.
Obviously, the best option is a semicircular groove. Do it with a chainsaw and use a chisel to remove any residue.
Walling
Step 4. Insulate the joints of the logs, preferably using flax-jute fabric. Place one piece of fabric on the lower crown, and seal the longitudinal groove with the second (especially if the latter has a triangular shape).
We fill the entire groove and recess of the bowl with caulking material
Step 5. Connect the crowns together. Here you can use:
- square dowels;
- round dowels made of wood.
The second method is preferable, because dowels can be purchased ready-made and holes can be made using an electric drill.
Make holes in increments of 1-1.5 m, parallel stitching the top pair of crowns completely and not completely the third one (from the bottom). To avoid distortion, after shrinkage is completed, recess the dowels into the upper crown by at least 6-7 cm.
Joining logs
Step 6. After raising the walls to the desired height, lay the ceiling beams and rafters on top of them. If damp wood was used, then lay slate sheets instead of rafters and wait until the structure shrinks. Usually, it is enough to overwinter once, but ideally, shrinkage should last a year and a half.
Flooring made of massive solid logs
In the spring, when the shrinkage is complete, start caulking.
Video - Roof made of aspen shingles
Marking and cutting logs
To know how to cut down a log house, you need to understand the method of marking logs. To do this, they need to be laid perpendicular to the lower crowns. It is recommended to use staples to secure the structure. This will prevent the log from turning around its axis. Next, using a line, you need to draw the contours of the bowl and longitudinal grooves using several rules:
- One leg of the feature should rest on only 1 log.
- The distance between its points should be half the diameter of the log, depending on the log house used: “to the edge” - the upper one, and “to the edge” - the lower one.
- It is recommended to start drawing with a bowl and end with a longitudinal groove.
- The prepared logs are placed in bowls, and after that it is necessary to process the joint: if there is a large gap, insert wedges, if it is small, remove the excess layer.
It is recommended to mark the log using a line or a chemical pencil. A carpenter's ax must be carefully sharpened before starting a log house. This will make cutting out the bowl easier and will also help avoid unnecessary stress and injury. The bottom of the recess is made smooth so that the gap during installation is minimal.
Log marking Source drevo78.ru
Stage 7. Doors and window openings
We specifically started talking about openings after construction was completed, since there are two options for their arrangement.
Installation of a casing for installing windows and doors in a log house
- In the first case, holes are created after the completion of construction work. At the same time, in the crowns located in the places of future openings, first leave small gaps (the dimensions of the latter depend on the size of the mounted products). Once you've finished laying the logs, simply cut the openings with a chainsaw.
- In the second case, leave openings during the construction process. This is very labor-intensive and expensive, since you will use bars with notches at the ends and special grooves.
How to install a window in a log house
Window installation
Bath windows
Doors for a bathhouse made of logs
Therefore, we advise you to give preference to the first option.
Calculation of the amount of wooden material
To make a correct calculation, you need to know the length, height and width of the load-bearing walls, and all internal walls and partitions - this is the first thing. The second is the parameters, dimensions of the logs (thickness, width).
For example , for a log house 3x6 m3 (five walls) - two walls of 6 m each (12 m.) and three walls of 3 m each (9 m.). The standard height is 3 m, and the diameter of the log is 30 cm.
Calculation:
- The length of one crown is considered to be 12 m + 9 m = 2 1 m.
- Calculate the number of crowns in the log house. 3 cm is subtracted from the diameter of the log (to make a groove). The height of 300 cm is divided by the resulting figure of 27 cm, resulting in 11 rows up.
- The number of logs for a log house - the number of crowns and the length of one crown are multiplied. 11 x 21 = 231 m. This total length is divided by the standard log length of 6 m, rounded up. 231:6=39 logs in total will be needed to build a bathhouse 3x6 m3.
To find out how much this amount of timber will be in cubes, you should refer to a special table - the round timber cubes. In this example it will be 20.3 m3.
Stage 8. Caulking logs
Types of tools and caulking methods
After shrinkage is completed, the log house is caulked. To do this, prepare the following equipment:
- hammer;
- caulk (made of wood or metal).
Attention! If you sealed the inter-crown space with tow or moss, you can skip this step, since you most likely will not need caulking. But if you find even the slightest cracks, then it is still better to carry out the procedure.
Proceed to work only after the insulation has completely dried. First, twist the material (tow or moss) into a rope, then hammer it between the crowns with a hammer and caulk.
Caulk
You can use tape jute - in this case, the material is simply fixed with nails or a mounting stapler.
Primary and secondary caulking of a log house
Video – Caulk of a log house
Useful tips
In order for the bathhouse to be in working order for a long time, you need to know the subtleties when building a structure:
- Logs for the log house are harvested in winter. This is necessary because during winter harvesting the log undergoes less rotting and is resistant to various precipitation. To check whether the logs were harvested in winter, iodine is dripped onto them. A bluish spot should form.
- To ensure that the building lasts as long as possible, all wooden structural elements are treated with an antiseptic.
- To increase the thermal capacity of the structure and give it a beautiful appearance, it is necessary to fill all joints and gaps with tow. It should not protrude further than the logs, otherwise it will get wet and rot.
- If you choose the “foot-to-foot” method of fastening logs, it is necessary to protect the corner joints. To do this, they are sheathed with boards.
- It should be remembered that during shrinkage, the height of the building will decrease by 5 or 10 percent.
- Cutting the material to the center will help prevent cracks from appearing in the log.
- Caulk work is carried out in dry weather.
- They increase the stability of the structure and prevent the displacement of logs by securing them with dowels, installed in holes in the center of the logs.
Thus, making a log house with your own hands, although a complex process, is doable. In the video presented for this article you can find complete information on this topic.
Stage 9. Roof
Construction of a roof on males with layered rafters
Rafter system
As soon as the tree shrinks, you can begin building the roof. If you do this earlier, the roof will simply collapse.
Step 1. Place wooden beams on the wall framing (we have already talked about this).
Step 2. Fix the beams and attach the rafter legs to them in 1 m increments. In the ridge part, cut the rafters at the appropriate angle for the connection.
Step 3. Nail a solid board deck to the rafters (if you plan to use rolled roofing material) or make a sheathing (if you use slate, tiles, etc.).
Step 4. Install the roofing according to the instructions for the specific material.
Step 5. Cover the ridge with galvanized sheet steel to protect it from aggressive environmental influences.
Step 6. Cover the roof gables with siding or clapboard.
How to sew up a pediment
After this, proceed to further planned work - pouring a concrete screed or building a wooden floor (in the second case, the logs are cut into the logs of the second crown and fixed), install insulation, carry out interior finishing and arrangement of the steam room according to your project.
An example of a log house with a shingle roof
An example of a log house with a shingle roof
Cornice filing
Roof overhang trim
Briefly about the main thing
The log house is most often made from pine or other coniferous wood.
The main advantage of a wooden log house is thermal insulation and environmental friendliness.
When choosing a log manufacturing technology, it is recommended to take into account the level of knowledge and skill. If it is not high enough, then it is better to contact specialists.
It is necessary to use high-quality thermal insulation and means to combat fungus and insects. This will extend the life of the building.
All logs for a log house must be treated with a fire retardant to avoid fire in the structure.
Log selection
It is best to harvest timber for the bathhouse in winter, from late November to early March, when there is no sap flow. Summer wood, compared to winter wood, dries out much more, so after shrinkage there will be more cracks and cracks in the log house. In addition, it darkens faster and is more susceptible to fungi and mold.
You need to choose a tree that is not affected by rot, fungus and insects, preferably with a minimum number of knots. The trunks should be smooth and not runny, that is, the difference between the diameters of the butt and crown should be no more than 50-70 mm. The most suitable type of wood for a bathhouse is pine, although the lower crown, which is most susceptible to dampness, can be made from larch.