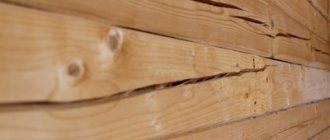
Cracking of log logs should not frighten developers, since this is an absolutely natural process.
The higher the percentage of wood moisture, the more liquid fills the internal volume of the logs. The process of moisture absorption will continue until the humidity reaches equilibrium with the external environment.
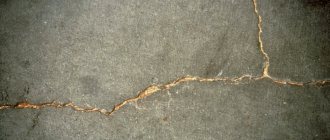
When the humidity in the atmosphere drops, moisture from the wood will evaporate outward - this is the process of shrinking the log. In this case, the outer dry pores will shrink, but the inner ones are still filled with excess moisture.
As a result, tension is created between them and, as a result, a rupture and the appearance of a crack in the body of the log.
Causes of cracks
When cracks form in the walls of a log house, most owners of such households think about the reasons for their occurrence. In fact, they depend on many factors that affect the tree from its birth to the harvesting of the log.
The key root cause is the uneven shrinkage of logs from the end and sides, under the influence of which internal stresses are created in the fibers, leading to rupture. Especially massive cracking occurs during sudden temperature changes.
On the sunny side of the wood, the density decreases due to a rapid decrease in the level of moisture, and on the cold side it will remain high.
Important! The log has a hygroscopic structure, which strongly absorbs natural moisture, especially if the log house is built from very dry material. The first year for such a house will be critical. In the area of logs where the annual rings have been damaged, a small “network” of small cracks will initially be created, which will eventually merge into a common deep crack.
Main reasons:
- The place where the tree grows determines how much the tree has defects - curliness of the wood. Usually, any natural defects are later overgrown with new fibers and hidden by layers of the most ancient growth rings, but during the drying process of the felled tree they are revealed, appearing on its surface in the form of cracks.
- Uneven drying of logs.
The layers closest to the surface dry faster than the inner layers. A situation is created when the outside of the log is almost dry, but the core remains saturated with moisture. As a result, stress occurs on the fibers. The surface layer is subject to a tensile force, and the internal layer is subject to a compressive force. They literally explode the wood from the inside. The process depends on the drying speed; the higher it is, the more cracks there are, and their sizes are wider and deeper. - Shrinkage processes. As a result of such influences, wooden parts twist, changing their shape and linear characteristics.
- Sudden changes in temperature and humidity levels in a finished house as a result of operation. Trying to properly “heat” a home in the first winter season will most likely result in the formation of through cracks due to the difference in temperature and humidity of the walls of the log house.
- Time of year for logging. If it was a warm period, cracking will be high; the best period for harvesting wood for felling is winter.
Consequences of wood delamination
Small cracks are not capable of causing serious damage to the finished building. But deep defects and damage can cause uneven shrinkage of wood and deformation of the entire structure of the log house.
When eliminating defects, you should not ignore the smallest grooves and cracks, which, under the influence of high humidity, can become a breeding ground for mold, fungal formations and rot.
All this can lead to the destruction of the log house itself and a decrease in its performance characteristics.
Why do you need to seal cracks?
The developer of a log house should not be afraid of small cracks in the tree, since they do not affect the strength characteristics of the walls and cannot cause serious damage to it.
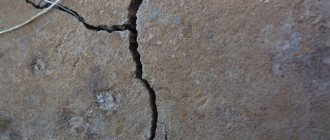
But in the event that a gap 5 mm wide is discovered throughout the log, he will need to immediately take effective measures.
Consequences of having large gaps in a log house:
- Moisture penetrates freely into them, which activates the processes of decay.
- Such defects spoil the appearance of the building.
- The thermal protection characteristics of the building decrease.
- Sometimes a very tiny crack becomes a door for harmful microorganisms and fungi. In contrast to the top layer, which is blown by the wind, particles of water are concentrated in the cracks, which is considered a necessary condition that promotes the rapid proliferation of microbes, as a result, rot and rot appear in the body of the log.
- Weakening the mechanical strength of the tree, which is especially dangerous on the top crown to which the roof is attached. A powerful wind or seismic activity can destroy such a building. Because a log oppressed and destroyed by cracks is not able to withstand the increased load. In the practice of wooden house construction, there are cases when, due to the occurrence of a crack, the log split into 2 separate parts.
- Reduces the resistance of logs to fire. Since fire retardant impregnation is capable of penetrating into the body of a log no deeper than 2 cm, a deep gap allows fire access to layers that were not treated with this solution.
Why are cracks dangerous?
Water easily penetrates into the cracks formed in the logs and moisture accumulates. Which inevitably provokes internal rotting of the tree. And this is dangerous:
- gradual destruction of the structure;
- significant deterioration in thermal insulation qualities;
- the appearance of dangerous mold and fungi inside the building.
It was noted that the largest number of cracks appears in the first year of construction and subsidence of logs.
The explanation for cracking is simple: the outside of the wood material dries out much faster than the inside. And when solid wood remains dry on the outside and damp on the inside, this situation automatically “stretches” the outer layers of wood, while the inner ones shrink. The result is the rupture of wood fibers and the formation of cracks on their surface. Moreover, the faster the tree shrinks, the more cracks appear on it.
Selection of material for repair and sealing
Preventive measures make it possible to significantly reduce the number of cracks that appear. However, it is impossible to completely free ourselves from their formation. The owner of a log house must learn to hide them, thereby preventing the development of putrefactive processes in the body of the logs. For this purpose, the retail chain has quite a lot of different materials in the form of dry mixtures, sealants and hardening putties.
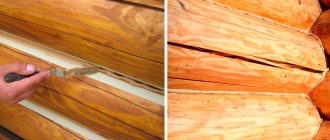
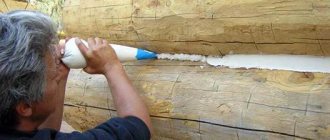
Important! The crack can be sealed in several ways: caulking, sealing and puttying.
Caulking is the most ancient and quite effective method, which is applicable for large cracks. Its principle is based on the fact that tow, which has a fibrous flax or jute base, as well as some types of moss, is pushed into the crack. The method is good for protection from raindrops and effectively removes excess moisture from the wood during drying.
The compaction rollers are placed in the cracks and caulked using a special spatula and mallet until the layer begins to spring back. The disadvantages of this method include the high labor intensity of caulking and the unpresentable appearance of the log house.
Putty is one of the new technological methods for insulating a house, which became available with the entry into the market of new building mixtures and compositions that can create a solid plug in the recess of a log, absolutely sealed for the penetration of any liquid.
They work well both indoors and outdoors and are chosen for covering large gaps.
The disadvantages of the method include the relatively high cost and the need for re-processing as a result of shrinkage work and the possible loss of putty from the crack.
Sealing is similar to putty, but differs in that it contains substances that penetrate several mm deep into the wood, thereby ensuring strong adhesion to each other. The sealant is not prone to falling out of the crack of the log, because the resulting strong elastic connection is capable of expanding/contracting together with it.
The method provides high protection against moisture and heat loss, creates an attractive appearance, covering damage to the tree. It is easy to apply and has a long service life. Its disadvantages include the ability to process shallow cracks of no more than 5 mm. For larger cracks, you will first need to lay a polyethylene rope in the crevice, and only then treat it with a sealant.
Sawdust and glue
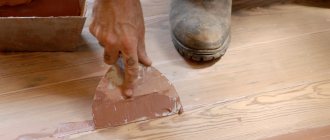
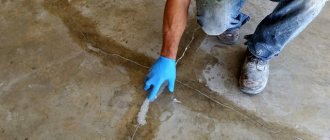
The cheapest, simplest and most accessible method of sealing cracks on the walls of a wooden frame is to use homemade putty mixed with sawdust and PVA glue. The ingredients are mixed to the consistency of putty and the resulting mass is filled into the gap.
You can work with a regular spatula, pushing the putty as deep as possible into the body of the log. Cheap method, good for large cracks, unlike putty and sealants. After drying, it sticks firmly to the walls and has the required elasticity.
Disadvantages include the need for repeated processing. Because after drying the putty may “fall off” slightly. Therefore, the resulting gap is sealed again.
The video below explains how to seal cracks in logs using sawdust and glue:
Wood putty
The areas of application for this putty are cracks with a width of no more than 2 mm and a depth of 7 mm. Select the material according to the color of the wood so as not to disturb the appearance of the wall. Before applying putty, antiseptic cracks are performed.
After that, the crack is filled with the prepared mass with maximum compaction, trying to reach the bottom of the crack. After which the layer is leveled to the surface level and left to dry. After filling all the cracks, the walls are re-treated with antiseptics and protective impregnations.
The most popular putties:
Acrylic is an environmentally friendly, odorless product that is easy to apply and preserves the natural color of the wood.
It dries very quickly and then does not absorb moisture. It perfectly smooths out defects, does not create shrinkage and does not form cracks after drying.Its disadvantages include the ability to repair only small cracks and is not desirable for external use.
- Waterproof - an excellent product for external protective work to eliminate cracks in log walls. It has high water-heat resistance and elasticity and does not create cracks when drying. It is produced in the form of a paste based on oil, polymer and adhesive materials. The disadvantage is the high price and the ability to treat the surface only in dry and warm weather.
- Polymer putty is used for external walls when finishing a log house. It is used for shallow damage, is easily applied to the surface of wood and is characterized by exceptional strength.
- Gypsum can only be used for interior work. This type of putty is distinguished by its plasticity and white color. It is simply applied and sanded. Disadvantages include the lack of a color scheme to match the existing color of the wood.
- Non-shrinking, suitable for sealing very solid and deep cracks. High-quality and durable putty, ideal for log cabins, does not crack or fall out of cracks. It has proven itself well for both external and internal work. Sold in colors to match different types of wood. The disadvantages include the high price.
Arbogypsum
Arbogypsum is an artificial solution with alabaster or gypsum filler with the addition of sawdust and water. Instead of sawdust, you can use tyrsa, crushed straw or bark. To obtain a homogeneous mass of arbogypsum, sawdust is poured into a container with gypsum in a ratio of 1 part gypsum and 3 parts sawdust and the resulting mass is mixed with water in a ratio of 2 parts of the mixture to 1 part water.
Attention! To create a plastic mixture, add a couple of drops of shampoo and mix thoroughly without lumps. The result is a very dense, but at the same time plastic putty.
Arbogypsum has the disadvantage that it hardens quickly, for this reason it must be used immediately after mixing. Work with a regular spatula, filling the cracks with the mass and leaving it until it hardens completely. The restoration layer of arbogypsum is very strong and durable. It adheres quite well to the wood and does not fall out of the cracks during the operation of the house.
Sealant
Sealants are modern and very popular protective materials for repairing minor cracks in log walls. Their advantages are the rapid process of restoring the wood surface of the walls, which, in addition to moisture and heat protection, improves the appearance of the house.
The retail chain has sealants for different colors of logs, as well as with good resistance to low and high temperatures. This allows the use of sealants both inside and outside the building.
The most popular types of sealants:
Acrylic, has good adhesion to log walls, has increased moisture resistance and is not afraid of temperature changes.
The material is environmentally safe, the main areas of application are indoors.- Silicone is a universal type sealant, applicable for external/internal work.
It has high resistance to temperature fluctuations, humidity, and sunlight. In the retail chain it is presented in a wide range of colors from colorless to dark modification. - Bitumen is the most reliable means of preventing moisture and has shown itself to be effective in protecting wooden roofing structures. However, it is harmful to people, and therefore should only be used for outdoor use.
Slivers
A good affordable option for restoring log walls, absolutely safe, can be used for both interior and exterior work. This protection option is used for large and deep cracks in log wall structures.
The repair technology is very simple; choose a chip according to the length and thickness of the crack. They sharpen it at one end, creating a wedge, treat it with a layer of PVA glue and forcefully drive it into the crack. Level its height with the surface of the log, apply any type of putty on top.
Video description
The video shows how and what needs to be done to protect logs using putty and sawdust:
Acrylic sealant
Before sealing the cracks between the logs in a wooden house with sealant, you need to clean the base. A moisture-resistant elastic mass on an acrylic base can be applied in a layer of up to 5 mm. If the depth of the split is large, then a silicone cord or polymer cord is first immersed in it. They are not associated with the production environment, so the placeholder's behavior will not be changed.
Wood sealant Source massivcolor.ru
Experts have differing opinions regarding sealant. The cork practically does not breathe; the mass penetrates into the pores. This leads to a decrease in the ability of the log to release moisture in the damaged area. That is, the risk of rotting and subsequent biological damage increases.
There is a possibility of dust formation under the sealant film. This will cause the aggregate to fall out and cause the split to increase in width. Silicone or polymer cord can affect the creation of a greenhouse effect, which also results in mold, mildew, bacteria and rot.
Which material is most optimal?
Currently, the building materials market provides a wide variety of materials for sealing cracks on log walls. The most modern and popular are putties and sealants.
When choosing the right sealant, you will need to carefully study its instructions so that the product is suitable for specific operating conditions.
According to user reviews, the following putties are the most popular:
- Finnish “Tikkurila” has good adaptation to the color of wood, is suitable for a wide variety of wooden products, and has high resistance to low air temperatures and moisture. Disadvantage: high price: 500 rubles. per package 0.5 l.
Russian “Extra” is an excellent budget material with high protective characteristics for water and temperature.
Universal, can be used for interior and exterior work, characterized by low specific material consumption per 1 m.p. repair. Price: 60 rub. per package 0.45 kg.- Russian "Eurotex" in convenient packaging has a good plastic structure, and therefore is easily applied to the surface of the crack, sanded and sanded. Budget price: 80 rub. for 0.225 kg of putty. The disadvantages include the poor color range of the material and increased shrinkage.
- Russian-Swedish “Parade” is a putty with increased water-resistant characteristics. Dries quickly and sands quickly. Price: 300 rub. per package 0.4 kg. Disadvantages include difficult application to the surface due to the liquid composition of the paste.
- Russian "Rainbow" has restrictions on the temperature of application to the surface, not lower than 15 C. Otherwise, it has a number of advantages, including low specific consumption for wood repair, high adhesion speed and low shrinkage, price: 119 rubles. per package 0.9 kg.
Among sealants, Russian consumers prefer the following brands:
- Russian "Neomid" is a highly effective sealant that can eliminate cracks with high deformation from 15 to 30% of the cross-section. It features high protection against moisture and temperature changes. At the same time, it is very elastic and flexible, capable of working in both external and internal environments. Price: 1000 rub. per package 0.6 kg.
- Russian acrylic sealant "Eurotex" for external work, has protection against moisture, insects and biodamage. It showed itself well in repairing side and end cracks in wall structures of a house. Very durable and at the same time elastic material. Price: 1000 rub. per package 3 kg.
- German “Remmers” for interior and exterior work, resists moisture and temperature changes well. It has a wide range of colors from colorless to dark brown, and is also well compatible with both varnish and paint. Price: 400 rub. per cylinder 0.6 l.
- Polish "Ceresit" is produced on both acrylic and silicone bases and has a low shrinkage rate. Resistant to low temperatures, ultraviolet radiation and high humidity. It performed well when restoring the external walls of a log house. Price: 160 rub. per bottle 310 ml.
- American “Check Mate” acrylic sealant of an elite modification, very elastic, creates lasting protection of walls from moisture, temperature fluctuations and biodamage, and has minimal shrinkage. The price is high from 1300 rubles. per bottle 650 ml.
How to properly make imitation wood from putty as a way to decorate the surface
To imitate the textured surface of wood, you will need a palette knife, a roller with a wood cut imprint, a textured roller, rubber spatulas, and stencils. For interior finishing, gypsum, acrylic and silicone putties are used. The texture can be created before putting putty on a wooden door, flooring, etc.
The work is carried out in stages:
- A section of the wall is covered with the compound using a metal trowel.
- The mass is leveled to a uniform layer 3-6 mm thick.
- Using a stiff brush, brush or rubber roller, grooves of the wood texture are formed.
- Depending on the type of tree, the furrows can be horizontal or vertical.
- The dried surface is rubbed with a spatula and the surface is dried for 30-40 minutes.
- The surface is then treated with clear varnish or painted.
- Finally, the surfaces are rubbed with a spatula.
What tools and supplies will be needed?
This type of work requires tools that are available to almost every home craftsman, and consumables are not in short supply on the construction market.
To complete the sealing you will need:
an ordinary spatula, but it is better to have 2 types - a narrow one with a width of no more than 100 mm for applying the material and a wide one for the final leveling of the layer;- caulk, shaped like a large chisel;
- two types of chisel: narrow and wide;
- electric drill with drill sets;
- sharpened knife;
- regular hammer;
- a small, completely clean container for preparing putty;
- primer brush, with a shape for deep penetration into the crack;
- a brush with hard bristles, used to prepare the surface before applying the material, thoroughly cleaning it from dirt and fine dust;
- reinforcing mesh (serpyanka) for large cracks;
- sandpaper;
- jute tow;
- antiseptic impregnation.
Sealant
It is necessary to carry out work with sealant in dry weather so that the sun's rays do not fall on the composition. The optimal temperature for closing cracks will be +10 degrees.
At the first stage, the wooden product is cleaned of dust, rot and dried. Then masking tape is applied on both sides to reduce the consumption of sealant and prevent it from getting onto adjacent beams.
For convenience, they work with a spatula, and if the damage is larger, then a special gun is used. The maximum thickness of the extruded composition should not be more than 5-6 mm. The seam is spread with a spatula to create a more even surface.
Repair technology
The technology for repairing cracks on the walls of a log house depends on the type of material chosen, although they have almost the same preparatory stages, yet their main stages are different.
After the contractor purchases the repair material in the retail chain, he must carefully read the instructions for use, since each manufacturer can make certain adjustments to the standard application procedure.
The most popular modern putty materials and sealants differ in the procedure for preparing the working solution; in the latter case, it is absent, since the sealant is completely ready for work.
Rules for restoring logs from cracks for different types of repair material:
- Sealing is carried out at a temperature not lower than 15 C and in dry weather.
- The logs are dried in advance; work is carried out only on dry wood.
- The cracks are deepened, and the adjacent areas of the log are thoroughly cleaned of debris, dirt and dust.
- When using putties based on dry mixtures, all preparatory steps are performed before preparing the working putty, in order to avoid premature hardening of the mass.
- Open the deep cracks with a chisel or V-shaped spatula. The resulting section must have the shape of a triangle, and for large gaps it is possible to make a profile in the shape of a trapezoid.
- Using a brush with stiff bristles, remnants of jointing are removed from the cracks again.
- Damaged surfaces are carefully treated with a primer; it can be applied with a brush, which has the ability to penetrate deeply into the crack.
- Start preparing the putty from the finished mixture; this procedure is not required for sealants.
- Dry mixtures cannot be stirred with a mixer, otherwise they will fill with air and quickly harden.
- To work, take a clean container and mix the composition with water according to the manufacturer’s instructions.
- Stir the solution with a spatula until smooth; during the stirring process, all lumps should be removed.
- Allow the putty to cure for the period specified in the factory instructions.
- Using a narrow spatula, apply the first layer of solution, filling the voids. The putty is applied with a spatula at 90 degrees to the crack from different sides.
- The 1st layer is necessary for the putty to shrink.
- If the performer tries to do the work in 1 layer, the working mass will be squeezed out of the gap and a bump will form on the plane of the wall.
- The second layer is applied only after the solution in the body of the crack has partially dried.
- The final strokes are made with a wide spatula, and care must be taken not to leave traces on the outside of the log.
- Paper tape soaked in water or sickle tape is glued to the newly applied putty.
- Using a spatula, press the tape into the working mass, removing excess solution.
- One tool holds the tape, and the other smoothes its surface.
- An additional thin layer of putty is carefully applied on top of the tape, removing all irregularities.
- After the treated cracks have dried, their surface is sanded with sandpaper.
- When using sealants, first apply masking tape to the surface adjacent to the crack so that the future seam is smooth and clear.
- If the crack is large, a water-heat-resistant cord with a diameter corresponding to the size of the recess is first placed in it.
- Apply the sealant using a simple spatula or using a special mounting gun.
- Then the seam is smoothed out with a spatula.
- After completing the work, the tape is removed, the restored surface is moistened with water and smoothed with a paint brush.
Epoxy resin
After hardening, the epoxy resin will begin to gain strength, which exceeds the strength of wood, and due to its fluidity and excellent adhesion, it will penetrate into all cavities and thus restore the original integral structure of the wooden product, and will also prevent the further spread of cracks. This method is often used when working with solid wood, when the problem of cracks worsens due to high internal stress.
After the epoxy resin has completely hardened, it will turn into an inert and completely safe plastic that will have increased strength. The resin can be used to repair defects in products that come into contact with food, such as repairing kitchen countertops or repairing cracks in a cutting board or dining table. Epoxy resin makes it possible not only to fill a crack in a beam/log/wood product and thereby hide cosmetic defects, but also to completely stabilize the condition of the wood. Often this is only the only opportunity to bring back to life a timber that seems to be completely and completely damaged by through cracks, as shown in the photo below.
Butterfly dowels for crack stabilization
Large cracks can become not just a headache, but even a natural decoration of the overall design of the project. To a greater extent, this will apply to products made from slabs - these are massive cuts of wood, which are subsequently used to make table covers, seats for benches and other elements. In such furniture, wide cracks can preserve the philosophy of the Live ege style, which is characterized by interference with the natural forms of wood. But in order for a crack not to be a defect and become a real decoration, it first needs to be stabilized. If this is not done, it will continue to expand and after some time will split the wood part into two halves.
Wax correctors
Special sticks made from hard wax are a simple and extremely convenient solution for cosmetic repairs of small cracks, dents, chips, deep scratches and other defects. Wax correctors have become very popular as a means of redecorating furniture and other wooden products that are used indoors and are not subject to much wear and tear. Wax concealers are usually offered in colors that imitate different types of wood. The colors can be easily mixed to obtain the desired shade.
Before starting work, the area to be repaired should be prepared - clean it of dust and various contaminants, remove chipped nicks. Wax correctors should be used at a temperature that is not lower than +10 degrees. First, polish the restoration site gently with a lint-free cloth. Next, you should apply the wax with force to the damaged areas so that it is thoroughly packed into all cavities.
Possible difficulties and errors of the process
Despite the simplicity of operations for sealing cracks in the walls of a log house and the good quality of the material, performers still make mistakes that negate all efforts to protect the walls of the house from such defects and further destruction.
The main mistakes made in the process of sealing cracks in logs:
Violation of the temperature regime for performing work was below 15 C or it was carried out in humid weather.- Wet timber timber.
- Poor preparation of cracks: dirt and jointing not done.
- Poor quality putty or sealant, composition not suitable for log structures.
- Putty intended for interior work is applied to external walls.
- Expired putties and sealants.
- The restoration seam was not polished, as a result of which it peeled off from the crack.
Approximate costs
Prices for material and work to seal cracks in log walls depend on the volume of restoration, the depth of damage to the wood, the choice of restoration material and the degree of contamination of the walls.
Average prices for work and materials:
- Preparing a crack for laying sealant – 50 rubles. /p.m.
- Impregnation of logs - 50 rub./m2.
- Sealing cracks - 230 rub./m.p.
- Wall sanding - 250 rub./m2.
- Sealing cracks with putty - 120 rub./m.p.
- Caulk of cracks - 100 rub./m.p.
- Finnish putty “Tikkurila”, 500 rub. per package 0.5 l.
- Russian putty “Extra”, 60 rub. per package 0.45 kg.
- Russian putty “Eurotex”, 80 rub. for 0.225 kg of putty.
- Russian-Swedish putty “Parade”, 80 rub. per package 0.4 kg.
- Russian putty “Rainbow”, 119 RUR. per package 0.9 kg.
- Russian sealant "Neomid", 350 rubles. per package 0.6 kg.
- Russian acrylic sealant “Eurotex”, 1000 rub. per package 3 kg.
- German sealant "Remmers", 400 rubles. per cylinder 0.6 l.
- Polish sealant “Ceresit”, 160 rubles. per bottle 310 ml.
- American sealant “Check Mate”, RUB 1,300. per bottle 650 ml.
Traditional methods
Folk remedies for restoring cracks in a log frame include tyrsa and moss. By tyrsa we mean a mixture of sand and sawdust.
The presence of up to 10% clay is also allowed in this mass; this provides the material with moisture resistance.
The paste hardens very quickly, the resulting seam has high strength and vapor permeability.
In ancient times, cracks in logs were caulked with moss. If it was dry, then it was moistened in water in advance, left for 30 minutes and then the excess water was squeezed out before caulking.
The moss was rolled into rolls and pushed into the recess of the gap. Then the roller is compacted with caulk and a mallet. Until it takes on a springy shape.
Reference. It takes approximately 72 hours for the moss to dry. During this time, its volume increases to 30%, after which the excess moss is cut off. Ultimately, the cracks become clogged, and the filler is able to breathe without letting moisture in.
Video description
A little about cuts and protective measures is described in the video:
See also: Catalog of projects of houses made of timber with two entrances for a family.
Why do you need to seal cracks?
Any split is a place for water to penetrate into the flesh of the log. The core cannot quickly release moisture, which increases the likelihood of rotting. This is where bacteria grow, fungus and mold appear. Bark beetles also like to live in cracks and destroy any tree. Among other things, heat escapes through these places. All this can be prevented only by sealing the damaged areas.
Consequences of the bark beetle's activity Source pbs.twimg.com
Preventive measures
There are several methods that can eliminate the root cause of damage in a log house and significantly reduce the number of new growths.
Basic preventive measures to protect the log house from cracking:
- Increase the duration of natural drying. Uniform slow drying of wood under natural conditions significantly reduces the difference in humidity between the inner and outer layers, thereby ensuring a smooth stabilization of the moisture level in the body of the wood in the direction from the core to the edges.
- Drying of wood should be carried out in the shade without exposure to sunlight for a minimum period of 2 years.
- Making a compensation cut. This is a longitudinal cut along the length of the log, which significantly reduces the drying period and the number of newly formed cracks. The depth of the cut is no more than 1/3 of the cross-section of the log.
- Drying with high frequency currents. This method helps to completely stop the formation of cracks because it allows you to dry all the inner layers of wood at the same time. The process is based on heating the inner layers with microwave radiation. Log fibers are known for their good pore permeability; for this reason, excess moisture quickly evaporates in the direction from the core to the edges.
From all of the above it follows that when logs naturally dry out, cracking is an inevitable process that is completely impossible to stop. The only thing that can be done in this situation is to minimize the size and number of newly formed cracks.
Is it possible to minimize the risk of splits?
The only condition that guarantees minimal cracking is prolonged drying of the logs under natural conditions.
Long-term drying of wood:
- Increases the strength of the log.
- Significantly extends its service life.
When drying logs naturally, it is important to ensure their uniform drying, that is, the same drying rate for both the outer and inner layers of the log house.
This can be achieved by creating certain conditions for complete drying. This is a cool and completely dry place in which the logs are allowed to dry out for at least 2 years.
From the appearance of the cracks we can deduce how long the wood has been drying:
- 1.5-2 years: crack size up to 2-2.5 mm.
- 1-1.5 years: the splits are already expanding to a width of 7-12 mm.
- Several months: the cracks become larger and occupy a distance of 12-25 mm.
To minimize the risk of faults, a compensation (unloading) cut is sometimes formed on raw logs. This measure relieves the growing stress on the wood fibers and ensures they dry out faster.
The cut is carried out according to special standards:
- it is performed along the log;
- has the appearance of a neat, even groove;
- has a thickness of 7-10 mm;
- it is made with a depth of no more than 1/4 of the diameter of the log itself.
When cutting, to protect the tree from moisture, when collecting, the timber is laid with the cut facing up so that the cut is covered by the log lying on top.