Beton-House.com
Website about concrete: construction, characteristics, design. We combine the experience of professionals and private craftsmen in one place
Cracking is the main scourge of any concrete foundation.
Concrete surfaces have gained popularity due to their great strength, which is why concrete is used in many areas of construction. However, even such a durable material can crack and split if not properly maintained and other factors occur.
How to repair cracks in a concrete floor, and how to prevent their occurrence, let’s take a closer look at this pressing issue from all sides.
- Industrial method
- Sealing cracks with cement and lime
Options for dust removal of concrete floors
The formation of fine and medium-fine dust is a problem that sooner or later appears on all concrete floors (if concrete acts as a finishing coating). At the same time, an untreated concrete floor (without topping or impregnation) begins to generate dust almost immediately, regardless of the grade of concrete (however, the lower the grade, the more dust).
Impregnation for concrete
Various impregnations for concrete floors are designed to solve the problem; there are many of them on the market. Compositions can be classified according to the type of action:
- Sealing impregnations. Operating principle – the composition is applied in the form of a varnish to the surface, absorbed to a small depth (up to 1 mm). After application, the composition is clearly visible on the surface of the slab, so its abrasion can be controlled (for re-processing).
- Impregnations acting at the molecular level. The composition is applied to the surface, absorbed and changes the molecular structure of concrete (strengthens). The impregnation is not visible on the surface, does not wear off like a layer of varnish or paint, and lasts longer.
There are also more expensive solutions - applying a thin-layer self-leveling coating (in other words, polymer paint), or installing a self-leveling floor.
Climatic and chemical exposure
A separate group consists of defects that arise as a result of a reaction to any chemical substance or climatic influence.
This may include:
- the appearance of light spots and stains, so-called efflorescence, on the surface of the concrete floor. The reason for the formation of salt deposits is a violation of the humidity regime or the ingress of calcium chlorides and alkalis into the composition of the concrete solution. It is for this reason that experts recommend using imported water to prepare the concrete mixture in areas with highly carbonate soils;
- destruction of the concrete floor surface under the influence of low temperatures. When water gets into the pores of the top layer of concrete, it freezes and increases in volume by 10-15%. Therefore, the microscopic pores gradually expand. The more often the freezing/thawing process occurs, the more intensively the concrete deteriorates. To combat this phenomenon, special anti-frost impregnations or compositions are used that reduce the porosity of the material;
- Corrosion of reinforcement also belongs to this group of damages. Metal mortgages become covered with rust where they are exposed. This leads to a decrease in the strength of the reinforcement and the entire concrete structure. To prevent this process, the reinforcement must be treated with an anti-corrosion compound.
All the defects described above can manifest themselves in a variety of forms. The first signs of many of them may look quite harmless, but if they are detected, appropriate measures should be taken. Otherwise, the situation may worsen dramatically over time.
Causes of cracks and other defects in concrete floors
There have always been problems with concrete. It is believed that the main reason for the appearance of cracks after concreting the floor has always been residual stresses in the structure of the material:
- As a concrete floor sets, the surface loses water unevenly and hardens faster than deeper layers. The inner layers of concrete put pressure on the surface, causing it to peel and crack;
- It is quite difficult to ensure uniform distribution of cement grain, sand and water in the solution, even with the most thorough mixing. Therefore, the surface of a concrete floor is always covered with an invisible network of microcracks and chips;
- Water flowing into seams and joints with subsequent ice formation. In cold weather, due to the ice crust, the concrete slab can even rise above the cushion.
Laying a floor or platform with a concrete screed is considered one of the simplest technological operations. Simply mix the ingredients and pour the mixture onto the floor. But it is almost never possible to do this in one batch; you have to pour the concrete floor in several approaches.
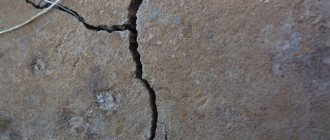
The appearance of cracks on the concrete floor means there are problems with the foundation or building frame
Hence the problems, for the imperfection of the technology you have to pay later by repairing the concrete base of the floor.
Advice! There are two ways to avoid the problem. Firstly, you must fill the floor in one step, for example, from an automixer. Secondly, use tampers and vibrators, which perfectly squeeze air out of the concrete mass, and this is another factor contributing to the occurrence of cracks. Thirdly, additives and plasticizers must be added to the concrete mass.
Local concrete spalling indicates a violation of mixing technology
Experienced motorists can confirm the fact that a concrete floor poured in a garage in one step on a sand base requires virtually no repairs for 20-40 years of service. The exception is when the owners do not insulate the gates and do not make a drain to drain rainwater at the entrance. Then the repair of the concrete floor at the entrance to the room is almost guaranteed.
Looking for the cause of the problem
To solve the problem once and for all, you need to find and eliminate the cause of its occurrence, otherwise it will recur. This also applies to situations where the floor screed is cracked - what to do with the cracks can only be decided after you understand why they appeared.
In general, on a surface finished with cement mortar, cracks often form due to the low plasticity of the material and its ability to expand and contract with temperature changes. Their occurrence can be avoided only by strictly following the technology of mixing the solution, preparing the base, installing the screed and fulfilling the conditions necessary for its uniform drying.
The slightest deviation in any of the above points is likely to cause cracking of the cement coating. Most often this happens in the following cases:
- errors when mixing the solution - excess water or uneven distribution of components in the mixture;
Liquid solution has less strength Source strojlyuks.ru
- insufficient screed thickness;
- weak, sagging or vibrating foundation under the screed;
- absence of damper joints or technological gaps between the screed and the walls;
- uneven drying of the solution due to drafts, temperature changes or as a result of forced drying.
The listed factors refer to gross violations of the manufacturing technology of concrete floor screed, which may lead to the impossibility of restoring the coating using spot repairs. If it is covered with deep cracks over the entire area, crumbles underfoot or “breathes,” the screed must be dismantled and remade.
Dismantling a screed is a dirty, time-consuming and expensive job, so it’s better to do everything right right away Source amazonaws.com
If concrete was poured on an unstable sandy base, on a wooden floor or thermal insulation slabs, and the floor screed cracked, what to do: pour another layer on top with mandatory reinforcement with steel mesh.
Defects in a fresh cement coating may not appear immediately, so after finishing the work you need to wait at least 3-4 weeks and then carry out an inspection. To do this, tap the screed with a rubber mallet, revealing local delaminations of the concrete, and strips of thin paper are glued onto the cracks and left for 10-14 days. If after this time it remains intact, it means that the cracks are stable and will not deepen or expand. If the paper is torn, this indicates that the concrete layer is unreliable - it will continue to deteriorate.
Floor condition assessment and initial preparation
The restoration of structures inside and outside the premises precedes the preparatory stage. The site must be fenced, lighting, delivery and preparation of materials and equipment must be organized.
Floor repairs will only be successful if a thorough inspection of the surface is carried out. During this stage, the type and volume of defects, the causes of their occurrence, and what must be eliminated are determined.
The initial assessment of the structure is carried out using visual inspection, for which the following categories are provided:
- good condition of the concrete floor;
- efficient;
- limited capacity;
- emergency (inoperable) condition.
To assess the danger of detected defects, the following categories are used:
- A – defects, damage to critical structures. This poses a danger, even to the point of their destruction. Such floors are taken out of service for repairs, restoration, and strengthening;
- B – defects do not pose a risk of destruction, but over the course of operation they can provoke damage to other components and elements; when they develop, they pass into the first category;
- B – these are local defects and damage. Even when developed, they cannot affect the damage and load-bearing capacity of the main structures.
In order to optimally select the work technology and repair material, a detailed examination of the technical condition of the concrete floor should be carried out. To do this, you should read the technical documentation, inspect the object and conduct instrumental surveys.
As a result, the physical and mechanical characteristics of concrete are assessed (tensile/compressive strength, retention of passivation properties in relation to reinforcement, condition of reinforcement, chloride content). Determine the condition of the artificial stone (moisture content, density, water resistance, etc.). The inspection should be carried out at a positive temperature, from +5 to +10 degrees.
Concrete floors are characterized by several types of damage:
- chips in areas where structures meet;
- reinforcement reaching the surface;
- reinforcement mesh corrosion;
- temperature-shrinkage cracks;
- abrasion and other mechanical damage.
Violation of waterproofing, general structural integrity, and sealing of seams also require repair measures
As a result, several groups of damage can be identified:
- three degrees of reinforcement corrosion (uneven, local, continuous);
- five degrees of concrete damage. The first is characterized by surface contamination (fats, oils, algae, mosses), shrinkage cavities, cracks, but at the same time the surface retains high strength. For the second - a crumbling, dilapidated surface with peeling. There are small chips, shrinkage cracks, and some efflorescence. Strength is reduced by 10-15% of the original. With the third, inactive cracks up to 0.2 mm appear, rust, chips, continuous efflorescence appear, strength is lost by 20%. In the fourth case, inactive and active cracks larger than 0.2 mm appear, there is exposed reinforcement, chips, and severe efflorescence. The fifth degree of destruction is characterized by loose concrete, exposed reinforcement with loosely fixed, exposed filler, deep chips, and internal voids. In some places the material completely loses its strength.
What to do? Damage belonging to the first group does not require immediate action. They can be eliminated during preventative maintenance. If the defects belong to the second group, repairs will provide additional durability of the structure. This must apply to the materials used - they must also be durable. Cracks located in the area where the reinforcement is located must be urgently repaired.
In case of more serious defects, they begin to restore the structure according to a specific feature. The technologies and materials used must ensure the durability and strength of the structure. In some cases, individual projects are developed to repair concrete floors.
If the damage is accompanied by the simultaneous action of the aquatic environment, it is recommended to additionally use penetrating materials as a protective composition when carrying out repair work.
If the surface operates in conditions of variable temperatures, in aggressive conditions, protection of the reinforcement is mandatory, the structure of the artificial stone is compacted, and chemical resistance is increased.
Cracks opened by more than 0.5 mm, voids, are filled by injection. This will increase the load-bearing capacity and restore the solidity of the floor. Repairs are carried out after the development of cracks has ended and the cause of their formation has been determined.
Self-expanding cords
This method is used to carry out repair work in the bowls of outdoor swimming pools, to restore monolithic foundations and restore the integrity of external walls in industrial premises.
To carry out the work, you will need to prepare the area by clearing it of small fractions and dust, measure the depth and width of the crack and select a suitable self-expanding cord or tape.
A cord is placed into the pre-prepared seam and the remaining space is filled with polyurethane sealant from a mounting gun. Excess sealant is leveled with a spatula, and after the material has risen, the surface of the problem area is sanded.
This method of eliminating defects in concrete surfaces allows you to select a cord to seal any crack, which ensures complete sealing of the seam and a long service life. An important feature of the method is the ability to perform work at subzero temperatures.
Shrinkage cracks in concrete mortar
What you need to know about concrete? This is a multicomponent solution in which chemical reactions occur. The main chemical reaction of concrete mortar is hydration between the cement stone and water, as a result of which the plastic mixture turns into durable stone. These processes are characterized by internal stress of the structure.
The first shrinkage cracks may appear on the concrete surface in the first 6-8 hours after pouring, as it contracts, releasing moisture. Cracks may also appear during the further period of strength gain. What can affect the appearance of cracks:
- Incorrect proportions of concrete mortar components:
- excess water;
- excess cement;
- absence of plasticizers and others.
- Incorrect initial care of the setting mixture. Moisture should not leave the solution too quickly:
- if 10% of the moisture evaporates in a short period of time, then 18% of the strength of concrete is lost;
- if 20% moisture, then 30% strength;
- if 30% moisture, then 50% strength.
Therefore, the solution is protected from drafts and direct sunlight. To do this, the surface is moistened and tightly covered with film. In general, small shrinkage cracks (hairline cracks) are normal for concrete, but their width should be no more than 0.1 mm.
Classification
Let's consider the classification of cracks that form in concrete after pouring:
- superficial hairline cracks in concrete;
- temperature-shrinkable;
- sedimentary cracks.
The latter are the most dangerous, appear as a result of uneven load on the structure and can cause the destruction of the entire building.
Concrete structures located outdoors are most susceptible to destruction. In addition to mechanical loads, their formation is caused by chemicals in the environment and the negative impact of climate.
How to repair cracks?
The types of deformation described above lead to the screed starting to crack. This is bad because over time, even the smallest recesses expand, and because of them, major repairs of the floor will have to be done. Cracks are one of the most severe types of destruction, requiring emergency removal, so they must be eliminated in a timely manner. Cracks can be small or deep.
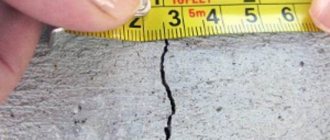
Small-diameter cracks are considered to be damage up to 2 mm wide.
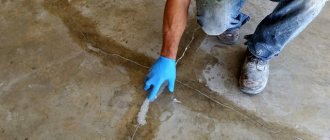
You can repair the screed yourself as follows:
Use a grinder to widen and deepen the crack
Particular attention should be paid to the fact that after expansion, the edges of the crack should not crumble, but should be absolutely solid. If you can’t use a grinder, you need to stock up on a hammer and chisel. After expansion, the cracks need to be cleaned
Only a construction vacuum cleaner is used for this purpose. The cleaned areas are coated with epoxy primer. This must be done several times until the mixture is completely absorbed into the concrete. After the primer has completely dried, the damaged areas are filled with a mixture of Rizopox 3500 and quartz sand. The mixture should fill the crack just above the surface level. After the mixture has hardened, the repaired areas are sanded and cleaned.
Repairing minor damage takes little time and allows you to do without special tools.
If large cracks have formed in the screed - more than 2 mm in width - the repair process will proceed according to the following scheme:
- As in the first case, the cracks must be cut to their full depth.
- After expanding the crack across it, it is necessary to make several grooves.
- Small repair seams (1.5 cm long) are made along the grooves at intervals of 2 cm.
- The prepared recesses should be cleaned using a construction vacuum cleaner, treated with a primer and left to dry.
- After the primer has dried, the repair joints will need to be filled with pieces of reinforcement, metal staples or wire.
- Next, the cavities are filled with liquid mortar made from a mixture of sand and cement. The surface is leveled with a lath and sanded after drying.
Reinforcing the screed helps protect it from stress and extends its service life. There is also a little trick that will help you find out whether the cracks are expanding over time or not. To do this, you need to glue a paper strip to the edges; if it breaks after a while, then the forecasts are disappointing. If the piece of paper remains the same as it was, then everything is in order. But this method requires a lot of time.
Making expansion joints
One of the main reasons for cracking of a concrete slab is the lack of compensation gaps around the perimeter of its abutment to vertical barriers - walls, columns, thresholds, etc. And in rooms with a large area, the screed can crack and swell during shrinkage and during linear expansion, if expansion joints are not installed in it, dividing the solid slab into several sections independent from each other.
The expansion joint allows the screed to expand freely Source tb.ru
See also: Catalog of companies that specialize in home insulation
Before repairing cracks in the floor screed, it is necessary to arrange all the necessary technological joints in it, otherwise they will appear again and again. And the sooner you do this, the better.
It will no longer be possible to create gaps between the floor and the wall using a finished screed. But you can cut the grooves as close to the wall as possible using a grinder with a large diameter disk or a wall chaser. If there are columns, a shrinkage seam is made around them, but not parallel to the edges, but in the form of a diamond, so that the corner of the column looks at the straight section of the groove.
If the dimensions of the room on one or both sides exceed 3-4 meters, the seams must be cut across it.
Note! The depth of the groove must be at least a third of the thickness of the screed, and the width must be at least 10 mm.
The finished cracks in the floor are cleaned of debris and primed. After the primer has dried, they are filled with polyurethane sealant or special mastic. After drying, these compositions retain elasticity, which will allow the cut cards to move independently of each other without transferring deforming loads.
Filling the seam with sealant Source stiagka-pola.ru
Repair compounds for concrete
In order for the restoration of artificial stone to be successful, before choosing a repair composition, a thorough inspection of the destroyed structure is carried out and an analysis is performed. The mixture is selected taking into account the following factors:
- the degree of loading of the structure, its load-bearing capacity;
- depth of damage;
- operating conditions of concrete (humid environment, temperature conditions, degree of exposure to aggressive environments);
- accessibility to the damaged area;
- expected scope of work.
If you are repairing the concrete surface in a visible area, it is important to take into account aesthetic requirements
Major Damage Repair
The large damaged area is filled with new concrete mortar. First, the surface of the structure is cleaned of loose pieces and dust. A clean, solid base of good quality concrete should remain.
Filling is carried out with a cement composition with complex additives that improve its performance characteristics. Good results are achieved by fast-hardening polymer mortar or fiber-reinforced concrete.
For concrete repair with cement mortar to be successful, it is important to create conditions for its reliable adhesion to the base being restored. Two methods are usually practiced:
- Continuous filling of the entire area of the structure is carried out with a solution more than 100 mm thick. If partial restoration is carried out, the concreting site is deepened.
- Better adhesion between old and new layers occurs when a steel reinforced mesh is attached with dowels to the base being restored.
Before pouring the solution, the surface of the structure being repaired is treated with epoxy, acrylic or other adhesive compounds that provide better adhesion.
Dry mixtures for concrete repair
All dry mixes for concrete repair contain cement, which ensures optimal compatibility with the concrete structure being restored. There are many compounds from different companies on the construction market.
Apply the repair composition in a layer 5-50 mm thick on horizontal and vertical substrates. To restore the ceiling, it is optimal to maintain a mixture thickness of 30 mm. Better adhesion is ensured by pre-treatment of concrete with a primer or primer.
concrete repair mixture OSNOVIT
According to the type of application, dry mixtures are divided into the following types:
- for work at temperatures above +5°C;
- at negative temperatures;
- for waterproofing and providing protective properties;
- for repairs that do not change the geometry and load-bearing capacity of the concrete structure.
The scope of application of dry mixtures is wherever quick repairs are required to eliminate defects.
Pros:
- good adhesion to the old base;
- high mechanical strength of the frozen composition;
- due to additives, the mixture does not shrink;
- possibility of eliminating defects up to 100 mm deep.
The disadvantage is the high cost and short shelf life.
Thixotropic mixtures
In essence, these are analogues of conventional dry mixtures, but with improved characteristics. Popular manufacturers are: MAPEI, BASF, Sika. The thixotropic composition for concrete repair is based on cement, sand, and complex additives. Mixtures with polymer fiber are considered the most effective.
Sika concrete repair mixture
The optimal layer thickness is from 10 to 30 mm. The mixture is used when repairing monolithic and prefabricated concrete structures, for sealing seams, and restoring protective layers.
Pros:
- resistance to mechanical loads and abrasion;
- good adhesion to the base;
- resistance of the frozen composition to moisture and low temperatures.
The downside is the high cost and inability to use at sub-zero temperatures.
Epoxy and polymer compounds
The main purpose of the compositions is the repair of self-leveling floors, injection work, and the organization of protection of a concrete structure from the effects of destructive factors. Popular, "Technoplast", "KrasKO".
polymer composition for concrete repair Elakor
Sometimes the composition is applied to improve the adhesion of the base to the new repair layer. Polyurethane mixtures eliminate leaks and prevent the influx of water.
Pros:
- resistance to mechanical and chemical stress;
- good wear resistance;
- high adhesion to the base;
- good waterproofing properties.
The disadvantage is the short viability period.
Protection and prevention during concreting, means and methods
To prevent concrete from cracking, the hardening mixture must be protected from external influences until it is completely cured and reaches brand strength. For this, experts recommend:
- make plastic shrinkage of the mixture minimal;
- ensure the absence of impacts that reduce the strength and durability of the composition.
At the same time, according to regulatory documents, acceptable dates for starting work on concrete objects are those at which 100% brand strength is achieved, and removal of the formwork is expected after reaching 70% readiness of the composition.
- careful selection of the percentage composition of the mixture, taking into account operating conditions;
- vibration compaction, including repeated compaction if necessary. Preference should be given to the machine version, since manual does not provide the necessary guarantee of the absence of cavities and the correct distribution of volume throughout the formwork space.
To avoid the problem of “concrete cracking as it dries,” it is also important to take care of the mixture during the curing process.
- Protection of concrete outdoors from excessive dryness and wind, daily and long-term temperature changes. To do this, depending on the air temperature, measures such as covering with film, moistening the concrete and formwork, maintaining a thin layer of water on top of the poured mixture, and thermal insulation of the mass are used.
- Protection of concrete from destruction (mechanical and chemical damage) until it reaches its design strength. For this purpose, the formwork can be covered on top with shields over film or thermal insulation.
Polymer coatings for concrete during the curing process (film) are laid, whenever possible, as a single piece or with pieces overlapping at least 30 cm and the seams are taped.
Video description
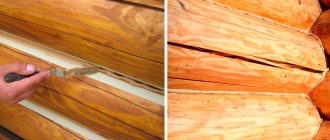
How to strengthen concrete that is peeling off from the base is described in the video:
Having found out why the floor screed cracked and what to do, you can begin repairs.
- First, by tapping, areas of delamination and voids are identified and marked with chalk.
- In the marked places, holes are drilled in the screed at a distance of 15-20 cm from each other.
- After cleaning and priming, an epoxy mixture is poured into the holes.
- It also seals cracks.
- After the mixture hardens, the holes are filled with liquid cement mortar.
When drilling repair holes, there is a high risk of damaging the cable Source sense-life.com