Many owners of private houses are increasingly giving preference to such types of heating as gas or steam, and if there is central heating in the locality, some find it easier to connect to the heating network. However, in many houses the stove heating method is retained - both as the main source of heat and as an auxiliary one. Often the choice in favor of a conventional stove is associated with economic considerations - the best brick stove will cost less than laying a distribution pipeline to connect to central heating.
The stove is a fairly voluminous structure, making it invisible is almost impossible. Most often, red brick is used for masonry, which does not always look harmonious in the room. Therefore, the owners make efforts to ensure that the stove fits into the interior and looks neat. Furnace finishing is often done using plaster.
However, many are faced with this problem - after a few years, the plaster from a brick kiln begins to crumble. In fact, this can be avoided, the main thing is to do the plastering work correctly.
Why plaster the sauna stove and fireplace?
Bricks, clay mortar or iron are used to make the stove. Fireplaces are made from brick, stone blocks or concrete mortar.
The structures can withstand temperature changes; finishing is necessary for long-term and safe operation. A popular way to decorate stoves is plastering. Finishing mixtures are selected in accordance with the required thermal conductivity and base material.
Plastering a heating device is necessary to solve the following problems:
- strengthening stoves and fireplaces;
- improving the tightness of the structure;
- preventing cracking of brickwork;
- design for an updated interior;
- increasing aesthetics;
- leveling the stove or fireplace base;
- plastering the fireplace will prevent the appearance of insects and fungus in the seams of the blocks;
- increasing the heat capacity of the furnace;
- treatment with a fire-resistant mixture increases the level of safety in the room.
Stove plaster has the following advantages in finishing:
- simple application, which is performed without complex equipment;
- the material is universal, can be used for different surfaces (concrete, brick);
- after the leveling layer, decorative mixtures with the effect of a marble surface or Venetian plaster can be applied to the box;
- the product can be used for restoration work to restore the fireplace;
- after plastering, it is possible to paint the surfaces or whitewash the base;
- the composition is more economical than other finishing methods.
Conclusion
Do-it-yourself plastering of the oven walls is completed. It is important to follow all the necessary tips so that the stove lasts a long time and we can enjoy warm, cozy evenings in which it warms us with its warmth.
I would especially like to draw your attention to the fact that you cannot apply plaster if we have just completed the brickwork of the stove. The oven must dry and undergo a shrinkage process. And this requires enough time, 2-3 months of regular use.
Sources
- https://strbani.ru/kak-oshtukaturit-pech/
- https://kirpichguru.ru/pechi-i-kaminy/shtukaturka-pechi-iz-kirpicha.html
- https://stroyremont.info/otdelka/chistovaya-otdelka/kak-oshtukaturit-pech.html
- https://otoplenie-expert.com/kirpichnye-pechi/kak-oshtukaturit-pech-chtoby-ne-treskalas.html
- https://StrojDvor.ru/otoplenie/kakim-rastvorom-shtukaturit-pech-chtoby-ne-treskalas/
- https://kamin-expert.ru/otopitelnaya/shtukaturka-pechi-iz-kirpicha.html
- https://samstroy.com/%D0%BF%D0%BE%D1%87%D0%B5%D0%BC%D1%83-%D0%BF%D0%BE%D1%8F%D0%B2% D0%BB%D1%8F%D1%8E%D1%82%D1%81%D1%8F-%D1%82%D1%80%D0%B5%D1%89%D0%B8%D0%BD%D1 %8B-%D0%B2-%D0%BF%D0%B5%D1%87%D0%B0%D1%85-%D0%B8-%D0%BA%D0%B0/
- https://pechnoy.guru/pechi/izgotovlenie-pechi/materialy/shtukaturka/kak-oshtukaturit-pech.html
- https://strir.ru/vnutren-otdelka/shtukaturka/pechi
[collapse]
Classification of plaster for stoves and fireplaces in the house and requirements for it
Before finishing the structure, a suitable material is selected. There are 2 types of mixtures used in the work: simple and complex.
The plaster mixture must meet the general requirements:
- resistance to temperature changes, high heat-resistant performance;
- the structure of the material ensures easy application to the base and prevents the composition from shedding after drying;
- the components of the finishing mixture must be environmentally friendly and safe after heating;
- the composition must be fire-resistant, not subject to fire and maintain performance characteristics when heated regularly;
- Crack resistance and good adhesion are required.
Simple formulations
Simple mixtures consist of 2 components (clay and sand). Before preparing the solution, the sand is passed through a sieve, and the clay is ground through a fine-mesh metal mesh. After pre-processing, the raw materials are cleared of impurities and debris.
The clay needs to be soaked in water for 2-3 hours to increase the plasticity of the mass and prevent cracks from appearing on the treated surface. To increase adhesion, experts recommend using fatty types of clay for solutions. In this case, the ratio of clay and river sand should change.
Complex mixtures for ovens
Plastering of stoves is also done using complex mixtures. Solutions may contain more than 2 components. Products are produced that contain more than 3 ingredients.
The following complex options for plaster mixtures are in demand:
- from lime, river sand and clay;
- with asbestos, sand and clay mass;
- from clay, asbestos, cement powder and sand;
- a multicomponent solution may contain clay, fiberglass, gypsum powder, lime and sand.
For complex mixtures, it is important to choose the right ratio of water and dry mass to prepare a coating that is aesthetically pleasing and resistant to mechanical stress.
Technology for plastering a stove
To carry out work on plastering a stove, a set of tools for a mason and a painter is required. You will need a hammer and chisel to work with the base. For the solution, use a container for mixing, spatulas, trowels, graters with smoothers. For alignment, a rule and a level are used.
Additionally, a construction knife, brushes with a roller, and a brush with metal bristles may be useful. The list of consumables looks like this: mixture, water, soil, beacon and corner-forming profile, reinforcing fiber or plaster mesh, gloves, whisk attachment for a drill or hammer drill for preparing the solution. It is also necessary to provide protection for adjacent walls and floors from contamination. For this you will need film and masking tape.
Preparatory work
In the case of a new stove, it is permissible to begin finishing work only after several thorough heatings over a period of 2-3 months. Then shrinkage of the structure, which leads to cracking of the plaster coating, will be eliminated. For older units this requirement is not relevant.
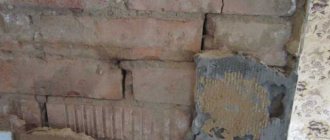
New stove for finishing Source yandex.net
Next, before plastering the stove, you need to carry out preparatory work. The working base is considered to be a clean, grease-free and flat surface. Protruding excess masonry mixture or previous decorative finishing must be removed. Damaged bricks are restored or replaced completely. The depth of the seams must be at least 10 mm. Notches are applied to a durable concrete surface.
Types of plaster
It is possible to determine what is used to plaster the stove, taking into account the technical characteristics of the varieties.
The following compositions are in demand:
- clay-sand;
- cement-clay-sand;
- gypsum based;
- lime-clay-sand;
- with asbestos, etc.
Clay sand
Simple clay-sand plaster is characterized by plasticity, waste-free use, and fire resistance. Clay mortar is economical. Clay can be purchased or prepared yourself. When digging up material, it is necessary to clear the mass of grass, rhizomes, stones and sift it using a sieve. The composition is the optimal plaster for a brick oven.
The advantages of a solution with sand and clay are as follows:
- low thermal conductivity ensures long-term heat retention in the oven;
- the composition is environmentally friendly and safe to use;
- good vapor permeability;
- long shelf life of the material, even in diluted form the composition will not deteriorate for a long time;
- the hardening speed is average, it is possible to make adjustments during design;
- plaster is suitable for coating the stove;
- clay-sand coating is repairable;
- the material is waste-free to use.
However, it must be taken into account that the thickness of the coating must be at least 1 cm to prevent cracking and shedding. The standard solution proportions are 1 part clay to 2 parts river sand.
Cement-clay-sand
Heat-resistant plaster for stove structures is a complex mixture and consists of cement, clay and sand. The product is durable and is used for finishing fireplaces and structures in bathhouses. However, it is necessary to take into account the rapid drying speed of the solution. The mass is prepared in small portions and quickly applied to the surface.
The solution is prepared from 3 parts sand, 1 part clay and cement. If the plastered surface is facing externally with tiles, it is necessary to add 1 part each of chalk and liquid glass to the composition to increase the strength of the base and resistance to cracking.
Calcareous-clay-sandy
Fireproof plaster for finishing stove structures is made from clay, lime (1 part each) and water (2 parts). Adding lime components to the mixture increases the plasticity, strength of the material, adhesion, disinfects the mass, and prevents the appearance of insects and mold.
Gypsum based
A plaster solution based on gypsum in combination with lime is characterized by plasticity and good adhesion. The material is kneaded in small portions, because the mixture hardens quickly (15-20 minutes after application to the base).
Fireproof plaster with asbestos added
Heat-resistant plaster for stoves and fireplaces containing asbestos is characterized by high strength and good adhesion to the surface. Asbestos acts as a reinforcing component in the finishing mixture. When mixing on your own, add the substance in small portions.
Plaster with asbestos has the following advantages:
- durability of the coating;
- moisture resistance of the base;
- non-flammability;
- preventing the formation of cracks.
Strengthen the plaster mixture with salt
The mortar for plastering the stove can be strengthened with salt to increase the hygroscopicity of the clay base. The coating does not dry out, retains its plasticity and will not crack. Salt increases the protective characteristics of surfaces, prevents the formation of mold and damage to the base by insects when treating a stove in a country house or country house.
The addition of salt slows down the drying of the mixture and allows you to adjust the quality of the coating. Gypsum powder can be included in the solution to increase the strength of the composition.
However, it must be taken into account that the plaster mixture with the addition of gypsum dries faster, so it is diluted in small portions.
Advantages of plastering the stove
Without decoration, the walls of the stove do not look aesthetically pleasing, since building bricks are used for masonry without the use of neat facing bricks. Such heating structures are always finished with finishing materials. Here are a few reasons why the use of plaster is important:
- The fine-grained mortar fills the pores in the masonry mixture. This prevents carbon dioxide from entering the room.
- The leveling mixture can be used as a stand-alone coating or as a base for any heat-resistant facing material.
- Plaster is acceptable for finishing any stove or fireplace. This could be restoration, strengthening or decoration. At the same time, the universal mixture can be considered an economically advantageous choice due to its relatively low cost.
In addition, this material, to one degree or another, has insulating properties, which helps to retain the heat of the furnace walls for a longer time. The solution is easy to work with and dries quickly. You can give the oven surface a smooth, rough or decorative texture.
Decorative plaster on the stove Source www.elitfasad.rf
We plaster a brick oven with our own hands - step-by-step instructions
Many people are interested in how to plaster a stove with their own hands.
It is recommended to follow the following steps:
- cleaning, eliminating cracks with heat-resistant putty and leveling the surface;
- preparation of solution;
- base reinforcement;
- applying the plaster mixture.
Necessary tools for plastering a brick oven
The following tools are required:
- Master OK;
- trowel;
- spatulas;
- grater or grater
- ironing board;
- metal brushes;
- hammers;
- scissors for working with metal;
- plumb line, building level;
- construction mixer;
- rule;
- brushes;
- beacons, etc.
Do-it-yourself oven surface preparation
Before plastering the stove, you need to prepare the base. Irregularities on wall panels are leveled with a special solution. If there are large defects, it is recommended to install beacons. In places of deformation, the mixture is applied in layers. After plastering is completed, the beacons and planks are removed from the base.
The remaining grooves are filled with solution. When using planks, the soil layer can be more than 10-15 mm. The coating is smoothed using the rule. The corner parts are leveled with a special spatula. When preparing the base for tiling, 2 layers of mortar will be sufficient before applying plaster with the addition of fireclay clay.
Basic rules for preparing the mixture: composition, proportions (how to prepare the solution)
Before plastering the base of the stove, you need to mix the finishing compound.
Before work you need to prepare materials:
- The clay is soaked 24 hours before use. Then the mass is filled with water, debris is removed from the clay, and the liquid is drained. The remaining material is mixed until smooth.
- River sand is used as an additional component, which must be washed, sifted, and dried. Wet material is not used.
- Asbestos needs to be fluffed up.
- Lime dough or milk is prepared from lime.
When finishing different types of surfaces (bricks, stone blocks), a solution of components in different proportions is used. As standard, dry substances are mixed, then liquid mixtures are added. For stoves fired with peat briquettes or coal, fireclay powder must be added to the composition.
You can prepare a solution from the following components:
- clay (1 part);
- asbestos (0.1 part);
- sand (2 parts);
- lime dough (1 part);
- water (until the required consistency is achieved).
The ingredients are mixed until smooth.
For another version of the solution, substances will be required in the proportion 1: 2: 0.1: 1, respectively:
- clay;
- river sand;
- asbestos;
- cement grade from 300 and more.
First, sand and clay are combined. The mixture is diluted with water, then the remaining components are added.
How to properly reinforce ovens with mesh
Before plastering the stove, you can perform mesh reinforcement. The method allows you to strengthen the plaster coating, prevent peeling of the material and the appearance of cracks.
The following components are added to the reinforcing mixture (optional):
- asbestos fiber;
- slag wool;
- fiberglass;
- hemp, etc.
The greatest strength is ensured by the use of metal mesh. Fastening reinforcement for stoves with uneven walls with a layer of plaster coating greater than 1.5 cm is mandatory. The work is carried out using nails 10-11 cm long. The elements are placed at intervals of 2-3 rows of bricks. The horizontal step is 15 cm. The mesh can be fixed using wire in the brickwork. Choose metal threads from copper and stainless steel.
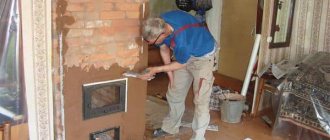
Applying plaster to a brick stove
You can plaster the stove yourself using a spatula.
The work is performed in the following sequence:
- The oven is heated in advance.
- Two types of solution are prepared (liquid, creamy consistency and dense with high viscosity).
- The quality of the reinforcement layer is checked. If there are any unevenness, the chips are covered with fire-resistant putty.
- The bricks need to be wetted with water.
- Plastering is carried out with a liquid solution in a layer of no more than 5 mm, the work is carried out with a wash brush.
- The coating is left to dry, then a viscous plaster solution is mixed.
- The mass is evenly distributed over the base of the oven using movements from top to bottom.
- After the mixture has hardened, you can grout.
- When drying the plaster, the treated base is moistened with water to prevent areas from delaminating.
Surface preparation
Before starting plastering work, be sure to prepare the surface of the oven. This will make it easier to apply the solution, and the resulting finish will look better and last longer.
If we are talking about an old stove, then you will need to prepare the surface according to the following scheme:
- Cleaning the stove surface from old plaster. This can be done using a spatula or chisel.
- The surface is rubbed with sandpaper - this will help eliminate minor irregularities.
- Use a vacuum cleaner or dry cloth to remove any debris and dust that has formed.
In the case where a freshly laid stove needs to be plastered, such work should begin approximately a month after the completion of the brickwork. This period is enough for the mortar used for masonry to dry, harden and gain strength. Before starting work, you need to clear the seams between the bricks that make up the stove to a depth of about 0.5 cm - this will help the plaster mortar adhere better to the masonry.
Frequently occurring defects and their prevention
Over time, during use, deformations and cracks may appear on the surface.
The reasons for the occurrence of irregularities are as follows:
- improper operation of the structure (overheating of areas);
- regular excess of temperature;
- door loosening;
- incorrectly performed plastering.
Depending on the cause of the deformation and the condition of the heating device, a method for eliminating the defects is selected. It is possible to reposition the stove, apply another layer of fire-resistant plaster, or add fireclay powder to the clay. The structure can be strengthened using reinforcing mesh.
Work on sealing the stove is carried out in compliance with the following sequence of actions:
- Surfaces are cleaned of whitewash.
- The primer layer is applied with a brush.
- Then the plaster mixture is prepared.
- The composition is applied to a pre-moistened area. Spread the mixture in small portions and rub the surfaces.
- The coating is dried.
- Doors and latches are removed, damaged areas are repaired.
- Then the elements are placed on the stove using updated fasteners.
- The work is completed by applying clay mortar to the stove surfaces.
Is it worth buying a ready-made mixture?
Undoubtedly, a factory-made mortar purchased on the construction market will be more reliable when plastering the stove. They are made from special components for interior decoration, which give the mixture many useful properties: it will be able to withstand higher temperature changes (up to +200...+250⁰C).
Plastering a stove with such a solution is practically no different from the process of applying a clay solution prepared by yourself. In addition, all factory mixtures have special instructions, which indicate the subtleties of working with the composition you have chosen.
Ready mix
The disadvantage of this approach is the price: the cost of a solution prepared by yourself will be slightly lower than the cost of a product purchased on the market.
How and what to grout the stove after plastering
The procedure for grouting the stove structure is carried out after the solution has hardened, which should not dry completely. The work is performed with a wooden or plastic grater, supplemented with a cloth attachment. The tool performs circular movements with adjustment of the degree of pressure. Surfaces must be regularly moistened with water. The result should be a smooth surface.
How to seal cracks in a metal stove
You may also need to decide how to cover the cracks in a metal stove, because it gradually burns out, and it is not always easy to allocate funds for repairs. Clay grout can be used as a restoration product. It is important to make a thick enough layer that will prevent combustion products from escaping from the firebox. The clay should be diluted in the traditional way, you can add a small amount of ash from the same oven and mix thoroughly until smooth.
Repairing a metal furnace by welding exfoliated metal fragments Source ipk-rotor.ru
If a hole or crack in the metal appears in the area where the chimney meets the stove chamber itself, then you need to take a small plate of metal, coat it with stove glue and fasten it to the deformed area. Seal the space on top with the same composition. To solve this issue, a reinforcing mesh is also used, which is subsequently plastered.
Features of repairing fire-resistant stove plaster when cracks appear
If plastering work is carried out incorrectly, cracks may appear on the surface of the stove, the finishing layer may move away from the base, etc.
When deciding how to plaster the stove so that it does not crack, it is recommended to take into account the following nuances:
- Finishing of a new heating device is allowed only 2 months after laying. During this period, the structure will shrink.
- The installed stove must be heated so that the condensation in the chimney and on the walls evaporates. The duration of the procedure is gradually increased.
- It is recommended to plaster the surface with compounds with the correct proportions for the material of the fireplace or stove. For oily clay, sand consumption increases.
- Sanding can be done even on a damp surface; the work is done with a piece of fabric.
- The plaster layer dries in 3 days. After this, you can heat the stove structure.
- It is not recommended to prime a hot surface (with a temperature of more than +300°C), because Failure to comply with the requirements may result in foundation defects.
Expert advice on repairs
The stages of finishing the stove wall are identical for any selected mass. The differences are insignificant, but they are taken into account during the plastering process.
So the composition with the introduction of gypsum will dry 2 times faster than with cement. The use of fireclay clay in bulk is well suited for laying on bricks of the same composition, since the thermal conductivity is the same.
The plastered structure must dry without using auxiliary means.
More than one master will not answer how best to finish a stove building. Each stove maker has his own secrets and components of solutions for plastering brick surfaces. You can knead a clay and sand mixture and buy a ready-made mass. It is important to correctly connect and apply the material to the walls of the heated structure.
Ways to decorate sauna stoves and fireplaces
After plastering the stove is completed, decorative finishing is performed.
Available types of work:
- painting or whitewashing surfaces;
- applying decorative plaster mixture;
- facing with ceramic tiles.
How to paint a stove after plastering
After plastering, surfaces can be painted or whitened. Substrates must be primed before painting. The work is performed using brushes.
When using ready-made paints, experts recommend using water-based products and synthetic materials. The compositions must be heat-resistant.
When used to paint fireplaces, oil paints will quickly darken because... are not resistant to elevated temperatures.
The traditional way of finishing stoves and fireplace installations is whitewashing. A recommended method for plastering with a solution containing lime. Processing is performed in several layers. For every 10 liters of whitewash solution, 100 g of salt is used. You can give a bluish tint to the mixture by adding a small amount of blue to the composition.
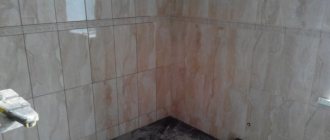
Tile laying
Stove structures and fireplaces are lined with terracotta or ceramic tiles. The elements are fixed to a special adhesive base designed for treating surfaces that can withstand heat. Standard glue is not recommended for use, because... the lining will quickly fall off.
Tiles are not suitable for finishing stoves, because... will not withstand temperature increases. Tiles can be used to adjust the corner parts of structures.
The gluing of tiles is carried out in compliance with horizontal and vertical levels. The uniformity of spaces between elements is taken into account. The color scheme and texture of the tiles are chosen to suit the stylistic design of the rooms or country house.
Decorative plaster
Manufacturers produce specialized decorative plaster for fireplaces and stove devices. The material must have high thermal and wear resistance and strength. When using standard decorative plaster mixtures, gauze fabric can be used as an additional layer.
Decorative plasters with acrylic, silicate, silicone, mineral, and heat-resistant bases are recommended for finishing stoves. The mixture, ready-made or diluted in water, is applied using spatulas. The dried coating is treated with varnish or special wax.
About materials and tools
You need to learn how to plaster a brick stove and prepare all the necessary tools and materials in advance. You will need a set of tools, including:
- trowel or trowel;
- grater;
- hammer;
- chisel or spatula;
- wire cutters and pliers (they can be replaced with pliers);
- sprayer - it is needed to wet the surface with water (if you don’t have it, a paint brush will do);
- metal scissors and fabric scissors;
- coarse sieve - for sifting sand and / or clay;
- container for solution and separate for water;
- scoop for the plaster mixture (or its components);
- broom or vacuum cleaner.
The list of materials for plastering the stove includes the mortar itself for plastering the stove, a reinforcing mesh with 10 x 10 mm cells (you can get by with burlap), lime (or water-based paint), as well as a cement mortar (it will be needed to secure the wire, including case if we are talking about an old stove).
Reinforcing mesh with cells 10 x 10 mm
Popular brands of plaster mixtures
The most popular plaster compositions for the construction of stoves and fireplace installations are the following brands:
- PC400 W oven;
- Typhoon Master;
- Kalina Master;
- Terracotta;
- Stove maker, etc.
Heat-resistant ready-made plaster (thermal plaster) for stoves and fireplaces
When purchasing heat-resistant plaster compositions, it is important to consider the following nuances:
- established limit of operating temperature conditions;
- environmental friendliness of ingredients;
- hardening time;
- moisture resistance;
- resistance to sudden temperature changes;
- purpose of mixtures (for interior or exterior decoration);
- integrity of packaging, production date, etc.
PC400 W oven
The heat-resistant plaster material Osnovit PECHFORM PC400 W is used to treat areas near the hob, side walls of the fireplace, and stove. Permissible operating temperature is up to +400°C. After treatment with the mixture, no additional puttying of the base is required. When using shaped spatulas and rollers, you can make a relief base. The material is universal and is intended for interior and exterior decoration.
The composition is used to treat surfaces made of the following materials:
- concrete;
- composite slabs;
- limestone;
- bricks.
The mixture has an adhesion level of 0.5 MPa, the maximum fraction size is 0.315 mm. The frost resistance of the plaster is 35 cycles of freezing and thawing. The thickness of 1 application layer is 2-15 mm, mass consumption for a 10 mm layer is 12-13 kg per 1 m². Compressive strength reaches 5 MPa.
The mass is applied at a temperature in the range of +5…+35°C. The diluted solution is suitable for application within 2 hours. Coloring is allowed after 2 weeks.
Typhoon Master
The heat-resistant plaster mixture is produced by a domestic enterprise and is used for finishing chimneys, barbecues, and barbecue structures made of brick. The material is based on fireclay clay. The composition is universal and is used for interior and exterior decoration. The mixture is heat-resistant, withstands high humidity, plastic, and easy to apply. Material is consumed at the rate of 1.6-1.8 kg per 1 m².
Kalina Master
Fireproof plaster material is characterized by high strength, because... contains Portland cement. The coating can withstand changes in temperature conditions, surface heating, and is resistant to mechanical damage. When applied, the solution hardens quickly and has good adhesion properties.
Pechnik
Heat-resistant plaster for stoves and fireplaces of the Pechnik brand contains fireproof fireclay clay, cement powder, gypsum, and modifying polymer additives. The material is used for laying stoves and finishing them, repairing old structures, and hardens quickly. The mixture is easy to apply, does not deform when the device shrinks, can withstand heat, and the fire resistance parameter reaches 6000.
Heat-resistant adhesives
To fix tiles when finishing stoves, it is recommended to use adhesive bases with heat-resistant characteristics. Materials must have good adhesion, withstand high humidity and mechanical damage. Heat-resistant adhesives and mastics are produced by Pechnik, Hercules, etc.
Terracotta
Reinforced heat-resistant adhesive is used in finishing stoves, barbecue areas, baths and other heated surfaces with natural stone. ceramic tiles or facing bricks. The material contains kaolin fireclay dust, chemical additives, and astringent components.
The adhesive base has high adhesion characteristics to the surface, withstands heating up to +400°C, and is resistant to high air humidity. The glue is used for finishing surfaces made of aerated concrete blocks and fireclay bricks. The optimal layer thickness is up to 8 mm; the composition can be adjusted within 15 minutes.
Dry powder is diluted with water in a ratio of 1 kg per 260 ml. The material can also be used for leveling chips and adjusting brickwork. The optimal application thickness is up to 1 cm.
Mixture for plastering the Hercules stove
The composition is heat-resistant, used for finishing furnace structures and devices that heat up. The mixture is optimal as an adhesive base for fixing decorative ceramic tiles. The manufacturer offers the material in packages of 5-25 kg. The coating can withstand temperatures ranging from -50...+1200 °C. The adhesive is used for fixing low-porosity tiles and glazed tiles with increased bending strength.
Features of plaster mortars for ovens
To improve the appearance of the stoves, fireplaces are plastered
; stoves are plastered to improve the appearance and additional sealing of the masonry. In case of cracking of the seams, the reinforcing layer will not allow large cracks to form. Previously, a thick layer of material was applied to smooth out the surface, which subsequently cracked. Modern mixtures are divided according to the purpose of use.
Two types of heat-resistant plaster mixtures are produced:
- For rough finishing. Apply about 1 cm thick.
- For final leveling. Its layer is 2 - 3 mm, and it contains finely dispersed substances to create a smooth surface for whitewashing or finishing painting.
You can prepare the solution for plastering the stove yourself; it is used for finishing fireplaces, just like store-bought ones. Exact proportions are introduced into the composition, allowing the layer to remain intact for a long time. If you do not follow the technology, the plaster will crumble, crack, fall off in pieces, and you will have to grease the stove wall every year after the end of the heating season.
Manufacturers of heat-resistant plaster
Ready-made plaster compositions with heat-resistant characteristics are easy to use.
These products are offered by the following companies:
- "Concord East"
- Plitonit;
- Wolfshoher;
- "Bossnab";
- "Terracotta";
- Vetonit;
- Rath, etc.
Plitonit
The Plitonit company is a German-Russian production facility that produces a range of materials for laying fireplaces and stoves.
In the product line:
- heat-resistant plaster mixtures;
- adhesive bases with heat-resistant characteristics;
- heat-resistant putty;
- compositions with reinforcing components for the construction of fireboxes;
- decorative fire-resistant plasters.
SuperKaminOgneUpor plaster dries within 30 minutes after application. The coating does not crack, is resistant to high humidity, and does not collapse when the structure shrinks. There is no need to wet the brickwork before applying the mixture. The products include modifying additives and fibers with heat-resistant characteristics.
Concord East
The company has been operating on the market since 2000 and produces a range of building materials and paint and varnish products, including those with fire-resistant characteristics.
The company's assortment includes:
- primers:
- water-based, latex and acrylic-based dyes:
- adhesive compositions for different operating conditions:
- ready-made putties:
- oven plasters, etc.
Wolfshoher
The Wolfshoher company (Germany) has official representative offices in Russia. The factory produces stove bricks and materials for finishing stove and fireplace structures. The product line includes adhesive heat-resistant bases, mastics, plasters, putties and primers for ovens.
The materials are high-quality, durable, tested, and presented for different operating conditions. The production is developing improved products for fixing modern finishing materials.
Bossnab
(Russia) produces specialized products for furnace production. The line includes plaster compositions for finishing fireplaces and stoves made of different materials. The range has been supplemented with adhesive bases and primers. Plaster materials are produced in different fractions and differ in operating temperature conditions.
Terracotta
The domestic company produces products for plastering and fixing facing tiles. The product line includes thermally stable mixtures that can withstand heating up to +1300 °C. The products are environmentally friendly, because... contains only natural ingredients. The main raw materials used are kaolin, fireclay powder, sand, and binders. The list of products includes terracotta fireproof putty.
Rath
The RATH company (Austria) has representative offices in European countries and supplies products to the Russian market. The company's product line includes finishing materials with fire-resistant characteristics, oven plaster, putty, and adhesive bases. The products are high quality, durable, tested, but are very expensive.
How to make the solution yourself
To mix the components, use an electric drill with a mixer.
Use an electric drill with a mixer, or mix the mass by hand to prepare the plaster. Take clean water, without silt or fatty film on the surface. Rainwater is ideal, but this condition is not mandatory, so filtered liquid is used.
Lime is an excellent plasticizer. The good viscosity of the substance contributes to the greatest adhesion of the plaster to the base. There is no universal mortar that can be used to plaster a brick stove in any type of house and under different operating conditions. It is better to consult with an experienced stove maker before plastering a brick fireplace.
From clay
The clay is pre-soaked for 24-48 hours.
The advantages of the material compared to lime and Portland cement are its fat content. Most often, stove makers try to plaster a brick stove with clay, since the composition is strong, elastic and plastic, and resists a sharp rise in temperature.
Cooking process:
- the clay is pre-soaked in a container for 24 - 48 hours;
- knead the lumps, mix until a creamy consistency is obtained;
- strain before use;
- sand, slaked lime, asbestos fibers, liquid clay are poured into the container, water is added, and mixed.
A simple solution is stored under a lid made of cellophane or roofing felt. Complex mixtures are used during the day, and with gypsum - immediately after mixing.
From fireclay clay
Sand and water are added to fireclay clay.
Burnt kaolin (clay after heat treatment) partially loses its plasticity, but becomes heat-resistant.
Released material:
- with moisture absorption 2 – 10% (highly annealed);
- with absorption up to 25% oxen (low annealed).
Fireclay clay is poured into the trough, sand is placed on top, and water is poured in. Stir, cover and leave for 72 hours. After mixing again after the specified time, the solution is ready to plaster the outside of the stove.
Complex compositions with glue, fiberglass, asbestos do not need to be defended; they can be plastered immediately, after first saturating the wall with a primer.
With the addition of cement
Cement-clay-sand mixtures are used for plastering chimneys.
For the cement-clay-sand mixture, grade M 400 is used. Cement hardens 20 - 25 minutes after mixing with water, but the process will finally end after 4 hours. Prepare such a volume that can be worked out during this time.
Work process:
- a solution with the consistency of a thick dough is made from sand, oily clay, and filtered water;
- Asbestos and cement are introduced into the mass, water is added and quickly mixed.
The composition may contain only cement in the form of a binder component, or lime may be added to it. A mixture with added cement works well in damp areas. It is used for plastering chimneys in the attic area and outdoors.
Methods of applying grout
The following methods can be distinguished for applying grout material to the seams between tiles:
Semi-dry method
When applying grout using this method, the mixture is diluted with a small amount of water. The result is a consistency that resembles wet sand. Using a special jointer, the mixture must be placed in the seam.
The advantages of this application method:
- low cost of the product;
- There are no substances among the components that provide plasticity.
Disadvantages of this grout:
- a seam that is less than 5 mm cannot be sealed;
- the color palette is limited only to gray and beige;
- the installer must have experience in sealing seams using this method, otherwise the design will be of poor quality or unaesthetic.
Using a construction gun
The grout is diluted with water and poured into a special construction tool - a gun. All seams are coated with a thin tip, and excess product is removed. To fill the joint more tightly, you can process the line by pressing the grout in with your finger or some other tool.
Advantages of the method:
- simplicity and ease of application of the composition;
- You can choose the desired grout color.
Flaws:
- high price of the composition;
- you need a special tool;
- Among the components are plasticizers.
Applying the composition over the entire cladding area
The creamy mixture is applied over the entire surface of the tile, then cleaned off with a rubber spatula, leaving the mixture in the joints. The grout for the oven joints is removed from the tiles using a damp sponge.
Pros:
- long-term operation;
- You can use any type of tile.
Minuses:
- high price;
- small palette of colors.
What is grout used for?
This building material is used at the last stage of working with tiles. When all the parts are laid out and the glue has dried, you can begin to aesthetically design the seams between the tiles.
The grout serves as a kind of barrier against moisture and dust. By sealing the seams with this material, you guarantee the safety of the tiled surface.
If during the work the seams turn out to be sloppy or have different widths, you can easily correct this defect using a rubbing compound. It is enough to choose a tone as close as possible to the color of the tile and imperfections will not be noticeable.
And if you are planning to make an unusual design, grout will also help with this. You need to choose a tone that will be significantly different from the color of the tile. This way you can achieve an unusual interior design.
Is it possible to plaster with Rotband?
Experts answer this question categorically - no. Such protection will quickly turn yellow and crack. The basis of this plaster is gypsum, which goes into a semi-aqueous state when the temperature reaches 1300. Such a layer will simply fall off the wall.
Therefore, it is better to use a proven method of preparing a solution from clay and sand, even if it takes several days to prepare it, than to end up with cracked walls.
In general, the most worthy option is to line the stove with ceramic tiles, which will serve for a long time and reliably. The main thing is to choose a good glue or solution and do the job well.
But it all depends on the choice of the home master
It is important for us to answer the main question of the article - what mortar should I use to plaster the stove? The TOP 10 mixtures from leading manufacturers of heat-resistant plaster will help you solve the problem of choice