Why plaster the stove?
The materials of the Russian stove include:
- clay;
- fireproof (fireclay) brick;
- iron (doors, grates, grates).
Each has its own heating temperature, expansion, and thermal conductivity.
Yes, it is indeed possible to leave the stove unfinished, but after a short time it will lose its neat appearance along the colored seams. If the masonry was done in haste, cracks will begin to appear.
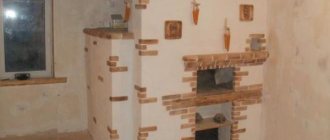
Plastering is performed to strengthen the structure, protect it from drying out, and give it a beautiful appearance.
In addition, the procedure is relevant in the following cases:
- The oven is not laid out neatly. The mixture will help level the corners and sides.
- The old coating began to crack and fall off.
- To increase the strength of the walls, their thickness will increase.
- Heat capacity improvements. The bathhouse or house will remain warm longer.
- The seams were filled with a natural-based mixture, which is why insects settled there.
- The interior design of the room has been changed, so the furniture needs to be decorated in the appropriate style.
- Increases the level of fire safety. It prevents carbon monoxide and smoke from entering the house through cracks in the brickwork.
Using heat-resistant plaster is an excellent way to restore antique stoves, fireplace boxes, followed by laying ceramic tiles, marble and other decor on top.
Decorative finishing
Fireproof plaster cannot boast of attractive decorative properties. But on top of it you can put almost any material used for finishing stoves and fireplaces:
- Surface painting . You can use water-based paints that are resistant to heat and retain their color for a long time. Before applying paint, the surface is covered with a layer of primer. You can paint it using the simplest method - whitewashing, adding lime to the plaster. To increase the strength of the coating, you can add 100 g of salt per 10 liters of mixture.
- Laying tiles . For cladding, ceramic or terracotta heat-resistant tiles are selected. You will also need glue with similar properties. Tiles can be used to mask uneven surfaces well.
- Decorative plaster . Any compositions whose characteristics indicate fire resistance are suitable.
You should not leave a stove or plastered fireplace without finishing.
Classification of plaster for stoves and fireplaces and requirements for it
During combustion, a significant temperature difference is formed outside and inside the product. It disappears only after it has completely cooled down.
To avoid cracks in the brickwork, purchased or homemade plaster must meet a number of conditions:
- Be resistant to high temperatures, be heat resistant.
- Have an elastic structure. This will simplify the application process. The mixture will not begin to crumble from drying out.
- All components in the composition must be environmentally friendly and, when heated, safe for health.
- Be fire-resistant, not exposed to flames, maintain working properties.
- Adhere well to the surface.
Regardless of whether it is purchased thermal plaster or made at home, it must meet the requirements.
Ready-made factory mixtures are sold in dry form, so you need to dilute them with water in the correct ratio.
Based on the composition of the mixture, they are classified into two types.
Simple
Simple plaster is called plaster, which contains only two components: clay and sand.
Before making the solution, sand is passed through a sieve, clay through a metal mesh with small cells. This way the raw materials are clean, powdery, without any debris.
Stove makers recommend choosing fatty clay, since this way the adhesion to the surface will be much better. With increased fat content, simply increase the proportion of sand in the mixture.
Before mixing the solution, the coarse clay must be filled with water and allowed to soak as much as possible for 2–3 hours. This will make the mixture plastic, and over time the coating will not begin to burst.
Complex
A complex composition involves the combination of three or more components at the same time. There are several mixture options:
- lime, clay, sand;
- asbestos, clay, sand;
- clay, cement, asbestos, sand;
- fiberglass, sand, gypsum, lime, clay.
The basis throughout is heat-resistant clay.
It is important to maintain the correct proportions of the mixture and mix to the desired consistency, otherwise the solution will become too hard and may crack.
The composition of the purchased putty includes fireproof kaolin clay. After being fired (at a temperature of 1500 degrees), it is crushed to powder.
Features of the problem
Why is it recommended to plaster a brick oven? In terms of increasing the reliability of the entire structure, it is necessary to note the fact that the plastered brick is protected from the direct influence of aggressive bath factors (temperature changes, moisture, steam). The brickwork itself increases the strength and tightness of the seams. The bonding material is less susceptible to cracking. 2 important reason - improved appearance. After plastering, the stove has a smooth wall surface, which gives it neatness and makes it possible to create a specific interior.
//www.youtube.com/watch?v=kXcpeiwD3dw
Brick oven plaster has its own specific characteristics. First of all, this is due to the high temperature on the walls during its operation. The plastered layer must withstand the following influences: prolonged heating and open flame, temperature changes, mechanical influences, smoke and steam, oil splashes during cooking. As the oven heats up, the brickwork tends to expand significantly, and therefore the plaster solution for ovens must have increased elasticity in order to withstand such loads without cracking.
One of the functions of the stove is to heat the room. This condition dictates one more requirement for stove plaster - good thermal conductivity. If additional significant energy is required to heat this layer, then the efficiency of the entire structure will significantly decrease. In addition, when heated, the material used for plaster should not release substances harmful to the human body.
Preparing the room for plastering a brick oven
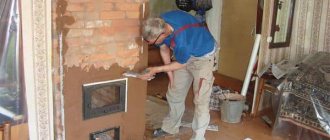
In fact, even a home craftsman who has no experience in similar work can properly plaster a brick oven. It is important to pay close attention to the process and use high-quality materials, then the stove will retain its presentable appearance for a long time.
Before plastering the stove, you need to prepare the room. To do this, you need to make room for work - all unnecessary items need to be removed from the room. Furniture should also be removed from the room if possible. If this cannot be done, then you need to cover it with a thick cloth. To protect windows, walls and floors from debris, dust and damage, these surfaces should be covered with polyethylene.
Warp finishing
Sometimes old age, damage or unscrupulous work of builders can cause distortions in the walls of the stove. You can fix this this way:
- focusing on the building level, set up beacons for alignment;
- heat the stove so that it is warm;
- moisten the slanting wall with a roller or brush;
- the surface is primed and left to dry;
- the first layer of plaster is applied using the “spray” method so that the mixture covers all the seams;
- after the first layer has dried, apply the second - it should protrude about 1 cm above the beacons. Start work from the bottom, leveling the rule every half meter of the layer;
- the wet solution is polished with grout;
- To level the corners, use a special corner spatula.
Application of mesh
The use of this mesh in cladding allows not only to level and hide surface defects, but also makes the plaster coating more uniform and durable. To plaster the stove, you need:
- install the mesh near the work surface at a distance of no more than 2.5 cm;
- “spray” apply the plaster and wait for it to harden;
- cover everything with the next leveling layer;
- rub out;
- decorate.
Light plaster
The need for such work usually arises if the stove has no obvious defects or distortions, but needs cosmetic repairs. Plaster it like this:
- guide elements are fixed on a previously prepared surface so that the coating is uniform;
- apply the solution from bottom to top with a wide spatula, which is immediately leveled using the rule;
- the corners of the structure are plastered with an angle spatula;
- the result is neatly erased.
Application
The main elements of buildings/structures that are currently being processed/coated with various types/types of fire-retardant plasters are metal structures.
This is due to the fact that it is very attractive for architects/designers, as well as builders, to construct frames, floor trusses/coverings of buildings, various structures from hangars to stadiums using curtain wall panels. This is due to the short construction time, cost reduction compared to the construction of buildings made of reinforced concrete structures, but this in no way eliminates the issue of the need to ensure the fire resistance of buildings; which is achieved by using OS both when protecting load-bearing elements and when installing fire partitions.
Fire retardant plaster for metal structures comes in various types/types. The requirements for them are set out in the following documents: SP 2.13130.2012, NPB 236-97, GOST R 53295-2009.
Fire protection of wooden building structures, very popular back in Soviet times, is now a thing of the past. This is due to the fact that such a coating on wood is short-lived due to poor adhesion, warping, cracking of the protective layer of plaster when humidity/temperature changes; as well as the emergence of more effective materials, processing/application methods - impregnating compositions, structural fire protection with layers of plasterboard over a metal frame using non-combustible filling. For example, fire-retardant basalt material.
Even fire protection standards for wood: NPB 251-98, GOST R 53292-2009 do not consider plaster as a protective composition. In practice, this is usually protection with plasterboard and/or surface impregnation of load-bearing wooden structures, for example, rafters, roof sheathing, attic floor structures.
Another material, or rather, a group of insulation materials for thermal protection of external walls of buildings is extruded polystyrene foam, expanded polystyrene foam, penoplex, which differ little in terms of flammability; because when exposed to fire, they easily depolymerize, melt, flowing down the wall, even if, through the efforts of the manufacturers, they are assigned category G1 or the proud name “fire-resistant”.
Although the use of plaster mortars has the main goal of protecting the multi-layer “pie” of the external walls of modern buildings of “economical” construction from atmospheric influences; but at the same time, a fire-retardant function is also performed, which prevents the flammable insulation from igniting, even if the fire, intense thermal effects cannot be dealt with by the fire-prevention gap between the buildings.
Reinforced concrete. Manufacturers of fire-retardant plasters and other similar coatings mainly write a lot about the fire protection of this monumental, absolutely non-combustible material, most of the finished products from which meet the requirements of all fire safety standards/rules, referring to SP 28.13330.2012, which talks about the protection of building structures from corrosion. In practice, designers, builders and fire department specialists do not have the problem of using fire protection for reinforced concrete elements of buildings very often if they are of small cross-section and mass.
How to protect materials, watch the video
About materials and tools
You need to learn how to plaster a brick stove and prepare all the necessary tools and materials in advance. You will need a set of tools, including:
- trowel or trowel;
- grater;
- hammer;
- chisel or spatula;
- wire cutters and pliers (they can be replaced with pliers);
- sprayer - it is needed to wet the surface with water (if you don’t have it, a paint brush will do);
- metal scissors and fabric scissors;
- coarse sieve - for sifting sand and / or clay;
- container for solution and separate for water;
- scoop for the plaster mixture (or its components);
- broom or vacuum cleaner.
The list of materials for plastering the stove includes the mortar itself for plastering the stove, a reinforcing mesh with 10 x 10 mm cells (you can get by with burlap), lime (or water-based paint), as well as a cement mortar (it will be needed to secure the wire, including case if we are talking about an old stove).
Reinforcing mesh with cells 10 x 10 mm
General rules for carrying out work
Before directly plastering the stove onto the work surface, the following work must be completed.
- The plaster must be stirred to achieve a homogeneous mass and the consistency of thick sour cream.
It is important to remove all contaminants from the working surface of the stove (dust, remnants of the previous plaster that were used when laying the stove). To improve the “grip of the mortar”, you need to clear the masonry seams to a depth of about fifty millimeters
Before application, it is important to heat the oven a little in order to achieve 20–25 degrees of heat; On warm walls, the plaster will lie more evenly, and an excellent level of quality will be achieved.
After all the preparatory procedures, you need to proceed to the main part:
- Additional surface cleaning.
- Treatment of cracks.
- Surface primer.
- Installation of reinforcing mesh.
- Plastering the stove
Plaster solutions
Today you have the opportunity to choose between buying a ready-made dry mixture for plastering the stove or preparing the solution yourself according to proven “folk” recipes. To achieve a high-quality result, it is necessary to carefully observe the ratio of dry components and water, which must be either tap water or technical water (neither lake nor river water can be used for the solution).
Depending on the purpose of the room and its humidity, the mode of its use, the planned method of exterior finishing, as well as the climate in the region, the owner must decide how to plaster his stove.
How to prepare the “correct” solution? The classic recipe includes clay and sand. If you plan to paint the stove white, then lime can be added - it must be slaked. To increase the strength of the solution, you can add crushed asbestos or fiberglass.
The composition of the mortar for plastering the stove may vary. The table shows the main popular options:
| Clay | Gypsum | Sand | Cement | Lime | Asbestos | Fiberglass | |
| ratio of parts in solution | |||||||
| 1 | 1 | — | 2 | — | — | 0,1 | — |
| 2 | 1 | — | 2 | — | 1 | 0,1 | — |
| 3 | — | 1 | 1 | — | 2 | 0,2 | — |
| 4 | 1 | — | 2 | 1 | — | 0,1 | — |
| 5 | — | 1 | 1 | — | 2 | — | 0,2 |
The sand content in the solution may vary depending on the fat content of the clay that will be used. If the fat content is high, then instead of two parts of sand, it is permissible to add three or even four.
To determine the correct ratio, you need to prepare a portion of the sample solution and apply it to the surface - a small area. If, after the solution has dried, the plastered area becomes covered with cracks, this means there is not enough sand and more needs to be added. If the solution crumbles, this indicates that there is not enough clay in its composition.
Bad solution
Covering
The last layer of plaster is necessary in order to completely level the surface of the stove. The primer needs to be moistened quite generously before applying it. The solution in this case should be used even less thick than for the first two layers. The mixture should fill absolutely all cracks and irregularities remaining on the surface. The thickness of the covering layer can be from 2 to 5 mm. It is impossible to level the stove in planes with plaster. Ultimately, the total thickness of the finishing layer should be no more than 1-1.5 cm. When laying out brick stoves for your home with your own hands, this should be kept in mind. When performing this work, you should initially try to make the walls as even as possible.
Rules for preparing the solution
In order to achieve good results, close attention must be paid to the process of preparing the solution itself. In this case, it is necessary to follow a number of simple rules not only when mixing the plaster mixture, but also when preparing the components.
Clay:
- clear away debris;
- Place in water to soak for several days;
- filter the resulting slurry through a coarse sieve.
Soaking clay
Lime (work on preparing this material is carried out only outdoors):
- pour pieces of lime into a bucket (it should only be metal) - no more than half the volume of the bucket;
- fill with water (no more than 0.6 bucket volume);
- Allow the solution to cool overnight;
- drain the solution;
- pass the lime slurry through a coarse sieve.
Sand also needs to be sifted, asbestos or fiberglass must be thoroughly crushed.
Sifting sand
To prepare a high-quality solution, you need to reproduce the following sequence of actions:
- Sifted sand is mixed into the prepared clay.
- The remaining components of the solution (for example, fiberglass) are added.
- The solution is thoroughly mixed. This can be done using a drill, a construction mixer, or a hammer drill with a special attachment.
A high-quality solution should not contain solid particles or lumps; it looks homogeneous and plastic.
Ready-made solution for plastering the stove
There are a number of nuances associated with storage and use periods, depending on what solution it was decided to use:
If gypsum was used as a base, such a solution hardens very quickly. It must be prepared in small portions, which should be immediately applied to the stove;
The prepared solution with a cement base should be used within an hour after it has been diluted with water;
The clay-based mixture can be prepared in advance. It can be stored for a long time if the container is sealed.
What do you need to consider when starting plastering and finishing?
When plastering a stove, you need to take into account some points that may affect the quality of the work performed.
You cannot apply plaster to a newly erected stove structure. A “fresh” stove should not only be well dried, but also go through the stages of shrinkage. To do this, it is used for two to three months, and only after this period can finishing work begin.
To paint a plastered surface, only water-based paints can be used. Other coloring compounds containing drying oil or organic solvents will release harmful substances and unpleasant odors into living spaces when the stove is fired.
For all plastering and decorative work on the stove, it is recommended to use natural-based materials, without any synthetic additives that are harmful to human health.
It should be noted that all the methods discussed in the article are not as easy to implement as they seem at first glance. Therefore, if you have a complete lack of experience in this work, you should not take risks and translate quite, sometimes, expensive materials. It is better to entrust these important activities to real professionals who know first-hand the secrets of masonry and subsequent finishing of the stove.
Ready mixes
Plaster can withstand high temperatures for a long time, does not crack or crumble.
The building materials market is filled with various types of fire-resistant products that allow you to plaster stoves yourself. The most popular, well-deservedly recognized, are the heat-resistant compositions “Fireproof”, “Terracotta”, “Pechnik”.
“Fireproof” mixture, available in three modifications:
- smooth plaster;
- simulated mixture;
- composition for tiled surfaces.
When using a modeled variety, it is possible to obtain a textured surface onto which any pattern can be easily applied. The smooth composition is ideal for painting most stoves.
“Terracotta” is another dry mixture, which includes clay and fine fireclay sand with fireproof additives. The solution is intended for treating surfaces made of ceramic and fireclay bricks and can withstand heating temperatures up to 200 ºC.
The composition called “Kilnmaker” includes lime and sand, as well as gypsum, cement, asbestos and clay.
Selecting heat-resistant paint
Heat-resistant paint can be applied both to a metal or brick surface, and to the preparatory layer of putty or plaster. The use of paint protects the surface from corrosion and helps give the equipment an aesthetic appearance. The paint for the stove must have sufficient elasticity so as not to crack when heated and cooled, there should be no changes in color, burning, or fading due to high temperatures.
Important! Paints for stoves cannot be made based on oils, which release toxic substances when heated, so mixtures are made based on acrylic, epoxy, and silicone. The consistency of the paint should be uniform and applied evenly
Sometimes spray guns and ready-made aerosols are used - in this case, the consistency of the composition is more liquid (for example, this is how heat-resistant enamel is applied)
The consistency of the paint should be uniform and applied evenly. Sometimes spray guns and ready-made aerosols are used - in this case, the consistency of the composition is more liquid (for example, this is how heat-resistant enamel is applied).
Well-known manufacturers of thermal paints, photos
- "Tikkurila". Finnish manufacturer, presents a line of paints of varying heat resistance (up to 1000 degrees).
Photo 2. A can of heat-resistant black paint. Manufacturer: Finnish.
- "Certa". Various types of heat-resistant anti-corrosion paints and varnishes are produced. Withstands heating up to 650 degrees.
Photo 3. Three cans of heat-resistant enamel that can withstand heating up to 650 degrees. .
- “New-Tone” is available in cans and is suitable for processing metal parts of the stove (doors, chimney). Withstands heat up to 800 degrees.
Photo 4. Two cans of heat-resistant paint in black and gold. .
A layer of paint must be applied to a surface prepared in strict accordance with the manufacturer’s instructions; it is usually cleaned of dirt and dust and degreased. It is also recommended to preheat the oven (this will help dry the surface of the walls before painting).
Plastering a brick oven with your own hands: step-by-step instructions
Before you begin finishing work on lining the stove with plaster, you need to prepare the following materials and tools:
Plastering tools
- Medium spatula - for scooping up the solution.
- Wide spatula - for spreading the plaster over the surface.
- A hammer will be needed to reinforce the wall.
- A grater helps distribute the solution and smooth the surface.
- Chisel.
- Smoothing - allows you to bring the surface to a perfectly smooth coating.
- Brush – will help give the surface a textured pattern.
- Corner aligner.
- Metal brush for cleaning the surface.
- Construction rule.
- Construction level and plumb line.
Step 1. Preparatory work
It is recommended to carry out the work of plastering the stove no less than 2-3 weeks after the complete completion of the stove laying. It should dry well and the masonry mortar should completely harden. If you rush and start facing work ahead of time, then after 2-3 lightings of the stove cracks may appear on the decorative layer.
To apply the solution evenly, it is necessary to carefully prepare the oven wall.
- Prepare the workplace for construction work. It is advisable to cover all furniture and the floor with film, since in the process of cleaning the surface of the walls a lot of dust is generated.
Removing the old coating
- If you decide to renew the cladding on an old stove or fireplace, you must first clean the surface of the old layer. For this step, use a chisel and hammer. If you are covering the stove with plaster for the first time, you need to brush the surface well, as mortar may remain on the walls.
- After you have completely removed the top old layer of plaster, clean the surface well from dust and dirt using a wire brush and a rag.
Advice. To clean the walls, use only a dry cloth, as a wet one may leave dirty stains that will appear through the layer of plaster.
- Now we begin to deepen the seams. Using a brush and trowel, clean the dry mortar from the seams.
Deepening the seams
- If, after cleaning the surface from the old layer of cladding, you see that the wall is not level, then you will have to apply plaster in several layers. To do this, you need to stretch a metal mesh with 15*20 mm cells onto the wall. Attach the mesh to the wall using wide-brim nails, which must be inserted between the seams. The reinforcing mesh will allow the plaster to adhere well, and a thick layer of cladding will only increase heat output.
- If the corners are not straight, you can attach the steel corners with glue.
- Prime the seams with a brush.
Step 2. Preparing the mixture
You can choose any mixture for plastering the stove: ready-made store-bought or do it yourself.
To prepare the solution with your own hands, combine the required amount of dry ingredients in a bucket and only then add water. Using a construction mixer, you need to knead the solution well.
How to prepare lime mortar?
- If you use a clay-lime mortar, the lime must first be slaked.
To do this, pour lump lime into a metal bucket and fill it with water. Do all work outside. After a day, drain the cooled solution, and pass the slurry, which has settled as sediment at the bottom, through a wide sieve to remove all undissolved lumps.
Preparation of the solution
- Soak the clay in water for 4-5 days. After it turns into a paste, you need to pass it through a wide sieve to filter out all the lumps and excess debris.
- Add 0.2 parts of asbestos or fiberglass.
- Thoroughly knead the mixture with a construction mixer or a drill with an attachment. The consistency of the solution should be plastic, without lumps and resemble sour cream.
Step 3. Plaster application process
There are two ways to plaster the surface of the stove. It all depends on the condition of the walls.
First way
- If the walls are not level and a reinforcing mesh is installed on them, it is necessary to attach guide beacons that will serve as a guide for the correct application of the solution. We set the beacons to the building level and check their verticality with a plumb line.
Plastering on beacons
- Heat the stove well and wait until the fuel burns out completely.
- Apply water to the hot surface of the walls with a large brush. You can use a roller for this. This will remove any remaining dust.
- Apply the primer and wait until it sets well. If you skip this step, there will be poor adhesion between the wall and the plaster, which can lead to peeling in the future.
- Apply the first layer of plaster 5 mm thick. We apply it in sketches, as if spraying it all over the wall. The task of this stage of work is the deep penetration of the mortar into the seams between the bricks, which were previously buried.
- Let the solution dry thoroughly.
Application technique
- Now carefully apply the second layer of solution. At the same time, we make sure that it extends 9-10 mm beyond the beacons. Movements should be made from bottom to top. Immediately level the mortar using construction rules.
- Slowly move along the entire wall, applying plaster from the bottom of the wall to the top and leveling it with the rule.
- When it comes to the corners, use a corner spatula.
You can stick a metal profile on the corners
It's better to round the corners a little. Firstly, this will ensure the safety of the residents of the house, especially children. And secondly, there is less chance of the corner chipping during operation.
- Now you need to sand the surface of the wall while it is still wet and yielding.
Advice. To prevent cracks from appearing on the walls during operation of the stove, throw damp burlap over them. Once the fabric is dry, wet it again and throw it over the wall again until completely dry.
- The third layer will be decorative. For this you need to prepare a more liquid solution. If you still have a lot of ready-made solution left, add a little water to it. It will help to perfectly level the entire surface of the wall and sand it.
- The plaster is applied in a thin layer of 1 mm. If you do not plan to whitewash the stove or coat the paint, then you don’t have to apply this last layer.
Second way
This option should be used if the surface of the walls is very uneven and you had to attach a metal mesh to the stove.
Reinforcement
- In exactly the same way as in the first method, the first layer of plaster is applied using the “spray” method from top to bottom.
- In places where there are large depressions in the stove, you need to apply plaster until it goes beyond the mesh. The metal frame will add rigidity to the structure and will not allow the plaster to move out.
- After applying this first layer, you will notice that the mesh can no longer move. Now apply a second layer of plaster on top of it.
- Using a rule and a trowel, level the wall.
- We rub the seams.
Grinding
- Surface grinding.
Step 4. Decorative work
Of course, plaster itself can act as a facing material, but to make it more decorative, the stove can be decorated.
To do this, you can use elements of ceramic tiles, laying them out as an ornament, or you can whitewash a plastered wall.
Decorating a plastered stove
An excellent way to beautifully decorate a wall is to apply a design to a plastered surface. It all depends on creativity and skill.
For this part of the work you will need a brush and plastic film.
Apply a thin layer of liquid plaster.
Drawing using polyethylene
Using polyethylene rolled into a ball or a paper ball, we make a drawing in any shape, slightly pressing the shape into the layer. We are waiting for it to dry completely.
To make it easier for you to master facing the furnace using plaster, we suggest watching a training video before starting work.
How to properly plaster corners
To make the stove look neat, carefully leveling the surface of the plaster is not enough. In addition, you will need to decorate the corners beautifully. To make them as neat as possible, it is worth using leveling slats. After the solution has dried, they should simply be removed. Instead of slats, you can also take an aluminum profile designed for attaching drywall. It is fixed to the stove using mortar and plastered flush. Of course, both the slats and the profile should be set using a building level.
How to cover up cracks?
You can cover the stove with a purchased mixture or a solution you prepare yourself. Further about the features of the options.
Sand-clay mixture
Putty made of clay and sand is the most accessible and inexpensive option. Scheme for preparing the mixture:
- you need to take clay and fill it with water in a ratio of 1:3; after this you need to leave the mixture for at least a day;
- The clay should be thoroughly mixed, adding liquid from time to time; after kneading, strain with a fine-mesh sieve and tincture again (several hours);
- after the next infusion, you need to drain the water and make sure that the mass has a creamy consistency;
- you need to mix clay and sand - first in equal proportions.
Readiness is determined using an object used to mix the solution. If too much clay sticks to it, add a little sand. As a result, the ratio of components can be from 1:1 to 1:2.5. The composition can be considered ready when a small amount of the viscous component remains on the stick.
This recipe is approximate as clays can vary greatly. It is best to rely not on a stick with stuck clay, but on the result of experiments. Experienced craftsmen make grout with different compositions. After this, several different types of cakes are dried in a place free from sun and wind. Those pieces that are not cracked are dropped from a meter height. “Surviving” flatbreads demonstrate the optimal ratio of components.
Fireclay putty
Bag of fireclay clay
A slightly more expensive, but also more effective option. Fireclay clay is very heat-resistant and durable. Most often, fireclay is used for stove repairs. The material is sold by construction stores. Before sealing the structure, purchased clay is infused in water for a couple of days.
Oven adhesive
If you need the best option, use a special mixture for ovens. The solution consists of fire-resistant cement and fireclay powder. There are two main types of glue you can buy in supermarkets - viscous and hard. If you are looking for something to cover up small cracks on the stove, purchase the first type. Solid mixtures are used for plastering.
The main advantage of factory materials is the optimal ratio of components and very thorough mixing. It is impossible to achieve such quality at home. In addition, there is no need to waste time preparing grout. Another advantage of ready-made compositions is quick setting.
An alternative option is oven grout.
Factory solutions are good for everyone, except for the price. There is another opportunity to save money - use putty prepared according to the following recipe:
- the clay is broken into small lumps and infused in water for about 12 hours;
- sand is added to the mixture of water and clay, after which the components are thoroughly mixed;
- during the mixing process, crushed straw is added to the composition from time to time, which reinforces the solution;
- After the mixture becomes homogeneous, salt is added to it (about a pack).
The ratio of sand and clay is 1:4. You need about 10-15 kg of straw per bucket of clay. It is easy to see that this is a modified version of the sand-clay mixture described above.
Expert advice on repairs
The stages of finishing the stove wall are identical for any selected mass. The differences are insignificant, but they are taken into account during the plastering process.
So the composition with the introduction of gypsum will dry 2 times faster than with cement. The use of fireclay clay in bulk is well suited for laying on bricks of the same composition, since the thermal conductivity is the same.
The plastered structure must dry without using auxiliary means.
More than one master will not answer how best to finish a stove building. Each stove maker has his own secrets and components of solutions for plastering brick surfaces. You can knead a clay and sand mixture and buy a ready-made mass. It is important to correctly connect and apply the material to the walls of the heated structure.
Conclusion
Do-it-yourself plastering of the oven walls is completed. It is important to follow all the necessary tips so that the stove lasts a long time and we can enjoy warm, cozy evenings in which it warms us with its warmth.
I would especially like to draw your attention to the fact that you cannot apply plaster if we have just completed the brickwork of the stove. The oven must dry and undergo a shrinkage process. And this requires enough time, 2-3 months of regular use.
Sources
- https://strbani.ru/kak-oshtukaturit-pech/
- https://kirpichguru.ru/pechi-i-kaminy/shtukaturka-pechi-iz-kirpicha.html
- https://stroyremont.info/otdelka/chistovaya-otdelka/kak-oshtukaturit-pech.html
- https://otoplenie-expert.com/kirpichnye-pechi/kak-oshtukaturit-pech-chtoby-ne-treskalas.html
- https://StrojDvor.ru/otoplenie/kakim-rastvorom-shtukaturit-pech-chtoby-ne-treskalas/
- https://kamin-expert.ru/otopitelnaya/shtukaturka-pechi-iz-kirpicha.html
- https://samstroy.com/%D0%BF%D0%BE%D1%87%D0%B5%D0%BC%D1%83-%D0%BF%D0%BE%D1%8F%D0%B2% D0%BB%D1%8F%D1%8E%D1%82%D1%81%D1%8F-%D1%82%D1%80%D0%B5%D1%89%D0%B8%D0%BD%D1 %8B-%D0%B2-%D0%BF%D0%B5%D1%87%D0%B0%D1%85-%D0%B8-%D0%BA%D0%B0/
- https://pechnoy.guru/pechi/izgotovlenie-pechi/materialy/shtukaturka/kak-oshtukaturit-pech.html
- https://strir.ru/vnutren-otdelka/shtukaturka/pechi
[collapse]