The main purpose of the foundation is to distribute and transfer the total load of the finished structure to the ground.
To carry out construction work on problematic soils - unstable, heaving and swampy - it is recommended to equip floating foundations.
This technology for constructing a foundation is characterized by increased complexity, labor intensity, and also requires significant capital investments.
A do-it-yourself floating foundation is the best alternative to a traditional pile foundation due to its unique performance characteristics.
Advantages and disadvantages
A “floating slab” foundation is another name for a foundation built on problematic soils. The main structural element of the foundation is a reinforced concrete slab, which has a high load-bearing capacity and resistance to extreme mechanical loads.
Also, such a foundation reliably protects the finished structure from the negative effects of groundwater and low temperatures.
Advantages
A floating foundation has a number of advantages, including:
- strength, practicality and durability;
- no shrinkage;
- ability to withstand extreme loads;
- resistance to frost heaving of soil;
- A reinforced concrete slab can act as a floor base in the basement of a building;
- Great for building a bathhouse.
Flaws
The design of a floating foundation is not without significant disadvantages:
- high cost of construction work;
- the need to use specialized equipment and technology;
- labor intensity and duration of construction.
Laying depth
As already mentioned, this type of base is not buried. This allows you to significantly save on construction, but also without losing quality. The construction process itself is also simplified. In general, cost savings during work are 30-40%.
The recommended depth is 20-25 cm. But do not forget about the need to arrange a crushed stone-sand cushion; it must be at least 40 cm thick, which will ensure the stability of the created structure. But, here a lot depends on the characteristics of the chosen one; if it is shallow, then the depth is increased to 35 cm, so you will get the most optimal characteristics.
Types of floating foundations
Modern floating foundations are divided into the following types:
- slab;
- tape;
- columnar.
Slab base
Another name for a slab base is a floating slab, which is intended for the construction of buildings from heavy building materials. The disadvantage of the traditional floating slab design is the weight of the finished structure, which affects the integrity of the entire structure due to uneven heaving of the soil.
A more effective technology for arranging a slab with minimal impact of soil heaving is the use of a protective frost-resistant cushion for the foundation, as well as the arrangement of a drainage system.
The slab foundation is represented by the following types:
- Straight bowl is one of the most popular and durable bases. It allows you to equip a wear-resistant concrete base of different heights.
- An inverted bowl is a base equipped with additional strength ribs.
- A caisson slab is a foundation designed for the construction of buildings that are equipped with technical and residential premises.
Tape base
Strip foundations are designed for the construction of lightweight buildings and structures made of foam concrete, aerated concrete, brick, and wood. The arrangement of a floating grid involves placing a tape under the base on a special sand cushion.
Maximum strength of the finished structure is achieved through the use of internal stiffeners. The use of a grid allows you to strengthen the strip base in conditions of excessive soil heaving.
The base installation process is as follows:
- A film is laid on the sand cushion (thickness - 0.16 mm).
- Expanded polystyrene blocks (thickness - 35 cm) are mounted at a distance of 45 cm from each other.
- After pouring the concrete mixture, permanent formwork acts as thermal insulation for the floor base.
Columnar base
Floating pillars are recommended for use in the construction of frame, panel and wooden buildings. A floating columnar foundation is erected on rocky and sandy soils.
The construction of the pillars is carried out on a special concrete slab erected on a sand bed. To strengthen the structure, the pillars are installed in increments of 150–250 cm. This type of foundation does not have a base, so it is additionally recommended to install a fence.
Tape
Floating strip foundations are used for lightweight buildings. That is, in simple words, it is a monolithic closed structure made of reinforced concrete in the form of a strip, which is mounted on a sand and gravel cushion of small thickness. Great for areas with small horizontal differences in elevation. With its help, you can erect buildings on the following soils:
- Loam;
- Clay soil;
- Sandy soil.
The technology for constructing a strip floating foundation is quite simple, but it is for this reason that only small buildings can be built on such a foundation. First, a pit is prepared for a shallow immersion depth, and a cushion is formed on the leveled bottom. Only the pillow must have several layers, and there must be a separate layer of crushed stone.
Crushed stone is used to eliminate local subsidence of the base and is used as a shock absorber. The pillow is moistened for 3 days, while the base is pressed. After the pillow is ready, wooden formwork is performed.
Pouring this type of foundation is done using a stepwise method, especially if there are sudden changes in height.
A floating foundation must be reinforced with metal rods or mesh, and all connecting elements are welded together. In most cases, reinforcement is done on two high-rise tiers, and the lower edge should be at a height of at least 5 cm from the pillow, and the second should be at a height of 5 cm from the upper edge of the horizontal base of the foundation. The foundation must be poured over the entire area at the same time.
Advantages:
- Minimum labor force;
- No special construction knowledge or skills are needed;
- Ideal for the construction of light, small structures;
- Cheap;
- Stable on heaving soils.
Flaws:
- Not used in areas with large elevation differences;
- Cannot be used for the construction of massive concrete and brick buildings.
Foundation arrangements
To equip a floating foundation yourself, it is recommended to conduct a preliminary soil analysis and determine the groundwater level.
The construction of a foundation of this type involves the following points:
- Installation of a drainage system - ring and bottom - for effective drainage of heaving soil.
- Backfilling of the sand cushion with obligatory compaction with a vibrating plate.
- Using practical insulation – polystyrene foam boards.
- Arrangement of stiffeners to reduce the thickness of the floating slab.
- Timely installation of communications before pouring the slab.
- Installation of a reinforcing layer of rods (thickness – 10–14 mm, cell – 11 cm) to strengthen the monolithic concrete base.
Scope of application
The use of a slab foundation is considered the best option when building houses from a wide variety of materials, both light and heavy. Its installation is allowed on any type of soil, from sandy to peat. The slab will perfectly level the vertical and horizontal displacements of the earth. Such a foundation is not afraid of groundwater, which has a rather large impact on it.
Due to the high costs of concrete and metal, slab foundations are rarely used for the construction of objects with a large built-up area. Most often they are used in the construction of small buildings. It is effective to use slabs as a foundation on soils subject to excessive activity and heaving, as well as in regions with high soil moisture or high groundwater levels.
In private construction, slab foundations can be combined with buildings made of any materials. These can be frame houses, houses made of timber or SIP panels, brick or aerated concrete.
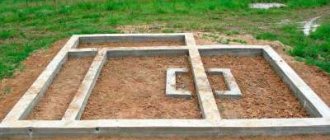
Marking and arrangement of the pit
To mark the foundation the following are used:
- cord;
- pegs;
- construction level;
- roulette;
- triangle.
At the construction site, one corner is marked along the perimeter of the future foundation. A peg is driven in. A triangle is placed on it, and along one side the length of the building is marked, and along the other - the width. Pegs are driven in at the resulting points.
Next, the axis lines are determined and the 4th peg is driven in. Correctness is checked using a triangle - the resulting diagonals are compared. If the stakes are installed correctly, the difference between the diagonals will not exceed 2.5 cm. If the sizes do not match, it is necessary to make an adjustment by moving the corners.
A cord is stretched between the driven pegs to obtain visual contours for the foundation.
After preparing the markings, you can begin arranging the pit. The size of the finished pit should exceed the size of the slab by 110 cm around the entire perimeter. This is required for arranging an insulated blind area and drainage of the base.
Important! When digging a pit, it is necessary to take into account the soil loosening coefficient. Rocky soil doubles in volume, sand triples, crushed stone and gravel quadruples.
When constructing a pit, a slight slope of the walls should be observed in a ratio of 1 to 0.25 to prevent possible soil shift.
The laying of utilities is carried out at the initial stage. In this case, water pipes are installed with a depth of 150 cm, sewerage is buried 80–100 cm below the soil freezing level.
To protect a floating foundation from soil heaving, the following methods are used:
- arrangement of drainage wells;
- waterproofing sand or gravel cushion 55 cm high;
- an insulating layer of polystyrene foam boards 15 cm thick;
- waterproofing layer made of polyethylene film.
Myths about floating slabs or how a developer can reduce the construction budget
Due to the availability of information on construction forums, private developers often receive it in abundance, trying to apply all the technologies at once in their project. A floating foundation can be built much cheaper if you really evaluate the need for specific conditions for the following operations:
- USP only - in practice, it is often enough to insulate the blind area to obtain a complete absence of freezing;
- deepening into a pit - Sazhin’s manual, TSN 50-303 standards allow for the construction of non-buried foundations on the surface (the topsoil layer with a high organic content will still have to be removed entirely);
- necessarily sand, crushed stone in the foundation cushion - any of these materials or their combination is allowed, since the drainage properties are high in any case;
- geotextiles under the underlying layer - necessary exclusively on soft soils (silt, peat, water-saturated) to increase the design resistance;
- built-in underfloor heating - water, electric or combined circuits can be laid later in the screed at the finishing stage.
All this allows you to save the construction budget without reducing the resource. If there are doubts about the advisability of using a particular technique, it is better to resolve it at the project stage. Technologies that are obviously unnecessary for specific operating conditions should be discarded.
Thus, the floating foundation is approaching the budget of MZLF and is becoming more popular among individual developers due to its maximum reliability in comparison with other housing foundations.
Advice! If you need builders to build a foundation, there is a very convenient service for selecting specialists from PROFI.RU. Just fill out the order details, the experts will respond and you can choose who to collaborate with. Each specialist in the system has a rating, reviews and examples of work, which will help with the choice. Looks like a mini tender. Placing an application is FREE and does not oblige you to anything. Works in almost all cities of Russia.
If you are a master, follow this link, register in the system and be able to accept orders.
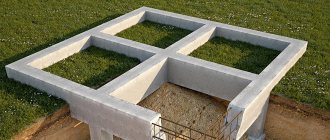
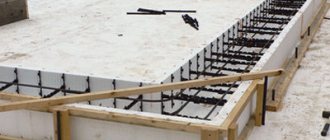
Installation of formwork and reinforcing frame
A traditional foundation that will float requires additional installation of a reinforcing frame. Foundation reinforcement is performed as follows:
- The lower level consists of 10 mm thick rods installed around the perimeter of the base.
- The upper level is installed similar to the previous one, the rods are tied using U-shaped clamps.
- Under the load-bearing walls, the rods are laid with a minimum spacing.
The upper level of the reinforcing belt is mounted on clamps to increase the strength of the finished structure.
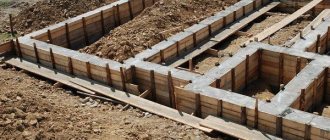
To arrange the formwork, it is recommended to use polystyrene sheets, plywood panels and boards. The height of the side of the formwork should exceed the height of the foundation by 10 cm. The panels are fixed to the walls of the pit, compacted with paper, cardboard sheets or roofing felt.
A cord is laid along the top of the formwork to control the pouring, one side of which is securely fixed to the formwork elements.
Device technology
To make a floating foundation yourself, you need to realistically assess the composition of the soil and groundwater level. The most important points of construction are:
- drainage – plantar + ring;
- sand bedding - must be compacted (no shoe marks remain) with water or a vibrating plate;
- insulation – the densest polystyrene foam available on construction markets in the region;
- stiffening ribs - allow you to reduce the thickness of the slab;
- communications - after pouring the slabs, it will become problematic to introduce them into the building; it is better to provide duplicate circuits;
- reinforcement - rods from 10 to 14 mm with a cell of 10 cm, the lower protective layer is 2 - 3 cm.
The technology is used on clay soil, peat bogs, undermined, unstable and any other problematic soils. The limitation is a slope with a 1 m height difference between opposite walls. For grates and slabs, the technologies are largely similar, although the second option is more expensive.
Marking and pit
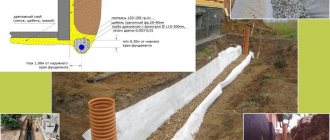
The fertile layer of soil is removed, and geotextiles are laid along the bottom of the pit.
Due to significant subsidence of the arable layer, construction on it is prohibited. To mark a floating foundation, you need four cords around the perimeter on eight castoffs. The size of the pit is 1.2 m larger than the slab on each side, since it is necessary to insulate the blind area and lay drainage around the perimeter of the slab at the level of the base.
Engineering systems in a floating foundation must be laid immediately so as not to forget about them later. Even with insulated formwork, the water supply system will have to be buried by 1 - 1.5 m, the sewerage system by 0.7 - 1 m in order to avoid freezing. Any foundation is protected from soil swelling in several ways; it is better to use everything in combination:
- drainage - wells in the corners of the cottage with perforated corrugated pipes in geotextile laid between them, having a slope for gravity flow;
- underlying layer - 40 - 60 cm of sand or crushed stone;
- insulation on the bedding - extruded XPS or PSB-S polystyrene foam 10 - 15 cm thick;
- waterproofing the sole - polyethylene film can be laid under the thermal insulation or on top of it.
A 20 cm layer of sand is laid on the geotextile and compacted with a vibrating plate.
Drainage prevents soil saturation with moisture, and swelling in nonmetallic materials (sand, crushed stone) is reduced. Thermal insulation allows you to preserve the geothermal heat of the subsoil under the building. Film waterproofing protects concrete structures from getting wet and prevents the absorption of cement laitance into sand and crushed stone when pouring the foundation.
Geotextiles are laid over a layer of sand, then crushed stone in a layer of 20 cm (compaction with a vibrating plate is mandatory). Geotextiles prevent sand and crushed stone from mixing.
If you lay the bottom layer of polystyrene foam solid and the top layer loose, the slab will have stiffeners. Insulation sheets are used as permanent formwork when pouring a lattice floating foundation. In this case, a lattice is formed inside the outer formwork using double sheets of PSB-S, and communications are provided.
Read more: How to correctly mark the foundation for a house.
Reinforcement and formwork
A concrete preparation (50-70 mm) is laid over the crushed stone layer, and waterproofing is laid on it. Then the bottom row of the slab grid is reinforced, the formwork is installed and strengthened, then the top layer of the slab is reinforced.
The classic floating foundation does not have insulation, so the project requires a slab thickness of 40 cm and reinforcement of 12 mm. By insulating the base and blind area, draining the perimeter, and replacing the soil with non-metallic material, heaving forces can be eliminated almost completely. This makes it possible to use the reinforcement scheme even on clay soil:
- lower chord – rods from 10 mm of periodic section along the perimeter of the structure;
- the upper belt is similar to the lower one, the mesh is tied with U-shaped elements at the ends;
- The grid spacing is reduced under load-bearing walls.
To provide a protective layer, gaskets are used under the lower mesh made of concrete and plastic, 2–3 cm thick. The upper armored belt is placed on special clamps (sometimes called “spiders”). The following can be used as formwork:
- polystyrene L-block – insulation of the end face of the slab, bonded with thermal insulation of the blind area;
- plywood or board panels - the height of the side is 5 - 10 cm above the design mark; polystyrene foam can be placed inside with anchors passed through it.
The minimum clear distance between meshes is 10 cm, the recommended mesh size is 10 x 10 - 30 x 30 cm. Wire binding is preferable to welded seams or polymer clamps, which usually fly off or weaken when moving concrete in the formwork.
We recommend reading: Reinforcement of a monolithic foundation slab.
Pouring and waterproofing
It is unrealistic to lay concrete in large-format formwork 20–30 cm thick in buckets. Therefore, mobile concrete mixers, mixers, and concrete pumps are used. The developer needs to realistically assess the possibilities, adjust the supply of mixers in order to maintain technological intervals between laying the mixture within 2 hours.
Ready floating foundation (slab).
If it is impossible to fill a floating foundation in one go, the partitions must be prepared in advance. In accordance with the pitch of the cells, cuts are created in them (top, bottom), into which reinforcement is passed, and the remaining cracks are foamed. After installing the jumper, it is recommended to fasten the strip along its entire length from the inside. After stripping, a groove is formed at the end of the slab into which the concrete of the next slab section will be poured, which promotes better bonding.
To ensure the maximum possible service life of all elements of the building’s load-bearing frame, it is necessary to waterproof all faces of concrete structures. The most commonly used complex insulation is:
- priming with a primer – increasing adhesion, strengthening the surface layer;
- coating with bitumen mastic - a waterproof film after drying;
- pasting with roll materials - fiberglass with a double-sided bitumen layer.
The maximum resource of combined waterproofing is 50 – 80 years. When impregnated with penetrating compounds, you can achieve an unlimited resource with a slight increase in the construction budget.
We recommend reading: Technology for pouring a monolithic slab foundation and Do-it-yourself waterproofing of a slab foundation.
Compound
The composition of the slab foundation depends entirely on the characteristics of the future building. If there are errors in the selection of material, it will be impossible to correct them after pouring. The grade of concrete is selected depending on the purpose of the building and weather conditions:
- for one-story auxiliary buildings (garage, summer house, outbuildings), concrete grade M50 can be used, subject to the subsequent installation of a screed made of stronger concrete;
- if in winter the temperature drops to -20 degrees, then it is better to use frost-resistant concrete grade F-75;
- for permanently used residential buildings, durable concrete grade M200 with increased water resistance (at least 95%) should be chosen.
If the entire volume of concrete cannot be poured in one day, then work can be continued no later than 12 hours later. Otherwise, you need to wait 1-2 weeks until the poured layer has completely dried and only then continue pouring; this will prevent the formation of cracks due to uneven drying of the concrete.
Description of layers
If we describe a slab foundation layer by layer, it looks like this (from bottom to top):
- Priming. Before laying the foundation, a pit of the required depth is dug, and its bottom is carefully leveled and compacted.
- Sand "pillow". Sand is poured onto the ground. At the same time, every 10 cm it is spilled with water and compacted.
- Geotextiles. A drainage pipe is laid on it.
- Crushed stone. Necessary to prevent soil from clogging the drainage pipe holes.
- Concrete screed. Prevents damage to waterproofing.
- Waterproofing. Its installation is necessary because concrete absorbs moisture well and cracks can form when it freezes.
- Extruded polystyrene foam, for example Penoplex. Required for additional insulation of the foundation, especially in cold climates.
- Protective layer made of polyethylene film.
- Reinforced concrete slab.