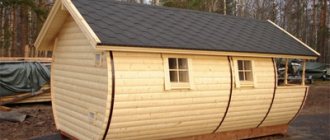
Strip foundations are often used in low-rise construction - they are easy to make, and they are universal, suitable for all types of buildings and almost all soils. Let's look at the strip foundation for a house from all sides: what it should be like according to construction science and standards, and how this theory is embodied by the hands of FORUMHOUSE users.
Design features Shallow strip foundation MZLF Fully buried strip foundation Tape: calculation algorithm How to build a strip foundation with your own hands Example: MZLF 11*14 m Example: foundation made of FBS 10x10 To help the strip builder
What is a strip foundation
Strip foundations are erected for the construction of buildings.
A strip base means a reinforced concrete closed contour of building elements that are erected under the load-bearing walls of a building.
It transfers the load from the building to the nearby soil. The structure is considered a reliable foundation, because Suitable for most types of soil.
Among its features are the following:
- The foundation resists swelling processes, which reduces the likelihood of subsidence or distortions.
- It is used in the construction of buildings with basement floors or extensive basements.
- It promotes uniform distribution of the mass of the building.
- The stone strip or strip, which represents the foundation, is made not only from reinforced concrete, but also from rubble stone, as well as brick.
- The structure is not used for construction on swampy soil.
Basic mistakes and tips for construction
Errors in assessing the quality of construction soil and the groundwater situation, as well as the behavior of the selected foundation during operation, often lead to irreparable technical and economic damage.
The foundation of the house may be squeezed out, collapsed, or spread to the sides . To avoid such problems, you should study the groundwater map of the area and make the waterproofing layer correctly.
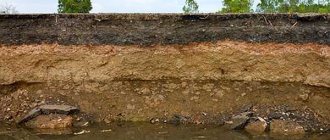
To determine the size of the foundation, it is necessary to establish the permissible load on the building soil, as well as the type and properties of the soil, by digging and probing (if such data is not available for the area).
Load table for the Russian Federation:
The foundation of a strip-type house is placed below the soil freezing level , because most soils swell at the end of winter. If this rule is violated, the foundation will most likely float in the spring.
Freezing level:
Water cannot be added to the prepared solution. Concrete will no longer absorb it, however, it will form voids, which will reduce strength and lead to deformation.
Pros and cons of strip foundations
The main advantage of this base is its long service life. Such a foundation can last up to 150 years; brick strips – 30–50 years, concrete – 50–70 years (with good insulation and waterproofing).
Long service life is an advantage of strip foundations.
Other advantages:
- Low cost (compared to a monolithic base).
- Availability of materials.
- The presence of several types of structures that allow laying a foundation in different conditions (the width of the tape, the diameter of the reinforcement, the cross-section, and the depth of the foundation change).
- Simplicity of preparatory measures, which makes the construction technology accessible for self-construction.
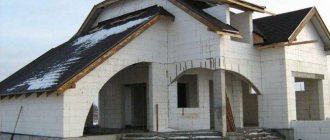
In addition, thanks to the design features, it is easier to provide high-quality thermal insulation of floors in the house.
Disadvantages of the foundation:
- not suitable for fences and light buildings (barn, bathhouse, gazebo) due to high cost (the best foundation for a fence is a columnar one);
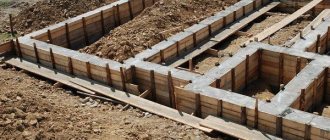
- requires a large amount of excavation work;
- undesirable for structures on waterlogged or weak-bearing soils;
- When erected independently, it does not allow you to correctly perform the concrete pouring technology.
A strip foundation requires a large amount of excavation work.
Basic requirements for LF for a private home
Events with “ribbon” are carried out taking into account existing SNIP standards. The main provisions for the construction stages of forming a foundation from reinforced concrete slabs are set out in SNiP 2.02.01-83, additional standards in GOST 13580-85. The requirements for the construction of foundations in SNiP 3.02.01-87 and the Document on load-bearing and enclosing buildings SNiP 3.03.01-87 are also important.
Basic requirements for the construction of the ribbon:
Following the technology (do not change anything in the order of work and the rules for their implementation).- Composition of building materials (they must be of high quality).
- Reinforcement procedure (a metal frame is an integral part of the base, giving it basic strength).
- Compliance with the proportions of materials from the calculation part (volumes cannot be used in larger or smaller quantities) of the foundation design.
A strip foundation for a private house must have large safety margins, since it will bear the main loads.
Types of strip foundation
The main criterion by which foundations differ is their depth. It depends on the massiveness of the building and the type of soil. The design features of the tape are also important.
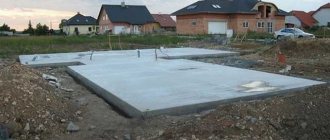
Solid cast
Another name is a poured, or monolithic, foundation. It is installed at the construction site. The concrete strip itself must be reinforced, and before its construction, wooden formwork is erected to prevent the solution from spreading.
The characteristics of a solid foundation are:
- Ease of construction.
- Reliability of the design.
- High resistance to bending loads.
The solid cast foundation has a reliable design.
Concrete pouring should be done in 1 step, because... It is important that the entire structure hardens evenly. Its disadvantage is the large mass of such a base.
Made
The foundation is constructed using ready-made reinforced concrete blocks. They are laid out on the site, fastened together with cement mortar. Reinforcement of structures is used, but this is not necessary. Prefabricated foundations are used mainly in the construction of small houses (up to 5 floors). In terms of its load-bearing qualities, it is in no way inferior to a solid cast base.
Its features:
- Simple preparatory work.
- High resistance of structures to cold, which makes it possible to construct the foundation in winter.
- The speed of its installation.
However, the foundation is not suitable for soils with organic impurities (peat, silt).
The prefabricated foundation is made of reinforced concrete blocks.
This type also includes a pile-strip foundation. To deliver blocks to the construction site, it is necessary to use lifting and loading equipment, which increases the cost of the foundation. At the same time, the materials themselves are cheap.
In addition, when connecting structures to each other, the problem of adjusting the size of different elements often arises, which slows down the process of laying the foundation.
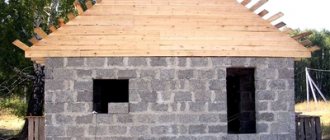
Shallow
It is used in the construction of frame houses made of timber or logs and other light buildings. The construction of the foundation takes place at minimal depths, so the foundation is suitable only for stable soils (rock, gravelly sand, coarse foundations).
During the construction process, attention is paid to:
- support factor (within 500 mm from the surface);
- arrangement of waterproofing;
- reinforcement;
- laying insulation.
Shallow foundations are used in the construction of frame houses.
High-quality installation of protective layers of the base can reduce the impact of soil heaving. A non-buried structure requires good drainage to remove water that accumulates in the sand.
A significant advantage of a shallow foundation is that it does not require heavy excavation work. However, with such a foundation there are no basements (as compensation, auxiliary buildings, extensions, etc. are often erected on the site).
Deep
It is one of the most reliable grounds, because... has the best load-bearing capacity. A monolithic concrete block is reinforced with composite or steel reinforcement and then immersed in the ground.
The depth of the foundation is determined depending on:
- groundwater level;
- bearing capacity of the soil and alternation of its layers;
- surface freezing level;
- planned height of basements.
A deep foundation is a reliable foundation.
Recessed foundations are used in the construction of multi-story buildings or for the construction of buildings made of heavy materials. Carrying out the work requires considerable material and physical costs, but it can be used on loose and other difficult soils. This type of foundation is practically not used for private construction.
Example: foundation made of FBS 10x10
For his house, a user of our portal with the nickname Zheka888 built a foundation from gas silicate blocks - a strip of FBS. The soil in his area is heaving, the freezing depth is 1-1.2 meters.
Scheme of work:
- We dug a pit 1 meter deep;
- We made a tape without a sand cushion using six bars of reinforcement No. 14. The structure is built on dense continental soil. Width 500mm, height 400mm. The sole is not rated - Zheka was criticized for this on the forum;
- We installed three rows of FBS 400mm wide (height 1800mm);
- Two layers of waterproofing were applied on the outside;
- Covered with 20 mm EPPS;
- The sinuses were filled with clay. Additionally, they compacted it with a bulldozer;
- We made an armored belt with a height of 200-250mm using four bars of reinforcement No. 16;
- We poured a lintel over the basement gate, length 2800mm;
- Covered with floor slabs.
FBS is inferior to a monolithic strip foundation due to the large number of seams, they are also cold bridges. According to the well-known saying, “water will find a hole” - you need to take a particularly responsible approach to the issue of waterproofing.
And here is a foundation similar in design, made by FORUMHOUSE user with the nickname MartynovD: reinforced sole 500x500 - three rows of FBS - armored belt 400x300-PB-74. The slab above the door lies on an armored belt, reinforced in two layers of three D12 rods, B20 concrete.
MartynovD FORUMHOUSE user
When I was building it, a lot of different people walked by. And everyone said: “Where is such a margin of safety on the sole, on the armored belt, etc.” But I did it in accordance with the project.
Features for different buildings
The arrangement of the foundation for the house and its structure depends on the type of soil and the load of the building. When constructing small-sized buildings, a shallow foundation is used (depth - 70 cm). If they are made of stone or brick, then a deep foundation is recommended.
There are other features you need to be aware of:
- In the northern regions, where winter temperatures drop below -20...-30 °C, the main attention is paid to the thermal insulation of blocks (especially if the soil is slightly heaving).
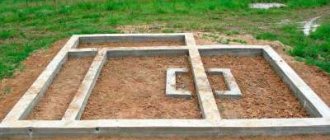
- The preferred form of foundation laying for small buildings is a trapezoid or rectangle with a labyrinth inside. In the latter case, the masonry expands downward.
- The heavier the building, the more extensive the preparatory work on the site should be.
- If they are building a country house with a basement, then they use fundamental reinforced concrete blocks. An important task is to ensure waterproofing, insulation and ventilation. Even in an area with dry soil and low rainfall, it is necessary to protect the foundation from groundwater.
- For buildings that are subject to movement (garages, gates, swings, slides, attractions), a strip base is well suited.
The arrangement of the foundation depends on the type of soil.
Choosing a concrete grade for the foundation
It is the grade of concrete that is the main one in determining the strength characteristics of a structure, directly affecting its load-bearing capacity. For pouring, a mixture from M100, with a strength equal to 7.5 MPa, to M700, corresponding to 50 MPa, can be used.
Direct calculation of concrete for a strip foundation is carried out according to the following criteria:
- structural load;
- moisture resistance requirements, directly determined by the depth of the foundation of the house;
- design and other features of the foundation itself.
Using the example of specific buildings for the construction of which different types of materials are used, it looks like this:
- concrete grades M100, M150 belong to the lowest class and are used as pouring concrete pads during the construction of prefabricated foundation structures;
- M200, M250 - used when pouring monolithic tape under wooden and frame buildings, as well as for installing a sole under FBS blocks;
- M300 and M350 are the most popular and popular brands, recommended for the construction of brick and stone houses with 2-3 floors, they are also suitable for the construction of buildings made of cellular types of concrete, although for them, in normal geological conditions and low groundwater levels, it is quite You can even use M250.
Concrete grades from M400 and higher are practically not used for foundation construction in private housing construction, due to their high cost, as well as the lack of obvious need for it.
Since concrete is a solution consisting of a binding component (cement), filler (gravel and sand) and water, the cost of a strip foundation largely depends on the brand of cement used in the production of the concrete mixture.
How to Determine Depth
Depth refers to the distance from the soil surface to the base of the foundation (at least 0.5 m).
The density of the soil matters:
- On homogeneous soils (sand with crushed stone and clay), the recommended foundation depth is 0.5 m.
- The laying level in heaving soils (loam, sandy loam, clay) is 0.7 m.
- Weak and mobile soils (quicksands, pseudoquicksands) force the construction of a foundation at a depth of up to 2.5 m.
At the same time, its level can be slightly increased when there are nearby trees growing nearby. The concrete strip is laid at a level of half the soil freezing depth (GPG, determined according to tables depending on the region).
If groundwater is located below the freezing mark, then the concrete strip can be installed at any level. In the case where the groundwater channel passes above the freezing point, the foundation is laid at the level of the GPG.
Foundation depth is the distance from the soil surface to the foundation.
Video description
What are the features of concrete driven piles?
We will talk about pile foundations in our video: Since this technology is relatively new and not all construction companies can boast that they master it perfectly, there are still cases when, some time after construction, a house sags somewhat under some piles. But foreign experience shows that such incidents occur only when the technology is not followed, and if the installation of a pile foundation is carried out according to all the rules, then it will become a reliable support for the house. In addition, piles allow the construction of buildings even on soils with a high degree of mobility.
Pile foundation in section Source rust-mint.ru
Foundation calculation
Excavation and construction are preceded by the calculation of the foundation width, depth and total area of the base.
It is defined as follows: S>k(n)*F/k(c)*R.
In this formula:
- k(n) – reliability coefficient.
- F – load from the building and everything that increases the pressure on the strip base.
- k(c) – coefficient, the value of which is taken depending on the type of soil (from 1 for wet soils to 1.4 for dry soils).
- R – soil resistance.
It is important to take other loads into account.
These include:
- snow cover;
- ceiling and ceiling area;
- the area of the internal elements of the building (stairs, railings, etc.);
- rafter system, weight of the roof and materials from which the roof is made;
- weight of material for cladding and home improvement, plinth, air and thermal insulation.
The calculation of the foundation is determined by formulas.
Approximate initial data for calculation:
- Place of construction (city, region).
- Type of area (village, urban-type settlement).
- Size of the building (in meters, along the outer edges of the foundation).
- Roof angle.
- Estimated height.
- The presence or absence of a base, materials for its construction.
- Internal and external load-bearing walls, their thickness and height.
- Type of roof.
Online strip foundation calculator
It is possible to calculate the base using an online calculator and similar programs. It is so easy to calculate the approximate cost of work, determine the volume of supplies, the amount of required materials and purchases.
An online calculator helps you make the calculation.
Step-by-step instructions for a typical construction calculator:
- Select the desired tape type.
- Specify the brand of concrete.
- Enter the values of the ribbon parameters (width, length, height, thickness).
- Specify the length of the reinforcement bar.
- Calculate metal structures (is there concrete preparation on the site, what is the cross-sectional area of the rods and their length).
- Enter the characteristics of the formwork (thickness, width and length of the board).
Based on this data, the program produces a printable drawing and detailed information regarding:
- weight and volume of concrete;
- loads on the soil from the base;
- areas of the outer lateral surface and sole;
- total weight and length of metal structures;
- pitch of transverse bars.
Based on the data, a drawing of the strip foundation is obtained.
To help the tape builder
Anyone can build a strip foundation for a house, provided all calculations are completed and all work is carried out responsibly. Our users, without much construction experience, made their monolithic strip foundations and structures from FBS, literally following the technology and strictly observing SNiPs. The materials on our portal will help you achieve a successful result.
On FORUMHOUSE you can get all the necessary theory, documents, constructs, reports, find step-by-step instructions for making a strip foundation with your own hands, study the strip design algorithm, read articles with arguments against carrying out geotechnical surveys and finally decide for yourself the main question: is it true? you need a sand cushion under the tape.
Our video talks about how to independently build a reliable foundation on problematic soils.
Subscribe to our Telegram channelExclusive posts every week
Required materials and tools
To independently build a foundation from materials you will need:
- For formwork - wood panels, bars, planed boards.
- For the frame - reinforcement and wire for tying rods.
- For the foundation cushion - sand and crushed stone.
- Foamed polystyrene (to ensure waterproofing of wooden structures).
- Materials for protecting the base are cement-polymer, bitumen or roll mixtures.
- Concrete (for mixing - crushed stone, cement and sand).
The list of tools includes a grinder for cutting reinforcement.
The list of tools includes:
- Roulette.
- Grinder (for cutting reinforcement), chainsaw or hand saw.
- Sledgehammer.
- Concrete mixer.
- Bayonet and shovel shovels.
- Axe.
- Vibrating plate.
- Hammer.
- Master OK.
- Tamper.
- Screwdriver, screws, nails.
- Metal containers for preparing concrete mixture.
Example: MZLF 11*14 m
When building a foundation, future homeowners use different materials and offer their own solutions. Let's look at a few examples of tapes made by members of our portal. The work of our user with the nickname Alexey_$ received good reviews.
Alexey_$ FORUMHOUSE user
The height was 90 cm, they were buried 60 cm, of which in the end there was 30 cm of sand cushion and 30 cm of tape underground. The width varies and is indicated in the foundation design.
The trench was dug with a tractor according to markings made with white spray paint directly on the grass. While digging, Alexey “shot the level so as not to over-dig or under-dig.”
Small errors were eliminated with a shovel. High-density waterproofing material was laid in the trench.
The foundation design provided for a 30 cm sand cushion; pouring and compaction with a vibrating plate was done every 10 cm.
Alexey_$FORUMHOUSE Member
After all the manipulations, the error in level was within a centimeter over the entire area.
Ruberoid was laid out on the pillow in two layers
and set up the formwork: longitudinal boards 150x40 mm, every 60 cm - 100*50 mm. The inside of the formwork was lined with polyethylene and reinforced with 8-diameter studs.
12 mm reinforcement was knitted in 2-4 rows depending on the thickness of the tape (400 - 650 mm). The protective layer on the bottom was 5 cm, on the other sides 3-4 cm. Every 40 cm there were vertical jumpers with 8 mm reinforcement.
Alexey_$FORUMHOUSE Member
Spliced at least 50 cm, mating, where necessary, was carried out in a run.
Pouring concrete:
The foundation was covered with polyethylene. A little more than a week passed, the inside of the formwork was dismantled and waterproofing was done.
Backfilling: 10 cm of sand along the tape, the rest is sulinka - 5 cm below the level of the upper edge of the tape.
To reduce heat loss into the ground, the voids were insulated with EPS. This is part of the complex insulation of the sub-foundation space: voids + tape outside + blind area.
Alexey_$FORUMHOUSE Member
The house will have to spend the winter without heating for a couple of years and the influence of frost heaving forces will be reduced.
How to make a strip foundation correctly: step-by-step instructions
When all the calculations have been made and the desired type of foundation has been selected, it is important to pay attention to the expected costs. In private construction, a situation often arises when a well-designed drawing has one drawback - the lack of money for its implementation.
After making the calculations, it is important to pay attention to the costs.
If work on the construction of the foundation has begun, it must be completed as soon as possible.
It is important to take into account that it will not be possible to postpone the process of pouring concrete due to a lack of material or breakdown of the necessary tool.
Preparatory work
Foundation preparation activities take up almost a third of the entire construction budget.
Before building the foundation you need:
- Clear the area of debris, branches, bushes, and trees.
- Artificially reduce or dry groundwater.
- Mark the area using rope and wedges. Draw the outer and inner boundaries of the foundation on the ground.
- Determine the unevenness on the surface, find the lowest point. The bottom of the trench must have the same depth everywhere (evenness is determined using a level).
Marking the area: how to make it level
Correctly carried out markings simplify the work of constructing the foundation for the house and guarantee its reliability.
Good site marking guarantees the reliability of the foundation.
Among the tools for marking the foundation are used:
- Metal tape measure (at least 10 m long).
- Twine, cord, fishing line.
- Wooden stakes, bars, U-shaped fittings.
- Hydraulic level.
To mark the foundation as evenly as possible, it is better to use a laser level.
This device has high accuracy (error 3–7 mm) and ease of use.
When marking, you must comply with the following requirements:
- Frequently check the lengths of the sides of the foundation.
- Establish the axis of the future building.
- Correctly set the corners of the future foundation.
- Maintain the geometry of the foundation, which is specified in the drawing.
- Determine the first angle with a plumb line. Pull a rope from it to 2 other corners located perpendicular to it.
- Stretch a rope between the corners.
It is important to maintain the geometry of the foundation according to the drawing.
Internal markings are done in the same way as external ones (the size of the indentation is from 40 to 90 cm).
Soil development
Activities include excavation work - leveling the site manually or using machinery, digging ditches and trenches, developing a pit for the foundation. By this time, all materials should have been delivered to the site, all formwork panels and reinforcement sections must have been assembled.
For shallow foundations, the trench can be dug by hand. If the construction requires the presence of a basement or basement, you cannot do without special equipment.
Experienced builders advise:
- Develop the soil for the foundation in the summer and in the first autumn months.
- Start digging from the highest angle. In this case, deepening should be done gradually, over the entire area of the trench.
- As the depth increases, strengthen the walls with side shields.
- After excavating the earth from the trench, find in advance a place where to put it.
Soil development involves digging ditches and trenches.
The bottom of the pit should only be horizontal.
Creating a sand cushion
The purpose of the pad is to replace loose soil with a strong foundation that can support the load of the building. The composition of the layer may include gravelly soil, sand-crushed stone mixture, medium or coarse sand. Its thickness depends on the weight of the building and ranges from 10 to 25 cm.
The main requirement when creating a pillow is to compact its surface tightly.
Installation process:
- Level the bottom of the pit.
- Arrange drainage from crushed stone or gravel (if groundwater is located nearby).
- Place an even layer of cushion material on top of the bottom of the pit.
- Compact the layer of sand with a vibrating plate. For efficiency, pour several layers of sand, each of which is compacted separately.
- Check the quality of the tamper. There should be no footprints left on the sand from the shoes of a person standing on it.
Creating a sand cushion is necessary to withstand the load.
Drainage system
High-quality drainage of groundwater prevents flooding of the foundation and increases its service life. In some cases, a storm drain near the foundation is sufficient, but most often it requires the installation of a full-fledged drainage network.
Step-by-step drainage installation technology:
- Strengthening the walls of the foundation and house using construction mesh.
- Treating the base walls with bitumen-based mastic or any other waterproofing substance.
- Digging a trench at least 0.5 m deep below the foundation.
- Creating a slope and cushion. Filling and compacting sand at the bottom of the trench.
- Lining its bottom and walls with technical fabric (geotextile filter).
- Laying crushed stone (1 layer – 10 cm).
- Laying out drainage pipes.
- Backfilling the trench with a 10 cm layer of crushed stone.
- Wrapping her up with geo-fabric.
- Insertion and installation of the system.
- Backfilling, compacting it with earth.
The drainage system prevents flooding of the base.
Installation of formwork
The design determines the shape of the foundation. In private housing construction, wooden structures are most often used.
To install it you need:
- Make boards from wooden blocks 25 mm thick (width equal to the sum of the base and the depth of the trench).
- Drive vertical wedges throughout the site. The step is 1 m.
- Attach the shields to the wedges (use self-tapping screws or nails).
- Strengthen the shields with crossbars and spacers.
- Make sure that the entire structure is level.
Installation of fittings
The main material is steel rods with protruding longitudinal and oblique ribs (diameter from 12 to 20 mm).
Steel rods are used to install reinforcement.
The bottom of the trench is lined with bricks. The bottom row of rods (2–3 rods) are placed at a height of 5–10 cm from the bottom of the trench. The pitch of transverse reinforcement is 0.5 m.
To make a metal mesh, you need to tie the rods together with special wire to make a square with a side of 40–50 cm. It is not recommended to weld the joints of the rods, because they are vulnerable to corrosion.
To reinforce the corners of the foundation, it is most convenient to use L-shaped rods.
Useful tips
When installing a strip foundation, you need to determine the quality of the soil in advance. It is worth paying attention to the quality of the roads that lead to the house. If they are uneven and in dips, then the soil will be uneven. It is also worth paying attention to the neighboring buildings. Are there any cracks on them?
The foundation built on heaving soils has a special structure
If the soil is homogeneous, but there are clay layers in several places, then you can dig a trench deeper and sprinkle it with sand. You can produce a strip foundation on your own if you take into account its properties and strictly follow the sequence of installation work.
The durability of the entire structure depends on the correct installation of the foundation.
Addition to the pile-tape structure
Concrete pouring stage
Concreting is carried out in one go to prevent the formation of cold seams, air cavities and delamination in the concrete mass. In addition, the cause of these negative factors may be incorrect concrete formulation, prolonged or intensive compaction of the mixture.
Which to choose
For pouring into formwork, it is advisable to choose heavy grades of concrete, the filler of which is fractions of rocks. Granule size – from 6 mm.
You should focus on one of these brands:
- M100. Suitable for 1-story houses made of aerated concrete or wood. You need to make a pillow with a layer of 100 mm, consisting of the same mixture.
- M150. Designed for light buildings made of cinder blocks, aerated concrete and similar materials.
- M200. Refers to universal brands used in the construction of 2-story houses.
- M250. It has increased frost resistance and density.
- M300. Used for pouring foundations for heavy buildings.
- M350. Characterized by a high cement content. Wear-resistant, waterproof and durable compound.
- M400, M450. Designed for watery soils. The mixture is strong, but expensive. Rarely used in private construction.
To pour the foundation, use heavy grades of concrete.
Most often, the choice of developers falls on the concrete grades M250 and M300.
How to make the mixture yourself
To prepare a concrete mixture, you need to choose the right components. Among them are cement (grades M300, M400), sand without clay, granite crushed stone (fractions of 5–40 mm) and water. Various plasticizing additives and reinforcing fibers (fiber) can be included in the solution.
To prepare concrete without a concrete mixer, you need:
- Pour all components into a large container in the required proportions. Standard - 1–4–2–0.5, where 1 is cement, 4 is granite crushed stone, 2 is sand, 0.5 is water.
- Pour in water (leaving 1/3 of it).
- Stir and check consistency. If the concrete density is too high, add the remaining water.
Algorithm of actions with a concrete mixer:
- Turn on the device.
- Fill in all the components - first water, then cement, then sand and crushed stone.
- If the concrete is very thick, add water.
You can prepare the mixture yourself without a concrete mixer.
The total mixing time is no more than 10 minutes.
Correct filling
Concrete is poured in layers 20 cm thick each. Moreover, they should be laid along the entire length of the formwork, and not in parts.
After pouring, the concrete must be leveled with a flat board or trowel. Then compact the layer manually (with a crowbar, shovel, mechanical tamper) or using a deep vibrator. Each subsequent layer of concrete is poured no earlier than the previous one is compacted.
It is important that the concrete cures in a damp environment. 1.5–2 hours after pouring, it is important to cover it with covering material or sawdust.
Curing
After pouring, the concrete needs to settle and gain strength. On average, it takes about 28 days to completely harden. However, the formwork can be removed earlier when the material reaches more than two-thirds of its design strength. How long it takes for this to happen can be determined based on the grade of concrete.
Attention: to prevent the foundation from becoming brittle due to dehydration, it should be watered every 8-10 hours for the first 3-4 days.
To reduce the rate of moisture evaporation, concrete is covered with polyethylene or tarpaulin. Also, hardening concrete should not be exposed to sudden temperature changes - this is possible in early spring and late autumn. It should be protected from mechanical and chemical damage.
What to do next
After concreting the foundation, you need to dry it by covering it with insulating material. The strip base gains strength in 26–28 days (at low temperatures, the period can increase to 4 weeks).
Removing formwork
It is recommended to dismantle the structure after the concrete has reached grade strength. Dismantling the formwork should begin from top to bottom, from the protruding parts of the foundation and corners.
Removal of formwork is done from protruding parts of the foundation.
The process goes like this:
- First, unscrew the bolts and remove the top ties.
- The lower ones are released.
- Separate the shields from the racks.
- The supports are removed.
- Remove the formwork boards.
It is undesirable to abruptly tear off all structural elements, because in this case, chips and cracks may appear in the concrete.
Insulation and waterproofing
Protection of the foundation from the effects of groundwater is carried out before pouring concrete or simultaneously with it.
For waterproofing the base, the following materials are used:
- Bitumen-polymer emulsion.
- Liquid rubber.
- Rolled pasting materials – fiberglass, fiberglass, polyester.
Roll materials are used for waterproofing.
Experienced builders do not recommend using parchment, roofing felt, roofing felt, etc. for waterproofing the base.
It is best to insulate the foundation at the stage of its construction.
The work can be divided into 4 stages:
- Preparation and cleaning of the base.
- Laying waterproofing materials.
- Insulation with polyurethane foam, foam boards or backfill method.
- Finishing.
Other popular insulation materials include expanded clay, mineral wool, penoplex and slag.
To insulate the base with bulk materials, it is necessary to dry the soil and remove dirt and sand from the surface. Slag, gravel or sand are used as backfill.