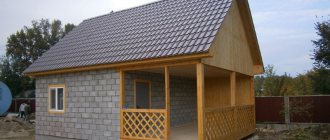
Today, many people prefer to build a bathhouse with their own hands, since this option is cheaper, and the construction of the structure is not very complicated. There are different materials from which you can make a bathhouse: rounded logs, aerated concrete and beams.
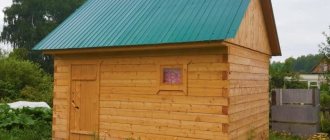
Many people choose wood because it is a natural and environmentally friendly material that creates an atmosphere of unity with nature. A sauna made of timber is an excellent alternative to a sauna made of rounded logs, since it is almost the same in appearance, but the process of its construction is much simpler and takes less time.
In addition, construction from timber is similar to the construction of a traditional Russian bathhouse, since in Rus' strong buildings were built, but without nails; when building a bathhouse with your own hands from timber, nails are also not used.
Do-it-yourself bathhouse made of timber, step-by-step construction
Do-it-yourself bathhouse made of timber, step-by-step construction
Do-it-yourself bathhouse made of timber, step-by-step construction, consider the optimal sequence of work:
- We mark the foundation and install the pile foundation
- We tie the foundation
- Assembling the frame and floors
- We make the roof
- Let the log house sit and dry
- We are finishing the bathhouse
- Installing a stove and chimney
- We additionally insulate the bathhouse if necessary
- And at the very end we finish the terrace and entrance
Let's look at all the stages in more detail and give some recommendations
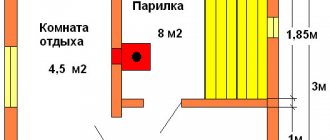
How to determine the area of the bath
At the preparation stage, the main thing that needs to be done is to decide on the area of the bathhouse. It depends on the purpose of use. If you are planning a vacation with a group of friends or family, then a small area is not enough.
A 3x3 building is a small room where only 1 person will be comfortable. Due to the small square, the entrance leads directly to the steam room. The situation is similar with the 3x4 bathhouse. But there is already room for a small dressing room. For example, for a comfortable holiday with friends you will need an area of at least 6x4. It is not difficult to calculate how much timber is needed for a 6 by 4 bathhouse. This length is standard factory blanks, so they will not need to be cut additionally.
The price for a finished building varies from company to company, and in some cases it is cheaper to order a 6x6 bathhouse, and here’s why: at the factory or in a house-building company, the wood is stored in standard pieces - usually 5.8 or 5.9 m. If you order timber for a bathhouse 3x4, these blanks are cut to the required length. The trimmings are recycled or used in the production of other products, such as window frames.
An example of a 3x3 bathhouse layout Source pinimg.com
When the company does not recycle the leftovers, they are thrown away, and the customer “pays” the costs. That is, they are obviously included in the price of the bathhouse. In this case, ordering a 6x6 building will be cheaper, since they take blanks for it without cutting, and there is no waste. The company does not incur costs, and the client does not overpay.
Marking the foundation and installing a pile foundation on your own, tying the foundation
Work begins with preparing the site - digging out the roots of large plants, removing 10-15 cm of fertile soil (a recommended step when screwing in metal piles, mandatory when laying driven or poured reinforced concrete supports) and minimal leveling of the site under the future bathhouse.
Optimal results are achieved when laying the foundation for a log bathhouse from metal screw piles with a cross-section of 108 mm or more. The supports are laid at the corners and under the load-bearing walls in increments of no more than 2.5 m, the exact number depends on the weight and number of storeys of the bathhouse, the length depends on the depth of placement of stable layers of soil (from 2 m or more).
Advice! It is best to place screw piles at a distance of about 2 meters, so that there is no sagging and vibration.
The marking of the pile foundation is carried out in 2 steps - preliminary, with marking the places where the supports are screwed in with pegs and pulling the cord to check the level (diagonally, sideways and vertically) and the main one, after digging a pit about 50 cm deep.
After this, the support is inserted into the finished hole exactly in the center and screwed in using a long crowbar or a lever made of a 2-3 meter pipe, placed on the top of the pile. The work is carried out by at least two people (one worker holds the pile in a vertical position, the other presses on the crowbar and turns the pile).
To avoid mistakes , corner piles are screwed in first (taking into account the requirement that the main axis of the support coincide with the center of the future log or timber). And only then, after re-checking the diagonal and sides, the remaining piles are screwed in, usually having the same diameter.
The piles are screwed in to the maximum stop and the support stops wobbling and sagging downwards. Separate requirements are put forward for the foundation for the furnace, which is directly dependent on its weight and design. So, under a capital masonry kiln made of brick, a separate, small slab foundation, not connected to other structures, is laid. If the weight of the unit is within 100 kg (modern wood-burning stoves, gas models), it is enough to further strengthen the ceilings in this place by adding, for example, a beam.
The installed piles are cut with a grinder along the lines previously marked with fishing line and chalk or paint. Before cutting, the evenness of the fishing line is checked using a laser level; by analogy with screw-in, markings begin with corner piles. The internal space of the piles, if necessary (namely, there is a high risk of displacement of the supports by unstable soils), is filled with sand or concrete. In other cases, the stage ends with preparing the piles for tying with timber.
Advice! Definitely fill the piles with concrete and better reinforce them with three rods.
A monolithic reinforced concrete bathhouse is rarely needed; the simplest and most practical way to prepare piles for attaching the lower crown is to weld thick (from 5 mm and above) metal plates on top with dimensions no less than the thickness of the beam. Holes for fasteners (anchor bolts or self-tapping screws) in the plates are prepared in advance.
Upon completion of welding work, the outer parts of the piles and plates are treated with bitumen mastics or anti-corrosion paints.
If there is a high risk of pile displacement, the plates can be replaced with a metal channel, but in most cases this is not necessary. Immediately before putting the bathhouse into operation, the pile foundation should be insulated with a fence made of wood and polystyrene foam or covered with special panels.
Advice! You can save on pile heads; to do this, when pouring concrete into the pile, make an embedment in the concrete from a pin, to which you can then attach the timber when tying it. Advice! Treat all welding points with an anti-corrosion compound and additionally the junction of the pile and the ground, as this is the weakest point.
Piles strapping
Insulation used for laying between the crowns
As mentioned above, flax-jute fabric is the most optimal material for providing insulation between the crowns. Now you can buy it at any construction supermarket. This insulation is available in rolls of different widths, depending on the size of the selected log or beam, which greatly simplifies the choice, and it is also very easy to cut into strips according to the selected length. This material is made from natural fibers of jute and flax, the composition is maintained in strict proportions.
During the production process, a fabric of high density and uniform thickness is obtained, in which the fibers are fastened together using special barbed needles.
By laying flax-jute fabric between the beams as insulation during the construction of walls, you will save yourself from the need for additional caulking, and after the shrinkage of the timber is completed, the walls will take the form of a solid monolith. Such a fabric will not unravel due to the loads imparted by the crowns, will provide uniform insulation along the length of the seam, and is resistant to moisture, wind and dust, temperature changes and other climatic disturbances.
Assembling the frame and floors
When carrying out the work yourself, the best solution is to order a finished bathhouse project with the delivery of sawn and numbered timber or logs. But this method is more expensive. If this is not possible, the stage begins with the preparation of lumber. If necessary, the bark is removed from the logs, the products are treated with antiseptics and fire retardants and laid to dry for 25-30 days without tightly adjoining each other. Good quality lumber that has undergone the necessary preparation is simply inspected and rejected if there is a deviation from the dimensions of more than 5 cm, the presence of large cracks or severe bending. All elements are sawn according to plan, grooves or bowls are cut out in the timber or log, taking into account the chosen technology for connecting them.
Advice! If you are assembling a bathhouse yourself from timber with natural moisture, then you can assemble it right away without waiting for the material to dry, it will dry naturally when folded in the log house. This method is cheaper because even if you unscrew the beams a little, they will not be rejected, but will already be standing in the log house. But at the same time, you need to understand that the cracks of such a log house will be larger and you will have to caulk more.
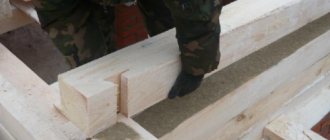
Assembling a log house
The method of connecting corners into a paw without leaving a trace is valued for its savings in material and simplicity of the external decoration of the bathhouse, but is suitable only for experienced craftsmen.
The technology of joining logs or beams into a bowl, with a protrusion of materials of 20-30 cm, is considered reliable; the baths obtained in this way retain heat well and have stable walls, but at the same time it will be more difficult to insulate your log house.
The type of cutting and the shape of the grooves are selected based on the quality of the lumber and the experience of the assembler. In particular, it is recommended to cut a bowl of profiled timber with smooth walls or a smooth rounded log using the Norwegian, Canadian or Swedish method (with cutting more complex grooves), and round timber – using the Russian method.
The last method is recognized as the simplest and is successfully implemented by beginners. During Russian felling, a straight semicircular groove is cut in the stacked logs using a grinder, an ax and a chisel (angles other than 90° are only available to professionals). The direction of the bowl can be any, but log houses with recesses in the lower part of the upper elements are less susceptible to wear and weather. After choosing the method of fastening the crowns (square dowels or round dowels) and cutting the logs, assembly is carried out according to a simple algorithm:
1. 2 parallel logs are screwed sequentially to the metal plates of the pile foundation. As a rule, thicker and moisture-resistant logs or beams are laid in these areas, with the underside evenly cut and impregnated with antiseptics and pre-prepared grooves for laying floor joists on the sides. When fixing the lower crown to a metal channel or grillage tape, a 20 mm thick linden board soaked in antiseptics is laid between the elements. Bowls in the corner joints of the lower crown must be insulated with linen, jute or a combination of fabric. 2. Using the selected fasteners (beginners should use ready-made pins made of durable wood), tape inter-crown insulation, a drill and a wooden hammer, the remaining links are installed. The recommended dowel pitch is 1-1.5 m; 2 crowns are completely drilled with a drill and the third one is partially, up to half, drilled. To avoid mistakes, after laying each row, the level of the walls is checked horizontally and vertically. The walls of the bathhouse are erected at least 2.5 m (preferably higher). 3. On the first 2 links of the upper crown, matrices are placed in specially cut grooves - logs evenly hewn from below and above or an even rectangular beam with a cross-section of 100 mm or more. As a rule, they are placed across the long side of the bathhouse in increments of about 60-80 cm. The last 2 links of the upper crown are laid in the standard way - with the obligatory insulation of the corner bowl. The resulting comb is the main one for the ceiling and rafter system.
Adviсe! If you are assembling a log house from ordinary timber with natural humidity
- If possible, fasten the beam according to the dovetail pattern, but this is difficult for an untrained person to cut on their own. You can look on the Internet and talk to your builders to see if they can do this; for convenience, you will need to make a stencil and cut it out. As a last resort, if you involve a brigade, then you can make gashes in the paw.
- If you are building it yourself, you can simply lay the timber next to each other like bricks without cuts, but in this case the freezing of the corners will be more pronounced, it is necessary to additionally insulate the corners. And the main thing is not to miss the moment with the dowels, their correct location and sufficient quantity.
- It is best when building from timber with natural moisture, at the assembly stage, to plan the timber from the inside and from the outside if you do not insulate it, this will allow you to better polish your frame later.
Log bathhouse
Preparation of material
For the construction of the walls of the bathhouse, I decided to use softwood lumber.
To do this, I chose a beam 5.5 m long and with a cross-section of 100 x 150 mm. Thus, the wall of the bathhouse should have been 100 mm thick. Few?
Of course it is. But even a thickness of 150 mm would not be enough for the bathhouse to meet thermal protection standards. And since subsequent wall insulation cannot be avoided anyway, why increase the cost and labor intensity of the work? Since I worked alone, the weight of the lumber was a very important quantity for me. I really didn’t want to carry 50-kilogram “sleepers” 150 x 150 mm on myself.
After I brought all the timber for the bathhouse to the site, I had to dry it for some time, as it was very damp. To do this, it was enough to stack the lumber on spacers and close it on top. After a couple of weeks the wood was ready to be used.
Timber for a bath
To construct a log house, each beam for a bathhouse had to be antiseptic in order to prevent the further development of putrefactive bacteria and bugs. Processing the wood separately would take a very long time. I carried it out simultaneously with the installation of the bathhouse frame. While I was covering with protective impregnation the amount of lumber sufficient for the installation of two tiers, the first two or three timbers were already drying out. With them it was possible to begin the next crown of the bathhouse.
Flax-jute fabric
To seal the gaps between the crowns, I used 100 mm wide flax-jute tapes, which I simply rolled out and attached with a construction stapler. The crowns were connected to each other with nails 200 mm long. Of course, I admire the skill of the ancient carpenters who built log houses without a single nail, on wooden dowels, but I did not subject myself to such “self-sacrifice.”
Read about the best way to fasten the crowns of a log house
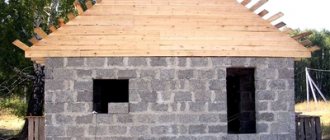
Roof installation
In its simplest design, the roof on a log bathhouse is held in place by a gable rafter system supported by ceiling beams or a mauerlat.
The functions of the latter are successfully performed by the upper crown of the log house, which can be covered, if desired, with an additional support beam.
The stability of the structure is provided by vertical supports or horizontal crossbars; all elements are connected exclusively with metal fasteners.
The rafters are made of timber with a cross-section of 50×150 or 100×150 mm and are installed in increments of 60-120 cm. The upper part of the rafters rests either on the second leg or on a ridge beam; the specific type of system is selected based on the size of the bathhouse and the presence of internal load-bearing partitions.
The gable of the bathhouse is subsequently covered with boards and insulated.
In a more complex design, the bathhouse has an attic floor, a raised rafter system, a chopped pediment or a complex roof configuration.
For obvious reasons, such projects require the involvement of specialists and are more expensive. The same applies to bathhouses with two floors and insulated attics.
In order to save money, most owners opt for the first option, covering the rafters with sheathing, roll waterproofing, counter-lattice and temporary or permanent metal roofing. Requirements that must be met at this stage include:
• Reinforced treatment of wooden elements with fire retardants. • Providing fire protection for future chimneys. • Overlap and sealing of joints of roof waterproofing materials. • Laying ventilation ducts under roofing materials, rain-protected channels for removing exhaust air from the bathhouse and vents for inspecting and ventilating the attic. • Protecting areas around pipes with special aprons, using special self-tapping screws with rubber gaskets, screwed in strictly at right angles in places where the wave deflects.
Advice! The most inexpensive and yet reliable solution would be a roof made of metal tiles or profile sheets.
Roof construction
So, now let's move on to building the roof. The simplest option is to build a gable roof, under which to organize an insulated attic with good ventilation. But, usually in a bathhouse there is always not enough extra room to organize a guest room, bedroom, billiard room or home cinema room - why waste valuable meters?
We advise you to build a broken attic roof and arrange a living space (and more than one) in it:
It is only important to insulate it correctly:
Shrinkage processes and drying, timing
Shrinkage of the log bathhouse is inevitable and is explained by:
• Shrinkage – changing the dimensions of lumber when removing internal moisture. When using pieces that have undergone chamber or long-term drying, the changes will be minimal, but baths assembled from logs of natural moisture will settle by at least 7%. • Mechanical subsidence of structures due to the dead weight of the logs and subsidence of the inter-crown insulation. This stage takes at least 6 months, including the mandatory wintering of the log house and foundation.
The opinion that a bathhouse should settle without a roof is wrong; according to the rules, the log house should be maximally loaded. Ideally, the log house is covered with a temporary roof in the first 2 years and only then with a permanent one.
The exact terms of shrinkage depend on the type, quality and fit density of the lumber; according to the standards, finishing of buildings made of laminated corrugated timber begins no earlier than after 3-4 months, lumber that has undergone special treatment - 6, round timber and lumber with natural moisture - from 1 year and more.
An exception is made (at the owner's own risk) for baths assembled in winter and finished the following summer.
During shrinkage: • The bathhouse elements are impregnated with protective compounds against cracking, fading or rotting. Once every 2 months, surfaces are inspected and, if necessary, the protection is updated. • The level and condition of the main structures are checked at least once a month, beams and ceilings - once every 2 months. • The condition of the interventional insulation is checked and measures are taken to prevent birds from pulling it out.
Permissible work during shrinkage includes only the laying of communications not related to the main vertical structures, the arrangement of floors and ceilings. All other actions for interior and exterior finishing are carried out after the completion of the primary shrinkage processes.
Choosing a foundation for a bath
For a bathhouse, choose a shallow strip (up to 60 cm) or pile foundation.
Wooden material must be protected from high humidity, so the foundation base must be at least 50 cm.
The site of the proposed development is leveled, the fertile layer of soil is removed and transferred, stones are removed, bushes and stumps are uprooted. Using pegs and strong thread, mark the perimeter of the base and the width of the trench.
- A trench is dug under the strip foundation, the depth of which depends on the type of soil, the level of freezing in winter, and the height of groundwater.
- On loose, sandy, clayey soil, the depth of the lower part of the tape should be at least 60 cm; for strong, stable soil, 40-50 cm is allowed.
- We add a 50 cm base, a cushion of gravel and sand, and we get a minimum pouring height of the concrete base of 1.0 m - 1.20 m.
- To fill the base, it is necessary to install removable formwork. It is prepared from scraps of boards, remnants of old wooden products, and durable plywood.
- To strengthen the base, in order to avoid distortion of the structure and subsidence of the soil inward, an armored belt with at least two weave threads is installed.
Pile or columnar foundations are laid on quicksand, swampy areas, in flooded areas, on the banks of reservoirs and rivers. For construction, industrial concrete piles are used or they are made of brick, rubble stone, concrete blocks measuring 20x30x60 cm.
To install them, they dig a hole to the depth of the foundation, fill it with a bed of sand and gravel, set up piles or lay out pillars, and concrete it with cement mortar.
Important! The top of the foundation is covered with a layer of waterproofing. To do this, apply a layer of bitumen mastic to the surface and cover it with one or two layers of roofing felt.
Finishing the bath after shrinkage
The sequence of finishing the bathhouse may vary depending on weather conditions and the method of installation of communications (open or closed). Let's consider the optimal sequence of performing such work.
Window and door frame
To protect the openings from distortion during assembly, constrictions are placed in them, which are removed only during the mandatory installation of casing boxes. The latter are wooden platbands installed inside the opening with a compensation gap of at least 1/20 of the height of the walls (from 3 to 8 cm), subsequently insulated with non-flammable mineral wool or inter-crown sealant.
The bottom board is installed first, then one side and top, and only then the second side. The framing of doorways is carried out in a similar way, with the simultaneous installation of the frame.
Subfloors and ceilings and hidden communications in them, electrical, plumbing, ventilation
Optimal air exchange and comfort in the bathhouse is achieved by laying ventilated and, if possible, insulated floors along the joists. Simultaneously with these actions, ventilation ducts, pipes for water supply and drainage, and other communications are laid in the floors.
When installing floors in a future washing or shower room, a 10° drain slope is provided in advance and an insulated dry drain is installed. The laying of vertical communications is carried out exclusively after the completion of primary shrinkage in compliance with all sanitary and fire safety requirements. In particular:
• Electrical wiring in the bathhouse is installed only with cable protection with PVF corrugation, special channels or non-flammable pipes. • In the steam room and high-temperature areas, use a cable with heat-resistant insulation. • An RCD with a trip current of no higher than 30 mA (preferably less) must be included in the circuit. • The protection class of switches and lamps is selected taking into account the humidity of the areas with a minimum of IP44. • In the premises of the bathhouse there are vents for a quick flow of fresh air. When planning its intensive use, the ventilation system is forced.
Sanding, initial caulking and painting
Sanding of the log house is carried out after removing moisture from the wood using grinders with wall attachments with different, gradually decreasing grain sizes (ends and walls) and chisels (corners and problem areas).
The tool is directed along the crown; the requirements for surface smoothness depend on the chosen finishing method. The lumber covered with clapboard simply protects against bark and darkening, and the painted walls are brought to perfect condition.
After complete external and internal grinding of the frame, completion of the initial shrinkage, dust removal and impregnation of the wood with primers, paints or oils, the crowns are caulked with tow (a budget-friendly but labor-intensive solution) or jute fiber.
Inserting windows
If possible, wooden frames made of linden are installed in a bathhouse made of logs or timber. Fastening is carried out to the frame through the frame using through dowels, anchors or blocks. Absolutely all sauna windows, including steam room windows, must have handles for opening; the requirements for quality and anti-corrosion protection of fittings are high.
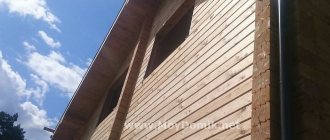
Finishing the steam room, sink and rooms
For arranging a steam room and relaxation areas, wooden lining made of linden or coniferous trees is recognized as the optimal material; whenever possible, the sink is lined with ceramic tiles.
The technology for installing tiles on walls or floors involves laying a base made of VGKL, DSP or other slab materials that is stable and not connected to the walls made of timber. Whenever possible, steam room structures (the ceiling is a must) are insulated from hot vapors with non-flammable materials (mineral wool with a foil side, special membranes, lavsan with an aluminum backing) and only then are they lined with wood. Advice! Simply sand the timber and paint it with a moisture-resistant compound.
Furnace installation
The main guidelines are the manufacturers' recommendations; the type of foundation and the distance to other structures is checked by calculation. The base is protected by a layer of concrete, metal or asbestos sheet, the space in front of the firebox is lined with ceramics or cement. Finished metal structures with a sufficient foundation and budget are covered with fireclay. The stove chimney is usually made straight, and the appropriate roof protection is thought out in advance.
Inserting doors
Bathhouses are equipped exclusively with doors that open outward, have well-insulated panels, moisture-protected hinges and handles that do not heat up when heated. The doors to the steam room are made small, with a 14-16 cm threshold. To attach the hinges, places are selected on the post without knots and other defects; the doors at the entrance to the bathhouse are, if necessary, insulated with mineral wool or EPS.
Briefly about the main thing
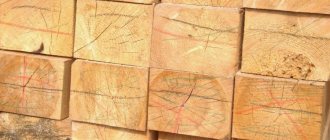
Before construction, it is necessary to choose the right timber, since at each stage factories offer several processing options. If there is a risk that the construction of the bathhouse will not begin on time, choose chamber drying. This way you can store the wood on your site for another couple of months.
To make the building warm, you need caulking - that is, insulation - or you can order wood profiling. If you want to strengthen the foundation and prevent rotting, use larch, at least as a pair of lower crowns.
To calculate how many cubes of timber are needed for a standard 3x4 or other size bathhouse, use the calculator on the website of a house-building company or the special formulas specified in the article.
Ratings 0
Builders' mistakes are typical and gross.
As Alexey Markin notes, the most common mistake when making a log house from chopped logs is the small areas of contact between log and log (small width of the inter-crown groove). The thermal characteristics of such a house will be low. The head of the Domostroy-SK enterprise, Oleg Valuev, adds that in some cases the crowns may not be adjacent to each other at all (photo 1). Huge cracks will have to be caulked regularly, which will require considerable additional costs. However, the appearance and thermal characteristics of the house cannot be radically improved.
Photo No. 2
– The log house cannot sit properly due to incorrectly placed racks.
It happens that builders build a house in such a way that it simply cannot sit down.
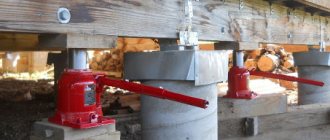
As Oleg Valuev explains, if you plan to make a veranda under the roof, then between the upper end of the post and the upper crown you need to install a special jack for shrinkage (photo 3). This will allow the log to sit evenly. Instead of a jack, you can put several planks that will need to be knocked out periodically. By the way, shrinkage jacks are clearly visible in the first illustration (Fig. 1) to ours.
Photo No. 3
– Jack for shrinkage (photo by Domostroy-SK).
Another mistake that prevents the shrinkage of a log house is an attempt to fasten adjacent crowns with nails. The log lies unevenly on the nail head, and an inter-crown gap appears. Due to a loose fit, the log may begin to “spin” during the drying process.
The problem of poor-quality waterproofing of the lower crown of a log house has somewhat lost its relevance. As a rule, the installation team performs this operation efficiently
However, the customer should pay attention to how the foundation and wooden walls are connected. If the foundation is strip or grillage, then the surface of the strip should be leveled, and between the foundation and the lower crown there should be 2-3 layers of roofing material, or a waterproofing layer of similar effectiveness
However, excess moisture can enter the wood not only through the foundation. If you lay floors and hang ceilings in a house before the frame has settled and dried, this will impede air circulation and lead to “steaming” of the house - mold or mildew may appear on the internal walls.
The head of the Domostroy-SK enterprise, Oleg Valuev, notes that in the washing room there is also no need to make baseboards on the floor. Moisture collects under them and the process of rotting also begins.
Photo No. 4
– Mold on unventilated wooden structures.
Ready-made log houses for baths
How to assemble a log bath? Making a log house yourself from scratch is a difficult job that requires refined carpentry skills, and it is better to entrust it to professionals. The highest quality processing of corner joints will be required: Russian, Norwegian or Canadian cutting can be used, but in any case the joints must be smooth and of the highest quality.
Then the log house is disassembled and the logs are delivered to the site itself. This option has several advantages:
Preparing for the construction of a bathhouse
How to assemble a bathhouse from a log house yourself? A number of works must first be completed. Construction begins with a project. If you want to order a ready-made log house, any organization can offer various options for baths.
The classic option is a rectangular structure 4x6 meters. In such a bath there will be space for a dressing room and a washing room, which will serve as a steam room. If the bathhouse has a large area, the space of the soap and steam room can be divided.
How to assemble a bathhouse from a log house with a dressing room? The layout should take into account the location of doors and windows: they are usually made small in order to maximize heat savings in the room.
The standard door height is 160 cm, width is 60-80 cm. The owner must determine the location and size of the windows in accordance with personal lighting preferences.
It is important to choose the right place for the bath. In a small area it is usually located in the opposite corner from the building to ensure compliance with fire regulations
If the size of the plot allows you to choose, the place for the bathhouse is chosen away from the gate and the house itself; it should be located so that you can relax near the bathhouse without disturbing anyone.
Single harness
Single strapping - is a crown consisting of one row of edged timber fixed to the foundation. The cuts for arranging subfloors are made in it. A waterproofing material must be laid on top of the single trim, and only after this the first finishing crown made of profiled timber is installed.
This type of binding has only one advantage. It's cheaper than double. However, this option is not always possible. For example, single piping is not recommended if the house is built on a columnar or pile-screw foundation. It also does not have the required reliability in the case where the building has a residential attic or a full second floor.
Single strapping also has significant disadvantages. They appear, for example, in the form of “walking” floors. This is when, over time, the floors in a wooden house “play”, creak, and so on when you walk on them. In addition, due to savings on piping, wooden houses often warp, cracks form in them, requiring constant sealing, and mold often forms in the lower corners.
Foundation for a wooden log house
For buildings made of wood, foundations are arranged more often than others:
- Columnar type - are divided into prefabricated ones made of: brick and FBS (foundation wall blocks) and monolithic ones made of reinforced concrete;
- Pile: screw and bored.
The monolithic tape version is also suitable for buildings, but is more expensive
Note! The unique Florence has stood on cedar stilts for several centuries.
Foundations of this type do an excellent job with the main functions assigned to them on soft soils:
- Support the mass of superstructures;
- Redistribute the load on each support, reducing pressure on the soil;
- They provide the opportunity for natural ventilation of the base, which significantly prolongs the service life of a wooden building (especially in flooded areas).
When creating a foundation of any type, it is important to strictly adhere to technology at all stages, one of which is the bottom frame made of timber.
The essence of the strapping
A pile field and a columnar foundation map represents a certain (design) number of individual structures, at a certain distance from each other. To connect them together into a single base on which the floors, walls and roof of a wooden frame can be supported, it is necessary to tie the columnar foundation with timber.
The figure demonstrates the calculation formula used to calculate the strapping parameters
What is the structure of the strapping or, as it is otherwise called, grillage? This is the creation of a rigid structure from beams connecting piles or foundation pillars. In essence, a grillage is the overlap between the pile (columnar) foundation and the building itself, which is entrusted with the responsible task of distributing the weight of the house across all foundation elements.
Double harness
Double strapping - consists of two rows of edged timber, and the first is laid flat, and the second on the edge. Performs all the same functions as the single version, but more efficiently. In the case of double piping, the floor joists are cut not into the first beam, but into the second. This solution has only one drawback - many companies install double piping only for an additional fee. In our company, double piping is the default, and we do not charge additional money for this.
Advantages of double strapping:
- increased reliability;
- more uniform distribution of the weight of the house on the foundation;
- distortions and deformations of walls are excluded;
- improving the thermal insulation characteristics of housing;
- increasing the durability of floor structures;
- the ability to build on any type of foundation;
- Home renovation is simplified.
Double piping is considered optional only in cases where the house is small and the foundation on which it is built is strip.