If you decide to raise a bathhouse for reconstruction or build a new foundation, then you should prepare for the fact that this process will take a lot of effort and time. First you need to carefully prepare for this by purchasing lifting mechanisms and all the necessary materials. In addition, you will need to follow a number of certain rules. You should also make sure that the procedure is safe, because not all buildings can be moved - there is a risk of destruction.
Ready-made bath projects
Bathhouse B-037
from RUB 1,792,640
Bathhouse B-012
from RUB 1,175,936
Bathhouse B-060
from 621,580 rub.
Bathhouse B-048
from 1,014,400 rub.
View all baths
Photo
Miniature bathhouse with dressing room
Frame-panel bathhouse with porch
Mini sauna
Small bathhouse - wild log house
Why are baths raised?
Raising a building may be necessary for a number of reasons. Other buildings may also require lifting, but most often this is needed in old bathhouses that were built without a full foundation. It is these buildings that need to be raised.
It is important to understand that in the absence of a reliable foundation, the ground will sag unevenly under the weight of the structure. This will lead to the fact that the bathhouse will begin to sink into the ground, gradually warping. Because of this, the buildings will slowly begin to rot. Why demolish the bathhouse if it is enough to simply raise it, level it, and then replace the worthless crowns. And then you can take care of a reliable foundation for the building.
Here are a few other reasons when a building will need to be lifted:
- The foundation collapsed;
- The level of groundwater or flood waters has changed, causing the building to be flooded;
- The lower crowns were destroyed;
- The building settled unevenly;
- There was a need to increase the ceiling height.
The lifting procedure may be required not only for old baths, but also for new buildings. For example, if it is necessary to correct distortions in the frame, treat the structure with antiseptic impregnations, or install waterproofing, then it is simply impossible to do without raising the structure. It also happens that the bathhouse needs to be moved due to a serious conflict with neighbors or due to the poor location of the building.
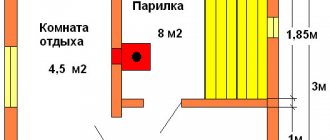
Dimensions
Sauna dimensions: length 6 m, width 2.2 m, height 2 m. Dressing room 1.5m by 2m. Recreation room 2m by 2m. Shower 1m by 1m with a metal tray. Steam room 1.5 m by 2 m with a lower and upper shelf along the long side (for a bath it is at the end).
Unkas calculated the dimensions as follows: the height of potential users is no higher than 1m 90 cm - the ceiling height is 2 m without protruding parts. The length of the shelves in the sauna is also 2 m, so taking into account the thickness of the walls, the width of the entire building is 2.2 m.
What buildings should not be raised
If you have one of the above problems and you decide to raise buildings, then first you should find out whether it is safe to do so. Sometimes it happens that it is much easier to disassemble the building and then reassemble it than to raise the bathhouse.
There are also buildings that cannot be raised:
- Structures made of aerated concrete and foam concrete;
- Buildings made of monolithic block, brick or blocks, if there are serious cracks;
- Frame baths, in which the supporting structure is built into concrete;
- If the corner locks of the building are rotten.
In addition, you should not perform the procedure of lifting a bathhouse that has two or more floors. This should especially not be done if the second floor is made of a different material than the first.
Finish line
An integral part of every sauna is the stove. It can be made independently from sheet material or a large-diameter metal pipe. In another version, it is laid out of brick, but in this case it can take up a large space. For small spaces, it is better to use electric options that are purchased ready-made.
Stove for a small bath
A shelf is installed inside the steam room. It is better not to use coniferous wood for it, because... When heated, it may release resin, causing burns. Good material for it would be aspen, larch, linden or oak. If the space is small, a width of 40 cm will be sufficient; it is more convenient when there is a footrest. The fastening material must be flush so as not to burn the skin (it must also be made of stainless material). It is better if the entire structure is assembled on dowels.
Shelves for a small bath
For wiring, you must use a double braided cable. It is better if it is non-flammable (usually the marking has the prefix “ng”). Be sure to lay the conductor in the corrugation. There are no switches installed in the steam room itself. The lamps used are waterproof with an IP68 index.
Make sure there is good ventilation. To do this, you can install an adjustable supply valve, as well as anemostats with an outlet to the gable through the roof. This will be enough to ensure that all moisture is removed after taking a steam bath.
As you can see, there are no restrictions on what you can build a small bathhouse from. Choose the option that suits you best.
Selection of jacks
To lift the bathhouse without causing any harm to it, you should use special, powerful jacks. In any case, it is important to prepare thoroughly, and only then proceed with the procedure.
It is worth understanding that not all jacks can be used for such work. It is worth refusing to use frame and rack jacks, because they cannot guarantee sufficient reliability. But screw and hydraulic jacks will be an excellent help in lifting the building. It is worth noting that a hydraulic tool can be used even if you need to lift a house with a large area.
When choosing equipment, you need to carefully check its load capacity and rod length. These characteristics can be found on the body. It is very important to choose a device with a margin of approximately 30-40% of the load you need. To find out the required lifting capacity of the jack, you need to calculate the weight of the building with the roof, trim and fixed equipment. You should multiply this result by 1.4, and then divide by the number of jacks that you are going to use during the work.
Typically, a standard bathhouse, having one floor and dimensions of 4x5 meters, will weigh no more than 5-6 tons.
The length of the rod allows you to determine the amount by which the frame can be raised.
Jacks should be load tested before using them to lift a structure. Use the devices to lift a load that weighs a lot and leave it in that state for a while. Check the working rod - it should not give any arbitrary upset.
As for the number of jacks that you will need to lift the building, this will depend on the complexity and scale of the work to be done. If the structure is light or only one part of it needs to be lifted, then only one jack with sufficient power will be sufficient. In other situations, you will need to use at least 2 devices for each wall.
- If only one jack is used during work, then it should be gradually moved around the perimeter. After slightly lifting the wall and installing a stand under this location, the device should be moved. When the lower part reaches the required level, the procedure is considered complete;
- If two jacks are used during work, this allows the wall to be lifted much more evenly, maintaining the integrity of the corner joints;
- If four jacks are used during work, this minimizes the risk of deformation of the structure.
The greatest difficulty is lifting the building onto the base if the box is large, as well as the longitudinal joining of the beams. The fact is that the joint points are the weakest points. This is where deformation can occur. If the logs are long, they may sag and bend when you lift the bathhouse. In this case, the problem can be solved with the help of additional jacks.
Ventilation device
Comfort when staying in a mini-bath will be ensured only if the owner takes care of creating a competent ventilation system. Without it, you will have to constantly smell an unpleasant odor. To get rid of it, you will have to make a lot of effort. The installation of an effective air exchange system will ensure maximum effect from taking paired procedures.
During the construction of a compact object, care must be taken to create a small glazed window. It is optimal to place it opposite the front door. You can also create a hole in the wall instead, which should be equipped with a damper. If there is no shortage of funds, then you can purchase an exhaust or supply opening of the required dimensions.
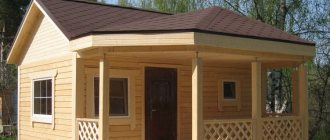
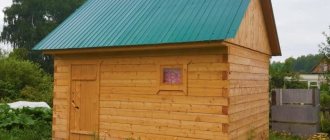
Building a mini-bath with your own hands on a country plot, the area of which is limited, is a good solution. Also, such a facility is suitable if there is a great desire to take paired procedures, but there is no money for the construction of a large facility.
A mini-steam room can be built with minimal time and money. Any gardener can easily cope with this task, even without serious skills in construction. The operations performed during the construction of the facility are simple, so it is enough to spend a little time to get a mini-bath on the site. It will not only provide an opportunity for bathing procedures, but will also decorate the area.
Preparing the bath for lifting
The first step is to remove all lifting items from the house. If it is necessary to replace the floor, then the covering should be dismantled before the procedure of raising the building.
And then you need to complete several steps
- Door and window openings should be cleared. You need to remove the frames and door panels. To prevent the openings from warping during lifting, they should be strengthened with spacers
- Next you need to strengthen the cladding. If there is internal and external decorative wall cladding, then the bars should be fixed diagonally. This will help maintain the integrity of the casing.
- It is necessary to disassemble the chimney assembly through the ceilings and roof. This should be done if the oven is installed on a separate base and cannot be lifted with the frame.
- Now you should dismantle the lower part of the outer cladding of the walls and the base. If the building has rotten crowns, they will need to be replaced.
- The last stage is to remove the soil around the perimeter of the foundation. This is an important step to determine the condition of the foundation. Knowing the scale of the problem, you can understand exactly what materials will be needed for the job.
What can you really lift with your own hands?
Each building that has stood on the ground for 10-20 years acquires its own strictly individual characteristics and features, which can significantly affect how to raise a bathhouse onto the foundation with your own hands.
You cannot even attempt to raise the following categories of buildings:
- Houses and baths made of gas foam concrete;
- Frame buildings, the wooden base of which is concreted into the foundation;
- Bathhouses made of logs or timber, the walls of which have destroyed crowns, rotten corner locks, and no ceiling beams;
- Brick and concrete buildings with deep cracks in the walls.
All other bathhouse options, even if there is a strong tilt, the box is askew and one edge has grown into the ground, can be lifted. If the box has retained at least 40% of the initial rigidity, there will be no problems. All this can be raised, the bathhouse can be moved, or even moved to a more reliable foundation.
Advice! Particular attention must be paid to furnace equipment.
If the bathhouse used a brick stove on a separate foundation, then before raising the bathhouse onto a columnar foundation, you will need to disassemble the passage through the ceiling and roof.
If you plan to change the height of the lower crown of the building above the ground, for example, to raise it like a bathhouse on jacks, then in 9 out of 10 cases you have to disassemble and completely rearrange the stove box.
Preparation of thrust pads
It is possible to raise the building evenly only if there is a reliable and level foundation under the jacks. If the ground sags under load, then because of this it will not be possible to make the same movements. If the device is installed at an angle, the structure may move to the side.
The tool stem must rest against strong material. If the device rests on the ground, then several preparatory steps will need to be completed.
- Groundwater should be drained using drainage channels.
- You need to mark the reference points where you will dig. It is worth noting that there must be at least 4 such points. If necessary, more support platforms can be made.
- It is very important to compact the bottom of the holes well. After this, you can make a platform using reliable and strong material.
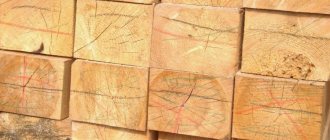
- All rotten crowns should be cut out so that there is support for strong logs that are not damaged.
Video description
This video shows how to prepare sites for installing jacks in an existing strip foundation:
But much more often, lifting mechanisms rest on the ground under the walls. To create a solid foundation, some preparatory work is performed.
- Drainage of groundwater using drainage ditches around the perimeter of the building - this is sometimes necessary in wetlands and clayey soils supersaturated with water.
- Marking reference points, in place of which holes are dug to remove the loose top layer of soil.
On a note! The minimum number of such points is 4 - two under each long wall with a distance from the corners of no more than half a meter. If the walls are long or made of joined logs, additional intermediate support platforms are installed.
- Compacting the bottom of the pits and constructing a platform on it from thick scraps of boards, flat stones, metal plates or other durable material.
- Sawing out areas of rotted crowns to ensure support for intact logs.
Preparation of tools and materials
When you remove the siding and expose the foundation, you will be able to understand how much work awaits you in the future. This way, you can prepare in advance all the necessary tools and materials that you will need. Be sure to take a laser or water level, as well as a plumb line. In addition, you will need materials to make temporary supports. The role of supports can be boards, beams, bricks or other reliable and durable materials.
If you need to pour a new foundation or move a log house, then you should stock up on long, reliable steel beams or channels. The logs or beams that you will use to replace the lower crowns must first be prepared by cutting them to the required length. In addition, do not forget to treat the wood with an antiseptic.
You should prepare in advance all the materials and tools that you may need during work. The less time the structure is in an elevated state, the better.
Construction options
Types of buildings:
- frame building;
- plank construction;
- barrel bath.
Frame
Tools and consumables needed to build a steam room:
- Rafter beams, slats, beams, lining.
- Roofing material.
- Insulation. You can use mineral wool for the relaxation room, and foam glass for the steam room with washing area.
- Vapor barrier film.
- Impregnations for wood.
- Shovels, cement, crushed stone, sand.
- Hand drill (for columnar foundation).
- Metal piles (for pile foundation).
- Jigsaw, miter saw.
- Hand hacksaw for wood.
- Set of chisels.
- Screwdriver, drill.
- Hammer, mallet.
- Fastening elements.
- Metal corners.
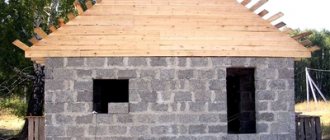
Construction:
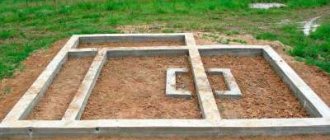
Drawing up a construction project. On the drawing you need to indicate the area of the rooms, the general dimensions of the building, the location of the stove, windows, doors, shelves. Preparing the site for construction. It is necessary to mark the boundaries of the building with pegs with a stretched thread, and remove all debris from the designated area. Construction of the foundation. Since the structure will have a small mass, a pile or columnar foundation is suitable. Assembling the binding crown. A timber with a section of 150x150 is suitable for it. It is recommended to soak the lumber in advance with used motor oil. In the corners, individual elements are connected using a half-beam system. Additionally, they need to be secured from the inside with metal corners. Assembling a frame from beams used for the rafter system
It is important that the material is dried in advance. For additional stability, they are secured with spacers diagonally. Connecting individual racks into a solid frame using the top strap. Assembling the rafter system
It is better to assemble a gable roof. Stuffing of batten sheathing. Fastening the vapor barrier film. Stuffing slats to form a counter-batten. Next, you can fasten the roofing material. Wall cladding with OSB boards. Formation of a “pie” from a layer of insulation, vapor barrier film. Installation of windows and doors. Wall covering with clapboard.
It is important to use wood paneling with the lowest thermal conductivity
Plank construction
The outside walls are covered with unedged boards. The finishing technology is the same as for the construction of a frame building. For compact structures, you can choose a pitched roof.
Buildings sheathed with boards have high heat loss. To level out this drawback, you need to use high-quality insulation materials and stuff the boards overlapping each other.
For the exterior cladding of a building, it is better to use aspen boards. This type of wood has a low thermal conductivity and retains heat inside better.
Barrel sauna
When building a bathhouse, a rectangular frame is first assembled, and semicircular arcs are formed for each of the partitions. Tongue boards are placed on top of the frame.
If you do not have the skills to work with hand and power tools, it is difficult to build a barrel sauna yourself. If there are no financial problems, you can purchase a ready-made barrel sauna. Manufacturers completely complete the mobile structure. The owner of the site will only have to prepare the foundation, install a barrel sauna, connect a water hose, and power supply (if the stove is electric).
Buy a ready-made mini-bath from a certain manufacturer or assemble it yourself using frame technology - the choice is only for the owner of the site
It is important to take into account the fact that purchased structures are standard and may not correspond to the personal wishes of the owner of the site regarding the internal arrangement of rooms, shelves, stove
Lifting rules
When lifting a building, you should know the weight and dimensions of the structure. Of course, you can use one jack, but the procedure will then take a very long time. But 2 or 4 jacks will seriously speed up the process. Do not forget that the walls must be securely fixed when the jacks are removed.
The lifting procedure is performed in several stages:
- Devices should be placed at support points. Support areas should be prepared in advance.
- Next, a rise of about 3-4 centimeters is performed. First you need to raise one wall, then put strong and reliable supports under the wall.
- Supports made of boards, logs or other reliable, strong material should be installed between the devices at an angle.
- Now we need to move the jacks. The load of the wall is transferred to pre-prepared supports. In the meantime, the devices need to be moved to the opposite wall. All previous steps are completed.
- Once the supports are installed, the devices can be removed. Next, the walls are raised to the required height. You can raise two walls or all four in this way.
What is the best way to sheathe the frame?
In Russian baths they often use a wooden frame.
For high-quality exterior finishing, you need to make the correct sheathing and secure the insulation.
The lathing takes on the functions of ventilation. The gaps will prevent moisture from accumulating on the surface of the timber and insulation. Ventilation gaps provide good air exchange, where there is no room for dampness or fungus.
Fastening is carried out vertically. To insulate the walls of a bathhouse, not all types of thermal insulation can be used.
It is prohibited to use flammable cheap polystyrene foam or polystyrene foam.
Expanded clay and ecowool are not suitable due to the fact that they quickly become saturated with moisture and lose their working properties.
The best insulation options:
- basalt wool;
- kaolin wool;
- vermiculite
Photo: wall construction of a frame bath.
The outside of the frame structure can be finished:
- siding;
- decorative plaster;
- edged board;
- half beam;
- clapboard;
- croaker;
- tiles;
- block house;
- plastic panels.
The cladding with a block house that imitates a log looks beautiful.
You should not use natural stone or brick for external cladding. Otherwise, the frame building will lose an important property - thermal inertia.
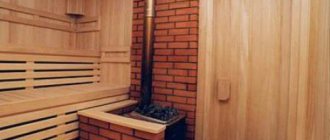
For interior work, lining is considered a universal ceiling and wall material. It is convenient for her to sheathe the steam room and dressing room. The lining does not heat up and is easy to install. To decorate the shower, choose ceramic tiles or moisture-resistant wood.
It is forbidden to paint or varnish the finish in the steam room, otherwise when heated it will begin to release toxic substances that are harmful to health.
It is allowed to use moisture-resistant plasterboard for covering the walls in the locker room. OSB and MDF boards are suitable for the same purposes.
Attention is paid to areas of walls, floors and ceilings near the sauna stove. They are laid out with tiles, facing bricks, and sheathed with steel or iron sheets.
The procedure for internal lining of the bathhouse is given in more detail in the section below.
Replacing the lower crowns
To replace the crown, you should free one wall of the building from its supports by hanging it on a longitudinal beam. As for the remaining walls, the supports should remain there.
This way you get the opportunity to remove the crown. The crown, which is located above, must be cleaned and then treated with an antiseptic. Next, you should install a new crown through a felt pad or tow. It needs to be pressed to the upper crown using jacks. It is then secured with metal ties.
Repairing the floor
When inspecting the floor, we pay attention to the condition of the beams, lower crown, joists and boards. If an unpleasant odor emanates from the underground, then the wood has begun to rot, although a visual inspection does not reveal any damage.
You can use an awl to check the integrity of the logs; they can be easily pierced if the tree has rotted at the core. Joists quickly begin to rot if waterproofing has not been installed.
Scheme for repairing damaged areas of the floor in the bathhouse
The process of rotting logs is especially dangerous for bathhouses made of logs and frame houses, since the damage can spread to the walls. If there is no need to completely change the coating, you can make partial repairs. Damaged areas are cut out, and new ones are installed in their place. The logs are fastened using aluminum plates and self-tapping screws. Then nail and mount new boards and the floor is completely dismantled and leveled with a plane.
If rot has damaged the beams, subfloor, joists and crowns, then you will have to replace it all:
- the floor is completely dismantled;
- logs and beams are removed;
- the two lower crowns are cut out in parts and replaced with a new beam;
- install new beams onto which to attach the logs;
- install flooring from new boards - subfloor;
- waterproofing and insulation are installed: 15 cm polystyrene foam for the dressing room, polystyrene foam for the washing compartment.
Construction or repair of the foundation
It is best to pour the foundation under an overhanging building if you use the claw method. To do this, you will need to place formwork between the supports. A reinforcement cage should be placed in this formwork. The ends of the reinforcement must extend outward.
In addition, you need to wrap the lower crown with roofing material. When the formwork is filled with concrete, the surface must be leveled.
When the concrete finally hardens and gains strength, you can remove the supports. And then a frame is installed there, which needs to be connected to the rods. Then you need to pour the concrete again.
The building should be lowered onto a new foundation only after about 2-3 weeks have passed. The procedure is the same as when lifting the bath, but is, of course, done in reverse order. One should not forget to be careful during this procedure.
You can raise the building yourself without the need to carry out dismantling work. Powerful, high-quality jacks should be used for this procedure. The building must be raised gradually, slowly. The jacks are moved to support points so that the box does not warp. In order for the bathhouse lifting procedure to be successful, the building must be cleared of removable structures in advance. In addition, you need to carefully strengthen it with spacers, as well as diagonal overlays.
The procedure for installing a clay base
Preparatory work for arranging the base must begin with markings. Once the measurements have been taken and the boundaries of the base have been marked, you should begin arranging it. Such activities are carried out in the following order:
- The first step is to dig a pit. Its depth varies from 20 to 40 centimeters. The bottom of the pit must be level, so when carrying out work you need to use measuring instruments.
- Next you need to make the formwork. For these purposes, you can use boards with a thickness of 25 to 50 millimeters (used, but in good condition).
- The next stage of foundation installation is filling the pit with clay. She needs to stock up for future use, as a layer of at least 30 centimeters is needed. Filling the pit with clay should be done in stages - approximately 10 centimeters per day. It must be compacted thoroughly. For these purposes, you can use a special device or an ordinary hewn log.
- Immediately before installation of the above-ground part of the building, it is necessary to carry out waterproofing measures. Roofing felt and expanded clay are best suited for these purposes. You can use special waterproofing materials, but their cost is much higher.
The construction of a bathhouse without a foundation is beneficial (from an economic point of view) in places where clay is freely available. Otherwise, installation without a foundation can be much more expensive. In such a situation, it is better to initially place the building on a foundation.
Roof
There are three types of roof for a bathhouse:
- Single-pitch.
- Gable.
- Complex - consisting of four or more slopes.
Usually the first two options are used for a bath. Let's look at the option of a gable roof covered with metal tiles:
The manufacture of the roof begins with the installation of the Mauerlat. In the case of frame walls, the role of the Mauerlat is performed by the upper outline.
- Place the uprights on the bench.
- Connect the posts using purlins and ties.
- Install the rafter legs by attaching them to the mauerlat, purlin and connecting the upper ends together. The distance between the rafters should be 50-60 centimeters.
- Install sheets of metal tiles.
- Cover the gables with wooden slats or sheet metal.
For a more visual understanding of the roof fastening, here is a drawing:
All dimensions of roof elements are given in the list:
Please note that the less you slope the roof, the more snow load it will bear in winter. Also, a small roof slope can lead to poor water drainage and leaks.