Despite the fact that in some articles on our website we also touch on the question of how the lining in a bathhouse is attached, the reader sometimes needs to quickly get an answer to a practical question, so we decided to include various options for attaching lining in a bathhouse in a separate material. Let's look at the types and methods one by one, and finally we'll arrange a vote in which anyone who has personal experience with this lumber can take part, and this way the majority opinion will be seen.
Classification of lining
The industry produces a wide range of linings. The products of wood processing plants differ in several respects.
Depending on the production technology:
- Classical;
- European.
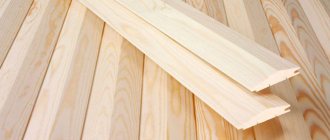
The profile of the classic lining has a trapezoidal shape. The edges of the panel are beveled at an angle of 30°. The surface of the board is flat and smooth. For sale it is produced without treatment with protective compounds.
Eurolining is manufactured according to Western European standards. It is distinguished by the presence of special grooves along the entire length of the back side. The recesses are designed for ventilation of the panels during operation. It has increased dimensions and shape of the profile elements. The surface is pre-treated to protect against high humidity.
By type of material used:
- Metal;
- Plastic;
- Wooden.
Products made of plastic and metal are used for cladding outside and inside buildings. They are distinguished by durability, water resistance and a variety of colors.
Attention! At high temperatures, plastic deforms. The metal has low resistance to mechanical damage. Products made from these materials are not used for lining steam rooms and saunas.
Wood lining has low thermal conductivity and increased moisture permeability. Used for lining the internal walls of baths and saunas. Fastening wooden lining in a bathhouse has its own characteristics.
Wood of various species is used to make wooden lining.
Products made from softwood contain large amounts of resin. At high temperatures, the resin releases a unique aroma. The resin has bactericidal and healing properties. For cladding baths and saunas, materials from cedar, spruce, oak, and pine are used.
Products made from hardwood have increased density and water resistance. Ash, birch, alder, linden, and African oak (abashi) are used to decorate bath rooms.
According to the degree of processing, the following classes of lining are distinguished:
- Extra;
- A (1st grade);
- B (grade 2);
- C (3rd grade).
Classification in Latin letters is used to designate products manufactured in Europe. Sorting by class is used in domestic industry.
The “Extra” finishing material has no defects. The surface of the products is flat and smooth. Used for high-quality finishing of premises.
Class A lining has a rough surface. Characterized by few knots, hairline cracks and shallow resin pockets.
For your information. Wood with a large number of defects heats up quickly. At maximum heating there is a risk of getting burned.
Class B products have an increased number of knots. Small cracks are allowed. In some places it may have wormholes and rot.
Class C products are used for cladding utility rooms. The products are of low quality with a large number of defects.
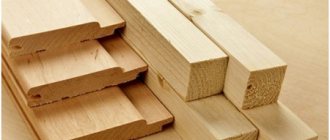
Depending on the profile, the following types of lining are distinguished:
- "Standard";
- "Calm";
- "Euro";
- "Soft-line";
- "Block house".
The profile of products of the “Standard” type is similar to the profile of classic lining. The length of the tenon is significantly less than the depth of the groove. A shortened tenon increases the strength of the connection of the planks during shrinkage.
The profile of elements of the “Calm” type has rounded outlines. On the reverse side there are special grooves for ventilation.
Eurolining is produced according to European standards. Has an increased spike length. The surface of the planks has a relief structure.
The profile of soft-line type elements has rounded outlines. The length of the spike has been increased. The surface of the products has a relief pattern.
Products like “Block House” resemble a rounded log.
How to lay lining correctly
There are two ways to fasten the lining in a bathhouse quickly and efficiently:
- Horizontal;
- Vertical.
The chosen method affects the speed and order of the cladding work.
With the horizontal method, the planks are placed parallel to the floor. When laying vertically, it is perpendicular to the floor.
When covering baths and saunas, they prefer to use horizontal installation. In this case, the boards are installed with the tenon facing up. The groove of each subsequent panel is placed on the tenon of the previous plank.
The advantage of the horizontal method is the high protection of elements from water penetration. In this case, ventilation of the space between the outer wall and the cladding is ensured.
During bathing procedures, the main percentage of dirt and splashes occurs on the lower panels. When positioned horizontally, the process of replacing them is greatly simplified. For repairs, it is enough to trim or replace a few planks. To repair damage in a vertical position, it is necessary to dismantle all adjacent elements.
Attention! The vertical position of the panels allows maximum protection of the tongue-and-groove system from water ingress.
Experts recommend using a horizontal position in wet steam baths. The vertical method is recommended in dry steam baths (saunas).
After determining the layout of the lining, they begin to calculate the volume of work.
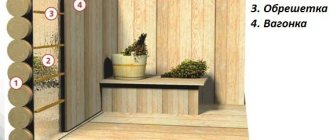
If frame
The frame structure is a sandwich made of (for example) boards, OSB or just boards on both sides and insulation inside. Of course, stiffening ribs are added to this - a frame, as well as steam and moisture protection, but the main thing is that insulation is already present. And if the thickness is good, then you can simply cover the OSB with a vapor barrier, fill the sheathing slats and cover the walls in the bathhouse with clapboard.
If it turns out that there is not enough insulation, then additional insulation can be done, and then everything will be the same. Before covering the steam room in the bathhouse with clapboard, you can cover the walls and ceiling with foil as a vapor barrier.
Calculating the amount of work on the interior lining
The scope of work is calculated based on the area of all premises. The area of windows and doors is excluded from the result obtained.
To roughly determine the volume of lumber, use the following ratios.
| Panel length, m | Number of square meters in 1m3 | Number of packages in 1 m3 | Area covered by one package, m2 |
| 3,0 | 73,4 | 27,8 | 2,640 |
| 2,7 | 73,4 | 30,9 | 30,9 |
| 2,4 | 73,4 | 34,7 | 2,112 |
| 2,1 | 73,4 | 39,7 | 1,848 |
The result obtained is the basis for calculating the approximate cost of repairs.
Calculation of material quantity
When choosing lining, you need to understand the amount of finishing material you will need. As a rule, the cost of wooden slats is indicated in square meters (less often in cubic meters). However, a basic mathematical calculation will not work in this case, since the quadrature will be influenced by parameters such as the length of the lamellas, the height of the floors in the house, and the dimensions of door and window openings.
There are two ways to help calculate the amount of lining.
- Intuitive. Following this method, you should calculate the perimeter of the surface area that you plan to finish with lamellas. From here you need to calculate the dimensions of the openings. Add 10-30% for waste to the result. This method of calculation is simple, but not the most accurate.
- Mathematical. This method of calculation is more scrupulous. To do this, you need to count the lamellas individually, taking into account their length and width, as well as the dimensions of the openings. To calculate, divide the surface length parameter by the width of the lamella. This way you can determine the required number of linings. As a result of all calculations, it will be possible to obtain a fairly accurate value. In this case, no more than 10% can be left for waste.
Preparing the necessary tools
For lining the inside of the bathhouse you will need the following tool:
- Chainsaw or electric saw;
- Drill or hammer drill;
- Hand saw and jigsaw;
- Screwdriver;
- Axe;
- Plane;
- Hammer;
- Doboynik;
- Clamps and clamps;
- Construction stapler.
Advice. To make plating faster and easier, experts recommend using a pneumatic tool.
For driving at an angle, the tip of the air gun has a rectangular groove. When working, the tip is placed on the edge of the tenon. The groove prevents the tip from slipping when moving along the ridge of the tenon.
Methods for attaching lining in a bathhouse
There are several ways to attach lining in a bathhouse with the best result:
- Through connection with nails (screws);
- Hidden connection with self-tapping screws;
- Hidden connection with nails;
- Hidden connection with clamps.
- Through connection with nails (screws)
A hole is pre-drilled in the panel to protect the material from cracking. A nail or self-tapping screw is inserted into the hole. The fastener head is recessed flush with the surface of the product.
The disadvantage of this method is the high risk of burns from the hot metal of the visible caps.
Hidden connection with self-tapping screws
With this method, the self-tapping screw is screwed in until it is completely immersed in the material. The screw head is closed with a wooden stopper. The upper end of the plug is ground level with the surface of the panel.
Hidden connection with nails
The nail is driven into the tenon at an angle of 30-45° to the surface of the panel. The cap is recessed flush with the surface of the tenon. Full recessing ensures unhindered entry of the tenon into the groove.
This method is characterized by high installation speed. Requires certain skills on the part of the master to avoid the risk of damaging the tenon. It is recommended to use it in Soft-line or Euro lining with an extended tenon.
Hidden connection with clamps
This method allows you to fasten the lining quickly, reliably and efficiently. The clamps are put on the tenon and secured with nails or staples.
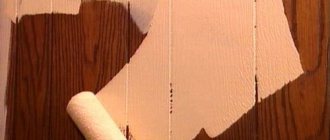
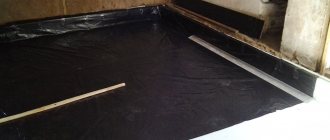
What is the purpose of foil?
To achieve effective energy saving in a bathhouse, you will need to not only insulate it, but also use reflective material in the form of a special foil film. Masters claim that it helps return up to 95% of the heat into the room.
The result is that fuel for the stove is saved and the duration of the fire is reduced.
For baths, aluminum foil with a thickness of 30–300 microns is used. It is used in combination with other insulation or is already fixed as its top layer.
Therefore, before covering, they first attach insulating material to the walls and ceiling, thanks to which the heat does not escape beyond the bathhouse. An insulated steam room heats up faster and retains heat longer.
The following are the advantages of foil:
- It acts as a vapor barrier and blocks the access of moisture to the insulation. The generated steam remains on the walls of the steam room.
- Its service life exceeds 50 years. Wooden elements will begin to rot faster than the foil layer will deteriorate.
- Excellent sound insulation. Foil can absorb up to 70% of all sounds and noise.
- Fireproof raw materials. Does not burn. It will become an obstacle to the spread of fire.
- Bathrooms warm up faster and take longer to cool down.
- If you fix the insulation with a foil layer, then the foil will prevent it from falling off.
Among the disadvantages, the following should be noted:
When there is a difference in temperature outside and indoors, condensation appears on the surface of the material. It is important to leave a gap for ventilation before covering. If this is not done, the resulting condensate will begin to be absorbed into the sheathing, which will lead to rotting of the lining. Foil has poor throughput
As users say, she is not breathing. Therefore, the rooms must have good ventilation, both forced and natural (windows, doors). Aluminum particles accumulate in the lungs, causing various respiratory diseases. But if you use the sauna periodically, the risk of harm to health is minimal.
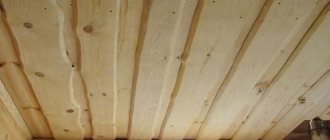
Headlining
Installation of the panels begins on the side of the ceiling farthest from the entrance.
The first bar is set along the cord line. Carefully checking the position of the first panel will ensure that all subsequent planks are parallel. If parallelism is not maintained, then leave a gap in the corner. During further covering, the gap will be closed with a ceiling plinth.
To fasten the panels, pneumatic tools are used. Clips and staples are used as fastening elements.
Advice. Universal pneumatic tools from Elektra Beckum & Metabo (Germany), Prebena (Germany), Senko (USA), Novus (Germany) received positive reviews. The universal tool works with staples 25-40 mm long and nails 10-50 mm long.
The operation and maintenance of such a tool is quite simple. The staples are inserted into a special compartment. The compartment lid snaps tightly into place and the device is ready for use. Under the influence of air, the impact mechanism pushes the staple out at high speed. This allows for increased installation speed and high fastening strength.
Panel installation work is carried out in pairs. One person holds the panel in a fixed position. Another person sews on the paneling.
If one person is working, it is convenient to use special racks for fixing the lining to the ceiling. These devices are made of metal. They have the ability to be adjusted in height. The upper end of the stand has a tip with a soft nozzle to protect the surface of the slats when fixing.
In the absence of such devices, use self-made racks from 50x50 mm bars. The length of the racks is 1-2 cm greater than the height of the room. The increased length will allow you to create the necessary stop for reliable fixation of the panel.
Using a finishing tool with a wooden or rubber tip, the boards are leveled and aligned with the cord. To avoid accidental displacement, one end of the bar is secured with a bracket. Further installation of elements is carried out to the opposite wall. Light tapping ensures that the panels fit snugly against each other. A tight connection is determined by the dull sound when struck by a hammer.
For information. Pneumatic tools that work with 25 mm staples are ineffective for work and do not provide sufficient fastening strength.
If the fit is loose, the lining is pressed against the sheathing. The panel is moved using a chisel. The tip of the tool is recessed into the lathing. With a smooth hand movement, the elements are moved until they are completely connected.
More significant irregularities are eliminated using a clamp. To do this, attach the device to the sheathing strip, tighten the fixing screws or lever mechanism. A wooden wedge is driven between the clamp and the board. The wedge is driven in until the panel is completely adjacent to the previously sewn strips. The sewing of uneven elements is carried out with two staples on each batten of the sheathing.
The parallelism of the boards is determined using a tape measure. Measurements are taken at each end of the laid panels. You can choose the frequency of checking yourself.
When joining a ceiling to a wall, a situation often arises when it is impossible to install a panel with a standard width. In this case, the last plank is cut lengthwise using a circular saw. The junction of the lining with the wall is covered with a ceiling plinth.
Installation of wooden sheathing
You need to stuff the bars under the sheathing in a direction perpendicular to the location of the lining. If you decide to lay the lining vertically, fill the sheathing horizontally, and vice versa.
Method 1
. Using a fishing line, a plumb line and a building level, they make a kind of frame on which it will be convenient to place the sheathing bars. If you install the sheathing vertically, horizontal guides are pulled at the top of the room and near the floor (check that they lie in the same plane), which will serve as a guide. Having placed the block at the top and bottom close to the stretched lines, secure it, if necessary, placing prepared chips or pieces of plywood or grinding down uneven walls or reducing the thickness of the block in some places (do not forget to check the verticality of each block). If the sheathing will be installed horizontally, pull the guides in the corners from floor to ceiling. The installation principle is similar, but the bars will have to be controlled in a horizontal plane.
Lathing for horizontal arrangement of lining
Method 2.
The frame is created using bars located along the perimeter of each wall. They then serve as a guide when filling the next intermediate bars. Chips or pieces of plywood are also placed under them, checking that they are aligned correctly with a level or plumb line.
The window and door must be surrounded with bars around the perimeter
It is better to secure each beam at both ends, install the necessary backings or cut off interfering parts, check the correctness of its installation using a level, and then begin to secure it further. The frequency of fastening for sheathing elements is 20-25 cm.
Installation of the sheathing for the ceiling is practically no different. The only thing is that the direction of the lining here is strictly perpendicular to the wall in which the entrance door is cut. And the thickness of the bars is usually greater on the ceiling due to the greater thickness of the insulation on the ceiling.
After the sheathing is assembled, all that remains is to lay the thermal insulation cake, secure it and begin attaching the lining.
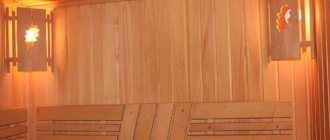
Wall cladding
The installation of vertical panels begins from the corner of the room. With the horizontal method, the installation of the planks is carried out from the bottom up.
The first bar is set strictly plumb. The remaining elements are laid in the same order as for the ceiling cladding. A tight fit of products with unevenness is ensured with the help of clamps.
In the spans between the main posts of the sheathing, additional slats are installed - short ones. They provide a gap for ventilation of the space between the foil layer and the transverse strips of the sheathing.
The additional panels in the opposite corner are cut with a circular saw. The joint area is covered with a decorative strip.
The described method of performing the work is based on many years of experience in building baths using pneumatic tools. This technique has shown excellent results in the question of how to fasten lining in a bathhouse with high speed and excellent quality.
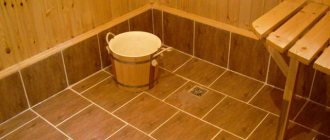
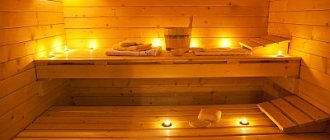
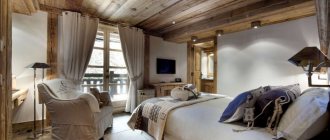
Decorating the rest room
The bathhouse is always perceived as a place of relaxation from everyday worries. Each room in it is intended for its own purposes. The name of the relaxation room speaks for itself: this is where you relax after water treatments. Therefore, it is important to create a cozy and relaxing environment in it.
Proper finishing of a relaxation room in a bathhouse is not an easy task, the implementation of which can be entrusted to specialists: designers and artists.
A cozy environment is created through the correct choice of facing materials, furniture, accessories, organization of lighting and illumination of various zones and architectural elements of the room.