Many owners of country houses want to install swimming pools on their plots. Moreover, there are a lot of options for this - from purchasing a bowl made of plastic or fiberglass and installing it in a pit to pouring a concrete monolith. In the second case, you will need formwork for the pool - an important element on which a lot depends.
Types of formwork for pools
You can use one of the options for formwork structures:
- removable;
- non-removable.
In the first case, the system is assembled from timber and plywood sheets with a laminated coating, the height of which is quite enough to equip a swimming pool.
Boards, plywood sheets or other sheet material capable of holding the concrete solution in a given shape are packed onto the beams installed around the perimeter.
The removable formwork version takes a long time to set up, but the features of the installation technology allow you to create any curved shapes.
To install a permanent structure, you will need reinforcing bars, steel or polystyrene. Polystyrene boards have the additional advantage of being able to perform the functions of a thermal insulation layer.
Briefly about the main thing
A concrete pool is a rather complex structure for a private plot, so a technical design is developed for it, which is then approved and registered with the BTI. Construction includes several stages, from digging a pit to cladding and arrangement of the surrounding area.
Correct execution of each stage will ensure the durability and integrity of the structure. Particular attention is paid to laying the bottom and pouring the walls of the bowl; it is important to use high-quality, frost-resistant and impenetrable concrete. High-quality waterproofing and finishing will make the operation of the structure trouble-free.
Ratings 0
Their advantages and disadvantages
Many developers choose a structure made of polystyrene foam as formwork for a pool. Such a system has the following advantages:
- the final cost of the pool is reduced by thirty to fifty percent;
- The time required to complete the work is significantly reduced. No time is required for the bowl to shrink; you can proceed to finishing immediately;
- such material is easily transported; there is no need to use special equipment for installation;
- if the pool is planned with heated water, then you are guaranteed to save electrical energy, because polystyrene foam material has good heat-insulating abilities;
- the walls of the pool, poured into a permanent structure, are a quarter thinner than when concreting using other technologies;
- the volume of excavation work is reduced;
- the pool bowl is obtained with ideal walls and corner areas, for which you can use any finishing option;
- This technology can be used to fill any type of pool;
- Expanded polystyrene walls will perfectly accommodate water and sewer pipes and electrical connections.
Construction of bowl walls
When the bottom is formed, wait for the screed to dry, periodically wetting the concrete with water (then drying will be uniform). After the bottom has dried, the walls are poured; the process consists of the following steps:
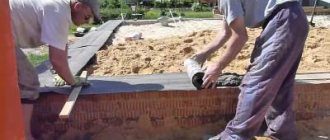
- Formwork is prepared from boards 30 mm thick; 5x5 cm timber is chosen for the stiffening ribs. If formwork of an unusual (bent) shape is needed, the boards are replaced with laminated plywood. At this point, check that all the necessary mounting holes are filled.
- To reinforce the pool bowl, metal rods with a diameter of 12-20 mm are used (calculated by the project). The rods are placed immediately after pouring the first portion of concrete, until the mixture hardens.
- Concrete is poured in layers; the thickness of each layer is about 15 cm. After 4-5 days, the walls will become hard enough to remove the formwork.
Reinforcing mesh in a bowl of complex configuration Source swimsv.com
- Before pouring the first layer, the base of the walls is moistened; this improves the adhesion of dried concrete and fresh mortar. For the same purpose, aluminum powder is mixed into the first portion of the solution (for the bottom layer).
- There is a second method, when pouring concrete is done at one time. This is argued by the fact that there will be no joining seams between the layers on the walls, and the structure will be homogeneous.
- After pouring, the concrete must strengthen and stand. This may take from two weeks to a month. The concrete surface is periodically moistened with water throughout the drying period.
- If the project provides for a concrete staircase (Roman steps), a separate sheathing is installed for it after the bowl has completely hardened.
Plywood formwork Source kamtehnopark.ru
Materials used
If everything is very clear with the materials for formwork, we suggest you figure out what will be required.
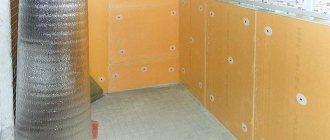
To install the outer insulating layer, we prepare a waterproofing roll material. In addition, the frame base is created from steel reinforcing bars, the cross-section of which and the placement spacing are determined by design calculations. As a rule, the diameter of the reinforcement is ten millimeters.
When constructing the frame, welding is not used so that the structure of the steel material is not disturbed, which will definitely lead to the formation of corrosion.
To avoid this, the frame is mounted using a knitting wire with a diameter of up to three millimeters. It will be necessary to stock up on clamps made of plastic material that protect the reinforcing bars from exposure to a humid environment.
To further protect the fittings from rust, they are treated with special protective compounds before installation. This measure will give the entire structure additional reliability and extend the operational period of the pool. It is recommended to treat the metal with polymer paints or mastics.
Finishing
The type of external decoration of the pool itself and the surrounding area depends on the landscape of the site, your financial capabilities and taste.
- The bowl can simply be painted with a roller using Temaflor epoxy paint or Strengthened-Universal polyurethane compound. And within a week it can be used for its intended purpose.
- If a colored membrane was used for waterproofing, additional finishing can be abandoned altogether.
- Finally, the most common, but also the most expensive type of finishing is tiling or mosaic. In this case, the quality of work is very important. Especially the quality of the grouting.
Installation of permanent formwork
If you decide to build a pool with your own hands, we recommend using permanent formwork for concreting. This method will significantly reduce construction time and save money.
The advantage is that the forms of the formwork structure do not have to be dismantled, and all its elements have already been treated with a waterproofing compound.
It is most convenient to work with polystyrene foam block elements, the outer walls of which are thicker than the inner ones, which allows for additional measures to preserve heat.
When assembling the formwork, you should strictly follow the shapes of the pool defined in the project. Pay special attention to the installation of the first row. The blocks are placed on reinforcing bars, leaving technological channels in the necessary places for laying communication lines.
Expanded polystyrene blocks are laid out according to the principle of bricklaying - the joining areas in the upper rows should be located in the central sections of the previous block row.
The connection is made using special locks using the “groove-ledge” system. Closing them is simple - you should press lightly on the forms.
Before you start pouring the concrete mixture, the necessary utility networks are laid - water supply, sewerage, filtration system, electrical wiring. All pipes and cables are carefully insulated from exposure to a damp environment.
Upon completion of laying out three vertical rows, the voids in the forms are filled with concrete mixture. It is recommended to compact the solution using a vibrator or manually. Upon completion of concreting, the work process is interrupted for several days, after which it is allowed to install the next section of permanent formwork for the pool until the required height is reached.
The final stage is finishing work. The choice of material is yours - all options are good.
Laying waterproofing
The pool construction technology includes waterproofing, which can be carried out using two methods. Some experts believe that the protective layer should cover the entire surface of the bowl, while others recommend waterproofing only the seams.
The work uses roofing felt sheets, bitumen, and liquid rubber. A PVC membrane and hydrophobic dry (or two-component) building mixtures are suitable. Liquid materials are applied in two layers, preferably with a reinforcing mesh.
When choosing a material, it is necessary to calculate the costs, since the surface of the pool has a fairly large area. The quality of waterproofing can be improved by pre-leveling the walls by sanding.
Installation of removable formwork
Let's assume that the bottom of the concrete bowl is ready, and you need to build the walls. We understand how a pool is poured from permanent formwork. Now let's look at removable structures.
Ruberoid material is laid on the ground, intended for external protection from negative influences. The formwork structure is constructed from timber, chipboard and plywood. In addition, reinforcement is laid into the formwork system.
The walls are bursting with supporting elements so that when pouring heavy mortar, the pressure created does not cause the structure to fall apart.
Once the installation of the formwork is completed, concrete is poured into it. In order for the solution to better fill all the voids, it is necessary to perform stirring and piercing movements using a steel rod.
When should you choose it?
A concrete platform should be chosen in the following cases:
- The site is located in a swampy area.
- It is planned to install a large-volume frame pool - from 10 thousand liters.
- The site has loose soil and excessive seasonal soil heaving.
- The pool has a height of 80 cm (on a soft sandy area the walls may become deformed).
If the frame structure is supplied with a ladder, its legs will sink into soft ground, which will damage the bottom of the bowl. With concrete this problem is eliminated.
Dismantling removable formwork
As soon as all the concreting work is completed, the pool structure is left alone for a month so that the concrete solution gains the required strength. If the weather is hot, it is recommended to water the structure to prevent cracks from appearing.
Dismantling of the formwork begins approximately four to five weeks after the completion of pouring. The sequence of work is performed in the reverse order of installation. There is no need for lifting equipment; everything can be done with your own hands.
About the technical project
Once the location has been chosen, the development of the technical design can begin. Construction work will be carried out according to this document, so all the nuances are spelled out in it:
- Construction technology, calculation of strength and durability.
- Pool parameters, including bowl shape, size and depth. Drawings are developed and dimensions are set.
- The configuration of utilities is selected. You need to think about how to fill the bowl and drain the water, and where to place the cleaning filters. You may need a heating or lighting system.
Filling the bottom with concrete
After the reinforcing belt is connected, you can begin concreting. Concrete is used with additives that impart water-repellent properties and improve strength characteristics. The solution can be ordered and it will be delivered to your site using an automixer.
It will be cheaper to do it yourself - in a concrete mixer. But the work will take a lot of time, and breaks cannot be taken. The pouring must be continuous so that the edges of the previously laid mortar do not have time to “catch”. At least two people need to work - one lays out, levels, the second prepares a new batch.
The outer wall of the formwork can be placed before reinforcement begins
When laying, it is necessary to avoid the formation of voids - there should be no air in the thickness of the concrete. To do this, use a special vibration installation or an ordinary pole, which is used to pierce the solution, shaking it from side to side. Since the bottom must be strong, it is advisable to use a vibration machine: you will not achieve the required density with a pole.
The solution should cover the upper reinforcing belt by at least 5 cm. To make it easier to navigate, place beacons on vertically raised wall reinforcements or on the formwork.
After the solution is laid out, compacted and leveled, the slab is covered with plastic wrap and left to gain strength. The aging period depends on the additives used and the weather - temperature and humidity. On average it is 4-10 days.
Choosing a location for a pit
If you don’t need a “pig in a poke,” then before starting excavation work, be sure to contact the geodesy service. They will conduct the necessary research, and you will not go wrong with choosing a location for your future pool. Since the nearby groundwater either did not allow filling, or would eventually destroy the concrete bowl of the pool. It is advisable to exclude the presence of green spaces near the pool, as they will be an additional source of garbage. But close proximity to sources of light and water is very necessary. For future connection to communications.
Digging a pit
The first step is to decide on the size and shape of the future pool. If you are building it yourself, it is better to go with a rectangular or oval shape. In addition, the simpler the shape of the pool, the less costs will be spent on equipment. Since intricate shapes require more filtering equipment. Markings can be made using pegs and a stretched rope between them. The top layer of soil and subsequent layers are removed along the intended perimeter. This method is considered the most convenient. The walls are torn out along the outer slope to prevent soil shedding. The desired depth for the pool is 1.5 m, length about 5 m. The hole is dug 60 cm deeper and wider on all sides; this reserve is needed for a cushion under the bottom and a concrete base.
In addition to the pit for the bowl, a recess for the drainage system and equipment is necessary. It is certainly smaller in size than the main bowl, but deeper.
ADVICE! Follow the rule that the bottom plate is larger in area than the bottom of the pool bowl. If the bottom slab is located at a level above which groundwater rises, then drainage must be performed along its perimeter.
Cleaning system
Setting up a swimming pool is impossible without a cleaning system. If you do not use a special device, the water in the pool will become dirty and an unpleasant odor will appear. A specific coating will appear on its surface.
The most budget option is to use a pump to pump out water. You completely drain the contaminated water and fill the pool with clean water. But there is one drawback to this method: it will take time for the water to warm up again.
You can install a special installation with a filter for cleaning. Two pipes are connected to the pump. One of them drains the water, the second supplies the purified and filtered water back into the pool. Filters can be sand, cartridge, or diatomaceous earth.
Chemical reagents are also used for cleaning and disinfection. These include chlorine, bromine, perhydrol, or products specifically designed for this purpose. Before use, be sure to read the instructions.
Recommendations
Construction of a concrete pool is a rather lengthy and labor-intensive process, so the start of work, as a rule, is planned for the month of March, as soon as the snow melts and it is possible to start digging a pit. In this case, it will be possible to build a bowl, line it and equip the reservoir with the necessary control devices around the beginning of summer. It will be necessary to lay water supply and electrical communications in advance, and lay pipes for draining water from the pool.
It is imperative to consider a water purification system for the time the owners are away from the dacha. Traditionally, the mirror is covered with a specialized plastic film; sometimes a protective grille with reflective marks is installed on top of the bowl. This will help the guests of the dacha not to fall into the pool at night.
Beginning of work
It all starts with a pool project, for this you choose:
- Pool shape: round, oval, square, rectangular, other.
- Location.
- Waterproof grade of concrete.
- Necessary building materials.
- Suitable dimensions to match the size of the plot.
Let's take a closer look at each point. When choosing a form, you need to consider what main functions your future structure will perform:
- Plunge into the heat.
- Jacuzzi - wellness with hydromassage.
- Swimming.
- Swimming training.
IMPORTANT! Despite the fact that concrete pools can be made of any shape, the most acceptable is the rectangular shape, when the length of the pool was 2-3 times greater than its width. Round or square pools are more expensive when calculated per 1 sq.m of area.
And in accordance with the size of the site, so that construction does not require the uprooting of fruitful garden crops and the demolition of necessary structures, you decide where the concrete pool will be located harmoniously and in its place.
The location of a permanent concrete pool must also meet the following criteria:
- Sunny side;
- Distance from the fence or buildings;
- Convenience when moving around the site;
- Proximity to communications - drainage, collection of water.
If it is possible to meet all the criteria, then you can immediately mark the location of the future reservoir with pegs.
When choosing a concrete brand, be sure to consider:
- Strength.
- Water resistance.
- Tightness.
- Frost resistance.
- Little susceptible to external mechanical influences.
It is better to choose a brand of concrete starting from M300, although many experts for rough pouring recommend a cheaper option - M100. In this matter, decide for yourself, as much as your planned budget allows.
And only after all of the above, start digging a pit, the dimensions of which should be larger in length and width than the dimensions of the pool.
| Brand | Class | Frost resistance | Waterproof | Proportions: cement-crushed stone-sand-water, part | Price per m3, rub. | |
| Cement grade M400 | M500 | |||||
| M100 | B7.5 | F50 | W2 | 1:4,6:7:0,5 | 1:5,8:8,1:0,5 | 3500 |
| M150 | B12.5 | F50 | W2 | 1:3,5:5,7:0,5 | 1:4,5:6,6:0,5 | 3600 |
| M200 | B15 | F100 | W4 | 1:2,8:4,8:0,5 | 1:3,5:5,6:0,5 | 3800 |
| M250 | B20 | F200 | W4 | 1:2,1:3,9:0,5 | 1:2,6:4,5:0,5 | 3900 |
| M300 | B22.5 | F200 | W6 | 1:1,9:3,7:0,5 | 1:2,4:4,3:0,5 | 4000 |
| M350 | B25 | F200 | W8 | 1:1,5:3,1:0,5 | 1:1,9:3,8:0,5 | 4100 |
| M400 | B30 | F300 | W10 | 1:1,2:2,7:0,5 | 1:1,6:3,2:0,5 | 4450 |
| M450 | B35 | F300 | W14 | 1:1,1:2,5:0,5 | 1:1,4:2,9:0,5 | 4700 |
| M500 | B40 | F400 | W16 | 1:1:2:0,5 | 1:1,2:2,3:0,5 | 4800 |