Perhaps you consider yourself a bathing connoisseur or simply love it. There are many such people, and some have their own baths, but even they make mistakes. You've probably heard about the importance of ventilation - mistakes are made very often when arranging it, especially with regard to the bastu system, which provides many options for air removal. Proper bastu ventilation in a Russian-type bathhouse with its high humidity provides many advantages.
After studying our article, you will be able to choose the parts yourself and assemble the ventilation duct without outside help. The work will take a lot of time, but it won’t be difficult if you know everything. We will also talk about the advantages and disadvantages of bastu ventilation.
Bastu works with a certain air circulation. Much depends on the layout of the bathhouse - you will need to combine your own comfort and the ideal layout for ventilation. Find out more about the operating principle of this ventilation system and its components from our article.
The meaning of the term “bastu”
Exhaust openings are installed in the highest part of the room
Bastu ventilation gets its name from the Swedish “bastu” or sauna. Its operation is based on a combined scheme that ensures air renewal in the following places:
- in the upper part of the room - due to the formation of a closed air circuit;
- in the middle of the bath space, where heated rising and descending cooled air masses meet;
- in the lower zone - by organizing a supply and exhaust system.
Thanks to the special principle of organizing flows, warm masses accumulate under the ceiling of the steam room, forming a kind of inverted dome. The decisive condition for obtaining it is the complete sealing of the room, in which drafts are not allowed. Only in this case is the air in the steam room effectively heated with a minimum of energy costs.
The upper hood in the bastu bath is not used at all, which is the main condition for the normal functioning of ventilation. The lower exhaust vents are designed in the form of two pipes equipped with standard valves. It is recommended to install them as far as possible from each other - on opposite walls of the building, for example.
The bastu ventilation scheme in the bathhouse allows you to open the vents as needed. It is taken into account that the system is operational only in situations where the stove is already lit or there is a strong wind outside. These conditions guarantee the absorption of fresh air, providing good draft. When new air masses appear in the bath or sauna room, those already used are removed through the pipe located above.
Is it worth installing basta in a Russian bath?
In a real Russian steam room there is always a lot of steam. There are no extremely high temperatures here, so excess heat loss is unacceptable. Experts note that for such conditions natural ventilation may not be the best solution. But if bastu is still installed in a Russian bath, you need to use the system correctly.
It is not recommended to open the valves while vaping. This way all the steam and heat will quickly leave the room. But the use of ventilation will be useful at the stage when the bathhouse is just warming up. Active operation of the furnace can lead to the release of carbon dioxide, so ventilation is extremely necessary here.
It should be noted! The use of bastu-type ventilation in baths during the warm-up phase leads to the fact that the kindling slows down significantly. This necessitates the use of more fuel. However, there is also a positive side, namely that when the ventilation is turned on, the room warms up more evenly.
During the steaming itself, you should not use the ventilation system, but at the end of the procedure it is worth activating the bastu pipes, as this will make your stay in the bathhouse more comfortable. The air will become lighter as the steam leaves. It will become easier for a person to breathe, which will prepare the body for going outside. This is an excellent end to a couples procedure.
You can control the bastu ventilation in the bathhouse due to adjustable ventilation holes
Moreover, if you activate ventilation at the end of the procedure, the air will become dry and excess moisture will disappear. In this way, the walls, floor and ceiling will be free from moisture, which will protect the bathhouse from fungus and mold.
General requirements for ventilation in the bathhouse
- Air inflow and outflow are interrelated indicators. If the first one is present, the second one must be arranged, and their volumes must correspond. The system must be installed with the ability to regulate and predict the direction of outflow and inflow of air.
- According to general rules, ventilation should ensure air movement in the direction from living rooms to technical rooms. An analogy for a bathhouse: from the steam room and dressing room to the bathroom and vestibule.
Arrangement of ventilation in the bathhouse - According to the general rules, in the case of mechanical (forced) ventilation, the opening for the supply of fresh air is installed at a height of at least 2 m from the ground level and is equipped with a ventilation grill. In the steam room, other provisions apply: the opening for the flow of fresh air is located at a maximum of half a meter height from the floor, preferably near the stove. The hood is created in the upper part of the opposite wall and is equipped with a damper.
- The air outflow from the rest room/dressing room is carried out through the washroom/bathroom - this is the best option.
- The maximum efficiency of air exchange is observed in the case of simultaneous use of the possibilities of forced and natural ventilation, i.e. when arranging a combined system.
Proper bath ventilation - For 1 hour of operation, supply and exhaust ventilation must provide at least 3 complete air changes (steam room is an exception). For example, if the volume of the serviced room is 15 m2, at least 45 m3 of fresh air should be supplied to the room by ventilation forces every hour.
Pros and cons of bastu and natural ventilation
Important! The most important advantage of ventilation in a bastu bath is the ease of installation.
There is no need to use any equipment, connect it to the network, etc. Everything is done very simply, and ventilation operates on the fact that the stove attracts fresh air through the lower pipe, which pushes out the exhaust air through the upper hole.
The work on such systems is simple, and the materials are inexpensive. You can also save on installation, since it is easy to do it yourself.
An additional advantage is that natural ventilation lasts for a long time. There is no equipment used here that can fail, so the system will function properly for many years. It is quite possible that someday the ventilation will need repairs, but, as a rule, they are minor and can be easily done on your own.
But bastu and other types of natural ventilation also have disadvantages. First of all, this concerns the fact that the possibilities of using ventilation directly depend on weather conditions and the operation of the stove. If it is not very windy in summer, then in autumn and winter there are strong winds, which cause drafts in the bathhouse. This makes it difficult to use ventilation.
The disadvantage of natural ventilation in the bathhouse is a draft in strong winds
Improper installation of the system may cause the indoor air to become unbreathable. There is no way to install filters in the bastu, so unpleasant odors, for example, from a chimney, can penetrate into the steam room.
Bastu ventilation in the bathhouse: diagram and device
“Bastu” is essentially the name of Swedish saunas, where the heating of the room occurs due to well-thought-out air convection. The ventilation was named after these saunas. The result of balanced and effective air exchange is as follows:
- • fresh and “light” air in the steam room,
- • easy to breathe and easy to perceive high temperature,
- • dry floors and other wooden finishing elements,
- • absence of fungus, mold and musty smell,
- • comfort and pleasant pastime in the bathhouse,
- • long period of operation of the steam room without repair.
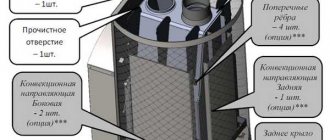
The scheme and device are quite simple: under the stove in the floor or in the wall (at the very bottom) a supply hole is made for cold air. On the wall opposite from the stove, a vertical ventilation duct is installed.
This box has 2 exhaust openings: bottom and top. The lower one is for removing heavy wet steam, the upper one is for “relieving excess heat” and for drying the room. The “exhaust air” is discharged through an air duct through the attic to the roof.
Cold air passing near the stove heats up and moves upward. The top hole in the box should be closed during paired procedures (unless you are very hot). The moist air that has passed through the entire room and cooled slightly begins to fall down. Here it is sucked through the lower hole in the box and removed to the street.
In this case, the stove plays the role of a heat pump, and air exchange occurs naturally. No forced ventilation is needed here. The air flow constantly circulates due to the upward movement of hot air from the stove, so being in the steam room is very comfortable and easy.
Ventilation of different rooms of the bath:
Due to differences in the temperature and humidity conditions of each of the bathhouses, ventilation in them is organized differently.
car washes
The washing compartment is the wettest, so it is recommended to equip it with a ventilation riser, which is located in the corner, under the floor. This is an asbestos-cement pipe, which is then brought to the roof and is equipped with a deflector on top. Ventilation in the sink occurs due to the pressure difference between the room and the end of the pipe above the roof; the air tends outward, taking with it excess moisture.
The reason why it is necessary to vent it to the roof is simple: if the humid air is immediately expelled to the street, then the wall where this hole will be located will quickly deteriorate from the outside.
steam rooms
See a separate article on ventilating the steam room of a bathhouse.
attic
Attic ventilation is a special story. This is done at the stage of roof installation.
1- ceiling 2- soffits 3- roof ridge
IMPORTANT! The opinion that a window in the gable is enough to ventilate an attic is incorrect. These windows will not replace the supply and exhaust system in the roof.
Supply openings are made under the roof canopy (between the roof sheathing and the upper part of the wall, where the rafters rest on the power plate), and exhaust openings are made at the ridge. There should be holes on the gables, but they are small and very high.
It is also important to take into account the ratio between the area of the supply and exhaust openings on one side and the total area of the attic. It is optimal that the first ones are 1/500 of the second. The ratio between the area of supply and exhaust is not 50 to 50; exhaust should be 10-15% larger in area than supply .
This system is suitable for those baths whose attic is cold. And there are also bathhouses with attics. There, ventilation is also done at a time when the roof is still open from the attic.
To ventilate the under-roof space (between the roofing material and the membrane), either natural or forced ventilation can be used. But for both to function, aerators and soffits are needed.
Aerators are installed either on the roof slope or on the ridge (these are the most effective). They serve for extraction. And the soffits are responsible for air flow. These are siding panels for covering roof overhangs, some of which must be perforated. The ratio of the area of the ventilation holes to the ventilated area is the same as mentioned above 1/500.
IMPORTANT! The efficiency of aerators will be higher if you install only conventional or only ridge aerators.
Fans for the under-roof space are used as supply fans. Particular attention is paid to the wiring so that it does not cause a fire.
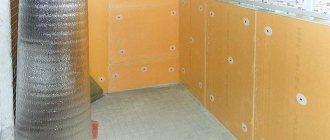
baths in the basement or ground floor of the house
Some owners of country houses allocate a basement or ground floor for a bathhouse. Such an arrangement of a hot and humid room places special demands on ventilation, on which the durability of the entire house now rests.
Note that the redevelopment of a former residential or utility room also includes the redevelopment of ventilation. In general, this is more expensive than a bath included in the design of a house under construction.
One way or another, you need to remember about the ventilation gap between the walls and the insulation . This will protect against damage to the insulation by condensation. But the moisture in the air corridor must also go somewhere. Therefore, for basement and basement baths, professionally made supply and exhaust ventilation is recommended, and it is better not natural, but forced. Both are accompanied by the installation of a base deflector.
The location of basement ventilation depends on the specifics of the project and will not be given here. It is also possible to install a special dehumidifier.
A good option would be to choose bastu ventilation - it is not so expensive, but very effective. The bastu device was discussed above.
shower
If there is a shower stall or open shower in the bathhouse, it is worth installing forced ventilation nearby, which will speed up the drying process.
If we assume that the air flow is ensured by the existing supply openings located in the washing room and other rooms, then you can install the fan only on the exhaust opening, which is located near the shower. (You can do the same if the bathhouse has a bathroom.)
dressing room
The dressing room suffers from condensation due to the temperature difference between it and the hot rooms of the bathhouse. Therefore, ventilation in it is necessary in the same way as everywhere else in the bathhouse . One vent is located at the bottom, the other at the top. The lower one is responsible for the inflow of air, the upper one is responsible for its outflow. Installation of forced ventilation is not prohibited. In addition, you can ventilate the dressing room using the door and (if there is) a window.
*** As you can see, the importance of ventilation in the bathhouse can hardly be overestimated. This is part of the sauna device, on which both the comfort of vacationers and the durability of the building largely depend. Therefore, it is worth paying attention to the details and reading more detailed materials describing the ventilation system in the bathhouse. We advise you to look at the corresponding section of our website. Tips about a bath hood and how to make ventilation with your own hands may also be useful.
Natural or forced air flow?
Natural air circulation is always more reliable. The ventilation system will not suddenly fail at the most inopportune moment. However, the main advantage why many people prefer natural ventilation is the low price. Before you make ventilation in the bathhouse with your own hands, you need to accurately calculate your budget. All ventilation components cannot be homemade. They must be purchased ready-made.
Ventilation tips
The most effective of many schemes is bastu. It is quite simple to do in both a new and an existing bathhouse.
We offer two videos that describe in detail the structure of the Swedish system.
Here the author installed a damper on the exhaust, but not on the supply. It’s not difficult to make: it can just be a metal plate.
Full review, interesting scheme for warming up the waiting room.
The authors of these materials described and showed in sufficient detail the stages of creating a ventilation system. In both videos there are interesting comments on where you can find rational grain for your existing or under construction bathhouse.
The distance from the bottom edge of the hood to the floor causes a lot of controversy. There are general recommendations, but since each bathhouse and climate are individual, the distance indicated by someone cannot be a dogma. The ideal interval is determined experimentally. To do this, a movable tube is placed on the lower edge of the exhaust pipe.
Proper ventilation in a bathhouse is a simple scheme with natural air movement. Fans in conditions of high humidity and temperature changes can fail at any time. A complex system with many air ducts is also unreliable.
Ways to increase ventilation power
The ventilation power of this type can be increased in simple ways. When the ash pit is located internally, the stove in the steam room is surrounded by a small elevation. At the same time, the air closest to it will warm up faster, which will increase the speed of its circulation and the efficiency of ventilation. If the ash pan is located in the rest room, the closed part of the stove is usually shifted to the steam room.
Under the floor of the steam room it is possible to place an additional pipe that removes exhaust air. Next, the opposite end of this exhaust channel is brought under the ash pan. This technique will allow you to remove air from the room faster than a hood in a steam room. If it is not possible to increase efficiency, the exhaust duct is left in any case as additional ventilation.
Do-it-yourself ventilation in the steam room
Ventilation diagrams in the steam room can also be found in. As for the stages of self-installation of air ducts, they are no different from those given above, so now we will consider in detail the method of drilling holes in walls made of logs or timber, as well as from blocks.
How to make a hole in a log house wall
- Before you start, you need to know the location and dimensions of the future hole, which is slightly larger than the diameter of the pipe, because you still need to wrap the pipe with a heat insulator. After this, markings are made. (It is advisable at this moment to have both pipes and gratings on hand so that you can control the process using them.)
- Using a wood drill, the length of which should be greater than the thickness of the wall with the entire “pie”, if there is one, a through hole is drilled in the center of the marking.
- After this, a circle of the required diameter is drawn on the outside of the wall with a drilled hole in the center.
- The external and internal finishing of the wall is carefully cut in a circle, freeing the wall log.
- Using the same drill, holes are made in the log around the entire circumference of the marked circle. And the closer they are to each other, the easier it is to remove the internal fragment later. Make sure the drill is perpendicular to the plane of the wall.
- A chisel and chisel will help remove bridges between the drilled holes. Work should be done both inside and outside the bathhouse.
- Having taken out the middle part, do not even out the edges - this is unnecessary.
Do you need thermal insulation of air ducts?
We see thermally insulated metal air ducts in air conditioning systems. They went from there. There, the main function of thermal insulation is to prevent the formation of condensation. In the air conditioning system, air is supplied through the ducts, the temperature of which is lower than the surrounding air.
With the bathhouse everything is exactly the opposite. The air ducts supply air that is hotter than the outside air. Oddly enough, this condition is not always met. For example, if a long supply air duct runs through the insulated attic of a bathhouse, then condensation will form in it, just like in the air conditioner duct. In this case, external thermal insulation is necessary.
Important. The second purpose of thermal insulation on air ducts is to reduce noise levels. If you use fans, then buy insulated ducts. Otherwise, the entire ventilation system will make a loud noise.
Ventilation of Finnish saunas
The term is translated from Finnish as “bad” - a bathhouse, and “stuga” - an insulated wooden structure. A common name is “Finnish sauna”. Ventilation in the Bastu bathhouse is a closed air space in the upper part of the sauna room, and below is a supply and exhaust system. This configuration ensures that warm air accumulates at the top of the sauna.
The system resembles an inverted dome with a closed upper volume. The room must have sufficient thermal insulation and tightness so that air does not leak through all the cracks. Heating is economical. The scheme has been tested in Finnish saunas and is very popular there.
Ventilation in the Russian bathhouse “Basta” is rarely done. There is a slightly different type of steam room. With large amounts of steam on the heater, this type of ventilation is inconvenient. It leads to stagnation of air in the room. At the same time, nothing prevents you from providing this ventilation option for variety.
Information. It’s interesting that by making Basta-type ventilation and adding at least a small concrete pool to the washing room, we get a Russian, Finnish bathhouse and sauna in one building. Operating modes will switch.
Another advantage that Basta ventilation provides in a bathhouse is efficiency. The absence of an overhead hood makes it possible to heat the room much faster. If the region where the bathhouse is being built does not have a large amount of inexpensive firewood, then this is another argument in favor of providing for the “Bastu” regime.
The absence of an exhaust hood at the top of the steam room is the main condition under which the “Basta” ventilation works in the bath; the circuit must necessarily switch to the normal ventilation mode. To ensure this, it is built according to the usual standard rules, which are described in this article.
To the standard set of upper and lower dampers, you need to add one more lower hood. As is the case with standard steam ventilation, the inlet and outlet should be as far apart from each other as possible. The optimal location is access to the opposite walls of the bathhouse, but this is not always possible.
In order for the “Bastu” ventilation to work in a Russian bath, the upper hood is closed and the lower one must be opened. In this case, the natural draft in the upper hood is greater than in the lower one. This must be taken into account when choosing the cross-section of ventilation ducts.
Nowadays, the typical layout of baths has a steam room in the corner of the building. The second corner is occupied by a washing room, and the remaining half is a rest room. The intake valve (inlet valve) is placed 20 cm higher from the floor of the steam room, between the outer wall and the sauna stove.
Very often, a sauna stove is installed in the middle of the sauna (so it simultaneously heats all three rooms). In this case, air must be supplied through a metal duct. You can’t just make a hole in the steam room to the street and cover it with a grate! This will certainly lead to drafts, which are completely unacceptable in the steam room. The air must be warmed up near the stove.
Attention! When closing the top valve and turning on the “Bastu” ventilation, less water should be poured onto the heater. Otherwise, there is a risk of quickly overheating the bath.
Installation of ventilation system bastu
We will do everything with our own hands, and before assembling the ventilation in the bathhouse, we proceed step by step: we select the material, bastu elements, and assemble them to the ceiling level.
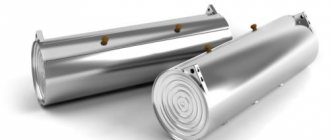
Taking into account all the nuances, it makes sense to try a system with a discharge into a pipe going through the roof. First we select the material. Stainless steel parts will last twice as long - up to 50 years, but galvanization better withstands pressure, bending and many other types of loads.
Preparation of tools and materials
We select the number of parts based on the height of the building. The pipe should be raised above the roof by more than a meter, and the bottom should be placed just above the floor or under the shelf seats.
A set with short insulated pipes, a tee, a TsAGI deflector, a retractable gate and everything is made of stainless steel - a good choice, but not ideal
Let's focus on the following kit for the exhaust part of the ventilation:
- 3 or 4 pipes, 1.25 m long, 110 mm cross-section;
- 2 channels of the same length, cross-section 180 mm;
- tee with cover;
- spherical turbo deflector;
- adapter from 110 mm to 180;
- gate
We will collect the elements one into the other. We will make sandwiches with insulation from pipes of different widths - at the level of the attic and roof. We will connect the adapter to the channel approximately at ceiling level. It is better to take a damper with a rotary damper rather than a retractable one. It will be more convenient this way.
When assembled strictly vertically, the tee will end up inside the building. The deflector will help to draw air more intensely, and it works from the wind. The turbo deflector spins and increases traction almost always, even in light winds.
Instructions on arranging ventilation
We begin to connect the parts of the exhaust part of the system. We take the gate and insert it into a pipe with a cross-section of 110 mm. We place the elements on a hard surface and fasten them with thirteen self-tapping screws on 3 or 4 sides - we use a screwdriver. The gate will be at a convenient height for control.
At an accessible distance from the floor, but at the top of the steam room, you need to place a tee with a lid. When the pipe is directed strictly straight, the part is fixed vertically.
We take a 110 mm pipe and cut off a fragment for insertion between the gate and the tee, less than half a meter is enough. The length of the intermediate segment depends on the height of the ceiling more than all other parameters. We measure the steam room vertically. Usually it is 2.1-2.4 meters. Then we insert the cut fragment into the gate and drill it. Then we attach a tee to the intermediate piece. We work with a screwdriver.
Galvanization for air ducts is quite pliable, so an element can be inserted inside another without much effort, and a slight curvature can be quickly leveled
We insert each element into the previous one and carefully press it. Next we take a straight pipe, again 110 mm wide, but not the full length, but the remaining part after the previously cut fragment. We insert it into the tee through the hole in the ceiling and fasten it inside the steam room. We strengthen all connections starting from the bottom of the exhaust system with tape to achieve normal density. We do the same with the subsequent ones.
In the attic we will insert a sandwich of 110 and 180 mm pipes. If necessary, we trim these channels. We place the insulation with the sandwich, and not openly, to protect it from unfavorable factors. Among the insulation materials, we choose either mineral/glass wool or polymer-based foam.
We select the thickness of the thermal insulation, fix it with glue, secure it with tape or adhesive foil over as large an area as possible. We install a 180 mm pipe on the insulation, and the sandwich is ready.
Then we insert an adapter from 110 mm to 180 mm into the finished part of the exhaust structure and secure it. We insert the insulated part into the transition element, fasten it with self-tapping screws and seal it with tape. We are making another sandwich - part of the system that will be above the roof.
Cut a hole in the roof. If the roof is made of corrugated sheets, then we make the hole without outside help. We drill points along the circumference to suit the width of the pipe and squeeze out the unnecessary middle. We insert another identical one into the previously installed sandwich. We go to the attic and secure it there with hardware and tape.
Among the deflectors, the spherical turbo deflector is most suitable; it is up to four times more efficient, is not subject to blowing, holds traction well, and can be installed without experience.
We install master flush on the roof. We treat its edges with sealant and fasten it with large self-tapping screws. We place a turbo deflector at the top of the last pipe. We treat the joints with tape, including on the master flush and in front of the deflector. The main stage of work ends here.
We decorate the pipe inside the steam room. To hide the tape, small dents and irregularities, we put on it cladding with imitation wood or brickwork. We screw a wooden handle to the tee cover.
Thanks to the Dutch oven, the steam room warms up quickly and cools down more slowly, which is good for the bastu system, while less load-bearing capacity is required from the foundation
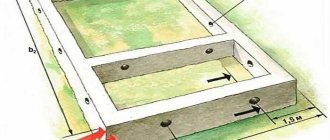
For better draft of incoming air in the supply part of the system, it should be done with a pipe, but the void between the brickwork alone will also cope with the task. The gap is left at least 5 cm.
Ideally, the air is supplied so that it comes out exactly under the stove and vertically. Then drafts in strong winds will be less noticeable. The air supply point is enclosed with a small podium approximately two bricks high. Often they lay one row edgewise. The air supply from the street will be regulated by a rectangular rotary damper.
We also recommend reading our other article, where we talked in detail about the best schemes for organizing ventilation in a bathhouse. For more details, follow the link.
Errors when installing ventilation
If the basic principles are violated, the ventilation will not work. And even if it does, it won’t be as effective as expected. Here are the main points to pay attention to:
- The hood is vented to the roof through the ceiling, not into the wall
- The air duct must be higher than the roof ridge (about 1 meter)
- The upper part of the air duct must be insulated
- To increase the draft, you need to heat the ventilation pipe more strongly. To do this, decorative holes are made in the casing that covers the pipe.
- The diameter of the supply channel is approximately equal to the diameter of the hood (usually 100 mm or more)
So, what can we say in conclusion? Bastu ventilation is an ideal option for your bathhouse. It is natural and does not require special devices or units. There is no need to install any forced electric fans. The entire system is reliable and based on ordinary physical phenomena. The flow of air masses can be regulated using dampers, and it is easy to change the microclimate in the steam room (Russian bath or Finnish sauna).
How to make a ventilation hole in the wall of a bathhouse
For example, we will take the most complex option - the external and internal cladding of the walls of the bathhouse has already been done. The hole can be round, square or rectangular.
Step 1. Mark the location of the vent on the inner lining of the steam room. Before starting work, you must not only know the location of the hole, but also its size and configuration. It is advisable that air ducts and decorative grilles be available; this will make it possible to accurately control the size of the opening and not do unnecessary work.
Step 2. Prepare a long wood drill, the working length should exceed the thickness of the bathhouse wall together with the outer and inner lining. In the center of the drawn outline of the vent, drill a through hole from inside the steam room. The drill outlet outside the steam room will be the center of the air flow. Draw around it the dimensions of the hole, similarly made in the steam room.
Wood drill
Step 3. Remove the internal and external trim elements in the outline. If your bathhouse is lined with natural clapboard on both sides, then the process is simplified, just carefully cut out the boards. If metal sheets were used on the outside, use a grinder.
Making a hole in the wall of the bathhouse
Step 4. Carefully inspect the supporting structures of the sheathing; if they are damaged, repair them. Drill through holes along the contour of the ventilation duct as close to each other as possible, constantly check where they exit from the outside of the wall. The drill must always be perpendicular to the plane. Drill the same holes over the entire area of the vent; the more there are, the easier it is to make a hole in the wall.
Principle of drilling holes
Video - How to drill a large hole in wood
Step 5. Next you need to work with a chisel and chisel, gradually removing the wooden bridges between the holes. It will not be possible to completely hollow out a hole on one side of the wall - it is too difficult to reach with a tool. Do half the work from the inside of the steam room, and the other half from the outside. There is no need to carefully level the surfaces of the holes, the main thing is that the air duct fits easily into the channel.
Hole in the wall
The most difficult physical work is done, you can begin installing the air duct and grilles. Don't be discouraged if it takes a lot of time to make holes; even experienced builders can rarely prepare more than two holes per day.
conclusions
Bath ventilation ensures normal operation of the bath, good air exchange, and the absence of foreign odors. You need to approach it responsibly and choose a good set of materials.
- provide a capacity reserve for the diameter of air ducts, grilles and roof hoods;
- installing a hood on the roof increases draft and improves overall ventilation efficiency;
- in wooden bathhouses made of logs, cutting corners is prohibited;
- fans, convectors, heaters and other devices must be of a moisture-resistant “bath” design;
- combining the ventilation of the bathhouse allows you to save on heating, but it is still better to do the ventilation of the steam room separately.
Before making ventilation in the bathhouse, draw up a detailed project and select a set of necessary materials. Everywhere you can use proven standard solutions and simple formulas for calculating air ducts.
Accessories for ventilation construction
To create favorable conditions in the steam room of the bathhouse and in all additional rooms, it is necessary to properly arrange the ventilation system. Otherwise, there can be no talk of any comfort.
The components used for the ventilation device are as follows:
- ventilation valve;
- valve;
- lattice;
- anti-mosquito/protective net;
- ventilation duct;
- galvanized or corrugated air duct;
- fan;
- hygrometer, thermometer;
- metal tape, clamp, polyurethane foam, sealant, fasteners and other consumables for installation and design of inlet and outlet openings.
Ventilation valves for ventilation in the bathhouse are placed on the supply and exhaust openings. They come in different sizes, shapes and materials. Therefore, it will not be difficult to choose a valve that perfectly matches the color.
Valves for ventilation, which are unscrewed/screwed, are the most convenient to use, allowing you to leave very small gaps for the passage of micro portions of air
Gate valves are also available in various designs. They are needed to open/close holes if necessary. Often, home craftsmen make a homemade design that copes just as well with the function of removing/influxing air masses from the premises.
The grille and mesh are needed to protect the ventilation hole from rodents, moths, mosquitoes and other living creatures getting inside. The gratings are chosen from wood, heat-resistant plastic, and the mesh is most often made of metal.
It is not advisable to place a grille made of soft material over the inlet openings - rodents can damage it. It is better to choose metal options
The ventilation duct is installed in a wall niche or, if conditions do not allow, laid on top, for example, if aerated concrete is used as the wall material. The box can be made from scrap materials or a corrugated or galvanized pipe can be used as an air duct. Plastic analogues are not suitable for a steam room - you need to take into account the temperature to which the room will heat up.
The fan in the bathhouse is used for both supply and exhaust. It is considered optimal to use it in only one direction - for the influx or removal of air masses.
You need to buy a heat-resistant device, specifically designed for baths and saunas with IP 44 and above. Do not forget about the specifics of the room - there is a lot of steam and high temperature.
If there is a swimming pool in the bathhouse, then you cannot do without forced ventilation. The pool is an additional room where water evaporates around the clock. But the tree doesn't like it
Consumables are used during installation for fastening air ducts, arranging ventilation ducts and installing valves and fans. A hygrometer and thermometer are needed to effectively use the ventilation system.
If mechanical ventilation is installed using climate technology, then there is a built-in temperature sensor and a humidity level regulator. Based on the actual indicators of the devices, the system starts the exhaust fan or opens the supply valve.
Properly equipped ventilation will ensure a comfortable stay in all rooms of the bathhouse, unclouded by extraneous odors and drops of water flowing down the walls and falling down the collar from the ceiling.
Another important condition for a long service life is timely and complete drying after use. It is on the implementation of this point that it depends how long the bathhouse will last and whether rotten boards will need to be replaced with new ones in the next 3-5 years
When there is no ventilation, and the owner of the bathhouse tightly closes the doors and windows after use, fungus, mold, and rot can be detected within a year