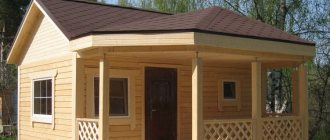
Frame construction technology came to Russia from the West. The conceptual difference in the approach to the construction of buildings for a long time did not allow the technology to gain a strong position, and was considered as prefabricated temporary housing and auxiliary buildings. However, over time, more and more attention began to be paid to the frame construction technique. Previously built houses were shown reliability and durability. Speed of construction, low demands on the quality of the foundation due to low weight, good heat conservation, possibility of erecting a mobile structure made this method of construction popular and widely known. These advantages and a small number of disadvantages of frame buildings contribute to the popularity of these houses and baths.
A bathhouse built using frame technology is not inferior in quality to more expensive building options (for comparison, read about logs or timber; a separate article is devoted to comparing frame and timber bathhouses, as well as about bathhouses made of foam blocks), despite the fact that in addition to saving on construction the bathhouse itself, it turns out a solid gain on the foundation. In practice, it has been found that the biggest calculations are caused by the roof of the bathhouse; care must be taken that it does not turn out to be overly heavy. Light walls are unsuitable for heavy loads, and the weight of the roof must correspond to the capabilities of the walls.
Manufacturing and installation of wall frames
Initial data: there is a columnar foundation with a wooden grillage. Boards (150x25 mm) are laid on top of the grillage, playing the role of a subfloor (later they will be dismantled).
The bathhouse frame will be installed on a columnar foundation with a grillage.
The frame of the walls is made of boards 150x50 mm. The walls were assembled on the ground and then fixed on a grillage. Each wall frame is made up of vertical posts (11 pieces on the longitudinal walls, 8 pieces on the end walls), horizontal frames, crossbars and jibs (2 pieces per wall, running at 45° from the corner to the middle posts). To install the jibs (flat) in the racks, cuts were made.
The finished wall frames were installed on a grillage and leveled. A second top frame is nailed to each wall along the top, and jute is laid between the solid beams. The jibs were cut into the racks and finally nailed down. The upper double frames of the walls are fastened together.
Bathhouse wall frame installed on a grillage
Thermal insulation foam
Polystyrene foam does not allow steam or air to pass through. A bathhouse made from it will be stuffy, and few people raise questions about the fire hazard of foamed polymers.
The savings on the vapor barrier membrane are offset by the costs of the seal between the blocks of thermal insulating foam and the frame. The polystyrene foam does not mold, does not crumble, is very light, and is easy to install. But very few people risk using it as part of the walls of a wooden building, especially a frame bathhouse.
[my_custom_ad_shortcode6]
Installation of the ceiling and roof frame
8 ceiling beams were mounted on the top frame of the walls, and saw cuts were made at the ends of the beams to accommodate the angle of the rafters. Connections from 3 beams were installed.
8 ceiling beams are mounted on the top frame of the walls
Three beam connections
The rafters were assembled using classical technology. First, the outer rafters were exposed, pinching the ridge. Then two rafters were fixed in the center. The remaining rafters were nailed through the ridge, first on one side of the roof, then on the other.
Please note that cuts were made on the outer rafters for cantilever beams to extend the roof.
Installation of rafters for a frame bath
Vertical gable posts were installed, the dimensions were determined locally. The opening for the attic hatch is formed with beams.
Cantilever beams are embedded in the recesses on the outer rafters. Frontal boards were nailed to them, and additional sheathing was attached on top.
Cantilever beams form the roof extension
Finished roof truss system
Assembly of frame-panel baths: projects and prices
The construction of a bathhouse using the technology of assembling panel structures on a frame basis is characterized by high construction speed and low costs for basic materials. The projects provide for and take into account all the requirements corresponding to the construction of structures of this category: ventilation, water supply, sewerage, electricity supply.
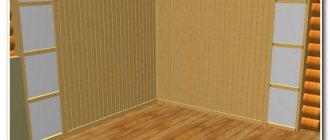
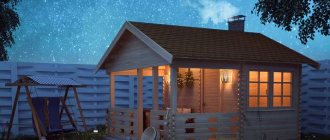
3D visualization of a small frame bathhouse
Projects of frame-panel baths
The main feature of this technology is that assembling a frame-panel bathhouse with your own hands is very easy - according to the principle of a designer. The modern market offers a large number of ready-made panel kits designed for installation on a frame. Thanks to the three-layer structure and low thermal conductivity of polystyrene foam used in SIP panels, this material has good characteristics and is excellent for baths.
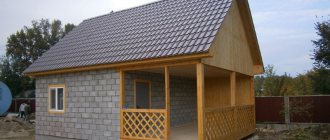
Projects for frame baths assume a gable roof; there is no attic space in it, since the panel structure is a lightweight building. The internal space under the roof can be used for storing bath equipment. Depending on the type of soil on which construction is planned, the foundation for a bathhouse can be columnar, shallow strip or pile. The last version of the base is used on sandy soil.
To create the frame, timber posts are used: 120x120 mm timber is suitable for corner posts; for intermediate supports, material of a smaller cross-section can be used. The ceiling is made of beams 40x75 mm. If the bathhouse is planned for year-round use, the thickness of the insulation is taken to be 15 cm; for seasonal use, a layer of heat insulation of 10 cm is sufficient.
Project of a small frame-panel bathhouse 4 by 3 m
As for the floor, it is recommended to make it pourable. For its installation, an edged or tongue-and-groove board mounted with a slope is suitable. The layout provides for the division of the frame-panel bathhouse into several rooms. The partitions between them are made of wood. If the bathhouse is heated by a stone stove, a separate foundation is made for it.
Price of a turnkey frame-panel bath
Taking into account the construction technology, the cost of a frame-panel bathhouse is always lower than the price of a structure built by any other method. Before placing an order, you should ask the manufacturer about the provision of additional services. Such as installing a stove, installing a roof, installing a chimney. Considering the high speed of assembly, no more than 7 days pass from the date of order to the start of operation of the panel bath.
Taking into account the fact that frame-panel baths are inexpensive, the customer can afford to choose any of the presented projects. This also applies to those whose budget is quite limited.
Manufacturers offer several configuration versions:
- turnkey facility - factory assembly of walls and partitions, finishing of facades and internal walls;
- finishing in the rough version - cladding either the facade or only the internal walls;
- without cladding - the object is only an assembly of panels.
The process of assembling a small frame-panel bathhouse with a foundation on piles
Before you buy a sauna of a frame-panel construction, you need to pay attention to the sandwich assembly diagram. Any deviations in the sequence of arrangement of elements inside the sandwich panel may cause rejection of the product from this manufacturer
If the finishing of the panels can be done independently, then re-sorting all the panels for the correct arrangement of materials in them at your own expense makes no sense.
Installation of roofing material
The roof sheathing was covered with Izospan waterproofing. On top of it - roofing ondulin. It is installed quite easily; the sheets are nailed to the sheathing with special nails. Each subsequent sheet is overlapped in one wave onto the wave of the previous sheet.
If you want to find out what inexpensive and high-quality materials you can use to cover the roof of a bathhouse, we recommend reading the article /krisha/chem-pokryt-kryshu-bani-nedorogo-i-kachestvenno.html
Installation of ondulin on the roof of a frame bath
Organic insulation
Ecowool is a fiber made from cellulose, antiseptic and fire retardant. Manufacturers use various protective additives, some of them are more durable and safe, some are short-lived and odorous. The main disadvantage of ecowool as insulation is the reduction in volume during operation. With volume, the heat-protective properties also go away. Shrinkage of insulation in the wall frames of a frame bath is fraught with voids.
Ecowool fibers are hygroscopic, which also affects thermal conductivity. They choose ecowool because it is environmentally friendly, non-aggressive, and has good sound insulation.
The raw material mixture of sawdust is a good insulation material, healthy and inexpensive. Unlike cotton wool, sawdust is heat-intensive - a heated bath will not cool down longer, but warms up with high fuel consumption. Humidity is contraindicated for sawdust. Flaws in insulation from water and steam will cause rot.
The fire safety of sawdust is reduced by the enveloping cement, lime mixture, and clay, but this only reduces the risk of fire. Laying a mixture of sawdust and binder, or ready-made cement-sawdust blocks, is more troublesome than installing mineral wool or foam plastic slabs. Organic thermal insulation is rarely chosen as part of the structure of a frame bath.
[my_custom_ad_shortcode5]
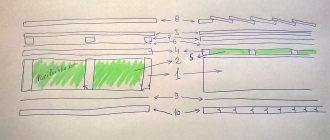
Decorating the “pie” of walls on the frame
Let's move on to the “pie” of the walls. For me it looks like this:
Scheme of the “pie” of the walls of a frame bath
Waterproofing and windproofing
The first layer was wind protection and waterproofing - Izospan A film. The bathhouse was sheathed with it on the outside, including the walls and pediments. Fastening was carried out with a stapler on vertical posts.
Attaching the waterproofing and windproof film “Izospan” to the frame of the bathhouse walls
Installation of counter-lattice
The next stage is the installation of a counter-lattice (along the frame posts), which forms a ventilation gap between the waterproofing and the outer wall cladding.
Installation of counter-lattice on the external walls of the bathhouse
Covering walls with imitation timber (outside)
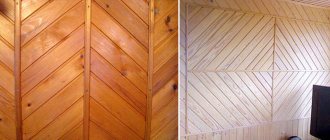
The counter-lattice was covered with clapboard - an imitation of timber. First, the first row was placed around the perimeter of the bathhouse in a circular manner (using a laser level). The rest of the lining was hammered in with galvanized nails according to the set level.
Wall cladding with imitation timber
Sewing the gables turned out to be a more difficult task. First, a layer of sheathing was formed (to continue the ventilation gap on the walls). It was then clapboarded, except for the opening for the hatch.
Installation of slats (lathing) on the gables of a frame bath
The hatch door was made “on site”. From the inside, cross members were screwed onto the corners, and the first row of sheathing was attached to them. A jib is also nailed to the crossbars for rigidity. Then the second row of sheathing was installed. Since I decided that the hatch would be closed from the inside, a latch was screwed onto the inside of the door.
Door for the attic hatch of a frame bath
Wall insulation
To insulate the walls, I used Rockwool mats 50 mm thick. The thickness of the insulation in the “pie” is 150 mm, so “Rockwool” was laid in 3 layers of 50 mm each.
If you are interested in what else you can do to insulate walls, we recommend that you read the article /steni/uteplenie-sten-bani-iznutri-i-snaruzhi.html
The mats were laid between the frame posts. The standard width of the mats is 600 mm, so the pitch between the posts was chosen to be 625 mm. Since the width of the racks is 50 mm, with this step there remains 575 mm between the racks, that is, 25 mm less than the width of the Rockwool mats. Thanks to this, the insulation is compressed and held tightly between the studs.
Laying “Rockwool” insulating mats between frame posts
The most difficult thing is to insert the mats opposite the jib, which is made of inch boards (25 mm). It was necessary to cut a channel in the insulation (with an assembly knife) that repeated the dimensions of the jib. The second layer of insulation is applied to the first without any problems.
For the third layer of insulation, a new sheathing is made. The insulation is completed by the last, final layer of insulation.
The third layer of insulation is laid between the sheathing slats
Vapor barrier of walls
A layer of vapor barrier is stapled on top of the insulation (on the sheathing). In the steam room, Izospan FB foil was used with seams taped with Izospan FL Termo tape (withstands up to 180°C). In the sink there is the same foil, but with Izospan FL seam taping (up to 80°).
In the rest room, Izospan B was used as a vapor barrier, and the adhesive tape for connecting the sheets was Yutafol SP1.
Vapor barrier of walls in the rest room
Thermal insulation methods
Many steam room owners do not know how to insulate a frame bathhouse. Thermal insulation methods:
- A classic method of insulation during construction work. This is a mandatory stage during the construction and cladding of the frame. The insulation is located inside the walls, between layers of hydro- and vapor barrier.
- External insulation of the frame. This is an additional measure that is needed if internal insulation is insufficient. For thermal insulation, polystyrene foam is used, which is glued over OSB panels and frame sheathing.
You need to think in advance about how many layers of insulation are best to sew into the walls. This will avoid unnecessary work.
Decorating the “pie” of the ceiling
It was decided to make the “pie” of the ceiling as follows:
Scheme of the “pie” of the ceiling of a frame bath
Installation of vapor barrier
First, vapor barrier sheets were stapled to the ceiling beams (from inside the bathhouse). In the steam room and washing room there is a vapor barrier “Izospan FB”, in the relaxation room there is “Izospan B”.
Vapor barrier foil “Izospan FB” on the walls and ceiling in the steam room
Ceiling insulation with ecowool
A sheathing is made on top of the vapor barrier - for further fastening of the finishing sheathing (lining) and maintaining thermal insulation. The sheathing bars are attached along the ceiling beams with self-tapping screws.
The following insulation work is carried out from the attic side. Insulation – ecowool. The optimal density is 35 kg/m3 – that’s what I was striving for.
You can read about other materials that can be used to insulate the ceiling in a bathhouse here: /potolok/uteplenie-potolka-bani.html
I had to beat the ecowool with a drill. No matter how hard I tried, I couldn’t fluff it up to 35 kg/m3. After finishing filling, I calculated it - it turned out to be 44 kg / m3. Apparently, it is difficult to achieve ideal density by beating ecowool manually.
The finished fluffy material was poured onto the vapor barrier. To prevent the cotton wool from collecting dust, I covered it on top with a regular covering film.
The ceiling on the attic side is insulated with ecowool
Sheathing the attic with boards
At the last stage, the ceiling (from the attic side) was covered with an inch board 150 mm wide.
Ceiling cladding (attic side) with sanded boards
Protection of the chimney ceiling passage from heat
To pass through the ceiling of the bathhouse, the chimney section is made in the form of a sandwich: two metal pipes of different diameters nested inside one with a layer of non-combustible insulation between their walls. But even a sandwich pipe is prohibited from coming into contact with any wooden products. Therefore, it is carried out through the ceiling at the installation site of a special passage unit.
The assembly for the safe passage of the chimney consists of a metal sheet with a hole and a box surrounding it (made of metal). The passage unit is inserted and secured into a square hole in the ceiling, and the chimney is brought up through it. The top of the box is filled with expanded clay or stone wool.
Installation of a passage unit with a chimney section in the form of a sandwich pipe
A bathhouse with frame walls is cheaper than a log building and can be erected very quickly. Its main consumer advantages are high heating speed and slow cooling. To do this, it is important to take a responsible approach to the choice of wood and heat insulator material, as well as to form a layer-by-layer wall “pie” correctly and without errors.
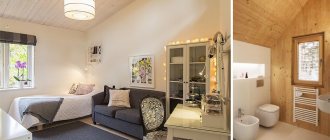
Internal lining of the ceiling and walls with clapboard (imitation timber)
The walls were covered with timber lathing. It was sewn up with clapboard (imitation timber) horizontally using self-tapping screws.
Lathing for lining the inner surface of bath walls with clapboard
The ceiling was also covered with clapboard (on top of the previously installed sheathing).
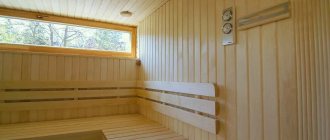
The walls and ceiling of the bathhouse are lined with aspen paneling
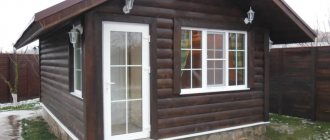
Do-it-yourself exterior decoration of the attic bathhouse
Immediately upon completion of construction, the attic made of timber should be caulked using tow, flax or jute.
From the outside, the completed attic should be decorated in the same style as the entire bathhouse. Regardless of the chosen finishing material, the timber structure needs shrinkage. Therefore, before starting exterior finishing work, you should wait a couple of years.
If both the bathhouse and the attic are built from timber, then it is enough to wait for all the structures to shrink and cover them with varnish, which is suitable for the exterior finishing of wooden buildings.
How to build an attic over a bathhouse - watch the video:
Is it possible to build in winter?
Frame houses have an important advantage - they can be built at any time of the year, incl. in winter
This is due to the lack of “wet” technologies during installation.
However, to ensure winter construction, it is important to consider the following recommendations:
- The foundation must be erected in the warm season and gain the necessary strength by winter.
- It is necessary to provide reliable approaches to the site and routes for the supply of materials.
- The construction site must have a hard surface to prevent getting stuck in mud. A possible option is geotextiles for car parks.
- All building materials must be reliably protected from moisture.
Work should be planned taking into account the short winter day. In general, the problem of winter construction of a frame house is associated only with the correct organization of the process.
Design
As with any building, a frame house needs its own project with exact dimensions and taking into account all the nuances. It is better to entrust this task to a professional. The specialist will coordinate with you all your wishes and technical issues, help you choose the right layout, and prepare an estimate for building materials and installation work.
At the design stage, the thickness of the walls of the frame structure is determined, which can reach a maximum of 60 cm.
To clearly establish the thickness of the frame walls, all materials used, methods of their fastening and the climatic characteristics of the region are analyzed. Also in the project, the master will take into account all contact connections, pipeline components and the laying of communications with the most convenient location.
Tiled floor in the sink of a wooden bathhouse
The tiles can be laid on a screed. In this case, you need to make a traditional concrete floor with concrete preparation. You just need to remember that you need to organize the flow of water. So immediately decide on the level of the finishing coating, set up a drain (drain), lay the pipes. Then you can start making the floor.
The technology, in fact, differs only at the very end - it is necessary to form a slope towards the ladder. And so, everything is the same. The bottom of the pit is compacted, crushed stone is laid out in layers, and compacted. Next, you can make a slab with a strength of M150 and a thickness of 3.5-4 cm, or pour crushed stone with lean concrete. The second option is more economical. Wait until the concrete reaches 50% strength and you can continue. To prepare, lay waterproofing and insulation on top. How to insulate the floor in a bathhouse in this case? Expanded polystyrene is optimal. It behaves normally in the screed, the layer is not too large, and is not afraid of moisture. In general, there is no better one.
How to make a tiled floor in a washroom
We lay expanded polystyrene in two layers. The slabs of the second layer overlap the seams of the first. This is for better thermal insulation. The first layer slabs can be attached to the base with long nails with plastic heads. The sheets are glued together with tape, you can foam the seams with foam, cut off the excess and lay out the second layer. You can simply lay it down, you can fix it with something. In principle, it will not go anywhere in a small washroom. We glue the seams of the second layer of polystyrene foam with tape. This is necessary so that the solution is not poured into the cracks - it will worsen the thermal insulation.
The floor in the shower also needs to be insulated
Next, spread a layer of PVC film on the polystyrene foam. This, again, is to prevent the solution from flowing. We roll out a damper tape around the perimeter of the room, lay out reinforcement or reinforcing mesh, set up beacons (don’t forget to form a slight slope towards the ladder) and fill in the screed. Once the concrete has hardened sufficiently, the tiles can be laid. But even with insulation, it will feel cold. There are two options - knock down the wooden gratings or use electric heating. Cable mats are ideal under the tiles. In a couple of hours, with normal thermal insulation, they will warm the floor.
Is it possible to lay tiles if the floor is made with joists? Quite. Again, there are options. You can lay plywood on the subfloor (don’t forget about the slope). Or maybe not plywood, but slate sheets. It is even preferable, since their thermal expansion with tiles is closer than with plywood. Then you can lay the tiles using a special tile adhesive. Special - this is for complex unstable foundations. It is expensive, but the cost of preparatory layers is less.
Still, in wet areas there is nothing better than tiles
You can also pour screed onto the plywood and lay tiles on it. But this makes sense if you are using water heating for the floor from heating or from a warm water tank. If it is electric, then it can be laid directly on plywood.
Design options for different types of foundations
Depending on the type of foundation for a frame bath, we will consider installing the floor on the following basis:
- pile or columnar;
- tape;
- slab
Pile or columnar
The most convenient and easy to install is the floor in a frame bathhouse on stilts. He is not afraid of either dampness or frost. Such a foundation can be easily corrected in case of subsidence (it is enough to jack up the corner and place a pad on the pillar or pile).
The cross-sectional design of all floor elements is the same as that used to organize leaky and non-leaky floors in a frame bathhouse.
Tape
It serves as the basis for a frame bathhouse, which is distinguished by its large dimensions and, as a rule, includes several rooms. The construction of the floor in such buildings is also capital, most often it is a concrete floor. When organizing a floor covering, the cross-section of the structural pie has the following form:
- A sand cushion laid on compacted soil.
- Waterproofing layer.
- Insulation (extruded penoplex).
- Reinforcing mesh.
- Heated floor system.
- Screed.
- Clean floor covering.
When installing such a floor, even before pouring the foundation, you should decide in which direction the water should be drained and the sewer pipe should be laid.
Slab
When building frame baths, slab foundations are quite rare, especially in cold latitudes, for a number of reasons:
- The bulkiness of the structure.
- Difficulty in laying communications and draining water.
- Difficulty in heating during the cold season.
- Significant financial costs when pouring the foundation.
Nevertheless, the floor cake with this basis has the following structure:
- Sand pillow.
- Expanded clay layer.
- Reinforced concrete slab.
- Waterproofing layer.
- Insulation.
- Warm floor.
- Screed layer.
- Finish floor covering.
Backfill insulation: vermiculite, expanded clay
Horizontal structures are especially often insulated with bulk material. Vermiculite is not toxic, but during mining it can be contaminated with a dangerous carcinogen - asbestos.
Expanded clay is fireproof, does not emit harmful substances, like insulation - it is light and heat-intensive. It will take longer to warm up a bathhouse with expanded clay inside the walls than with fiber insulation, but the room will also cool down more slowly.
Since expanded clay is dominated by closed pores, its moisture absorption is insignificant. But wet expanded clay takes a long time to dry. A layer of expanded clay is thicker and heavier than a layer of mineral wool with the same degree of thermal protection - the frame and foundation will need to be stronger.
[my_custom_ad_shortcode1]
What do partitions look like?
Internal walls perform their functions at a constant air temperature and a uniform microclimate. For these reasons, their arrangement looks much simpler than in the case of external frame walls.
The structure of internal partitions for frame houses differs significantly from the design of external walls
Internal partitions do not require additional moisture protection, but they do need sound insulation. The comfort of residents will depend on the choice of a high-quality sound barrier. Sound-absorbing materials used in the construction of internal frame partitions simultaneously perform the function of heat protection.
For these purposes, they most often use:
- acoustic mineral wool on an adhesive base;
- isolon (foamed polyethylene with high sound insulation properties);
- isover (rolled insulation based on basalt or fiberglass);
- foamed rubber (elastic slabs of rubber foam with a closed porous structure);
- soundproofing plasterboard;
- graphite or regular felt.
To improve the quality of sound protection, the material in the internal partitions is installed without gaps or cracks