SHARE ON SOCIAL NETWORKS
FacebookTwitterOkGoogle+PinterestVk
On the websites of construction companies, you can find thousands of beautiful and practical projects in the public domain. But each owner of a summer cottage has his own idea of what a bathhouse with an attic should be like: starting with the material on which the building will be built, ending with the layout, arrangement of the internal space and dividing it into functional zones. This article will help you create a truly comfortable and convenient project.
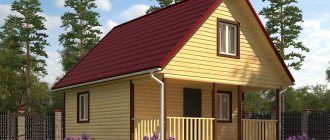
A bathhouse with an attic is a fully functional relaxation place for the whole family or with friends
Insulation materials
There are many options in this regard.
But I would not recommend mineral wool for insulating the roof and floors. There will be moisture in these places in different ways. And so that mineral wool insulation does not absorb it, they must be excluded. Of course, you can use them to insulate attic walls. There is nothing wrong. But the ceiling, floors, and attic roof insulation are best made with expanded polystyrene (penoplex). It does not absorb moisture, is not flammable, and is an excellent heat insulator. I know from practice that many people insulate their attic with polystyrene foam. Cheap, fast, but not practical. Polystyrene foam is still not a completely environmentally friendly product (it is better to leave it for the street), and it is also highly flammable. The best option is to add a little money and buy penoplex. But, as they say, the master is the master, they often insulate with polystyrene foam.
It also happened that the ceiling was insulated with basalt wool, but no vapor barrier was done. Six months later, this cotton wool was so saturated with water that everything had to be opened and the insulation completely replaced. In our case this is not acceptable at all.
A good option for interfloor insulation would be the old-fashioned method. This is insulation with clay and wood shavings (not sawdust). Honestly, few people will do this, but the method still works well. Just take clay, shavings and water. Mix it well until it reaches the consistency of thick sour cream, then pour it onto the subfloor. Be sure to do waterproofing on top (roofing films), and vapor barrier on the bottom (as a budget option, lay cardboard impregnated with drying oil on the subfloor). The disadvantage of this method is the heavy roof and the long and tedious production process. The clay will take a long time to dry.
It is also possible to insulate the floor with expanded clay. Also a good option. It is not flammable, an excellent heat insulator, but can absorb moisture, so again, steam and waterproofing are mandatory. There is an expensive, but not traditional, insulation option: Thermocork cork. Amazing thermal insulation properties, but a decent price.
It was no coincidence that I paid a lot of attention to the interfloor overlap; the reason, I think, is clear. My recommendations in choosing insulation for these purposes are as follows: extruded polystyrene foam (penoplex), clay with shavings, expanded clay
Also, a ventilation and air gap between the thermal insulation and the waterproofing layer is required. So that all structural elements “breathe”.
How to escape from moisture - arranging a vapor barrier
An attic above a bathhouse is not at all the same as a second floor above an ordinary room. It's all about the temperature and humidity conditions, which differ significantly from normal conditions. After all, the main problem of the second floor of a bathhouse is high humidity. After all, a lot of steam comes from below, from the steam room, and therefore a special layer for such a construction is simply necessary. If the bath attic is equipped like an ordinary one, it will always be too stuffy and humid. Therefore, the interfloor pie here should be like this: on the side of the bathhouse, below, a vapor barrier must be placed (this can be foil or film), then insulation, and the finished floor on top of it. The “pie” will look something like this if you look at it from the bottom up:
- Finish ceiling: lining, suspended or plasterboard.
- Rough ceiling.
- Vapor barrier: film or foil.
- Thermal insulation: basalt wool between the rafters.
- Ventilated bottom gap – 50 mm.
- Roofing membrane - Tyvek, Isopan or Utah.
- The upper ventilation gap is also 50 mm.
- Lathing.
- Roofing covering.
In addition, all wooden elements of a log bath with an attic must be carefully treated with fire retardants and antiseptics
Before you start insulating, it is important to make sure that all its supporting structures are in order - cracks and small flaws need to be caulked or sealed with foam
If metal tiles were chosen as the roof over such a veranda, a film under it is simply necessary so that condensation does not accumulate on its inner surface. And the ventilated space between the insulation and the roof itself will significantly extend the life of the rafter structure - the wood will breathe.
You can also build a more budget-friendly option: use ordinary reinforced film as a vapor barrier and seal its joints with tape. And as insulation, use Ursa for the floor, for walls - slab insulation, placed in a spacer between the existing frame posts. The cheapest of them are Knauf, Techno and Rocklight.
Types of attics
Attic spaces are distinguished by a variety of design solutions:
- for the installation of attics, single-pitched, gable, hipped, hip and half-hip roofs are used;
- thanks to the broken silhouette of the roof, the walls and ceilings have different slopes;
- the attic can occupy space above the main building or extend beyond it in the form of a console;
- with reliable roof insulation, the room will be suitable for habitation all year round; with a cold roof, it can be used in the summer;
- The material of the supporting structures, as a rule, corresponds to the base building; in bathhouses, beams are usually made of wood.
The attic in the bathhouse is additional space
The design can be one- or two-level, with a balcony equipped with sloping dormer or vertical gable windows.
The finishing uses materials and techniques that are functionally and aesthetically compatible with the design of the bathhouse.
Flat roofs
The slope angle is within 10÷15°, specific data depend on the width of the bathhouse and the climatic conditions of the region. The least suitable roof has a higher chance of leaks. But it’s easy to install, and the construction is cheap. Practical recommendation - you should not use such roofs for northern regions and for baths wider than 4 meters. To raise the slope on one side, you can use additional beams or pieces of them; the cracks are then clogged with boards. It is not necessary to fix it with dowels; metal factory or homemade corners or brackets made of reinforcement/wire rod Ø5÷10 mm are sufficient.
The structure of a flat roof pie
Features of the construction of an attic in a bathhouse
For example, designs for wooden bathhouses with an attic are much simpler than those for full-fledged two-story ones, but they are in no way inferior in functionality and thoughtfulness. That is why photos of bathhouses with an attic today can be found in fashionable landscape design magazines much more often than of solid bulky structures. After all, the Russian bathhouse has always been characterized by lightness of construction and compactness, and therefore people are simply not ready to make mansions out of it. But the attic is no worse than the second floor - on the contrary, there is much less load on the foundation.
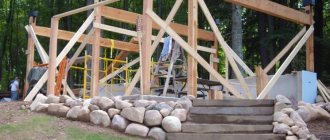
It’s good if the additional floor was planned at the design stage of the bathhouse with an attic and veranda - then you can make the most accurate calculation of the load-bearing structures. So, the attic frame is made of horizontal rafters - the basis of the future ceiling and vertical posts - the basis of the walls. Slate is most suitable as a roofing material, because... it doesn't get hot in the sun. And the optimal angle of inclination of the rafters will be 30-60?, and the greater it is in this range, the less usable area of the attic will remain. In general, the normal width of this room is at least 3 meters, and the height is from 2.2 meters. And the best roof for an attic is a multi-layer broken structure, which consists of a roof, solid waterproofing, insulation, lathing, vapor barrier and interior decoration.
One of the possible projects for a bathhouse with an attic floor
But if initially it was not planned to build a bathhouse with an attic and a terrace, then later all the difficulties of adding it will be related to the location of the stairs and windows. In this case, only a screw model that opens into a hatch in the attic can be successful. It will also be difficult to install windows, and for the normal microclimate of the room they will need to be in a ratio of 8:1. But everything can be resolved.
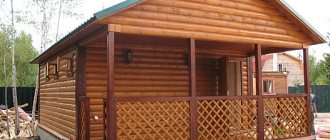
Most often, a bathhouse with an attic is built from timber, according to a ready-made design, or by a combination of materials: the first floor is made of logs, and the second floor is made of a wooden structure. But modern frame baths with an attic, covered with beautiful siding, also look no worse. But the brick ones completely resemble an architectural masterpiece.
Roof ventilation in a cold attic
In any room where there is no ventilation, a normal microclimate is impossible. Insufficient air exchange causes air stagnation and high humidity; at the next stage, mold begins to grow on structural elements and fungus starts to appear. All these factors negatively affect the structure; over time, it will begin to deform and lose its purpose. In a private house, the room under the roof can be warm or cold.
Differences between cold and warm roof ventilation
In the first case, the ventilation duct is installed over the entire area of the slope using sheathing and counter-lattice. Warm air masses enter the under-roof space at the eaves, rise and exit through the aerator in the roofing strip. Condensation also escapes through it.
Many owners of private houses, where the room under the roof is not heated, wonder whether roof ventilation is necessary in a cold attic, because no one lives there? Such a system should exist in this case as well, since it will ensure the safety of the structure itself.
Only for an unheated room it is arranged differently. In this case, vents are created in the under-roof eaves for cold air to enter, while warm air goes into the aerator and dormer windows in the attic of a private house.
Arrangement of roof ventilation for a cold attic
For the attic space this is the eaves level. Here you need to create holes
It is very important to correctly calculate the size of the vents in the attic, so that the inflow and outflow of air is the same. Often, owners of private houses use perforated soffits
To create an outflow of air from the attic, there are roofing elements such as aerators and a ridge. The direction of flow is determined depending on the characteristics of a particular house:
- if the roof of the house has two slopes, ventilation ducts are made on the gables - loose lining of the overhangs or holes in the wall, the area of the ducts should be 0.2% of the area of the attic space,
- if slate or ondulin is used as a roofing material and no vapor barrier has been used, then no additional structures are needed, since the air will circulate along the waves of the coating, the ridge will serve as an outflow element,
- if the roof of the house is flexible or made of ceramics, a “turtle” (valve) is formed,
- The system of two gratings has shown itself to be good, one is installed with holes pointing downwards, the other can be adjusted,
- on a hip roof, ventilation can be created using two holes, one of which is located at the bottom of the lining, the other at the top of the ridge,
- also on a hip roof, provided that the overhangs are wooden, you can place beams with a gap of several millimeters.
Sequence of work
- Calculation of air exchange. According to SNiP, in cold attics, as in basements, dormer windows or vents are necessary for air flow. Their total area should be 1/400 of the total area of the room.
- Selecting an air outflow and inflow system. After performing the calculations, you need to choose a system that will be optimal for your home: an aerator or a ridge, windows or vents. Next, a diagram is drawn up, that is, how many ventilation elements there will be, their sizes, how they will be located.
- Execution of work. When creating an attic ventilation system, you should strictly adhere to the diagram.
Let's summarize
From the above it is clear that the work is not difficult for a home craftsman who knows how to hold a tool in his hands and strictly follow the project recommendations. But it is still better to entrust the development of documentation to specialists. They will make calculations of the size of the vents in the attic, their location and quantity, according to the characteristics of a particular room. A professionally created project will save you from mistakes and shortcomings, the consequences of which can be disastrous.
Roof ventilation in a cold attic
The need to create effective roof ventilation in a cold attic is associated with the formation of the necessary level of comfort in residential premises. Otherwise, heat loss and the formation of condensation are inevitable, followed by the appearance of fungus and mold, and even deformation of the house.
How to change the shape of the attic when insulating?
The first difficulty that is usually encountered when insulating an attic is the shape of the room itself. After all, the geometry of the attic can be anything: triangular, broken, or with a steep slope of up to 70° or almost flat from 15°. In addition, during the insulation process, the following disadvantages will also come out:
Sloped ceilings that will now be slightly lower. Noticeable loss of usable space. A technically complex insulation process, where it is important to choose the right hydro- and vapor barrier. Health risk if insulation was carried out incorrectly.
Can we handle it? Certainly! So what to do if, instead of an attic, you still only have an uninhabited attic, the pitched roofs of which go all the way to the floor? And why such angles, if the usable space, which is still of some use, is 1.50 meters maximum? The solution to this problem is very simple: build a frame from metal profile guides for drywall, and insulate along it. By the way, the further such a structure is from the cornice, the warmer the entire room will be.
If you don’t like the shape of the attic that we have now, then you can make a special frame, insulate it and sheathe it. It will be even warmer! Plasterboard profiles need to be attached in increments of 40 cm, onto hangers. At this stage of construction, carry out the electrical wiring. And upon completion of the insulation, attach the sheets of plasterboard to the finished frame:
Although many, we note, even like such niches - with ingenuity, they can also be used to save space in an already small attic.
By the way, the simplest frame can be made from timber with a moisture content of at least 12%. Additionally, before installation, treat it with antiseptics, and the structure will serve you for a long time. But even better is to make a frame from a metal profile (for example, a profile for drywall). Or combine both options:
The most important thing: build the frame so that the vertical lines are perfectly vertical and the horizontal lines are perfectly horizontal. Use a good building level for this, and don’t be lazy to constantly double-check everything. Otherwise, you can’t even imagine how much trouble you will have to adjust the insulation later.
Install vertical partitions with a profile pitch of up to 50 cm and no more, and horizontal partitions - as it is convenient for you. After installation and checking the level, take a control measurement of the diagonals - stretch the thread between the extreme points of the profile, and now apply it in a different diagonal direction. If the frame is not skewed, both distances should coincide. You don’t want to end up with a room with incorrect geometry, do you? Then you will be interested to know that in cinema the walls of a room are specially made at different angles and with a slightly distorted rectangularity in order to achieve the effect of an unkempt room.
Features of the construction of a bathhouse with an attic
It’s good if the construction of the attic floor above the bathhouse was planned in advance when drawing up the project, this will make it possible to make the calculations more correct and accurate.
To build an attic space above the bathhouse, a frame construction system is used. The frame is assembled from horizontal rafters, which in the future will become the ceiling of the attic, and vertical posts, which in the future will become the walls of the attic
Particular attention must be paid to the selection of roofing material
We will use the bathhouse both in winter and summer. In the summer heat, the attic room should not warm up too much, otherwise it will be impossible to stay there. Therefore, we choose slate for roofing
The angle of inclination of the rafter system is also important. In this design, 30° - 60° would be acceptable
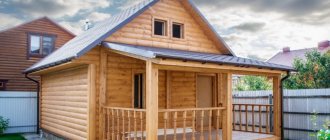
A bathhouse with an attic may look like this
As the angle of inclination of the rafter system increases, the usable area of the room decreases. For the roof of a bathhouse with an attic, it is better to choose a multi-layer broken structure. Multi-layering implies the presence of a slate roof, good waterproofing, insulation, lathing, vapor barrier and interior decoration.
Things are worse if the attic was not planned when designing the bathhouse, but during the work process the idea of building an attic arose. This is where you now need to consider the presence of stairs and windows. If there is no space for a staircase inside, you will have to install it from the outside, or a spiral staircase with a hatch in the ceiling will do.
The structure of the bathhouse with an attic is made of timber. A combination of building materials is allowed, namely the first floor is made of logs, the second floor is made of wood. There are frame structures of bathhouses with an attic, lined with siding. You can build a bathhouse with an attic and from brick.
Frame
Everyone knows that frame baths are built much easier and faster than timber or brick baths. They do not require the creation of a serious foundation, no drawings, or expensive materials. Everything is much simpler than you might imagine. The main thing is to have a clear plan in front of you and follow it. To build a bathhouse from bricks or logs, you need to use only expensive building materials, as well as competent drawings. To build a frame bathhouse, all these nuances are not needed, which is why it is considered the simplest, but very effective option for a bathhouse.
Room layout
Ready-made projects offer convenient zoning of the building area. The premises in the baths are divided into sections:
- water procedures - washing room, steam room, sauna, shower, swimming pool, jacuzzi;
- for relaxation - dressing room, living room, bedroom, billiard room, terrace, gym, solarium, herbal bar;
- auxiliary - locker room, kitchen, vestibule;
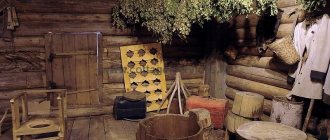
- technical - furnace, boiler room, firewood storage, place for drying brooms, laundry.
Ready-made projects offer convenient zoning of the building area
The premises must be conveniently located and properly communicate with each other. The wash room is preceded by a dressing room and a dressing room, from which you can go to the steam room or swimming pool. For winter use, an additional vestibule is installed in the bathhouse, which prevents the penetration of cold air and the appearance of drafts.
The steam room, shower and washroom must have a separate entrance. Technical rooms are separated from the rest. The bedroom or lounge is located in the attic, reached by a staircase. It is equipped with stable railings and non-slip steps. If the bathhouse has a swimming pool, it is combined with rooms for water procedures and access to the terrace.
The premises in the bathhouse should be divided into sections
Layout of 2 (two-room) Apartments: 215+ Photos of improved Design methods of transformation
Inclined single slope
Differs from flat by increased angle of inclination. Due to the larger angle, flexible tiles can also be used as roofing coverings. Water and snow shed better from a sloping roof, and the risk of mechanical damage is reduced. On free-standing bathhouses, sloping pitched roofs are rarely used; the design appearance and functionality are far from the wishes of customers. Most often, this type of roof can be seen on bathhouses that are closely adjacent to other buildings. Making a roof is not difficult; the rafters rest at one end on the upper crown of the frame, the other end rests on the purlin and headstocks. For the headstocks, side struts made of beams should be installed. All other operations for installing roofing coverings are identical to those described above.
What could happen in such a project?
The choice of premises depends on the personal preferences of the owners. When planning a 6x6 bath house, the rooms usually have the following purposes:
- Rest room;
- Gym;
- Dinner Zone;
- Small cinema;
- Bar;
- Workshop;
- Living space, bedroom.
On the ground floor you can place a dressing room, a washing room with a plunge pool, a vestibule with access to the terrace, a small dining area, a steam room, and a relaxation room. On the second there are a couple of rooms with a door opening onto the balcony.
You may be interested in: Features of installing gates for a private home
Wooden buildings encourage people to use them for permanent residence. Wood has the ability to saturate the room with life-giving air, which helps people get the most out of the city. This is noticeable from the first seconds of being inside.
Construction materials
A bathhouse with an attic is created with your own hands from various building materials, including:
- laminated veneer lumber;
- brick blocks;
- rounded logs;
- foam blocks;
- aerated concrete;
- frame blocks;
- particle boards;
- sip panels.
The following materials are used in the decorative finishing of the log house;
- lining;
- block panels.
Wood or brick
A 6x4 bathhouse project with an attic can be built from wood or brick.
Wood is environmentally friendly, durable, practical, safe to use, and after treatment with impregnations, it is resistant to humidity and changes in temperature conditions. When using insulation, the noise and heat protection characteristics of the building increase. The work uses glued and rounded timber, boards, and pressed shavings.
The list of benefits of wood:
- resistance to changes in temperature conditions;
- beneficial effects on the human body (relaxes, improves the condition of the nervous system);
- heat preservation;
- steam in wooden rooms is soft and humid.
Wooden structures can withstand a lot of superstructures, so you can build an attic later, if necessary. It is necessary to take into account the high cost of building materials. The fire hazard of wood requires the provision of an additional option for evacuation from the attic floor, as well as the treatment of logs with special compounds that slow down the spread of fire.
Brick blocks are durable (service life is 50 years), durable, and aesthetically pleasing. They are environmentally friendly materials because... made from natural ingredients (clay, sand, limestone, safe dyes). Depending on climatic conditions, design solutions and the load of the building, clinker, ceramic, refractory, and facing bricks are used.
The building material allows you to complicate the design of the bath complex. The building can be square, rectangular, asymmetrical, polygonal in configuration. Changing the standard form will not reduce the operational characteristics of the building; heat and noise insulation will remain high.
It is necessary to take into account the high costs of fuel when operating a brick bathhouse, and the need for waterproofing the room. The bricks are massive and require a reliable concrete foundation for durable and safe operation.
Gas and foam blocks
A 6 by 8 bathhouse with an attic can be made of aerated concrete and foam blocks. The materials are budget-friendly, practical, easy to install and replace if necessary.
It is important to consider the instability of materials to high temperatures and humidity. It is optimal to make an extension, an entrance block, from aerated concrete, combining it with boards and timber
You can build the 1st floor of wood and supplement the structure with an attic made of foam concrete.
Advantages of gas and foam blocks:
- affordable price;
- easy installation, because the work can be done independently;
- small mass of blocks, reducing the load on the supporting structures of the bath complex;
- resistance to fire and temperature changes, high fire safety characteristics;
- resistance to fungus and mold;
- large blocks can be sawed and given the required configuration for the author’s project, simplifying installation;
- materials do not have toxic fumes;
- the blocks do not deform or crack.
When installing foam blocks, it is important to thermally insulate the building to prevent heat loss and increase sound insulation characteristics
Frame or sip panels
The design of a 6x6 bathhouse with an attic can be made using frame technology and using sip panels.
Projects of frame baths with an attic are implemented from wooden beams or metal structures. The technology requires covering the outer part of the building with decorative panels; the materials must be environmentally friendly, fire-resistant, and not deform from temperature changes and high humidity. A seal is attached between the structural elements; interior finishing is required.
SIP panels allow you to erect a building in a short time. The materials are lightweight and can be used with a lightweight strip foundation. The panels have a multilayer structure and provide high-quality heat and sound insulation. They produce panels with moisture-resistant characteristics for the design of baths.
Adviсe
Professionals give several recommendations on how to make designing a bathhouse with an attic easier, so that the final result is at a high level:
It is best to include the presence of an attic immediately in the construction plan. Then the load will be calculated correctly and the bathhouse will not “lead”, and the walls will not crack.
If it so happens that the decision to build an attic was made later, the attic itself should be made of lightweight materials: if the bathhouse is brick, from blocks, if wooden, by frame construction or from SIP panels. If the main room of the bathhouse is built of light materials, it is best to refuse to build an attic floor, since it is not a fact that the load-bearing walls will hold up.
Pay attention to the roof. Not every roof can have an attic
When planning it, keep in mind that for the subsequent construction of an attic room, mansard, hip, half-hip and gable roofs are suitable, respectively.
When planning interior decoration, expect that all rooms of the bathhouse should be designed in the same style. It is ideal to use clapboard for the interior lining of a bath structure.
It is better to entrust the planning and construction work to a competent company
When choosing professionals, you should pay attention to the qualifications of the personnel, portfolio, reviews and special equipment. It is also advisable to communicate with employees personally before concluding a contract. Finishing material should be functional and pleasing to the eye
While paying attention to quality and reliability, do not forget about the aesthetic side. There are many finishing materials that combine all these properties. If you are building a bathhouse yourself, you must carefully follow the work technology and all recommendations, otherwise the result may be disastrous (at best, it will result in a waste of money and building materials).
- Ideas from the Internet will help you create comfort and warmth on the second floor. On the World Wide Web there are a lot of excellent tips for decorating an attic, from the color of the walls to the selection of accessories. The main thing is not to be afraid to experiment.
- The bathhouse should fit harmoniously into the surrounding environment. Being around the bathhouse creates a certain flavor. The landscaped area around the building will play into the hands of the owner of the country house. It is much more pleasant to watch pictures of beautiful nature from the windows of the upper floor, and not the depressing view of the gray earth.
- Don't overload the space. The bathhouse should be spacious and comfortable.
Design Features
The construction of a frame bath very often occurs through the use of well-dried wood, such as aspen, linden, or larch. All these tree species have a fairly low thermal conductivity, which helps preserve the original shape of the structure for a long time, this can be judged based on the numerous positive reviews that we can see.
When erecting walls, it is customary to use boards that are 20-30 mm thick. During the external lining of the bathhouse, you can use pine boards, and for the internal lining - boards of any type of wood
It is also necessary to pay special attention to correctly selected lining for the bathhouse.
Also, frame baths with an attic also have a fairly rigid frame, which is installed on the foundation for the bath, after which it is covered with boards. When assembling this frame, it is necessary to use pre-prepared racks, strapping and crossbars. The walls of a panel bath must be assembled in such a way that each wall looks like a separate frame.
Installation of a frame mini-bath begins with the base trim. To do this kind of work, you will need boards with a cross-section of 50x100 mm. They must be treated with an antiseptic solution. Before the work itself, you need to mark the walls of the building.
What is the best way to sheathe the frame?
In Russian baths they often use a wooden frame.
The lathing takes on the functions of ventilation. The gaps will prevent moisture from accumulating on the surface of the timber and insulation. Ventilation gaps provide good air exchange, where there is no room for dampness or fungus.
Fastening is carried out vertically. To insulate the walls of a bathhouse, not all types of thermal insulation can be used.
It is prohibited to use flammable cheap polystyrene foam or polystyrene foam.
Expanded clay and ecowool are not suitable due to the fact that they quickly become saturated with moisture and lose their working properties.
The best insulation options:
- basalt wool;
- kaolin wool;
- vermiculite
Photo: wall construction of a frame bath
The outside of the frame structure can be finished:
- siding;
- decorative plaster;
- edged board;
- half beam;
- clapboard;
- croaker;
- tiles;
- block house;
- plastic panels.
The cladding with a block house that imitates a log looks beautiful.
For interior work, lining is considered a universal ceiling and wall material. It is convenient for her to sheathe the steam room and dressing room. The lining does not heat up and is easy to install. To decorate the shower, choose ceramic tiles or moisture-resistant wood.
It is forbidden to paint or varnish the finish in the steam room, otherwise when heated it will begin to release toxic substances that are harmful to health.
It is allowed to use moisture-resistant plasterboard for covering the walls in the locker room. OSB and MDF boards are suitable for the same purposes.
The procedure for internal lining of the bathhouse is given in more detail in the section below.
Bathhouse projects
Number of projects 681
- 1 room
- 1 bathroom
Project Baths 7B-B
To favorites
- 14.3² Total area
- 4 x 5m Building area
from RUR 242,631 Construction time individually
- 4 rooms
- 2 bathrooms
Project AS-2121
To favorites
109.5² Total area
from RUB 1,478,250 Construction time individually
- 2 rooms
- 2 bathrooms
Bani Yar project
To favorites
- 44.42² Total area
- 8 x 7m Construction area
from RUB 599,670 Construction time individually
“Lux” octaval sauna project
To favorites
2 x 4m Building area
from 204,900 rub. Construction time individually
- 1 room
- 1 bathroom
Project Baths Koktebel 36
To favorites
- 36² Total area
- 6 x 6m Construction area
from 486,000 rub. Construction time individually
- 2 rooms
- 4 bathrooms
Baths Kupavnitsa project
To favorites
- 104² Total area
- 11 x 12m Construction area
from 1,404,000 rub. Construction time individually
- 1 room
- 1 bathroom
Bathhouse project Let's go to the bathhouse
To favorites
- 31.5² Total area
- 6 x 7m Construction area
from RUB 425,250 Construction time individually
- 2 rooms
- 2 bathrooms
Bath Tetra project
To favorites
- 58.75² Total area
- 7 x 6m Building area
from RUR 793,125 Construction time individually
- 1 room
- 2 bathrooms
Bathhouse Krutovo project
To favorites
- 85² Total area
- 11 x 10m Construction area
from 1,147,500 rub. Construction time individually
Bathhouse project "Banka"
To favorites
- 16² Total area
- 4 x 4m Building area
from RUR 298,152 Construction time individually
- 1 room
- 2 bathrooms
Jamaica Baths Project
To favorites
- 62² Total area
- 7 x 6m Building area
from 837,000 rub. Construction time individually
- 2 rooms
- 2 bathrooms
Bathhouse Serpukhov project
To favorites
- 90² Total area
- 13 x 8m Construction area
from 1,305,000 rub. Construction time individually
- 1 room
- 1 bathroom
Bath Sakura Project
To favorites
- 80² Total area
- 11 x 7m Construction area
from 1,080,000 rub. Construction time individually
- 1 room
- 1 bathroom
Quad bathhouse project "Mega-3"
To favorites
2 x 6m Building area
from 264,900 rub. Construction time individually
- 4 rooms
- 1 bathroom
Log bathhouse project BO-041
To favorites
- 63² Total area
- 5 x 8m Building area
from 850,500 rub. Construction time individually
- 2 rooms
- 2 bathrooms
Bani Senchukovo project
To favorites
- 138² Total area
- 8 x 9m Construction area
from 1,863,000 rub. Construction time individually
- 1 room
- 1 bathroom
Bathhouse project at Kuzmich
To favorites
- 106² Total area
- 11 x 11m Construction area
from 1,431,000 rub. Construction time individually
- 1 room
- 2 bathrooms
Bathhouse project "Riga"
To favorites
- 81.5² Total area
- 12 x 10m Construction area
from 1,630,000 rub. Construction time individually
- 1 room
- 1 bathroom
Bani Terem project
To favorites
- 38² Total area
- 6 x 7m Construction area
from 613,600 rub. Construction time individually
- 1 room
- 2 bathrooms
Bath Pagoda Project
To favorites
- 123² Total area
- 15 x 9m Construction area
from 1,660,500 rub. Construction time individually
View all projects
For a full life in a country house with all the amenities and pleasures, it is necessary to place many important elements on the site, including various landscaping areas and useful additional buildings. This can be achieved by increasing the functionality of buildings. For example, an ordinary wooden bathhouse can have minimal dimensions and maximum functionality due to the second attic floor. In this article we will talk about why a 6 by 6 bathhouse with an attic is convenient, what material to choose for its construction, what are the stages of its construction, what are the design solutions for such buildings and what ideas are there for using the attic floor.
Bathhouse 6 by 6 with attic Source moya-banya.ruAdvantages and disadvantages of a bathhouse with an attic
For such baths, instead of a regular attic, an attic floor is designed - a full-fledged living room with insulation and characteristic sloping walls. Such living space is interesting from the point of view of the emerging prospects, including:
Additional square meters. The most obvious advantage is that it allows you to use the room for different purposes. A 5 by 5 bathhouse with an attic can become a multifunctional structure. In addition, the room will be 30-35% cheaper than a similar one in a residential building, but will be just as comfortable. The mansard (sloping) roof, thanks to the vertical side gables, allows for maximum use of space. A hip or gable roof is less profitable because, due to the design features, it reduces the usable space.
Interior of a guest room in the attic of a bathhouseSource assz.ru
- Saving land. A bathhouse made of timber with an attic is a profitable solution if the plot is of modest size, and the owners have big plans for its arrangement. The saved space can always be put to good use.
- Multifunctionality. With the acquisition of an attic, the possibilities of using a bathhouse expand significantly. The owners can set up a gym here (which would otherwise remain a dream), a cinema hall, and equip a recreation area with a billiard table and a minibar. For some, it is more important to organize a guest room or a home SPA center. A bathhouse with an attic and a terrace will also expand opportunities for outdoor recreation.
- Originality. Historically, the design of an attic floor with a slanted ceiling line itself evokes romantic thoughts about a bohemian lifestyle; Therefore, it is especially pleasant to relax and communicate here. The unusualness of the situation can be emphasized by decorating the attic in the appropriate style. Luxurious oriental motifs, airy Provence with wicker furniture or the decor of a closed yacht club look impressive. The effect is enhanced by windows installed in the roof, a podium instead of a bed and light through shelving. If the choice fell on a bathhouse, projects with an attic are the most rational solution.
One of the options for using the atticSource homishome.com
Bathhouse designs with an attic also have some disadvantages:
- The issue of isolation. The top floor of a bath house with an attic needs careful protection from moisture, which is ensured by a layer of vapor barrier layer in the ceiling. The layer will preserve thermal insulation and the building structure, preventing the development of mold fungi and microorganisms hazardous to health.
- The issue of insulation. If you plan to use the attic floor year-round, you will have to thoroughly insulate it.
- The issue of complicating construction. The steeper the roof slopes, the more usable area there will be underneath. The best option would be a sloping (mansard) roof, but it will cost more.
A broken mansard roof is a technically complex structure that requires a professional approach. Source bruskarkasdom.ru
General information
Advantages
The main advantage of a two-level bathhouse is that it makes it possible to save space on the site. If, for example, home owners want a spacious bathhouse with a comfortable seating area, they will get this by allocating a minimum space for construction. In addition, the recreation area is partially or fully located in the attic of the building. Often such baths are built in order to avoid building any objects separately. For example, in the attic there may be:
- Workshop.
- Winter Garden.
- Billiard room.
- Guest House.
- Summer cuisine.
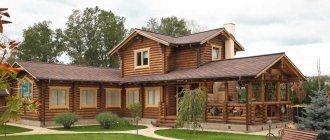
The attic above the bathhouse can be designed as a veranda with glazing, in which case it will act as a gazebo. In some cases, the upper level of a garage or bathhouse is equipped as a separate home for a family member. If you have 2 objects under one roof, you can save a lot of money on construction, communications, heating and room maintenance. Another plus is that such bathhouses made of logs or beams look much more impressive than one-story ones. The high-type roof slopes give them elegance. A beautiful bathhouse with an attic can become a beautiful centerpiece of a landscape design composition on a site.
Materials
Log sauna
At the moment, logs are a popular material. Based on the type of processing, it is divided into several types, here are the main ones.
- Planed - this type of wood is made by processing it with an electric planer. In this case, a small layer of wood is removed, and the fiber system remains unharmed, which provides the material with high performance properties. But the shape of such a log will not be ideal, but conical - like the real shape of a tree trunk.
- Rounded - when creating this log, most of the top layer is cut off on a machine to give the log an ideal cylinder shape. Because of this, the characteristics of the material are reduced, but it becomes as convenient as possible for construction.
- Scraped - this processing involves removing a minimum layer of bark. Such a tree will retain its natural resin content, which will make it as durable as possible. But its shape is not ideal, and it is difficult to lay out walls from it without noticeable gaps between the crowns.
For a bathhouse project with an attic and a terrace, rounded material is usually chosen, which allows you to make very high-quality log houses without cracks and gaps. There is an opinion that it is better to choose wood with natural humidity for a bath, rather than dried wood. But not all masters agree with this opinion. It is still worth trusting that the purchase of logs should be done by professional builders who have experience in selecting high quality wood
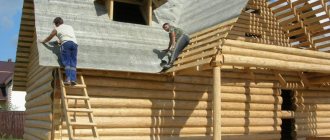
The peculiarity of such a bathhouse is that it will shrink, and it is important to begin its operation a year after the completion of the construction process. After the walls are laid, the log frame needs to be sanded and caulked a couple of times
timber
When creating timber from an ordinary log by sawing, a tree with a rectangular or square cross-section is obtained. There are also several types of timber.
- Classic (non-profiled) - a simple beam with smooth edges is cut from solid wood.
- Profiled - the edges have specialized grooves (ridges) for the most accurate fastening of the timber to each other.
- Glued laminated timber - when creating it, several thin lamellas are glued together under pressure, which is why a high-tech wood material is obtained.
- Half-beam - during manufacturing, the log is processed only on two opposite sides, which are needed for the crown connection. The other two sides will remain semicircular. Buildings made from this material have the appearance of a log house, but retain the technical parameters for a timber frame.
Such a bathhouse can be used almost immediately upon completion of construction. Shrinkage is 1-10% depending on the type of material. Glued laminated timber has a low percentage of shrinkage. Non-profiled bars will give maximum shrinkage and upon completion of the construction of the walls, caulking and finishing are needed. Other types of timber can be used without caulking.
Finished projects
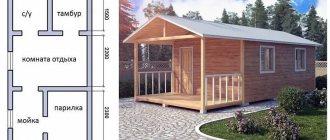
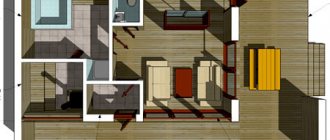
When evaluating finished bathhouse projects, it is easier to imagine what exactly you want to see in your personal project. Below is a project for a bathhouse with an attic; if you build such a solution from a log house, it will turn out very beautiful. The drawing shows that the ground floor has all the necessary premises. The sauna's steam room can easily accommodate 7 people. The entrance to the steam room is through the shower; there is a separate door to the bathroom. The ground floor also has a small veranda and a nice common room. A staircase leads from it to the attic. The attic is divided into two identical rooms. They can be used as living rooms above the bathhouse or as recreation rooms. There is also a balcony where you can drink a cup of herbal tea.
Below is another interesting bathhouse project, which can be assembled from a log house or using the frame method. This bathhouse has both a veranda and an attic. But the bathhouse project does not have a bathroom. You can allocate a place for it in the rest room, which is located below. The space will be compensated by the fact that there is another large room at the top of the bathhouse. The attic can be used for various purposes.
If the area for building a bathhouse is limited, then you can evaluate the design of a bathhouse with dimensions of 6 by 4 meters, which is given below. This bathhouse has everything you need and even has a veranda. Four people can be in the steam room at the same time, or the same number can wait their turn in the relaxation room. There is a shower in the bathhouse, in which you can also put a toilet, placing it behind a small partition. On the veranda you can place benches or sofas, as well as swings. The process of building a bathhouse with an attic from a log house can be clearly assessed in the video at the end of the article.
Zones
Let’s say it’s decided to build a log bathhouse 5x5 meters.
If we consider standard plans for functional areas, there are three main ones:
- dressing room;
- washing room;
- steam room
The 5x5 m bathhouse layout option involves placing the firebox not in the dressing room, but in a separate corner, separated by a wall. The same wall separates the dressing room from the steam room. The waiting room will be spacious. It is convenient to place a table and benches, as well as hangers. This room can be a living room.
A 5x5 m bathhouse will accommodate a group of 5-6 people. The attic floor in such a bathhouse is often used as a small rest room. The attic can be equipped with a toilet and shower room. It is definitely worth considering communications.
In a 5x5 m bathhouse, it is important to install the doors correctly. For example, it is important to get directly from the guest room to the washing room
This placement will prevent heat loss from the steam room. A shower room can be allocated a little less space than a steam room. Plan your steam room carefully. It is important to carefully consider the shapes and sizes of the shelves.
Don’t forget that part of the area will go under the stove and heater. Its location should not be close to the wall, otherwise there will be a risk of fire in the sheathing and wooden walls. They expand the area of small baths by providing the building with a terrace. A small terrace can serve as a summer kitchen. The construction of a terrace will increase the amount of building material.
Bathhouse with an attic: advantages and specificity of projects
When searching online for unusual solutions for developing a summer cottage, you can increasingly see attractive photos of bathhouses with an attic. Land owners often resort to the use of this architectural element in order to improve and expand the planning capabilities of such a building.
The attic floor can be adapted for a guest bedroom or billiard room
The attic floor is suitable for arranging premises for various purposes:
- rest rooms;
- a gym with exercise equipment;
- billiard room;
- pantry for storing bath equipment, towels, etc.
But the best solution would still be to use the attic to organize a room for a pleasant pastime.
Advantages of using bathhouse projects with an attic
Most often, the space under the roof is used as an attic, where things are simply stored. However, designers were able to find a better use for it after the demand for buildings with an attic floor increased.
In small areas you can place a small-sized building
The advantages of such projects are obvious:
- The owner has the opportunity to significantly save free space, as well as rationally distribute the usable area.
- Bathhouse projects with an attic of 6x8 m or more can be considered as guest houses, suitable for temporary residence of relatives and friends who come to stay at the dacha.
- Baths with an attic look much more attractive than mundane one-story buildings. Moreover, the cost of such structures is significantly lower than the price of constructing a two-story building.
A bathhouse with an attic will be a cozy relaxation corner at any time of the year
If you use the space under your roof wisely, you can reduce your heating costs. The attic floor can be heated by a sauna stove, thanks to which comfortable microclimatic conditions will be maintained in this area. If the bathhouse is designed exclusively for use in the summer, the space under the roof can serve as a living room. An excellent solution would be to organize a summer kitchen with a beautiful view from the windows.
Specificity of compact designs of bathhouses with an attic
Even standard building designs may differ in dimensions and internal layouts. Most often, owners of summer cottages, due to the lack of free space, give preference to compact buildings. For this reason, bathhouse projects with an attic of 6x6 m and 4x6 m are considered the most popular.
Despite their size and obvious simplicity of layout, such buildings are able to provide all the conditions for a good rest. They are ideal for families with a small number of people or owners of country plots with a small area.
Typical design of a bathhouse with a terrace and attic
Typical designs of bathhouses with a 6 by 4 m attic usually include a standard set of premises:
- steam room;
- vestibule;
- shower;
- veranda or terrace.
Some compact projects do not consider the presence of a veranda or terrace. In this case, the entire area of the entrance area is allocated for the arrangement of a rest room. In the attic there is a living space intended for guests. A pantry for storing bath accessories can also be located here. The location for installing the stairs is selected so that it does not clutter up the interior spaces.
The advantage of bathhouses with an attic of 6x6 m and 4x6 m is also that such buildings occupy a minimum of space on a summer cottage and allow you to save local area. At the same time, the layout, as well as the internal dimensions of the premises, can vary at the request of the developer.
The attic should be of small height, since higher rooms are considered a full floor and are subject to tax
Dimensions
There are standard sizes of custom-made baths for summer cottages. When choosing the right one, you should take into account the size of the site itself, the proximity of other architectural forms, the frequency of use of the bathhouse, as well as the maximum possible number of people who want to steam at the same time.
4x6 sq. m
This construction option is chosen by those who want to preserve free space on the site, but not deny themselves relaxation in the bathhouse. At the same time, this option will not seem cramped; it can easily accommodate a small family of 4 people.
Even such a small bathhouse can be built with a small open terrace. If desired, the terrace can be eliminated, thereby increasing the area of the rest room or washroom, and the porch can be moved outside the main building.
6x5 sq. m
The indicated dimensions seem to differ little from the previous version, but even looking at the drawings, we can say with confidence that such a bathhouse is much freer and can accommodate more people. For lovers of winter holidays in a large group, a building with a spacious seating area is suitable. This can be achieved by sacrificing the terrace.
But even with an open veranda, the bathhouse does not seem cramped: the relaxation room occupies 16 square meters. m, and the second floor is as much as 19 square meters. m, which can be divided by a partition into 2 full rooms or create an open space with massage chairs, billiards, a large TV and sofas.
6x6 sq. m
For bathhouses with such parameters, construction companies suggest considering options with balconies. Most often, the balcony is located above the open terrace. Both elements are approximately 1.5 m wide. This is enough to place a couple of chairs, a table, or hang a hammock in the fresh air.
6x9 sq. m
Bathhouse with a total area of almost 100 sq. m is truly royal. This building can accommodate at least 15 people. Most often, such objects are erected at recreation centers, because such a building is considered not only expensive at the construction stage, but also during maintenance. However, there are big fans of the bathing pastime among individuals.
Such a space can accommodate a standard set of rooms: a terrace, an entrance hall, a relaxation room, a bathroom, a steam room, a shower on the 1st floor, a guest room, a balcony, a hall on the second floor, or you can add a kitchen, a swimming pool, and a fireplace to the layout.
How to add an attic to an existing bathhouse?
A bathhouse with an attic can be built in three ways:
- On a finished bathhouse that has been in use for a long time, the side walls are added to the height.
- The existing attic space of the bathhouse is being converted into living space.
- The attic is equipped with a special roof shape.
The easiest way to build a bathhouse from scratch is from timber - with an attic of a wooden structure, it practically does not change its weight, and the ideal rectangular layout allows you to avoid unnecessary costs. In addition, if the second floor will also be used constantly, then it makes sense, after laying the interfloor ceiling, to add walls 1-1.2 meters in height, and only after that erect the gables.
Sloping gable roofs. Calculations and preparation for work
You need to start work by taking measurements of the bath, checking the placement of the upper crown and preparing materials.
Step 1. Check the parameters of the log house in terms of length and width; in plan, the log house should be rectangular.
Step 2. Prepare materials. Rafters for baths can be made from timber with a cross-section of 50×100 mm. For all types of soft roofs, you need to make a continuous sheathing; sheet plywood and fiberboard or OSB boards are suitable; you can use used material. For floor beams, take timber with a section of 100×100 mm.
Step 3. Determine the angle of inclination of the slopes. You can remember school mathematics lessons, measure the width of the bathhouse and the height of the roof. Then divide the width in two, using the Pythagorean theorem (the square of the hypotenuse is equal to the sum of the squares of the legs) to determine the length of the rafters. We decided not to overload you and provide a ready-made table for the various most commonly used options.
Determining the angle of inclination of a gable roof
| Height/half span | Angle of inclination of slopes, degrees. |
| 0,27 | 15 |
| 0,36 | 20 |
| 0,47 | 25 |
| 0,58 | 30 |
| 0,70 | 35 |
| 0,84 | 40 |
| 1 | 45 |
| 1,2 | 50 |
| 1,4 | 55 |
Indicators of standard snow load by zone
| Climate zone | Index |
| I climate zone | 80 kg/m² |
| II climate zone | 120 kg/m² |
| III climate zone | 180 kg/m² |
| IV climate zone | 240 kg/m² |
| V climate zone | 320 kg/m² |
| VI climate zone | 400 kg/m² |
For a rough guide, you need to know that Astrakhan is located in the first zone, Pechora is in the sixth zone, and the Moscow region is located in the third zone. Now you can begin installing the rafter system.
Bathhouse 6 x 6 - a popular option
The design for a bathhouse measuring 6x6 m can be called the most popular today. Such a structure does not take up too much space on the site, but the arrangement of the attic can significantly increase the usable area of the building. The dimensions of the rooms inside the bathhouse can be different, depending on the needs and wishes of the owner and his family members.
Such a bathhouse provides for the presence of premises on the ground floor for the same purpose as in the 4 x 6 m building - this is an entrance area with a staircase to climb to the attic, a relaxation room, a steam room and a washing room, which can additionally accommodate a small swimming pool. The rooms can be larger or smaller depending on the needs of the family and the number of bathing lovers.
Bathhouse 6 x 6 meters
The attic floor in a 6x6 bathhouse is also equipped differently. There can be one large room for relaxation in the company of family or friends. But often this large space is divided into several parts. A fairly common option is to create a place in the attic to relax after the steam room, a guest room and a balcony. Here everyone chooses a project to their liking, and what suits them best.
Foundation
Strip foundation for a frame bath
Before constructing the foundation, you need to prepare the site: clear it of debris and level the surface. The base of the bathhouse will be strip, so it is necessary to leave holes for water supply, drainage, ventilation, etc. Next, you need to mark the strip base, and for this you need to drive wooden pegs around the entire perimeter of the building. The foundation site must be level. If the soil on the site is of sufficient density, you can save time on making internal formwork and dig a trench along the width indicated in the plan. In the process of arranging the base for a bathhouse, you need to prepare a foundation for the stove, and at the same time a place for a small septic tank, which will collect moisture from the steam room and washing room.
From reinforcing bars you need to tie a metal frame for pouring concrete. Next, you need to dig a trench no more than 80 cm deep, the bottom of which will be covered with sand (no more than 30 cm) and compacted. The sand cushion will compensate for soil changes during winter cold and summer heat. Place a reinforced mesh into the finished trench and pour concrete evenly around the entire perimeter. Pouring concrete throughout the day is considered ideal. The next day, it is necessary to level the top of the foundation, since the base along the entire perimeter must be level. After the solution has completely dried, and this will happen no earlier than after 2 weeks, cover the base with 2 layers of roofing felt and apply stones.
Development of a bathhouse project with an attic
Important nuances when designing a building:
- When you are designing a future steam room, carefully plan the premises. In addition, windows must be built into the roof. They allow you to significantly save energy during the day by illuminating rooms with natural light. Also, the presence of windows will save you from installing additional ventilation.
- To get to the second floor you need a staircase. It is best to do it inside so as not to go outside and become a victim of drafts. For greater convenience, the stairs should be fairly flat - such stairs are easier to climb after the steam room.
- Sloping type roofs are recognized as the most suitable for wooden baths with an attic, which is why such roofs are often called mansard. Under such a roof, space can be used more efficiently, and all this is thanks to the steep slope of the walls, as well as the vertical arrangement of the gables.
- The main components of any steam room are humidity and high temperature. Based on this, be sure to think through such an issue as interfloor planning of hydro-, heat-, and vapor barriers.
Important points
With any method of laying insulation, it is important to understand that under the attic floor there is a steam room and all adjacent rooms. This means that at the second level a greenhouse effect is possible. This must be avoided at all costs, as steam will quickly render the entire structure unusable.
To do this, you need to take care of high-quality hydro and vapor barrier of the ceiling between levels. Ventilation will also be of utmost importance. The comfort of being inside and the service life of the building depend on how well the entire building is ventilated. Moreover, it is necessary to provide ventilation not only in the attic, but also in the bath complex itself.