→ Designs
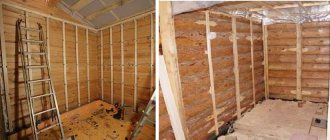
Owners of wooden log houses are rightfully proud of their acquisitions (or the results of the construction they have undertaken). The house turns out to be cozy, beautiful and environmentally friendly - in complete order! But when it comes to interior decoration of a wooden house, and even with their own hands, people sometimes get lost. In some areas of the building it is simply not possible to leave the tree intact. For example, in the kitchen it will quickly become smoky and possibly begin to crack. And the bathroom will begin to swell from moisture, threatening the residents with mold. You just can’t put the same tile on a beam or log: either it won’t stick at all, or very soon it will start to “walk” due to the breath of the tree. And here plasterboard can come to the rescue: in a wooden house it will serve as a load-bearing base for finishing.
Features of installing drywall in a wooden house
Wood is a natural material that not only has positive properties, but also some disadvantages. To avoid negative consequences during the construction and operation of a wooden house, it is important to take into account its features. The question of how to sheathe the inside of a wooden house with plasterboard correctly and complete the interior finishing can be solved by following the rules for its installation:
- Before installing drywall sheets, wooden walls are treated with antiseptic agents that will protect against the appearance of rot, mildew and mold.
- The wood is coated with fire retardants to protect the log or timber house from fire. These can be two-in-one antiseptic-fire retardant products.
- Plasterboard finishing is carried out after partial shrinkage of a wooden house - a year after construction.
- In case of additional insulation from the inside, a vapor barrier film is laid under the plasterboard sheets. The vapor barrier film prevents the formation of condensation in the insulation.
- Caulking cracks in the crown of the house and sealing cracks in logs and beams will help prevent the appearance of moisture on drywall.
- After the building shrinks, the building material is mounted on a frame that is not rigidly connected to the ceiling and floor of the house.
A deformation gap of 30-50 mm is left between the plasterboard and the floor or ceiling. To do this, pads made of any building materials are placed on top and bottom of the plasterboard sheets. Then they are removed. After finishing, the gaps are closed with decorative skirting boards. The frame must also be independent of the supporting foundation of the house so that the drywall does not deform during operation.
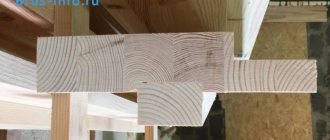
It is very important that the frame is secured to the “slippers” and is floating
Sliding frame made of wooden blocks
It is better to make a wooden frame for drywall from dense wood, such as pine or oak. Regardless of the type of tree, the frame elements must be treated with antiseptic solutions to prevent the formation of mold and rot and fire retardants to prevent the wood from burning.
The algorithm for performing the work is as follows:
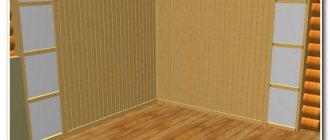
- The outline of the future frame is drawn on the floor and a projection is made onto the ceiling;
- Next, mark the places where you plan to install sliding guides for drywall. It should be remembered that from the corner to the near post it is necessary to maintain a distance of about 0.6 meters. The edges of the drywall must rest on the bars;
- For additional strength, intermediate slats are installed between the main bars in increments of 0.2 meters;
- Metal corners are used as fastenings for vertical frame elements, on one side of which there is a vertical oval groove. Direct fixation is performed with a screw and washer. The corners are attached at a distance of 0.2-0.3 meters from each other;
- The outer bars are placed first, between which a fishing line or cord is pulled to install intermediate elements;
- The fixation of the bars should not be strong so that the bolts can move along the mounting angle when the house shrinks;
- After installing all the vertical supports, proceed to the installation of horizontal struts; their location can be arbitrary. However, experts recommend installing the jumper so that the corner of the plasterboard sheet rests simultaneously on the vertical and horizontal frame element.
Advantages and disadvantages
- low cost. To cover the walls of a house with plasterboard, you will need a much smaller amount than when finishing with clapboard;
- easy and quick installation. Drywall sheets are large in size, so they can sheathe large surface areas of walls and ceilings in a fairly short time;
- plastic. The material bends easily. It can be given any shape from rectangular cascades to semicircular arches;
- has good thermal insulation properties, which allows you to save on energy costs and heating;
- has light weight. You can make the interior lining with plasterboard alone, with your own hands, without anyone’s help;
- During installation, free space is created under the drywall in which utility lines can be hidden;
- environmentally friendly material. It does not contain toxic or synthetic additives and is safe for human health;
- The constituent element of gypsum board is gypsum. It is fireproof. Only the cardboard part of the material can ignite, but only from the side of the fire. There are also fire-resistant plasterboard sheets that are not afraid of fire;
- fragility. Drywall can break off during transportation, operation, or installation. Therefore, it must be handled with care. To hang a heavy item on a plasterboard box, you need to use special fasteners. They will help avoid damage to the material;
- cannot withstand temperature changes. It is mounted at a temperature not lower than -10 degrees;
- It occupies a significant area, so it is not used in small rooms.
Preparatory work
Before you begin installing drywall on the ceiling or walls of a wooden house, you need to perform certain preliminary work, which includes:
- preparing the base;
- determining the need for materials;
- preparing the necessary tools and equipment.
Preparing the base of wooden surfaces
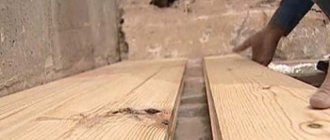
- trim the most protruding places;
- caulk and caulk cracks between logs, beams or boards;
- treat wooden surfaces with antiseptics to protect against rot and mold;
- Fire retardants are applied - compounds that do not allow wood to sustain combustion and increase the flash point.
Material calculation
To determine the amount of material required, it is determined what the frame will be made of, wooden slats or metal profiles.
Over time, wooden slats can also be subject to various deformations, which will be transmitted to the plasterboard sheets, bending them and causing cracks in the seams. Therefore, to make the frame, it is better to use metal elements with a channel-shaped profile, specially designed for drywall.
When sheathing timber, logs or boards, it is not recommended to install plasterboard sheets without a frame, nailing them to wooden planes. In this case, most of the defects will appear on the panels; they will become curved, wavy, with seams of uneven thickness. Leveling will require applying a thick layer of putty, which will begin to fall off over time due to seasonal deformations of the wooden house.
Next, a plan of the walls and ceiling is drawn in the form of a sweep. Having calculated the working surface area, subtracting all openings - door, window openings, radiator installation locations, etc., and multiplying it by 20...25% (safety factor), we divide the result by the area of one sheet with standard dimensions 2500 x 1200 mm, we obtain the required quantity GKL in pieces.
Tool
- electric drill; - screwdriver; - knife for cutting sheets; - hacksaw for wood; - construction corner; — staff-rule 1.2…1.5 m; — bubble level (for leveling when installing the frame); - plumb line (for wall cladding); - water level (for ceiling cladding); - hammer; - stepladder, scaffolding.
Types of drywall
According to the intended purpose, plasterboard can be:
- arched. This material is thin 6.5 mm thick;
- ceiling It is intended for arranging suspended structures and finishing ceilings in dry rooms with humidity up to 70%. Its thickness is 9.5 mm;
- wall It is used for cladding walls and arranging interior partitions. Its thickness is 12.5mm.
According to technological features, plasterboard is divided into:
- standard or regular plasterboard;
- moisture-resistant gypsum board;
- fire-resistant gypsum plasterboard;
- moisture-resistant and fire-resistant;
- acoustic. It is used in rooms where increased sound insulation is required.
The material varies according to the type of edge. The edge is:
- straight. Gaps between straight-edged sheets are not sealed. Designated PC;
- Refined edge of the UK. The joints between sheets with such an edge should be puttied, reinforced with sickle mesh;
- the semicircular edge is sealed with putty, but not reinforced (HRK);
- rounded edge of the lock.
Appearance of different drywall
Frameless method
It is not at all necessary to install the frame: you can attach the drywall directly to the wall surface using a special adhesive. The advantage of this method is that it increases the usable area of the room.
Disadvantages of the frameless method:
- Suitable only for smooth walls, otherwise it will be difficult to install the sheets.
- There is no way to lay wires or hide communications.
- It is unacceptable to use an adhesive composition - it is not among the environmentally friendly materials.
- It is impossible to apply insulation.
If profiled laminated veneer lumber was used to build a house, all of the listed disadvantages will not be observed (except for additional insulation) - this is a rare case when the walls will be almost perfectly smooth, so you can attach drywall directly to their surface.
GVL
GCR is a material consisting of a gypsum core and 2 sheets of cardboard. The elements are connected using glue. Cardboard is used as a reinforcing element. It also gives shape to the material.
GVL are gypsum fiber sheets. They consist of a mixture of gypsum and fluff pulp. Waste paper is mixed with water and sheets are made under a press, which are then dried. They are used to level surfaces and frame frames. GVL is a more durable material. Unlike drywall, it can be used to finish floors.
Finishing gypsum fiber board walls in a wooden house is more labor-intensive. Before screwing the screws into the gypsum fiber, you need to drill holes.
Otherwise, it is impossible to tighten the hardware due to the high density and strength of the sheets. Heavy objects can be hung on a wall covered with gypsum plasterboard: shelves, mirrors. This material is suitable for finishing a bathroom in a wooden house. GVL is not flexible, so it cannot be used for arranging shaped elements.
COVERING SIDING PANELS FOR EXTERNAL WALLS OF A HOUSE ON THE LAKE SHORE
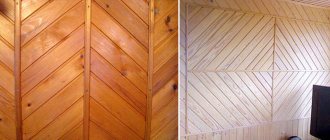
If you want a warm feeling from your exterior, cladding the facade with clapboard will give you this! Look at these photos of houses covered with wooden clapboards and you will see this. Fortunately, modern protective materials allow you not to think for a long time about restoring the facade of a wooden house.
Don’t be afraid to apply new technologies to old, proven materials and you will get ultra-modern wooden house facades that will delight you every day!
The one-story wooden house is located on Orcas Island, one of the archipelagos of San Juan Island off the coast of Washington, USA. The house is equipped with retractable panels that protect it from very windy storms, the prevailing ocean currents that come ashore in winter. Located on the coast of an island, the house uses both retractable wood panels and the surrounding forest for winter protection. Lining is widely used on the facade and interior of the house as a finishing material. But look how ultra-modern the cladding looks!
On the south side of the house there is a rocky shore overlooking the Pacific Ocean. The architects, answering the question of how to cover the facade of the house, used natural colors of cedar cladding on the facade to harmoniously combine this wooden house with the surrounding landscape. The lining material for the exterior cladding of the house is local.
The surrounding forest helps protect the house from weather conditions, which are severe quite often.
Stone collected from the site was used to level the area for the house. The space occupied by the house was compensated by the green roof on it.
The site is on an island with pristine shorelines and marine life, so carefully engineered stormwater flows were designed to replicate pre-construction conditions.
Wooden wall panels are installed on tracks, which allows them to close tightly or open widely depending on weather conditions.
When the weather is good and the panels are open - behind them is a wall of large panoramic windows, which can also be closed or opened wide for easy access to the outdoors.
This double sliding panel system is used on both the front and rear façade of this modern timber home.
When both sets of slides are open, you can easily walk through the house from the front yard to the back deck without opening the door.
The home's wide open spaces are ideal for allowing ocean views to travel unimpeded throughout the home and yard.
When the glass panels are closed and the wall panels remain open, cold parties remain comfortable.
The home's outdoor deck also boasts a large size, allowing you to enjoy outdoor dining.
This stunning outdoor dining table was crafted from two planks of naturally weathered building material.
The roof overhang and deck siding is Western Red Cedar.
Around the back of the house, the alcove is also lined with red cedar clapboard, and the open deck is left uncovered to weather conditions.
The back deck slopes down to the portion of the landscaping that was leveled for the home's foundation.
Inside the home, wood floors, clapboard ceilings and walls act as a frame for impressive views.
Even the view from the front of the house is magnificent and constantly showcases the local animal life.
When the wall panels are closed, the view to both sides of the house is still not completely blocked, and natural daylight can illuminate the interior areas.
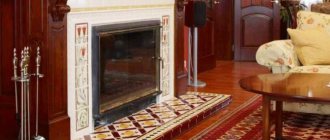
On cold days, when the house is closed, a wood fireplace is used for heating. The design with open square shelving on both sides is the main focus when covering the wall panels. Even the wooden paneling of the ceiling of this wonderful interior does not create the impression of a grandmother’s dacha. As a nod to the color of the ocean and sky, several parts of the interior feature rich blue hues.
The indoor dining table is made from a slab of Fir wood, but unlike the outdoor dining table, it has not been treated for outdoor use. The kitchen overlooks the side façade and deck. It has four small storage rooms on the side walls. The overhangs on the other side of the house are longer and contain a master bedroom overlooking the side garden and ocean, as well as a guest suite overlooking the side garden and a master bathroom overlooking the front yard. Unlike the social area, there is no clapboard paneling in the bedrooms, bathroom and toilets.
Which to choose
To choose the right material, it is important to know the operating conditions of the premises.
For rooms, standard plasterboard is usually used; for rooms with high humidity: kitchen, toilet, bathroom - moisture-resistant.
If possible, you can buy fire-resistant drywall for the entire house. In this case, for the interior decoration of the kitchen and bathroom, the material must also be moisture resistant. Therefore, moisture-resistant GKLVO plasterboard sheets are chosen.
You should pay attention to the quality of the material.
It is better to buy drywall from a well-known brand to be sure of its strength characteristics, for example Knauf.
When choosing, you should determine for what purposes it will be used: for walls, for finishing the ceiling or for creating curly elements. Based on the purpose of the material, you need to select sheets of a certain thickness.
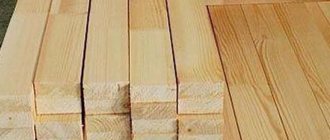
Choosing timber for sheathing
If you decide to assemble a frame for drywall made of wood, then you need to approach the choice of material very carefully. The list is as follows:
The wood must be very well dried. In most cases, you can only buy raw timber at the sawmill, which you will have to dry yourself
The ideal option is considered to be a maximum moisture content of the construction timber of 14%. Each lath and beam must be inspected for defects: uneven and knotty material will create problems during assembly or sheathing. It is important that the lumber is of the same cross-section. For guides and frame posts, you can use the same type of timber 50×50, 40×40, 50×40 mm and others
It is advisable not to use smaller widths, because sheets of plasterboard will be joined and secured with self-tapping screws on the racks.
After purchasing the material, all slats need to be inspected again and treated with protective impregnations or at least painted
This will protect the forest from moisture penetration. It is important to remember that the timber and slats must be stored in a horizontal position, otherwise, over time, vertical storage will result in curved racks
Common mistakes
The most common errors include:
- laying sheets of drywall with the front side facing the wall. They should be positioned with the front side inward. When the front sides of the sheets are combined, a recess is formed at the joints, which is convenient for treating them with putty;
- the formation of cross-shaped seams leads to a deterioration in the strength of the material. Plasterboard sheets must be installed with offset seams;
- the location of the screws is close to the edge. When temperature changes occur, the metal expands and breaks the plaster. The fasteners should be located at a distance of 10-15 cm from the edge and always not opposite each other on adjacent sheets, but offset;
- The screws are screwed in incorrectly. The cap should not stick out from the sheet, this will make it difficult to putty the seams. The level of the hardware can be checked with a spatula. If, when passing the spatula along the surface of the sheet, the head touches the canvas, then the self-tapping screw must be tightened;
- the absence of a compensation gap from the floor and ceiling can lead to the formation of cracks at the joints. The gap should be 30-50 mm.
How to build a frame for plasterboard sheathing
In the case of a wooden house, you can go in different ways:
1) If the cladding is carried out in a house that was built several years ago and has settled sufficiently in height, you can mount a fixed frame of slats. To work you will need:
- 75×25 mm slats for guides for gypsum board joints;
- 50×25 slats for sheet guides;
- Self-tapping screws;
- Metal corners for fastening slats;
- Screwdriver;
- Ruler, pencil and stationery knife for marking and cutting gypsum boards.
Horizontal slats are attached along the lower edge and under the ceiling. In this case, the lower one lies on the finished floor, the upper one does not reach the ceiling 1-2 cm. The placement of vertical guides begins from the corner. The distance between the main slats along the central axes should be equal to the width of the sheet. Internal slats are set in increments of 400 mm, i.e. 2 auxiliary slats for 1 sheet with a width of 1205 mm.
The slats are fastened to the wall using self-tapping screws or nails. The installation of each guide must be accompanied by checking verticality with a level or plumb line. The main and auxiliary elements can be attached to the horizontal floor and ceiling rails either with metal corners or with self-tapping screws, directing them to the support point at an angle of 45°.
It is important to check not only the strict verticality of the guides, but also the evenness of the plane to which the drywall will be attached. For control, it is optimal to use a long, flat rod or a construction rule.
2) The movable frame is suitable for installation in a newly built house, in which the rigid frame given above is deformed when the structure shrinks. You will need the same set of tools, only as a moving element you need to purchase “crab” attachments and PAZ 2 strips. The plank is attached to the wall motionlessly; a crab pre-installed on it with a rail can move along it within 6 cm when it shrinks. They tell you more about installation masters in the video. The work algorithm also applies to wooden frames.
3) Another interesting way to install a movable frame without complex devices. Fastening is carried out not to the wall, but to the ceiling. To do this, nylon plugs are inserted into the places marked on it. They will protect metal and wood from negative effects on each other. Holes are drilled in the ceiling beam at the attachment point, into which a long bolt and washer are threaded. It turns out that the upper part of the frame is not firmly fixed, but suspended. Thus, we leave the structure the opportunity to maintain its integrity and not change its position when the main wall shrinks and the ceiling lowers.
The guide rails are screwed into the ceiling and floor beams and to the walls along their length.
Beautiful examples
- Audacity and avant-garde. Walls finished with OSB without further coating create a bright interior with an interesting heterogeneous pattern. Extraordinary aesthetics are accompanied by cost savings. The fashion for such finishing is gaining momentum.
- Natural wall. Finishing the interior walls with timber-like boards allows you to create a monolithic interior with excellent aesthetics. Decorative beams are tinted in a dark contrasting color and highlight the light colors of the finish. The ceiling is covered with clapboard and painted in a light color or covered with matte varnish.
The interior decoration of a frame house is shown in the following video.
Finishing
After covering, you can immediately begin finishing the surfaces:
- Initially, the joints between the sheets are reinforced with a special tape and all fasteners are covered with putty.
- After drying, the applied plaster mixture is rubbed with sandpaper on a grater.
- If painting or wallpapering is planned, then all plasterboard walls must be puttied by applying a leveling starting layer of the mixture, and after drying and grouting a thin finishing layer, 1–2 mm thick.
You can also finish it with decorative plaster or lay tiles.
Briefly about the main thing
Using a cold attic space and creating a warm, cozy living room in it is possible today. We offer a choice of 6 options for covering the interior space of the attic.
Classic lining will help create a cozy “rustic” interior. Drywall will make it possible to create modern forms. A block house or imitation timber will immerse you in the atmosphere of a rich village mansion. Plywood will allow you to create a warm room with maximum savings. OSB boards will solve the finishing issue in the shortest possible time.
Knowing the characteristics of materials and their capabilities in installation and operation, you can make the final choice. After all, one of the attic cladding options will fit perfectly into your interior.