A warm, oxygen-rich wooden house provides an environmentally friendly microclimate and an aesthetically pleasing appearance. Walls made of wood, even after final shrinkage, continue to “breathe”, changing in size. This property of natural material is associated with some difficulties in interior decoration. The best option for a wooden house is to cover the walls with plasterboard. Light weight, simple installation and availability of pressed sheets allow you to level the surfaces of walls and ceilings without the involvement of specialists.
When to start
On a “fresh” log house, you can begin finishing work no earlier than the main shrinkage has passed.
If the log house is made of laminated timber, it should take 3-4 weeks. For all other types of wooden houses, the period is calculated in months, and sometimes years. The exact shrinkage time depends on the initial moisture content of the raw materials, climate zone and construction time. That's how difficult it is. In any case, it’s not worth starting finishing sooner than a year later, or at least 10 months later. During this period of time, active shrinkage of the wood occurs, logs and beams decrease in size, and the insulation laid between the crowns is crushed. If you attach the trim before the main processes have completed, it will fall off or become warped. Everything will have to be removed and redone. So there's no need to rush. Moreover, there will be enough work: you need to achieve tightness of the joints, and this is not easy. Careful competent caulking is needed. Before starting finishing work, it is tedious to caulk a log or timber frame
Typically, the main caulking of a log house takes place in two stages. Primary - a few weeks after installing the log house, and secondary - after about six to eight months. Each time the cracks are clogged with insulation - jute, tow, sometimes moss. It is done immediately both outside and inside, otherwise the house will warp. Therefore, they walk around the perimeter of the building, caulking alternately, each crown, now from the outside, now from the inside. Work begins from below, from the lowest row of logs or beams.
With each caulking, the frame rises by 5-7 cm. Then, under the force of gravity, it gradually settles. The compacted inter-crown insulation reliably covers the cracks
The quality of this work is very important: it not least determines how warm the house will be
Finishing work begins inside the wooden house after the frame has settled after the second caulking. To determine whether the process is completed or not, the height of the walls is periodically measured. If there are no significant changes within two to three months, we can assume that the main processes have passed. It's time to start decorating the inside and outside of the house.
How to choose the right materials
When selecting materials for finishing a house made of timber with plasterboard, several fair questions arise:
- Is it possible to attach drywall directly to wooden walls inside the house?
- If you use a frame, can it be assembled from wood or should you prefer a metal profile?
- What type of drywall should I use: wall, moisture-resistant or fire-resistant to improve fire safety?
The answers to these questions will determine the further choice of material, as well as the techniques for finishing a house with plasterboard.
Frame or frameless methods
The frameless method of mounting plasterboard sheets to the wall surface is simpler and faster, but requires compliance with many factors.
And in this case, laying communications becomes much more difficult. For example, you will have to directly drill the supporting structures for the wiring.
Metal or wood
In timber houses, both wooden slats and metal profiles can be used as frame material. Moreover, in the first option, it is permissible to build a simpler structure by attaching the beams under the gypsum board directly to the walls (again, taking into account differences). But the quality of lumber must be at a high level. Only wood that is well dried and treated with protective compounds is used. The cross-section of the racks of such a frame must be exactly 50×25, the same criterion for the crossbars, but the guide bars are no less than 75×25!
Mounted wooden frame under plasterboard in a timber house
The process of attaching wooden frame posts
Metal profile types are also suitable for use in wood construction. With their help, you can build a solid foundation that is resistant to influences such as humidity and temperature changes.
Examples of attic cladding - photos and videos
Walls - imitation timber, roof slope - plasterboardSource domoholic.ru
Walls - plasterboard, roof slope - clapboardSource yandex.net
Finishing with plastic lining and block houseSource samozdrav.net.ua
Beauty in the interior, created on the basis of plasterboardSource vse-otoplenie.ru
An interesting solution in plywoodSource modernplace.ru
Classic attic interiors of country housesSource izbrusadom.com
Interior of an attic at the dachaSource lestnitsygid.ru
Briefly about the main thing
Using a cold attic space and creating a warm, cozy living room in it is possible today. We offer a choice of 6 options for covering the interior space of the attic.
Classic lining will help create a cozy “rustic” interior. Drywall will make it possible to create modern forms. A block house or imitation timber will immerse you in the atmosphere of a rich village mansion. Plywood will allow you to create a warm room with maximum savings. OSB boards will solve the finishing issue in the shortest possible time.
Knowing the characteristics of materials and their capabilities in installation and operation, you can make the final choice. After all, one of the attic cladding options will fit perfectly into your interior.
Some additional nuances
The rest of the profiles can be placed inside the main frame, closer to its middle. This will make the structure more reliable and will allow various interior items to be attached to the locations where these scraps are located.
When insulating the under-frame space, it is better to use insulation in slabs, since it has sufficient density for vertical installation and will not sag during operation. If it is not possible to buy exactly this type of thermal insulation material, then you can use the rolled version. In this case, it will have to be rolled out onto the wall before the frame is assembled and secured using plates and dowel-nails directly to the wall. This point must be taken into account before installation work begins.
Finishing a frame house with plasterboard
Regardless of whether the frame will be assembled with metal or wooden sheathing, the cladding technology is practically the same. But the manufacture of the base itself has some differences, dictated by the characteristics of the material. The main rule is to start finishing the frame house from the ceiling.
Frame on the ceiling for plasterboard in a frame house
Installation of a plasterboard ceiling in a frame house follows the same technology as in other types of buildings. With fastening of guides, hangers and rack (ceiling) profile.
Wooden frame
Assembling a wooden frame is quite simple, and if the sheathing is installed, then the whole work is simplified even more:
- Initially, the walls are marked where the sheathing bars will be fixed.
- Wooden blanks are cut to size.
- Fastening is done using wood screws. Their length must be at least 75 mm for reliable fastening of the timber to the walls. The pitch between points is 300-350 mm.
- When installing lintels, first install the load-bearing support bars. They are mounted on the floor and ceiling according to the markings.
- The frame posts are installed on the guides, connecting them to the guides by attaching mounting angles.
- Jumpers made of the same material are attached to the racks with the same corners.
Insulation, waterproofing and frame base on the ceiling for plasterboard
After assembling the frame, you can route the wiring directly through the posts by drilling holes in them. They also lay sound insulation and a mandatory vapor barrier layer.
Metal carcass
The base from a metal profile is assembled according to the classical scheme: marking and installing guide profiles, fastening direct hangers to the walls, installing and connecting frame posts, installing lintels.
Installation procedure:
- Markings for the guide profile are made along the floor and ceiling.
- The lath is laid on the surface and holes are drilled for the fastening dowel nails. The distance between fasteners is 350-400 mm.
- The walls are marked with lines where the frame posts will be installed.
- Straight hangers in the amount of 3-4 pieces are attached along the lines with dowels - nails or screws - for each rack.
- A rack profile is inserted into the guides and connected to the supporting rails with small self-tapping screws. Direct hangers are bent and also connected to the racks. The number of racks is at least 3 pieces, with two sheets of drywall joined at the outermost ones.
- Jumpers are mounted between the racks, alternating their position up and down through 1-2 sheets.
After installation is completed, sound insulation and insulation, a vapor barrier sheet for the walls, and wiring in a corrugated pipe are placed in the frame, if necessary.
Drywall installation
Sheathing sheets are attached to the frame using the same technology and without any differences:
- the sheet is laid on the base and the lower right corner is first fixed, moving upward, then along the perimeter. Gaps should be left at the bottom and top within 10-20 mm;
- the next gypsum board is joined to the adjacent element on the frame post, leaving a gap of 2 millimeters;
- Self-tapping screws for mounting drywall sheets must be attached to the sheet at a distance of 250-300 millimeters. The caps are slightly sunk to a depth of 1-1.5 mm, but without damaging the cardboard shell.
- You can prepare holes in advance for wiring terminals for switches, sockets and distribution boxes. When attaching such a sheet, the wiring is pulled into the openings.
In general, finishing a house built on a frame with plasterboard is not very different from the usual options for performing the same work.
The main attention should be paid to laying communication lines, preparing and protecting load-bearing walls
Watch the video: covering the inside of a wooden house with plasterboard.
GKL against plaster
First, let's decide whether it's worth messing with drywall at all or whether it's better to use plaster the old fashioned way.
Here are the arguments in favor of gypsum boards:
- High finishing speed due to the large sheet area (3 square meters with a size of 2500x1200 mm);
- Possibility to eliminate significant unevenness of the base at minimal cost. Let's say, if the height difference between adjacent elements of a slab floor is 8-10 centimeters (yes, yes, this also happens), leveling the ceiling with plaster is very expensive and unsafe: the fall of peeling plaster of such thickness can cause a lot of trouble.
But for gypsum boards on the sheathing, the condition of the surface underneath does not matter at all - as long as there is something to attach the frame to;
It is easier and cheaper to level an uneven and littered wall with plasterboard.
- The surface of kraft paper (gypsum core shell) has excellent adhesive properties. You can glue wallpaper of any density to it using any wallpaper glue; tiles also adhere perfectly to cement tile adhesive or homemade cement-based mortar.
Interesting: I used spot-applied silicone sealant to adhere the tiles to the drywall above the bathtub. It was also used to seal the seams between the tiles and to connect the apron to the bathtub. All seams maintain absolute tightness for three years of active use of the bathroom; The tile holds more than securely.
Ceramic tiles adhere perfectly to drywall using any tile adhesive. And not only them.
How does drywall compare to plaster?
- Mechanical strength. Let me clarify: in this parameter, gypsum sheet material is second only to cement plaster. Using gypsum board to decorate walls in a gym or workshop is a dubious idea;
- Resistant to water with constant contact with it. Alas, even moisture-resistant drywall only tolerates high air humidity. If you immerse a gypsum core in water, it will get wet just like any other gypsum product. Accordingly, it would be a bad idea to use gypsum board without protection with a waterproof finishing finish for the construction of shower walls;
- Occupied usable area of the room. It is better to level walls with minor unevenness in a small room with a thin layer of plaster: even when glued directly to the wall, without lathing, a sheet of plasterboard, taking into account the thickness of the glue, will shift the surface of each wall by at least 20 mm. When mounted on a frame, each wall will move towards the center of the room by 60 - 80 mm.
The space under the sheathing is wasted.
Useful tips
Before leveling the walls, you should calculate the required amount of material for the work. To do this, the area of the surface to be finished is divided by the area of one sheet. Ceiling sheathing for plasterboard should not be made from a wooden block. Since it does not have a sufficient margin of safety to withstand the weight of the finish. The correct version of a metal frame for a room with wooden walls involves fastening the profiles using self-tapping screws. When installing lathing on a wooden ceiling, you should enlist the help of one or more people. You will need help when you need to sheathe the sheathing with heavy sheets. Even if you manage to lift them to a height with your own hands, you should take into account that the canvases are quite fragile and can simply crack. Before sheathing the inside of a wooden house, the walls should be prepared. To do this, all cracks are filled with construction foam.
It is also important to exclude high humidity of the material. Although a gap will be created between the sheathing and the main wall, ventilation there will not be as intense, and if the walls are damp, the materials may become covered with fungus and mold
Before installing the frame under the drywall on the wall, you should select the material. If these are metal profiles, then the rack-mount type will need to be fixed to the profiles at the top and bottom using brackets. The main profiles are attached to the walls of the house with dowels. The distance between them should be maintained within 90 cm or less. Regardless of how the walls in a wooden house are leveled using plasterboard - without a frame or with its use, the sheets must be laid in such a way that they are staggered. The fastening of the sheets can be installed not on a wooden sheathing, but directly on the internal walls of the house. If irregularities larger than 20 mm were noticed before finishing, they should be leveled by applying glue in the form of cakes to the back of the plasterboard sheets. Before attaching the sheets, you should make sure that they have been cut taking into account the expansion joints at the top and bottom. To control the gap, you can lay pieces of gypsum board or foam plastic on the floor. The design of a kitchen or any other room after the glue has dried can be done in the traditional way. Typically, drywall is covered with wallpaper or tiles. The ceiling can be painted, which is the most affordable and fastest way to decorate surfaces in the house.
- If the frame, covered with plasterboard, will hide electrical communications inside, they should be laid in flexible metal tubes. They communicate with the house's grounding system.
- Standard cutting of drywall may seem like a daunting task for a beginner. In fact, this stage of the work is quite simple. According to the markings, it is necessary to cut through the cardboard layer of the sheet, and then lay it on the edge of the table and bend it. After this, the cardboard is cut from the reverse side.
Advantages of designs
The positive side of a plasterboard partition is that, unlike brickwork, it does not need to be plastered. The wall surface is smooth, ready for finishing. Additional advantages of the designs:
- quick installation;
- light weight reduces the load on the foundation;
- stability and reliability of the structure thanks to a durable metal frame;
- The wiring of electrical points is simplified as much as possible, without additional gating of walls;
- high noise insulation;
- gypsum, which is 92% in the slab, is an environmentally friendly material.
When installing structures there is much less dust and debris. The ease of assembly allows you to build them yourself. You just need to adhere to a certain sequence and follow the recommendations of specialists.
Options for partition construction and design
Features of installing drywall in a wooden house
There are two ways to attach drywall to surfaces: frameless and framed.
Installing gypsum boards directly on timber walls is undesirable, due to changes in the volume of wood depending on environmental humidity. Rigid fastening of the slabs will certainly lead to the appearance of distortions and cracks in the coating. In addition, the uneven relief of the walls and ceiling made of timber does not allow the gypsum plasterboard to be installed perfectly evenly.
Interior finishing of a wooden house with plasterboard is possible only with the help of a frame. A budget option for old, established buildings and country houses is to install gypsum boards on slats or beams made of softwood. In this case, the sheathing should not be tightly adjacent to the floor and ceiling of the room. The gaps are covered with plinth.
The mobility of walls in a new house made of wooden beams can reach 6 cm in height. Therefore, drywall is installed on a sliding frame made of metal profiles. This method allows you to avoid cracks from shrinkage of the house and perfectly level the surface.
Preparatory work
A preliminary calculation of the amount of materials and a detailed plan for covering walls and ceilings with plasterboard will help you draw up an estimate and prepare tools for its implementation.
The first step is to draw a sketch drawing of all the surfaces that need to be leveled. Then the lines for the location of the frame and the places of fastenings are drawn on the plan. At the design stage, it should be taken into account that the vertical joints of the slabs must fall on the profile axis with a horizontal shift in each row. Based on a carefully compiled project, you can easily calculate the number of required profiles, drywall sheets, connecting parts and fasteners.
To carry out high-quality fastening of gypsum boards, you will need a standard set of tools: a level, tape measure, marker and chalk for marking fasteners, a drill, a screwdriver, a knife or saw for cutting.
Guide profiles are installed along the lower and upper perimeter of the room. The first vertical post is fixed at a distance of 30 cm from the corner of the room, then in increments of 60 cm. Horizontal planks are fixed at the same intervals to support the structure. The ceiling plan is marked in the same way.
Installation of frame base and drywall in a wooden house
Fastening the frame begins with precise marking of lines for fixing the guide profiles. In a wooden house, these parts are rigidly fixed only to the surface that is being leveled. That is, the wall frame is not connected to the ceiling and floor.
If your house is still shrinking. then before starting work, prepare sliding fasteners for vertical profiles. A strip is screwed to the first level connector (“crab”) with self-tapping screws, on which the PAZ 2 sliding support is mounted. It is this support that is fixedly attached to the wall of the house. In this case, the crab together with the profile can move freely up and down within 6 cm. Sheets of drywall are cut out so that there is a small gap between the floor and the ceiling. This fastening allows the wall to “breathe” without compromising the integrity of the skin. Shrinkage seams along the floor and ceiling are covered with floor and ceiling skirting boards.
Crab type mount
Sliding mount "PAZ 2"
Fastening with crabs to the wall
If the house is no longer new and the shrinkage is behind us, then the “crabs” can be attached directly to the wall without fear of cracks appearing.
Work order:
- Horizontal guidelines for the guides are carried out at a distance of 10–15 cm from the upper and lower edges of the wall;
- Mark the lines for attaching the vertical posts;
- The guide profiles are rigidly fixed to the beam along the lower and upper markings;
- Sliding connections for vertical supports (4 for each) are secured along the guide lines;
- The main metal profiles and horizontal jumpers are installed on the crabs.
General view of the frame after installation
After installing the frame, the electrical wires are enclosed in a metal box so as not to damage them when attaching the KGL. If necessary, heat and sound insulation is placed in the cells between the racks. For this purpose, mineral wool is used.
Sheathing the frame with plasterboard slabs is done on metal profiles with a pitch between screws of 30 cm. The fastener caps should be buried 1 mm in the cardboard. Before finishing, the joints and fasteners are puttied, having previously been glued with serpyanka.
Attaching drywall sheets to the frame
Puttying joints using serpyanka
This video explains simply and clearly all the subtleties that need to be taken into account when installing the frame:
Where to start building a frame?
Before building the sheathing itself, it is necessary to complete the installation of electrical wiring and check its functioning. Next, you need to decide whether the wall will be insulated. If so, then under the insulation it will be necessary to leave a space between the profiles and the wall equal to the thickness of the insulation material itself.
Installation of drywall is carried out in stages - from one wall to another. The sheathing on the next wall does not begin until the installation of gypsum boards on the previous one is completed. In this case, special attention should be paid to the fact that when leveling the general plane of the frame relative to existing window sills or communications, one must take into account the need to form a right angle relative to the next wall. If this is not observed, then the wall that will be mounted next may either go into the plane of the wall or, conversely, move far from the wall. Or you will have to make an angle that is not 90 degrees. And this can be greatly reflected in the future when arranging furniture, laying floor tiles or laminate.
If the room has windows, then the construction of the frame begins from them.
Tools that will be needed when installing sheathing on drywall:
- metal scissors;
- long level;
- laser level (it can be replaced by a plumb line and a spool of thread);
- cutter;
- perforator;
- screwdriver;
- roulette.
Wooden sheathing
It is especially appropriate if drywall is being installed in an old wooden house. Its shrinkage is complete, and the walls are probably not too smooth. But the main thing is that they only breathe and will not change much in size.
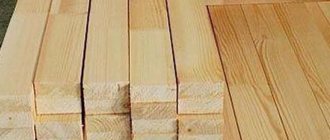
- A block measuring 75x25 mm is taken under the support posts. More is possible, less is in no case. Naturally, the sheathing is made from lumber treated with fire retardants and antiseptics, followed by drying.
- For guides and crossbars, 50x25 mm strips are sufficient.
- The support posts are attached in increments of 1.2 meters, that is, the width of the gypsum board sheet. At least one guide is mounted between them. If you want greater structural strength, stuff them more often. The main thing is that there should be a support post in the center of the sheet, and a guide at the junction of the plates.
- The crossbars are packed in such an order that they are located at the junction of the narrow sides of the gypsum board. Do not forget that horizontal seams should not line up: drywall is installed in a checkerboard pattern or at least with a noticeable offset.
All slats are leveled. The largest protrusion of the wall is taken as the reference point. In places of depressions, wedges are placed, hewn to the required thickness. When finishing the interior of your house with plasterboard on a wooden frame, the slats are attached to the lumber with screws and a washer at a distance of 20-30 cm. They should not be tightened too much so that the sheathing does not deform during natural movements of the walls.
Advantages
When the lathing is made from wood with your own hands, the home craftsman gains many advantages. Firstly, such a frame does not form cold bridges, which cannot be said about a metal profile. The internal cavities will only need to be filled with insulating material, which will also soundproof the walls. Secondly, installation work using wooden blocks is somewhat easier to carry out, because it can be difficult to deal with load-bearing, rack and guide profiles. Thirdly, all the disadvantages of wood such as fire hazard and susceptibility to insects can be eliminated by treating the material before installation with fire retardants and compounds that ensure biological inertness.
When do interior wall decoration work begin?
“It’s better not to rush and let the new building sit for at least 10 months”
The final finishing of a “fresh” log house can begin no earlier than the shrinkage process is completed. For a structure made of laminated veneer lumber, this period lasts about four weeks, for others it lasts for many months. To calculate the time required to shrink a new house, you need to know the percentage of humidity of the raw materials used for construction, the climatic features of the area where the cottage is located, and take into account the duration of construction. In any case, it is better not to rush and let the new building sit for at least 10 months. During this time, the logs themselves will dry out and the insulation lying between the crowns will shrink. Externally, it is difficult to notice the processes taking place with the eye, however, if you ignore the recommendations and sheathe the walls before the shrinkage is complete, you can clearly see that it is quite active. The finish will definitely become distorted, covered with a network of cracks, or even completely torn. In general, nothing will save you from remodeling, not even the installation of a floating frame.
Preparatory stage
Drywall is a finishing material characterized by durability. It is this fact that makes us think about carrying out preventive treatment of all surfaces that will be hidden behind gypsum board sheets. The owner of the building can only find out that fungus has appeared on the surface of the main walls or mold has grown at the moment when the structure, erected several years ago, begins to crumble and collapse.
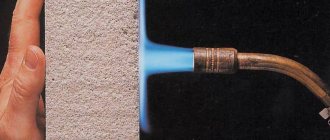
Natural wood is a fire hazard. Therefore, all surfaces should be thoroughly treated with antifungal agents. The gaps between the beams must be caulked with tow, impregnated with compounds that ensure the structure’s ability to resist fire. Silicone or foam can be used as an additional treatment.
Foaming cracks
All components of the structure are pre-cut or sawn into separate pieces, the length of which is determined after accurate measurements are taken. This applies not only to the contour. Longitudinal (rack-mount) guides and jumpers are prepared in advance.
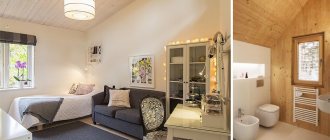
Types of wall decoration for a wooden house
If the log house itself has an attractive appearance, it is rarely sheathed. In this case, it makes sense to reduce the cost of interior finishing: sand the log or timber and tint it. Only the floors should be varnished: the varnish will prevent abrasion of the wood. It is best to cover the walls and ceiling with tinting antiseptics or water-based paints. They do not paint over the texture of the wood, but only give it a tint, better showing the pattern. You will still have to use antiseptics to maintain the attractive appearance of the wood.
You will most likely have to use antiseptics, you can take them with a coloring pigment, at the same time highlight the beauty of the wood pattern
If the log or beam is normal, the caulking seam looks bad, it is sealed with a twisted cord, and the walls are finished in the same way - sanded and tinted. Everything also looks good, and the cord in the groove serves as an additional guarantee against drafts.
Ugly seams from caulk can be sealed with cord - it looks attractive, and even prevents drafts
How to cover the walls of a wooden house inside
If the frame is so crooked or old that sanding will not help, you will have to make the interior decoration of the wooden house from lining, wall panels, drywall or other material.
For any of these materials, it is better to make a lathing: this way you can level the surface of the walls. In addition, there is space behind the sheathing for free air circulation.
In a wooden house, this is important, since only dry wood does not rot or blacken. Free air circulation between the finishing material and the wall will maintain their normal condition
The sheathing in a house made of timber or logs is done in the same way: you need to remember that it must “float” so that the finishing does not fly off
The space behind the sheathing is also used for laying communications - electrical wiring, for example. In a wooden house it should be made in non-flammable pipes, so you need a fair amount of space for it. If necessary, you can put insulation there if your house is cold. If you spend little on heating and the house is warm, it is better not to use any additional materials: neither insulation nor vapor barrier. Wood itself does an excellent job of maintaining stable humidity in the house, and extra layers only upset the balance.
Not everyone likes attaching trim to the sheathing: if an animal or insects settle behind the sheathing, it is difficult to get rid of them. In this case, you can level the surface of the logs by removing the protruding parts and nail the finish to this surface. A perfectly flat surface is difficult to achieve, but possible. The gaps between the finishing material and the wall, which in this case still exist, were once covered with clay. It will both provide thermal insulation and protect against drafts. Technologically this is incorrect, but they do it too.
Whatever materials are used for cladding the walls of a wooden house inside, there should be a gap of at least 2-4 cm to the ceiling. For a “young” log house, this is insurance against shrinkage. For the old one - a gap to compensate for changes in the geometry of the wood. She breathes all her life: sometimes she gains moisture and swells, sometimes she dries out. The gap under the ceiling will allow the wood to easily expand or shrink, without consequences for the finish. If this is not done, then either cracks will appear or the finishing will bend/rip out. To prevent the gap from “hurting the eye,” it is covered with a ceiling plinth. It is only nailed to the stream, it is only leaned against the wall. In this case, all movements will be invisible.
Read about the interiors of a wooden house and methods of interior decoration in the article “Design of a wooden house inside in photos and videos”
Construction of a brick partition
How to make partitions in a brick bath? This material is quite common and is often used for the construction of buildings in the bathhouse.
The construction is made using half-brick spoon masonry.
To make work easier, some specialists use hollow material.
Preparatory procedures
Before starting work, you need to carefully prepare the surface. The plank covering is removed from the floor to the very base, after which it is cleaned with a wet broom. The place where the construction will be carried out is equipped with good lighting. All foreign objects are removed from the premises and the outlines of the building are outlined.
To work you will need to prepare the following tools:
- level;
- sander;
- trowel;
- plumb line and rule;
- cement-sand mortar. For more information about the construction of a partition, watch this video:
Creating a partition
The process of erecting a brick partition consists of the following stages:
- A string is stretched and used as a guide. The solution is laid and leveled using a trowel. The level checks horizontality. You will need to wait until the solution begins to dry.
- Another layer is applied on top of the dried mixture. After which the first row of brick screed is laid.
- The mortar is applied to the end of the first brick, after which it is laid by pressing down. It is tapped and leveled according to the string; the remaining mixture will need to be removed immediately before it has time to dry.
- If an opening for a door is planned in the partition, it will need to be positioned first. The door frame is installed using spacers. The evenness of its location is checked and, if necessary, this parameter is adjusted.
- The brick is laid close to the box. To tie the partition together, special metal strips are used; they are folded and attached to the side surfaces between the bricks. Instead of strips, you can also use reinforcing rods.
- After laying the first row is completed, the brick is divided into 2 parts with a pick. One half is used to start the second row. The string that served as a guide is moved higher so that you can easily navigate. Laying the third row is carried out in the same way as the first. For more information about the process, watch this video:
Building any kind of partition between the steam room and the sink is a rather labor-intensive procedure.
Not every beginner will be able to do this kind of work on their own.
But, as a result, this will ensure a high level of comfort in the bathhouse, which is why the construction of such elements has recently become popular.
Also useful for repairs:
- How to knit a hat and snood with braids
- Diamond cutting wheels for metal
- DIY flowers in a dhow
Covering wooden walls with plasterboard
If the project was prepared in advance, then at this stage you should not have any difficulties. Even if you are taking on work for the first time and do not fully know what and how to decorate the walls in a wooden house yourself. If the length of the gypsum board is not sufficient in height, then a piece of the required size is cut from the new sheet. In this case, the fastening of adjacent sheets should be offset, i.e. in a checkerboard pattern.
Each sheet is attached to self-tapping screws, spaced 10 mm from the edge. The traditional step for fastening is 30 cm. Try to carefully screw the screws into the sheets of drywall so that the cap is buried 1 mm in the cardboard. This is enough to level the walls in a wooden house on your own. Afterwards, you can begin decorative finishing, not forgetting to first putty all the joints and screw heads.
At this stage, it is also possible to place insulation in the inter-frame space, providing the profiles with transverse jumpers, according to the cell principle. Insert rack profiles into the slots of the lower and upper guides, every 40–60 cm and secure with piercing screws with a 13 mm press washer. Pull the horizontal control threads (with a distance between them of 100–120 cm) to control the level, and, focusing on them, screw the profiles to the hangers (bent in the shape of the letter “P”) with metal self-tapping screws.
Bend the excess edges of the hangers back so that they do not protrude beyond the outer surface of the profiles. From all of the above, several logical conclusions can be drawn. First, plasterboard sheets are best suited for finishing work on leveling walls and ceilings. This is expressed both in savings on building materials and in savings during installation, because there are no special skills when installing structures made of gypsum plasterboard or gypsum fiber board.
And if the owner of the house does the leveling and covering of the walls himself, this will undoubtedly raise his self-esteem.
- ordinary plasterboard (plasterboard sheet - gypsum plasterboard);
- gypsum fiber sheet (GVL);
- moisture-resistant plasterboard sheet (GKLV);
- fire-resistant plasterboard sheet (GKLO).
- The unevenness of the wall is more than 4 mm.
- Non-standard room height. Plasterboard sheets will not be able to be attached without additional cuts.
This method uses long drywall screws. The first step is to determine the points of unevenness and hang a plumb line in this place. After this, this area is divided into small zones into which self-tapping screws are inserted.
The distance at which the screws will be inserted is 20 cm, but at different heights.
- natural composition of dry gypsum plaster;
- high vapor permeability of the material;
- light weight and ease of cutting facing slabs;
- low cost and simple installation on a frame base;
- additional thermal insulation;
- communication wiring hidden behind the casing;
- ideally flat surface for finishing materials.
The mobility of walls in a new house made of wooden beams can reach 6 cm in height. Therefore, drywall is installed on a sliding frame made of metal profiles. This method allows you to avoid cracks from shrinkage of the house and perfectly level the surface.
- saves significant funds from the family budget;
- preserves the volume of the room;
- carried out in a short time;
- does not require special skills - just the ability to handle various tools.
Important: when attaching gypsum boards to the wall with adhesive mixtures, it is not recommended to allow horizontal seams. Therefore, before purchasing material, you should measure the height of the ceiling in order to buy sheets of the appropriate length
If it is impossible to do without a horizontal seam, then the sheets are attached in the same order as brickwork. The frame in a wooden house under plasterboard can also be wooden or metal. The latter is considered more durable, in addition, a wooden frame can only be used in a house with complete shrinkage.
When installing electrical wiring, it is worth remembering, again, fire safety
, therefore, all wires should be placed in a metal corrugation or installed in an open way - in cable channels.
What profile is needed to build the frame?
- Rack profile (PS). It has a U-shaped structure. The rear plane of the profile is called the “back”. Its size can be 50, 75, 100 mm. The side ribs, which are called “shelves,” have longitudinal grooves. Their size is 50 mm. This profile is used to create vertical posts on which the guides are attached.
- Guide profile (PN). The width of its base or “back” is the same as the rack - 50-100 mm, and the “shelves” - 40 mm. This profile serves as a kind of frame for the future wall structure. It is attached to the floor, ceiling or above door and window openings transversely to the pillar guides.
- Angular profile (PU). It is made of perforated metal and has an 85 degree angle. Designed for corner joints, both internal and external.
- Arched profile (PA). Used for building bent structures and building arches.
All profiles are available in lengths from 2.75 to 4 meters. This is due mainly to consumer demands. If a larger length is required, then the existing dimensions are spliced using a special coupling called a “crab”. To install the entire structure, you will also need hangers.
Decorative walls made of plasterboard
Drywall is a gypsum board covered on both sides with cardboard. You choose the thickness of the material based on the planned work. The thickest sheets of 12.5 mm are used for finishing walls and partitions, thinner sheets of 9.5 mm are used for ceiling design and 6.5 mm for decorating arches.
- It is worth mentioning a number of reasons why you should choose drywall:
- Firstly, it is an accessible and relatively cheap material.
- Secondly, it can be given any desired shape, cut, bent, and so on. There is room for your creative imagination to run wild.
- Thirdly, you can forget about the mountains of construction waste. After all, the flat and smooth surface of the drywall is ready for any type of finishing. Improving heat and sound insulation and “hiding” electrical wires is also quite possible.
You have a unique opportunity to feel like a designer. After all, drywall “listens” even to an inexperienced builder
It is important to clearly imagine the end result by drawing up an action plan
As you can see, plasterboard wall design has many advantages. But someone wants to carry out a major renovation, and someone wants to change a single room, so let’s get acquainted with the different modifications of this unique material.
There are a lot of examples of using drywall, but we will take the most practical ones. Thus, plasterboard partitions decorate the interior and organize the arrangement of furniture, which allows for rational use of space. And the state of mind of the inhabitants of the house largely depends on the environment.
Let's sum it up
As can be seen from the above, if you follow some basic rules and general knowledge of the sequence of actions, it is quite possible to make a frame for the subsequent installation of drywall on it with your own hands. This fairly simple job will be better and easier done if it is done by two people, or if you use additional equipment, such as a drywall lift. With this simple device, you can prepare them yourself or buy them ready-made. With its help, not only the ceiling plasterboard is attached, but also the upper markings and fastening of the guide profile to the ceiling are carried out.