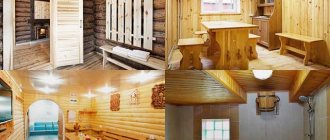
Antique-painted board in the interior of a country house
Many people do not perceive boards as a material with which they can decorate a living space, much less a ceiling. Board cladding is primarily associated with a bathhouse, balcony or veranda.
This is certainly true, but good quality wood always has a suitable role in interior design. Moreover, filing with a board can become its “highlight”, and we will try to prove this to you with the help of photo examples and videos presented in this article.
Features of the use of wood in ceiling construction
To finish the floor using ceiling boards, you need to know what types of wood can be used for this purpose, as well as familiarize yourself with the technologies for implementing such a project.
Before you start finishing the ceiling with edged or unedged boards, you should consider several important points:
- The cost of products made from different types of wood differs. Therefore, you should not be surprised that the costs of decorating the ceiling surface may ultimately turn out to be different. In addition, the final cost depends on the use of different parts. As for the availability of products, lining for ceilings is the best choice, since at an affordable price it has a different profile and therefore the ceiling made of boards looks different.
- All wood is sensitive to sudden changes in air temperature and humidity. For example, as a result of changes in humidity levels, cracks appear on wood products. When the temperature changes, the lumber begins to dry out, which leads to the appearance of cracks and cracks in them. In addition, changes in the degree of humidity can provoke a corrosion process on the boards for the ceiling of the house. To avoid unwanted problems with the wooden products used, they are necessarily treated with special impregnations to prevent the appearance of mold, mildew, cracks and other things.
- Everyone knows that wood burns well, so you need to take care to comply with fire safety rules. To reduce the likelihood of fire, any areas on the ceiling where the plank ceiling will come into contact with electrical wiring or heated surfaces should be insulated by attaching a metal sheet. The wires are laid in a special corrugated hose.
- It should be remembered that before attaching the boards to the ceiling, it is imperative to install the sheathing. As a result of its creation, the height of the room decreases. If the room is already low, then this circumstance should be taken into account.
- Even when a ceiling is built from edged boards and laid end-to-end, cracks will still appear, so they will need to be sealed periodically. The only way to avoid this is to use a technology called “tenon and groove”. As a result of using this method, the joints of the boards always have an attractive and neat appearance.
Finish coating
Next everything will be very simple. From one of the corners of the room, the prepared base is covered with wooden slats, planks or clapboard. All of them are mounted in approximately the same way - either nailed through with galvanized nails, or secured using clamps. The latter can be used to fasten the lining, but for boards it is better to use screws or nails, since the load in this case is higher due to the greater weight of the parts.
You will need to leave small gaps of one to two centimeters between the walls and the coating. They are necessary to compensate for possible deformations of the coating when changing temperature conditions. After completing the assembly of the covering, all these cracks will be closed with ceiling skirting boards and will not spoil the overall appearance of the ceiling. If necessary, the entire assembled structure is varnished or painted again and your ceiling is ready.
Pros and cons of covering the ceiling with boards
Advantages of finishing the ceiling surface with boards:
- The material is highly durable. To do this, it needs to be treated qualitatively with special compounds.
- When using wood finishing, the thermal insulation characteristics of the room are improved.
- Lumber on the ceiling soundproofs the room.
- Simple installation that any home craftsman can easily handle.
- Wooden plank ceilings have an attractive appearance.
This finishing method also has disadvantages:
- Instability to humidity and water. Their constant exposure leads to the fact that lumber begins to rot.
- Intolerance to sudden temperature changes.
- Special products will be required for care.
- When purchasing materials from expensive wood species, the cost of the ceiling is significant.
- Over time, the ceiling surface may lose its original appearance.
Taking into account all the listed pros and cons, it is necessary to decide which wood material is best to use for the design of the ceiling.
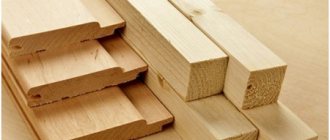
There are several types of boards for the ceiling of a house:
- floor board;
- lining;
- Planken.
Ceiling insulation
In cases where the ceiling trim of a house is placed under the rafter structure, the main floor is often additionally insulated. Until recently, the main thermal insulation materials in such cases were polystyrene foam, mineral wool and glass wool. However, life does not stand still, and the developers have released a new line of higher quality and easier to install materials.
Here are some of them:
- Basalt wool
. The material is sold in tile form: the slabs can be cut to size when laying. There is also foil material made from basalt wool, which is sold in rolls. Thanks to the foil, the insulation receives reliable protection from moisture. However, this does not mean that, once installed on the ceiling, the thermal insulation will cope with flooding from above. Therefore, before starting finishing, it is necessary to carefully check the ceiling for cracks and leaks. - Penoizol
. This is the name given to urea-formaldehyde foam, which is based on foamed resin. Foaming is achieved inside special devices. After this, the suspended mixture is pumped into the void between the rough ceiling and the decorative surface. To keep the hardening insulation in place, an internal mounting frame is made of durable plastic or other material. Urea-formaldehyde foam in a foamy state fills all the voids and cracks between the individual insulation boards. The result is a completely sealed surface with excellent thermal insulation characteristics.
Variety of wooden ceiling designs
A ceiling made of lumber and lining can be made in one of three ways, each of which has distinctive features:
- Option one - creating false ceilings
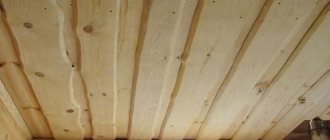
. This method is the most reliable, but not the cheapest. To lay finishing materials, floor beams should be installed using thick bars or hewn logs. It is these elements of the ceiling structure that are expensive. They are installed on the crown, and taking into account the type of roof, they are attached to the walls. Then boards are nailed to the beams. It looks durable and massive. Lumber can also be stuffed on top, making it completely safe to move around the ceiling or roof area. When hemming ceilings with sheathing boards, steam, heat and waterproofing are laid between the lower and upper rows. - Option two - arrangement of panel ceilings
. According to this technology, first of all, special shields are assembled, consisting of two bars installed in parallel. The boards are stuffed transversely. The already prepared panels are lifted to the ceiling and fixed. If desired, heat and vapor barrier is installed on the outside. It will be good if beams are used to create the base, since they have the required strength. Panel ceilings have a serious drawback - the structure made from lumber is heavy. To raise the shield, the participation of assistants will be required. In addition, it will need to be held for some time while the structure is attached. - Option three - construction of a flat ceiling
. This simplest method of laying ceiling boards can be implemented when the span does not exceed 2.5 meters. In this case, lumber must be fastened simultaneously at both ends of the ceiling. You cannot walk on flooring created in this way.
According to the recommendations of experts, when repairing the ceiling of a room, it is better to choose the third option, since it is less labor-intensive and requires minor financial costs. If the house is just being built, it is better not to save money and stick to the first method. The installed floor beams will simultaneously become the base of the roof being constructed.
Algorithm for filing the floor
The instructions for arranging a plank ceiling are quite simple, although they involve various options for action.
Below we present the simplest diagram, following which you can arrange an insulated floor finished with lining or tongue-and-groove boards:
- To begin with, we lay waterproofing on top of the ceiling beams and form the top flooring (it will also be the floor of the attic, attic or second floor).
Note! All parts of the ceiling must be treated with a fire-retardant compound. If this has not been done before, now is the time to impregnate, especially since such products dry in less than a day.
- We lay panels of thermal insulation material between the ceiling beams. It is advisable to use vapor-permeable insulation, since they do not interfere with the natural ventilation of the structure.
- The insulation layer is covered with a vapor barrier membrane. For this purpose, a foil film on a foamed polymer base is best suited. We fasten the vapor barrier to the beams using a stapler.
- On top of the vapor barrier we stuff sheathing beams with a cross-section of about 30x30 mm.
- Using nails or self-tapping screws, we attach cladding boards to the sheathing - planks, clapboards, false beams, etc.
Photos during installation
- We do not bring the edges of the boards to the walls by about 10 mm, forming a deformation gap. We cover this gap with ceiling fillets, which we install on the walls.
After completing these works, we mask the heads of the fasteners with wood putty, sand the ceiling, and then paint or varnish the wooden paneling.
Using a floor board
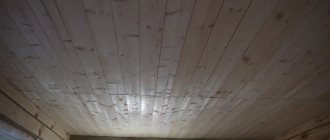
An original solution is to use tongue-and-groove boards for the ceiling. This has a great advantage, since the floor boards have a mounting groove, thanks to which, in the event of a change in humidity or temperature, cracks and crevices will not appear at the joints of wooden products.
Creating a ceiling from tongue and groove boards can be called the best choice of material - it allows you to create a perfectly flat surface. If there are differences, they will be almost unnoticeable.
Thus, if a floorboard has been chosen for finishing the ceiling, a number of nuances must be taken into account:
- You should not purchase too thick lumber for the ceiling;
- A 20mm material thickness will be sufficient, and in some cases less.
As an option, you can use a durable parquet board to decorate the ceiling, because such material will give the room a special atmosphere. By the way, many designers, in order to achieve original solutions when decorating walls and ceilings, opt for parquet.
When purchasing a tongue and groove ceiling board, you should pay attention to the quality of processing of this building material. Wood must be protected from all kinds of parasites and mold. When processing by manufacturers of building materials during the manufacture of products is not carried out, the home craftsman must take care of this himself.
? Laying over old floors
The first thing you should make sure of before starting work is whether the old floor can continue to withstand heavy loads. If there are no doubts, then you can move on to the repair measures themselves. The sequence is as follows:
- Roughly sand the old flooring and remove any accumulated dust.
- Install waterproofing.
- Lay new floorboards perpendicular or diagonal to the old ones.
Installation of solid boards over existing wood flooring
If you don’t want to experiment with a new laying direction, then use plywood as a base for the new floor. By choosing sheets with a thickness of 12 mm or more and roughly sanding the plywood surface, you can install the floorboard in the usual direction.
Important! If the strength of the old floor is still in doubt, then it is recommended to carry out complete dismantling and start work from the concrete screed. It is not advisable to carry out any construction work yourself
Even the simplest activities require certain knowledge and professional training. The work of the construction team is a guarantee of high quality and excellent results
It is not advisable to carry out any construction work yourself. Even the simplest activities require certain knowledge and professional training. The work of the construction team is a guarantee of high quality and excellent results.
Modern trends, including interior design, force us to look for new solutions. For example, in the arrangement of the ceiling. Suspended and tensioned structures made of plasterboard and PVC are already considered traditional. I want something new, extraordinary. Why not then put a floor covering on the ceiling? For example, a parquet board. After all, who said that this cannot be done?
Modern lumber for ceilings - planken
One of the latest innovative solutions to emerge in the field of production of materials for flooring design is planken. The products go on sale completely ready for use.
During the production process, planken is subjected to drying, heat treatment and hardening. Thanks to heat treatment, which occurs under the influence of high temperatures, wood has special technological characteristics. Purchasing planken is one of the best choices of lumber for finishing ceilings.
This is evidenced by its undeniable advantages:
- increased strength;
- high degree of resistance to the negative influence of all kinds of microorganisms;
- the material is not dangerous from moisture;
- long service life;
- excellent wear resistance, thanks to which the ceiling will look like new throughout its entire life;
- presentable appearance - planken will decorate any interior;
- resistance to sudden temperature changes.
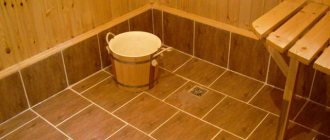
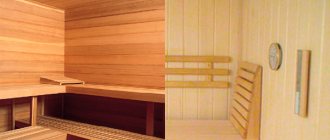
We can conclude that using boards to decorate the ceiling surface will be an excellent solution for every property owner. Therefore, this type of lumber is often purchased for the purpose of cladding the surfaces of saunas, baths and similar objects.
Gluing sheets
Frame mounting options are more common.
Creation of a wooden frame. To do this, you need to do the following:
- visually determine the lowest point of the ceiling;
- We mark the future frame on it. To do this, you need to retreat 5 cm and draw a straight horizontal line. If the drawing is done correctly, the starting and ending points will be on the same level;
- along this line we install a wooden batten;
- We fasten the rail using self-tapping screws;
- after that we install the base bars. The pitch should be chosen so that the structure is reliable and strong;
Note! The pitch for parallel bars must be at least 0.8 meters. If the structure is small, then the step can be about 0.5 meters
- We attach load-bearing strips to these beams;
- We also fasten the bars with self-tapping screws. The attachment points should not be on the same straight line. It is best to use a checkerboard order.
Unedged board ceilings
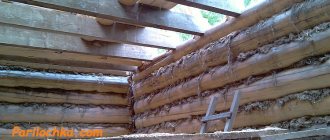
The ceiling is made from unedged boards and timber most often when decorating utility rooms. Of course, unedged lumber does not have such an attractive appearance as other wood products intended for decorating the ceiling surface.
But when choosing materials for objects such as a barn, poultry house and similar ones, it is quite possible to get by with unedged boards. When laying them, you need to remember that these products have an irregular shape. Therefore, in order to avoid the appearance of large cracks on the ceiling plane, you should select the next board taking into account the shape of the previous one.
There is a technology according to which unedged material is processed, then coated with varnish and used to finish the floor surface. Despite the fact that such products look unpresentable, you can create an antique-looking unedged board ceiling in a living room.
Some experts advise that you must remove the bark from this type of board. The fact is that various insects and parasites can live under the bark. In addition, the bark contributes to the process of decay.
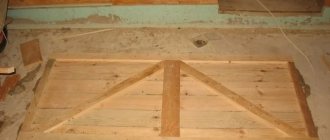
To make a ceiling from unedged boards, proceed as follows:
- First, a wooden frame or sheathing is assembled.
- Then lay a thick plastic film.
- At the final stage, the boards are secured with screws or nails.
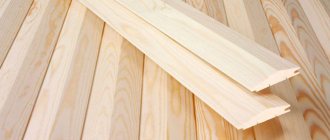
Lining
Very often, when deciding what to make the ceiling of a house made of timber with their own hands, owners of country real estate choose lining, which is planed boards.
They have a tongue, which is also called a ridge or protrusion, on one edge, and a groove on the other. The board for the ceiling in a wooden house is inserted with a tongue and groove into the groove of the previous product. This is how the ceiling boards are attached to each other. The lining differs in the length and width of the boards, material of manufacture, color and texture. On sale there are products stylized as a log house.
The main advantage of lining is the wide range of these products, from which you can always choose the boards that are most suitable for interior decoration.
The advantages of this finishing material do not end there:
- High sound insulation qualities. In rooms lined with clapboards, the sounds of movement and conversation on the floor above will not be heard, especially if a thermal insulation layer is laid before sealing the ceiling in a wooden house.
- Durability. Planks treated with antiseptic compounds, varnishes or other coatings can last for many years without replacement.
- The ideal combination of lining with wooden walls.
- Vapor permeability. Since this finishing material “breathes,” moisture and condensation will not collect between the finishing material and the rough base, which can reduce the service life of the ceiling and reduce the effect of laying the heat-insulating layer.
There is a nuance in how to properly make a ceiling in a wooden house using lining. The fact is that finishing from this material is not suitable for all rooms. For example, ceiling surfaces made of such wooden planks in large rooms look boring and unattractive.
This problem can be solved by using boards of different colors. This technique allows you to divide the space of a room into several functional zones - it is especially relevant when decorating a hall or living room. You can diversify the ceiling decoration using patterns, paintings or carvings applied to the lining before its installation.
There is another original way to decorate the ceiling in a wooden house. It consists in the fact that the planks on the outside need to be artificially aged. As a result, the interior of the room resembles the atmosphere of an old mansion.
Finishing boards called eurolining are available for sale. They are manufactured according to DIN 68-126 standard. This material is characterized by higher quality surfaces and tongue and groove design.
Installation of a ceiling in a wooden house using lining is carried out in stages:
- Measure the distance from the floor to the ceiling in all corners of the room. Then select a corner with a lower height and measure down 50 millimeters from it.
- Using a laser level or a marking thread, draw a line for installing the frame from the point selected in the previous step. As a result, the ceiling is perfectly flat relative to the floor surface.
- To assemble the frame, a wooden beam of small cross-section is used. The sheathing installation lines are positioned perpendicular to the future finishing. The gap between them should be from 40 to 50 centimeters. It is necessary to maintain a distance between the timber and the walls of the room of 10 to 15 centimeters. Before installing frame elements, they must be treated with an antiseptic and fire retardant.
- In the case when we are making a ceiling in a wooden house from lining, and the boards are not previously painted or varnished, then an appropriate coating is applied to them.
- Wooden planks are cut according to the width of the room, but at the same time, a gap of 10-20 millimeters must be maintained between them and the walls on each side, so that if the material expands under the influence of moisture, swelling and deformation do not occur.
- The first board is attached to the frame using clamps, nails or screws.
- Mount the next plank by inserting the tongue into the groove of the previous board. The lining must be carefully adjusted to one another using a rubber mallet.
- Repeat the previous step for all installed strips.
- The last of the boards is cut, if necessary. As a rule, it is attached to the sheathing with nails, which are forgotten “at an angle.”
- Compensation gaps between the walls and the lining are covered with ceiling plinths.
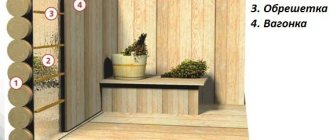
General device
To understand why this part of the structure is needed and how to properly arrange it, you need to understand the design of the floor itself, to which everything will be attached. The general schematic diagram of this design looks like this:
The wooden deck or floor is located on the second floor or attic, insulating materials and hydro-vapor barrier are laid between the floor joists, and the rough surface is attached to special cranial bars that support it. Some interfloor spans may be arranged differently, but the general principle of assembly is approximately the same.
The skull block may not be used, but then all the load-bearing beams will be hidden behind the surface of the finishing coating. If the height of the room leaves much to be desired, it is better to leave them in sight and raise the surface of the future ceiling, securing it between them. The optimal method of arranging this surface is selected based on the characteristics of a particular building.
Important Installation Steps
Even if the goal is not to equip a bathhouse or sauna (as rooms are definitely wet), the tongue-and-groove ceiling boards or bars (slats) laid on the sheathing must be pre-dried and impregnated with special means - in order to protect the future coating from dirt, swelling and deformation. Lumber is prepared in stages for a series of actions.
Lathing
At this stage, perfect alignment will not be required, but stripping will be useful. We are talking about removing layers of plaster and rough protrusions. The next step is related to communications. For serious electrical projects, you will need an electrician. You can handle the rough finishing of the ceiling with unedged boards yourself, but a couple of specialists will do it better and more reliably.
Thermal insulation
Insulation is not a mandatory step in the described chain of manipulations. But if there is a cold, unheated superstructure overhead, this phase will turn out to be very pressing. A layer of insulation (often in parallel with a soundproofing liner) is applied to the ceiling separating the attic and the living space below. The gasket is nailed, secured with twine or glued to the attic beams.
Binder
Finishing cladding is a critical segment. The classic longitudinal styling is solid and impressive. The combination of slats, boards or lining in dark and light colors is also interesting - it is preferred by the owners of country mansions and bathhouses. And the virtuoso carpenter will arrange one type of board effectively: checkered, trapezoidally or fan-shaped. If his hands are golden and his taste is excellent.
Installation
It is quite possible to sheathe the ceiling using wooden beams with your own hands. To do this, you first need to prepare all the tools, finishing material, as well as glue and mixtures for wood processing. In the case where the beams will act as the basis for the ceiling, they should be carefully checked for the presence of fungus and mold. If there are defects, the logs must be treated with an antiseptic solution, and cracks and chips must be filled with putty.
After completing the preparatory work, you can perform installation, which consists of several stages.
- First of all, you should create a vapor barrier layer and cover the beams. This is best done using plastic film or parchment, which can be easily attached with a stapler. Then the logs should be lined with any rough material; most often, edged boards are used for such purposes. If the ceiling is crooked and the ceilings have differences in levels, it needs to be leveled.
- The next step in the work will be laying thermal insulation; it will retain heat in the room and will not allow cold air flows from the roof or interfloor ceiling to pass through. This is especially true for the cladding of the first floor in apartments. Mineral wool or polystyrene foam is used as insulation.
- After installing the thermal insulation, an additional layer of vapor barrier is laid. Today, there are many materials that can be used to provide natural air exchange to structures, but the main one is considered to be membrane polyethylene.
- The final stage is the construction of a rough base. The covering is sheathed with plywood or corrugated sheets.
If the work is carried out in a private house, then the finishing should be done taking into account the functional purpose of the attic. In many buildings it can serve as a residential attic, or simply act as a non-residential space. For an attic that will house a full-sized room, it is necessary to add aluminum foil to the floor layer; it will help avoid heat loss in the house. In addition, when decorating the attic, a layer of sound insulation consisting of sawdust and mineral wool is laid.
A ceiling covered in this way should not only be beautiful, but also maintain the microclimate of the room. The aesthetic appearance of the entire structure will depend on the correct installation of the finishing coating. Therefore, work must be done slowly and adhere to all cladding technologies. To simplify installation, it is recommended to first draw up a ceiling diagram and indicate in it the installation of heat, steam and sound insulation.
What are the benefits of this coating?
Wood is a very flexible and versatile material. You can make a lot of different things from it, including covering the ceiling surface. But, in addition to beauty, this design has a number of advantages:
- Behind the canvas of such a ceiling you can hide all communications and wiring.
- Installation is simple, which means you can do it yourself.
- If you get tired of the appearance of the coating, you can always repaint it.
- The atmosphere in the room where such ceilings are installed improves.
- Wooden surfaces serve as additional heat and sound insulation.
- The material is not harmful to health at all.
If you do all the installation work yourself, then the total costs of creating such a ceiling will not be so huge.
Lathing
It is assembled extremely simply, from bars or slats, about three centimeters thick. You can take thicker parts, but they will reduce the vertical size of the room. Before installing the lathing in wooden houses, it is necessary to secure a layer of waterproofing to protect the ceiling structures from moisture. After all the parts of the sheathing are secured, you need to check how level the lower edges of the planks are - they should be located in the same horizontal plane.