Wood has long and firmly won first place among facing and building materials. Thanks to modern technologies, manufacturers have achieved an increase in the strength qualities of the product; moreover, a rich assortment makes it possible to select materials in different price categories. Among other things, wooden slats are convenient to install on any surface without the use of special tools or skills. We’ll figure out how to attach the lining to the ceiling, technological features of installation options, and consider advice from professionals.
Frame installation
Even before starting the main work, the lowest point on the ceiling is selected and a measurement is made from it 6-10 cm down the wall, where the first mark is made. Next, the mark is transferred to all four walls using a water level. In the best case, a laser level is used. As a result, a line will be obtained along the perimeter of the room, along which the installation of the frame will be verified.
Important: If wooden beams and boards are used in construction or renovation, they must be treated with an antiseptic and fire retardant to protect against rot, pests and increase fire safety.
Option 1: frame based on wooden beams
The beams must be fixed to the ceiling in a direction perpendicular to how the lining will be sheathed. The distance between the bars is selected in the range of 40-60 cm for plastic and 60-100 cm for wood. The beams must be mounted so that their lower edge is strictly parallel to the floor and at the same level as all other beams. You can check this using a water level.
So, at the beginning, two beams are fixed on opposite sides of the room at a distance of approximately 10-15 cm from the wall. Be sure to check the level not only at the edges of the beam, but also in the middle. For every 60 cm it is necessary to attach a beam to the ceiling. Impact screws and dowels or anchors are used for this. If the beam is distant from the ceiling, wooden plates made from the remnants of the same beam are placed.
A rope or fishing line is stretched between the installed beams along their lower edge. Using the line on the wall and the stretched line as a guide, the remaining beams are installed. Once everything is ready, you can start strengthening.
For reliability, you can install jumpers between the main beams. So, from the same timber, pieces are cut with a length equal to the distance between the installed beams and attached to them in the middle of the ceiling. However, it is enough to install jumpers only in those places where an increased load on the frame is implied, that is, places where lamps are installed. At this point the frame is considered ready.
Option 2: frame based on a metal profile
The rules for constructing the frame are the same as for covering walls and ceilings with plasterboard. Along the perimeter of the walls, according to the drawn line of the suspended ceiling level, a UD profile is attached using dowels. Next, the first two outer CD profiles are attached at a distance of 10-15 cm from the wall, also perpendicular to the direction of the lining. Along the length of the profile, it should be secured with U-shaped fastenings to the ceiling, with a frequency of every 40-60 cm. Using a stretched rope or fishing line, the remaining profiles are installed and secured along the ceiling at a distance the same as when using timber. Jumpers in places where reinforcement of the frame is required are mounted using crab crosses.
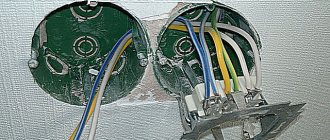
Before installing the lining, wiring for the lighting system is also laid. Loops or wire leads are left in the right places. After covering them with clapboards, they can be pulled out through the prepared holes and the lamps can be mounted.
Houses are different, and they need to be insulated in different ways.
There is no universal means for insulation.
Methods of fastening insulation materials also directly depend on the room itself: on the surface of the walls, operating conditions. It is best to consult with specialists before starting work.
Wood and stone materials are the most common materials used in the construction of houses.
Particular attention should be paid to surface preparation. If the walls are made of brick or concrete, you will need:
- get rid of all efflorescence on the brickwork;
- clean the walls from traces of paint, dirt stains, all kinds of deposits and fuels and lubricants;
- remove dust from the surface of the walls;
- if fungus is detected, the surface must be treated with an antiseptic;
- repair chips and cracks in the surface;
- treat the surface with a primer, then smooth out any unevenness with putty;
- reapply primer for the walls.
The tree is prepared much faster and easier. You will need to apply a specialized impregnation to the wooden surface to protect it from rot and insects. After this, install the timber base, also treated with impregnation. This nuance will allow for additional ventilation of the facades of a residential building.
General installation rules
To obtain a high-quality layer of thermal insulation, you must follow the rules for attaching penoplex. First of all, you need to fix the starting bar. This can be either a wooden beam or a metal part with perforation
The second one can be bought at any hardware store, but please note that the strip must be commensurate with the width of the insulation
The bar is set after small calculations. Initially, you will need to carve out a horizontal line along the entire perimeter of a private house. It is better to secure the “starter” using dowels. This feature will at least protect against the penoplex sliding down. Before installing penoplex, the wall is processed and cleaned.
The inner side of the insulation must be rolled with a needle roller. This guarantees a rough surface, which means better adhesion to the walls.
The slabs are installed from bottom to top, and each horizontal row will need to be offset by half a slab. This type of fastening of classic penoplex to the wall ensures maximum heat retention.
Press the plates against each other as tightly as possible. To make the insulation connection as strong as possible, the second row can be attached directly to the grooves of the first. To save adhesive composition, after installation you can seal the joints with installation foam. So, how to glue penoplex to a wooden or brick wall?
Features of frame installation
Before covering the ceiling with clapboard, a special frame is installed. If the ceiling is mounted without lathing, then all irregularities will be visible to the naked eye.
Installation of a metal frame consists of:
measuring the height of the room in each corner and detecting the lowest point of the ceiling. It is necessary to retreat 5-10 centimeters from it. This indicator will be the ceiling level; installation of the starting metal profile around the perimeter of the walls. The profile is fastened using dowels; the profile hangers are fastened to the ceiling itself. Next, the fixed hangers are folded down, the main sheathing profiles are secured to the starting profile and hangers, the level of all frame elements is checked, and their residual fastening is carried out.
Such frames are widely used in rooms with high levels of humidity, as they are resistant to its effects and deformation.
A wooden frame is more suitable for covering the ceiling covering. If your plans do not include lowering the ceiling, then the beams can be attached directly to it.
Attention! If the beams will be attached directly to the ceiling, then it is necessary to level the ceiling using plastic or wooden wedges.
Initially, it is necessary to attach brackets to the ceiling, on which the beams will later be placed. In order for the beams to hold as firmly as possible, it is necessary to use a construction gun.
Preliminary work: installation of a wooden frame
Installation of a wooden frame is an important stage in ceiling design. The reliable fastening of plastic or wooden panels depends on it. When installing the frame, it is important to use a building level, with which you can correctly and quickly place the necessary marks.
To ensure high-quality fastening of the sheathing, you need to draw marks made at the corners and combine them into solid lines.
It is also important to correctly install the cross bars. To do this, you can stretch a nylon thread between opposite marks.
We recommend: Minimalism is one of the most popular styles in home construction
Profiles for frame
Profiles for the frame are made of wood and metal. Installing a profile for the frame is an important step in the process of installing ceiling lining
wooden; metal.
In the case of a metal profile, many argue that it cannot be compatible with eurolining. However, this profile has advantages - while wooden blocks can get wet and become unusable due to moisture, this will not happen with metal structures.
What is lining?
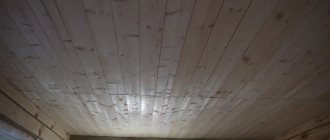
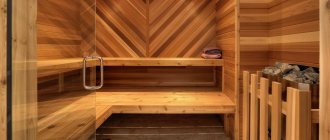
To figure out for yourself how to cover a ceiling with clapboard, you need to decide what this facing material is and for what purposes it is used. Lining for covering ceilings and walls has the form of thin planks with a special type of connection, in which a protrusion (tenon) of the next is inserted into the recess (groove) of one element.
With the right choice of material, such finishing will be appropriate not only in the kitchen and loggia, but also in living rooms. In apartments, lining is often mounted on the ceiling. Due to the variety of types, lining ceilings are suitable for rooms with different operating conditions and aesthetic requirements. For its production the following are used:
Solid wood species. MDF boards. Plastic.
The scope of application depends on the material. For example, in rooms with high humidity, it would be most logical to use plastic, since this material is absolutely not afraid of moisture and is highly resistant to dirt and fungus. MDF or treated wood will look great in any apartment and will highlight a kitchen or hallway.
Every home craftsman can do a beautiful ceiling made of lining with his own hands. It will breathe new life into the room and add personality to it.
Choosing material
Now we select the panels themselves. They are divided into several types:
- metal,
- plastic,
- wooden,
- MDF.
The principle of fastening is the same. Before you buy, you need to decide which room we will cover.
For wet rooms, a bathroom, for example, plastic is more suitable. But for the kitchen and veranda, the best option would be wooden, given its environmental friendliness and naturalness.
There are many materials for cladding, and they all differ from each other.
Wooden ones have four categories, distinguished by the presence of dark spots and knots on their surface.
The fewer stains and knots, the more expensive the material.
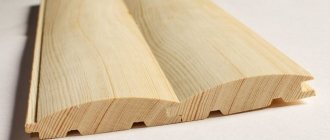
As for the choice of the species from which the panel boards are made, it is better to choose pine, linden or cedar.
Plastic ones are good for damp rooms, but exposure to direct sunlight causes “fading”.
They bend easily and hide uneven ceiling coverings well, but cracks may appear on them from constant stress.
But the cracks cannot be restored.
MDF panels should only be used in dry rooms. Moisture can cause material deterioration, deformation and collapse.
Types of construction lining
Wooden lining is a popular finishing material. It is made from deciduous and coniferous trees. Main advantages: resistant to the formation of fungus and mold, easy to process, there is a small number of knots. To cover the ceiling with clapboard with your own hands, many consumers choose it due to its strength, durability and environmental friendliness. In rooms where the air temperature is much higher than usual, and the ceiling is intended to be finished with clapboard, linden cladding boards are used, since it does not contain resin. The lining can be painted with enamel of various colors, varnished, or simply have its own natural appearance and color.
Plastic lining is distinguished by ease of installation and practicality, the absence of rotting and corrosion processes. It can be either with a seam or seamless, imitating the structure of natural stone, various types of trees, and also have a uniform color. After assembling the ceilings, no priming or painting is required.
Fibreboard or MDF panels are made from wood fiber using the pressing method; they are also used for finishing the ceiling with lining with your own hands, but are not recommended for use in rooms with high humidity. Features: due to the rich color range, they have a beautiful appearance and are durable.
2
Preparation for installation - frame installation
In order for the lining ceiling to turn out to be of high quality, some preliminary work is carried out. First, determine the direction of the sheathing, focusing on the long wall. The main factors are two: the owner’s preference and the required amount of material - when choosing one of the options, there will be less waste.
If wood is used, treatment is required. Various impregnations protect the material from moisture, fire, rodents, mold, and fungi. Each strip is coated on four sides and given time to dry.
Getting to the ceiling:
remove all elements: chandelier, lighting, etc.; get rid of fragile areas of whitewash, plaster; impregnate the surface with an agent that prevents mold.
They prepare tools, many of which can be found on the farm: level, tape measure, hacksaw, hammer, metal scissors. A screwdriver and a hammer drill will make the work easier. Select the lowest point on the ceiling and transfer it to the wall using a water level. They retreat 6–10 cm lower and make the first mark. Similar points are determined along the entire perimeter, then connected by a solid line. It serves to check the installation of the frame.
2.1
Wood lathing
Before starting work, the material is treated with fire retardants and antiseptics, which increase fire safety and protect against mold and pests. A square beam of 40 or 50 mm is used. For fastening to the ceiling, purchase dowels with 8x45 screws or anchors, as well as 4x50, 4x75 self-tapping screws.
The slats are fixed in the direction perpendicular to the location of the lining. The distance between individual elements is determined in the range of 40–60 cm for plastic panels and 60–100 cm for wooden panels. Mounted while maintaining strict parallelism to the floor and level with all slats. Long beams are difficult to hold on weight alone, so you will need the help of another person.
Step-by-step instructions will allow you to install the sheathing yourself quickly and accurately:
start with two bars, which are fixed at opposite walls, retreating from them by 10–15 cm; the horizontal position is verified at both ends and in the middle; fasteners are installed after 60 cm or less, but evenly using dowels with impact screws or anchors; if the bar located at some distance from the ceiling, pieces of wood from the same material are placed; a fishing line is stretched from both ends between two starting slats, as a guide for installing the remaining elements; short blanks are cut from exactly the same timber, which are secured perpendicular to the long ones.
They serve to strengthen the sheathing. It is not necessary to do this over the entire area - just a few jumpers in the middle and in places where increased load is expected: installation of a chandelier, lamps.
2.2
Metal profile base
The same material is used that is used to attach drywall. The range of components is somewhat larger than in the case of wooden sheathing:
the perimeter is formed by the UD profile; the basis is CD slats; fastenings called “crabs” and U-shaped; “flea” self-tapping screws.
The first to install on dowels with impact screws is the CD profile around the perimeter, according to the line indicating the ceiling level. Having retreated 10–15 cm from the wall, fix the two outer CD slats, placing them perpendicular to the planned direction of the lining. U-shaped fasteners are used every 40–60 cm.
We recommend: High-quality roof waterproofing
A cord is pulled between the first profiles, and all the others are placed along it, maintaining a distance of 0.4–0.6 m for PVC lining and 0.6–1 m for wooden ones. In places where a reinforced frame is required, jumpers are installed on the crab crosses. Before starting the sheathing, lay the wiring. Where it is planned to install lamps, loops are left or conclusions are drawn.
Cladding
If the lining is made of wood or MDF
The lining made of solid wood and MDF is mounted identically. To do this, strips of material are cut to a length equal to the distance between the walls minus 5 mm. A slightly smaller size is necessary to form a gap; this will protect the ceiling from the effects of thermal expansion. If you are not sure that the walls are perfectly parallel, it is better to cut a strip of lining for a specific installation location.
The installation of the lining on the ceiling begins with the first strip, which is fixed on both sides along the entire length, that is, to each guide. This leaves a gap of 3-5 mm to the wall. Subsequent strips are inserted at a slight angle with a groove into the lock of the previous strip, and are pushed tightly into it. For reliability, you can use a rubber hammer and lightly tap the end of the strip. The second side is nailed or screwed to the frame guides behind the lower edge of the lock. As mentioned above, either self-tapping screws with a press washer or nails are used for this.
Tip: When using self-tapping screws, it is advisable to pre-drill holes in the places where they are installed on the strips, otherwise the material may chip. When using nails, use a hammer to avoid damaging the front part of the lining with a hammer blow.
In the process of assembling the ceiling, it is important to take care in advance of the output of the supply wires in the required places and make the corresponding holes on the lining strips.
After the ceiling is completely installed, it will be almost impossible to do this without the risk of damaging the front side. Continue installing stripes to the opposite end of the room. The last strip is best driven into the lock using small wedges that are driven between the strip and the wall. Most likely, you will have to cut the strip along its entire length, because the whole strip will not fit. MDF lining, just like plastic, is easier to cut with a knife. Incisions are made along the entire length on both sides, after which the strip is carefully broken. Strips of solid wood will have to be cut using either a hacksaw or a jigsaw. There is no need to additionally glue ceilings made of wooden lining; securing all the strips to each of the guides will result in a strong and durable structure. Moreover, the glued lining will begin to creak and crack over time.
Video: finishing the ceiling in an apartment with wooden paneling
If the lining is made of plastic
Plastic lining, or PVC panels, are laid in the same way as wooden lining, and with the same gaps on all sides to compensate for thermal expansion of 3-5 mm. However, before installing the first strip, a U-shaped groove should be secured around the perimeter of the new ceiling, in which the extreme ends of all strips will be hidden. Often this groove is an integral part of the baseboard or is a collapsible structure made of L-shaped parts. One of them is fixed before covering with clapboard, and the second is snapped in after. It all depends on which option will be purchased.
Since a single ceiling level is already determined by the frame, when covering with clapboard you just need to carefully ensure that each strip fits tightly to the guides and does not move away at the joints.
Production process
At the beginning of production, you need to properly prepare the raw materials by making jointed blanks from untreated boards. You need to remove one side panel for now; to do this, mark a mark with a pencil, boldly draw a line on the side on the future lining and saw along the mark. Instead of a ruler, any long element with smooth edges will do, which is often a ready-made sample of shalevka (photo).
If this is your first time sawing, then these instructions are for you:
- We place the wooden part on the machine table, aiming to cut along the outlined line.
- We rest our torso on the end of the board. Pushing the future panel is done not with the hands, but with the body.
- Ideally, it is better to work together. One will serve the board, the other will receive it. Working together, you can monitor the entire cutting process: one watches the exit of the board so that it is located exactly in the grooves of the machine, the other looks after the material that moves directly during planing.
- So, following all safety rules, we saw off a certain number of boards on one side. It’s better to have more, because you won’t have to reconfigure the machine often. The main thing is not to get too carried away, as monotonous work can cause injuries.
Homemade machine
- When jointing with millimeter precision in width, you won’t get much, but you can achieve the same size by counting the number of passes along the cutter. It is difficult to repeat the same width of the board the next day, but experts advise leaving a piece of the finished part, using it for re-installing the ruler tomorrow.
- After our boards are sawn off on one side, we proceed to processing the second side. You will have to reconfigure the machine, setting the ruler to the required width. Using a ruler we will saw off the second side of the board.
- When sawing, scraps remain that will be used for connecting slats.
- After the boards have been processed on both sides, preparations begin for jointing the material. We reconfigure the mechanisms of the jointing machine - leveling long surfaces of wooden blanks.
- As before, we process and plan the board on one side for now. Sometimes the board may curl up - feel free to get rid of it, good material will not come out of such a sample.
The final stage
The final stage is the grooves in our boards. You can make the whole process easier by using a milling tool or a small sawing circle. We set the elements of the ruler, the planned depth of the groove, lowering or raising the table. And we begin to make grooves on each side of our board. After this processing, we will get a groove along the edge into which we will fasten each subsequent part of the shalevka.
As soon as our wonderful lining is ready, we begin processing the waste, making slats out of them with our own hands, which are simply sawn.
We can safely say that without special equipment it is not possible to make shalevka with your own hands. So, if you want to start producing shalevka yourself, learn to operate a machine.
Preparatory work
In order for the lining ceiling, a photo of the interior of which can be seen here, to be installed to the highest possible quality, it is necessary to carry out the preparatory work correctly. Upholstering the ceiling with clapboard can completely cover the ceiling, but before doing this it is necessary to completely remove the old finish from the ceiling. Otherwise, it will crumble over time, which will negatively affect the quality of installation work.
If there are cracks or other problem areas in the ceiling, they must be removed without fail. Most often, in this case, the plastering method is used. In order to kill harmful microflora and eliminate the possibility of its spreading to the lining in the future, it is necessary to treat the ceiling covering. For this purpose, an antifungal composition is most often used.
Attention! At the preparatory stage, insulation of the ceiling is very often done. For this purpose, it is pasted with a special foil-coated heat-insulating material.
The process of insulating the ceiling covering is quite simple, using special mineral wool. If the insulation is used in rooms with high humidity, it may sag under the influence of moisture. Therefore, it is secured using polypropylene twine. The twine is attached to the wooden slats using a construction stapler.
A vapor barrier layer can be laid on top of the insulation. Its installation is carried out with the rough side facing the insulation layer. A lining ceiling in an apartment, a photo of which can be seen on our website, will have an attractive appearance for quite a long time if the preparatory work is carried out correctly.
The installation of the frame should be started only after the ceiling covering has been fully prepared.
How to nail lining to the ceiling: types of installation directions
When deciding to nail the lining to the ceiling, you need to decide on the choice of material. The lining can be plastic or wood.
During installation, each material has characteristic features that affect the installation of the lining on the ceiling. However, the general principles of installation remain unchanged.
Before starting construction work, it is important to decide on the method of fastening the material. Thanks to the correctly chosen direction for installation, you can visually expand the space of the room and raise the ceilings.
Nailing the lining to the ceiling is not particularly difficult, so you can do it yourself, the main thing is to purchase all the necessary tools and material for this
Types of directions:
Horizontal. Installation occurs from wall to wall, which visually narrows the area of the room. Vertical. Installation is carried out from the far wall to the near one, which visually lengthens the room. Diagonal. Installation is performed at an angle and requires a lot of consumables, as well as high qualifications.
Installation methods can be combined with each other, but it is important to think through the design and draw up an action plan before the main type of work.
We recommend: What are the pros and cons of frame houses
Plaster
Plastering the ceiling surface in wooden houses used to be in great demand.
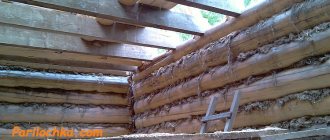
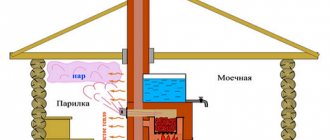
Plaster is often used in modern cottages, however, it is gradually becoming a thing of the past, since there are enough other materials in the assortment. The plaster is applied to a mesh of shingles, which was stuffed between the beams. The solution firmly adheres to the relief mesh and shingles, which ensures the strength and durability of the coating. It is almost impossible to plaster the ceiling with your own hands without a certain skill. Plastering is a complex and time-consuming procedure that must be performed by professionals. Do you want to buy a sunflower? Visit https://agronizer.ua/ru/selkhozprodukciya/podsolnukh/! Current prices for sunflowers, placement of volumes for purchase and sale!
The advantages of this option are:
- affordable cost of both the material itself and plastering services. And if you do the finishing yourself, you won’t have to endure large expenses;
- high attractiveness, wide color palette and the ability to create a surface with a variety of relief;
- durability and practicality.
The disadvantage of such finishing of ceilings in a wooden cottage is the need for thermal insulation of the walls, carried out from inside the room. After all, thermal insulation boards act as an excellent basis for the subsequent fastening of reinforcing mesh. But such technology hides the usable area of the room, which is undesirable if it is not very large anyway.
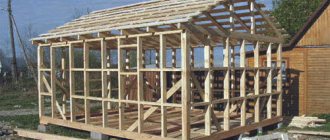
Frame
At this stage, you should decide on the sheathing. It can be done:
from a metal profile; wooden beam.
The choice of frame material depends on the functional purpose of the room: a metal profile is most suitable for conditions of high humidity, in other cases you can choose the material at your discretion. When using ceiling lining made from wood and its derivatives, the most justified would be to install a wooden frame, which is cheaper than metal and is excellent for attaching cladding.
Solid wood lining installed on the ceiling creates additional load on the frame, which should be strengthened if necessary.
How to attach a wooden frame
The first step is to mark the future ceiling from the lining. To do this, you need to find the lowest point on your ceiling from which to measure down the wall 6-10 centimeters and put the first mark. It will need to be transferred to all walls using a water or laser level. It is according to these marks that you will check the horizontalness of the mounted frame for the future ceiling.
Important! When using wooden beams or other wood materials, remember that they must be pre-treated against the appearance of various pests, rot and to increase fire safety.
Wooden beams are mounted to the ceiling strictly perpendicular to how the lining itself will be mounted. The step between the bars should not exceed more than 100 centimeters. If the finishing material is PVC panels, then the pitch of the beams should not exceed 60 centimeters.
Please note: We paint the ceiling with water-based emulsion: from preparation to the last layer
If you decide to make the ceiling not only elegant, but also improved, for example: to lay sound insulation or thermal insulation on the ceiling, then in this case the step between the beams should in any case be no more than 60 centimeters. Since usually the so-called “slabs” of mineral wool or other heat and sound insulating material are also 60 centimeters wide. The bottom edge of all beams should be parallel to your floor and flush with the rest of the beams. Be sure to use a water level.
We fasten two beams along two walls on different sides. The distance from them to the wall should not exceed 15 centimeters. We clearly check the level not only in the middle, but also along the edges of the beams. Next, we continue to install the beams in increments of 60 centimeters, checking our work using a level at different points. In places where the beam lags behind the ceiling due to curvature, it is necessary to place wooden pads, which can be made from the remains of the beam itself. Next, we stretch the fishing line and use it to fasten the entire frame for the ceiling from the lining.
If you are not sure of the reliability of the structure you have made, then you can install additional cross bars, which will also ensure the rigidity of the entire structure. You can strengthen it only at those points where, according to your plan, lamps or other elements will be installed. Be sure to carry out all the necessary wiring before installing the beam. That’s the whole principle of making a wooden frame for lining ceilings.
Advantages
Lining has many advantages:
- low thermal conductivity;
- good air exchange;
- easy care;
- service life – 30 years;
- installation is simple and fast;
- UV resistant.
If you use plastic material (PVC panels) to cover the walls, the room will be visually much more spacious. In addition, electrical wiring can be hidden under the board, which is aesthetically reflected in a modern home.
Wooden lining has different lengths from 1.5 to 6 meters. Thanks to this, anyone can easily select the right material, while using it sparingly.
In order to cover the walls with boards, you can use simple tools that a good owner always has available.
We install the lathing.
Installation from wooden beams:
First, we determine the level at which the sheathing is mounted.
Then we mark the direction of the bars. The panel must be attached strictly perpendicular to the direction of the beam. It can be mounted vertically, horizontally and diagonally.
Now the brackets are attached at the same distance from each other. A wooden beam is attached to the brackets. To level the level of the sheathing, wooden wedges are used.
The sheathing is installed very evenly; the lining will be placed on it. Otherwise, the coating will turn out wavy and ugly.
The wooden frame must be treated with an antifungal agent. This will extend the “life” of the ceiling covering.
Installation from metal profile:
We attach a metal profile to the walls along their perimeter . We fix the hangers.
The main profiles of the frame sheathing are attached to the suspension itself and the starting profile.
Before fixing the sheathing, be sure to adjust the level.
After installing the sheathing, we proceed to filing the ceiling covering.
Video - how to sheathe a ceiling with your own hands:
Sheathing with nails and clamps
Now let's talk about how to attach the lining to the ceiling. This is done as follows:
the boards are nailed to the sheathing strictly perpendicularly, pointing the panels towards the wall with a tenon; install using a level, attaching it with self-tapping screws; the second panel is inserted so that its tongue coincides with the groove of the first and is fastened in the same way as the first, applying a level. hem to the end; Holes are made in plastic panels with a drill before covering, thereby avoiding damage to the surface during installation.
The finished coating is decorated with wooden skirting boards around the perimeter, which well hide the cracks of the cut lining.
To make the lining ceiling look beautiful, you can paint it. It’s better to coat it with varnish, and cover the trim, for example, the contour of baseboards, with a stain of a darker color in relation to the main one, and then with varnish.
Now you can admire the finished beautiful ceiling, made by yourself.
Video - installation of plastic panels:
Cost in rubles
The cost of panels depends on the type of wood, its species, the quality of drying of the material, the equipment on which the panels are made, and their length.
The panels are divided into three price parameters: high, medium and low.
High – high quality material, made from deciduous soft wood. They are processed according to European standards. Their price is never less than 310 rubles. per square meter.
Medium - deciduous hardwood trees, their price ranges from 215 to 310 rubles. per square meter.
Low - coniferous species. Their price ranges from 100 to 215 rubles. per square meter.
When calculating the cost of cladding work, we calculate the area of the surface to be covered. Installation of cladding is estimated to range from 150 to 350 rubles. per square meter. It depends on the complexity of the work and the craftsman performing this work.
Knowing how to cover a ceiling with clapboard, using the information above, you can do it yourself. And if you need to hire a master, then you can independently calculate the cost of his work. Good luck!
kubvagonki.ru
Briefly about plastic panels
A ceiling covered with plastic lining looks no worse than the same surface trimmed with wood. All work on covering the ceiling with plastic is practically no different from similar work with wood. The only difference is that the material itself is several times lighter, which makes the installation process easier.
In addition, when installing such material, you will have to add a construction stapler to the tools. Otherwise, everything is done almost exactly the same. Apart from the fact that after working with plastic, much less waste remains, and caring for this material is much easier.