Home / Types of ceilings / Wooden / Antique ceiling made of unedged boards - features and application
You can assemble a huge number of different designs from unedged boards. The edges of such boards have a natural shape and are not subjected to special processing, like their main surface. However, despite its outward appearance, you can even assemble a ceiling in a living room from an unedged board if you decorate it in an “antique” manner. In technical rooms, such coatings can be used in their natural form, without bothering to make the surface look beautiful.
What should the ceiling in the bathhouse be like?
Contents of the material
First of all, it is worth understanding the conditions under which the ceiling in the bathhouse is located, and based on this, develop the requirements that it must meet. Compared to a residential building, the conditions in the steam room can be called extreme - the temperature rises to 80-90 degrees Celsius and higher, and this is with extremely high humidity. Both warm air and moisture, obeying the laws of physics, rush upward to the ceiling. Therefore, the latter is required to be resistant to high temperatures. In addition, it needs good thermal insulation, because up to two-thirds of heat loss occurs in the ceiling. And the less energy is lost “to nowhere,” the easier it is to maintain the microclimate in the steam room. High-quality thermal insulation of the ceiling in the bathhouse will save money in the future.
Now it’s worth paying attention to the problem of humidity. Here its level is very high, and moisture should not penetrate higher, to the ceiling and thermal insulation
Otherwise, the insulation will lose its properties, and dampness will negatively affect the strength and durability of the entire structure. In addition, high humidity creates a comfortable environment for the growth of fungi and mold.
Therefore, in addition to good thermal insulation, the ceiling in the bathhouse must have high-quality vapor and waterproofing.
Bath ceiling height
The next question is the strength of the structure. The wooden ceiling itself has a considerable mass, and a mass of insulation is also added to it. Therefore, the ceiling structure must be durable and able to withstand such loads. And if the space under the roof of the bathhouse is used as an attic or attic, then the requirements for strength and safety become even more stringent.
And the last (but not least important) characteristic of the ceiling in a bathhouse is its appearance. Agree, it’s more pleasant to be in the steam room when everything around looks beautiful, including the ceiling
In addition, a bathhouse that is attractive both outside and inside will give you a reason to be proud in front of your household and guests, because you did all this yourself, with your own hands. Therefore, when building a ceiling in a bathhouse, remember not only about thermal insulation and strength, but also about beauty.
Insulation of the ceiling in the bathhouse
Pros and cons of covering the ceiling with boards
Advantages of finishing the ceiling surface with boards:
- The material is highly durable. To do this, it needs to be treated qualitatively with special compounds.
- When using wood finishing, the thermal insulation characteristics of the room are improved.
- Lumber on the ceiling soundproofs the room.
- Simple installation that any home craftsman can easily handle.
- Wooden plank ceilings have an attractive appearance.
This finishing method also has disadvantages:
- Instability to humidity and water. Their constant exposure leads to the fact that lumber begins to rot.
- Intolerance to sudden temperature changes.
- Special products will be required for care.
- When purchasing materials from expensive wood species, the cost of the ceiling is significant.
- Over time, the ceiling surface may lose its original appearance.
Taking into account all the listed pros and cons, it is necessary to decide which wood material is best to use for the design of the ceiling.
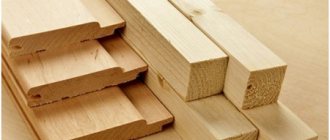
There are several types of boards for the ceiling of a house:
- floor board;
- lining;
- Planken.
Required tools and materials
You can use any boards for the outer cladding; for the interior you need sanded lining
All materials for the bath ceiling are divided into rough and white. The former may be poorly processed, of low grade, and consist of scraps, but have sufficient strength or density. White must also satisfy aesthetic requirements.
Most often, a false ceiling is built in a bathhouse. It is expensive to implement, but its long service life and reliability fully compensate for this.
For the design you will need:
- timber for beams made of softwood with a cross-section of 50*50 mm no less;
- boards for external cladding - can be unedged, low grade;
- boards for interior decoration - edged, lining;
- vapor barrier membrane - it is better not to use polyethylene film in the steam room, but it is quite suitable for a dressing room or shower room;
- insulation – mineral or basalt wool; polyurethane foam is undesirable, it is flammable;
- waterproofing membranes;
- marking tool - square, tape measure, level;
- saw or hacksaw for wood;
- hammer and screwdriver or air gun.
You will need stationery: a pencil, scissors, a paper knife - it is easier for them to cut mineral wool.
DIY installation: how to attach boards to the ceiling
To properly fix the ceiling with your own hands, you need tools that must be in place before the repair, which will eliminate unnecessary waste of time.
You can install a wooden ceiling yourself, the main thing is to purchase in advance all the necessary materials for carrying out repair work
You will definitely need:
- Roulettes;
- Pencil;
- Laces;
- Square;
- Hacksaws;
- Hammer;
- Screwdriver.
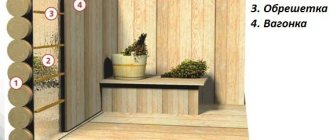
As a rule, in such structures, the floors are made of wooden beams that connect the room and the attic. It is through the arrangement of the rough layer that it is possible to form a reliable ceiling that will retain heat, will not allow sound to pass through, and will also prevent the formation of condensation. Initially, you need to use a high-quality vapor barrier, onto which unedged wood material is attached with a certain pitch between the sheets. Thermal insulation is laid on the boards, and only then the finishing material, for which edged wood is used. To make a beautiful room decoration, the ceiling covering must be combined with the interior decor of the walls, which is selected at the design stage.
Construction of a panel ceiling step by step
The three most common ways to make a ceiling in a bathhouse will provide the opportunity to choose the best option for the device. It’s easy to figure out the simple methods using the described diagrams; the complex panel type needs to be studied in detail.
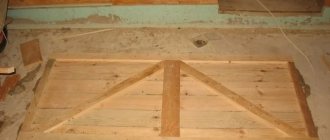
Making shields is the main “catch”
To build a shield, you need a level platform; for this you need to level a piece of land or lay plywood. For convenience and control, you will need an even measuring rod and 3 templates 50 cm long.
Here's how the work is done:
- Two bars are laid parallel on a leveled plane, there should be 0.5 m between them. Templates will help to thoroughly check the distance at each point. The accuracy of the location is checked by perpendicular installation of the auxiliary rail.
- Boards are nailed perpendicular to the bars. The length of the nailed boards is 0.6 m. From each edge, the transversely laid board should “overhang” over the bars by 5 cm. When joining inverted panels, these indentations should form a “pocket”; it is needed for insulation and vapor barrier placed in the joints between the individual elements. The board is secured on each side with two self-tapping screws or two nails. It is recommended to sheathe the ceiling in a Russian bathhouse with galvanized nails with a fairly wide head. Two nails are nailed in one place due to the additional load from the weight of the insulation.
- The knocked together shield needs to be turned over, carefully distributed and the vapor barrier attached to the inner surface of the “box” with a stapler. It is recommended to nail jibs to this “semi-finished product” to make moving it to the ceiling assembly site more convenient.
Panel ceiling assembly
Work order:
- Before installing the panels, a sealant is placed on the walls of the bathhouse at the points of contact with the timber. 5 cm of the panel should rest on the beam, 10 cm of the beam is left for the installation of the rafter system.
- When installing panels between them, due to the presence of overlaps, a “pocket” should form. It contains a vapor barrier layer and insulation. The panels are not connected with ties, and the ends resting on the beams are not nailed down. To connect them, transversely laid boards are used.
- Thermal insulation material is placed in vapor barrier panels installed tightly to each other. Most often it is mineral or glass wool.
- The “boxes” equipped with insulation are secured using transverse boards. The starting board should span the entire width of the ceiling. The transverse boards are nailed to the bars of the panel boards.
- Next, you can nail several short cross boards, then a long board again. Such alternation also promotes savings by reducing the consumption of long lumber.
- The joint lines are covered with overhead boards.
The ceiling assembled from the panels is ready, but most often the work does not end there. If not very presentable remains were used to make the shields, the interior decoration of the bathhouse ceiling will be required. But it will need to be done after modernizing the rafter system.
Changes in truss structure
According to precisely calibrated dimensions in the rafters, it is necessary to select corner recesses so that the leg can rest on the upper crown. The excavations made will slightly reduce the load-bearing capacity of the roofing system. Strengthening will be required by installing two vertical supports with a horizontal crossbar. To install the support beam, you will need to cut a recess and install a support in it. The rafter legs will need to be attached using cap screws to the upper lintel and to the crown in the area of the sawn corner. Screws are used to fix the point of intersection of the crossbar and the support, and the intersection of the crossbar and the rafter leg.
The three methods of installing a bath ceiling are distinguished by technology, load-bearing capacity, and cost of lumber. The owner of a small family bathhouse with a pitched roof will most likely be satisfied with a simple flooring. But the owner of a solid bath structure has a choice: hemmed and panel type. The first type will help save effort and time, the second - financial investments.
Lining the rough ceiling with plywood
Here the work will be carried out according to a slightly different principle. In particular, plywood has low load resistance. If the sheets are simply fastened between the beams, they are guaranteed to burst, damaging the finish coating.
Therefore, plywood hemming is carried out according to the following scheme:
- a waterproofing membrane is attached to the beams or joists;
- a frame is made from a wooden block of small cross-section on top;
- then the plywood is installed.
Considering that the installation is supposed to be on a frame base, it will not be possible to glue the sheets; they are screwed on with self-tapping screws or nailed with thin nails. After this, the structure is insulated and finished.
Processing lumber for the ceiling
Everyone knows that wood is prone to rotting in a damp atmosphere, and bark beetles also love it. Therefore, lumber cannot be used without pre-treatment. It is also desirable to impregnate it with fire-retardant compounds. But it’s also clear that you really don’t want to use chemicals in baths: this is a place for healing, with which chemicals don’t “fit in” in any way.
Chemicals may not be used, but there are traditional methods of treatment that are no less effective. One of these is treatment with hot drying oil and molten wax. When done correctly, it simultaneously protects against fungi, rot and bugs.
Read more about what kind of wood is best to use for the ceiling in a bathhouse.
Wooden ceiling in the attic
For the installation of an attic wooden ceiling, the use of lining is most preferable. Considering the complex geometry of the room, the use of this material can significantly reduce labor costs. In the attic it is necessary to make high-quality insulation and waterproofing.
Tile mineral insulation is used as insulation, which is installed in pre-prepared profiles made of boards. The heat-insulating material is subject to reliable waterproofing on both sides to eliminate the possibility of moist air entering the room. The lining is installed on the sheathing using staple clamps. If other lumber is used for finishing, then ordinary wood screws can be used to fix it.
A ceiling made of wooden materials makes the room more comfortable, but you should remember about the high flammability and the possibility of damage to the wood from moisture. High-quality processing of the material with special compounds can significantly reduce the risk of wood fire, and antimicrobial protection minimizes the likelihood of wood being damaged by various microorganisms.
Selection of lumber sizes
The requirements for the dimensions of boards and linings for lining ceilings are fundamentally the same:
- The optimal width is 90-100 mm. Installation of narrower lumber takes considerable time. Boards that are too wide often become deformed and crack during use.
- The thickness of the wood for making a panel ceiling can be any - due to the design features, the panels only need to withstand the weight of a small section of thermal insulation.
- The choice of boards for the hemming option depends on the presence of a subfloor in the attic. If provided, a thickness of 12 mm is sufficient; if not, 18 mm is required to support human weight.
- In two-story buildings, it is also permissible to use thin material for a false ceiling if there is a living space above it, which has, accordingly, a floor.
- Floor structures supported only by walls are constructed exclusively from thick moldings - from 50 mm.
On a note! When using tongue-and-groove boards, there is practically no difference from clapboard cladding. Their sizes are selected according to similar criteria, and the same fasteners are used during installation. But there is one nuance - due to the nonlinear configuration of the lining, the gaps between the cladding elements are much smaller.
If you work alone
It’s hard to find a good helper, so sometimes a builder has a question about how to line a ceiling with boards alone. In general, the principle of filing a rough ceiling remains unchanged, but here you will have to choose building materials more meticulously. In particular, when working alone, it is better to give preference to lightweight materials that you can easily hold yourself, such as PVC panels or MDF. If it is intended to be hemmed with boards, then it is better to lay the lumber on top of the interfloor floor beams.
It is noteworthy that you can also attach the boards to the bottom, but here you will have to use homemade spacers that will support one end of the board, replacing the missing assistant. You can also use various hooks on which one end of the board is hung until secured.
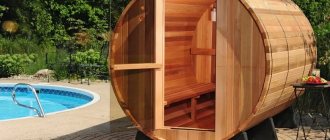
Board for bath-barrel
A barrel sauna is a popular stationary or mobile version of a home sauna. If we are talking about making it yourself, then you will need a rather specific type of lumber.
The board for the barrel bath is quite thick - 4-5 cm, and its sides are rounded for a “moon groove” connection.
You can buy such a board ready-made, or you can order it to be made.
The wood that is suitable for a barrel sauna (!about cedar barrel saunas here) is the same that is suitable for a regular steam bath. First of all, these are deciduous species - linden, ash, alder, aspen, etc.
Conifers are undesirable here too. However, many offer barrel boards made from the same cedar. If the board was kiln-dried and there was a procedure for removing the resin, maybe it’s worth it.
Preparatory work
Ceiling waterproofing
- The first step is to calculate how much material will be needed for the surface. To do this, you need to multiply the width of the ceiling by its length and add another 10% to the resulting result. This reserve will be necessary when trimming or damage to one of the workpieces.
- When purchasing, ask the seller to show the conditions in which the storage was carried out, this will avoid problems that may arise after installation.
- Installation work must take place at a temperature not lower than +15°. Also, the board should lie indoors for several days to acquire the internal humidity of the room.
- If required, it is necessary to carry out additional treatment with an antiseptic, as well as a fire-retardant coating.
- All layers of old finish are completely removed to eliminate possible harmful interactions.
- If the surface is concrete, then it is coated with a primer to further strengthen it and prevent crumbling. It would be useful to apply a layer of antiseptic composition.
- Wood is very sensitive to moisture, so it is necessary to stretch the waterproofing. This may be a special membrane that is used in construction. It is secured to the beams using a stapler, and to the concrete base using dowels and screws or umbrellas. There should be an overlap of 10 cm between the individual layers and the seams should be taped.
- At this stage it is also important to check the flatness of the ceiling. This can be done using, for example, a water level. A mark is placed on one of the walls at an arbitrary height. Next, it must be transferred to the remaining planes. To do this, one part of the level is placed on the mark, and the second in the required place, after which you need to wait a little for the liquid inside to level out. From each line you need to measure the distance to the ceiling. Thanks to this, it will be possible to find out the deviations and take them into account when attaching the sheathing bars.
- For greater convenience, you can apply markings under the sheathing in advance.
How to do
The peculiarity of blanks made from unedged lumber is that their edges have uneven outlines. Therefore, it will not be possible to fit adjacent parts tightly together. There will always be a small gap between them. To prevent all components of the floor or the base plane to which the coating is attached from being visible through it, the parts are attached in two layers. They are laid in a checkerboard pattern and the gaps formed when laying the first layer are closed with parts of the second.
The covering components can be attached directly to the floor beams or to a pre-assembled sheathing. This option is used when the surface to which everything is to be attached is uneven or for other reasons it is impossible to fix the boards directly on it. Fixation is carried out with galvanized nails or self-tapping screws.
What to consider
Assembling a ceiling from an unedged board is very simple and this type of finishing does not require a detailed analysis of each of the stages. However, some features of such materials should be taken into account and the most important of them will be the following:
- The boards have a certain percentage of humidity and even after drying they can become slightly deformed. Unlike ordinary boards, unedged boards are laid loosely and this nuance cannot damage the appearance of the structure. However, it is worth taking into account.
- Before use, all wood parts must be treated with impregnations that prevent mold, rot and increase the wood’s resistance to fire.
- When applying stains or tinted varnishes, darker areas may appear on the surface of the material, in which the wood is less dense and the composition is absorbed better. This will allow the wood structure to “reveal” during finishing.
- Before finishing, it is worth assessing the smoothness of the workpiece - if there are splinters or other defects on it, it is better to subject the workpiece to additional grinding. It is especially important to carry out this treatment before applying paint or varnish - the lights will instantly reveal all the imperfections.
Otherwise, this material will not present you with any unpleasant surprises. It is only important to think in advance what the interior will look like with such floor finishing, and if you are satisfied with everything, you can safely begin work.
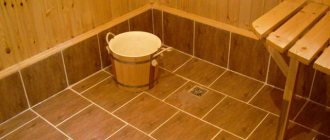
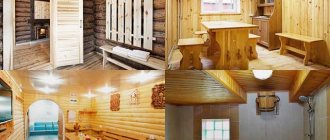
Ceiling device
The installation of a ceiling in a bathhouse involves laying a base (internal boards). Unedged or edged boards are often used; they are usually sheathed with clapboard (see Correct ceiling cladding with clapboard).
A protective layer is laid on the internal boards between the floor beams to retain heat and protect against moisture. Waterproofing and vapor barrier must be without cracks, joints must be sealed tightly. Boards must be selected of high quality, without knots. To create the best conditions and prevent the presence of water, you need to ensure that the boards fit snugly and even overlap them.
There are such types of ceiling installation: hemmed, panel and floor. The hemmed one is suitable for large rooms, the floor one is suitable for small and medium-sized rooms, and the panel one is universal.
The flat ceiling does not require external cladding, as it is covered with thermal insulation material. Such a ceiling arrangement for a bathhouse is not suitable if there is an attic - any repair of the floor there will certainly affect the ceiling, even just walking on it will be impossible (read: “Cold attic: device”).
A false ceiling in a wooden bathhouse can be done even if there is an attic (read: We insulate the ceiling in a wooden house: methods). The best thermal insulation for it is mineral wool. Its layer is covered with waterproofing and sheathed on the outside with boards. This material is produced in the form of pressed slabs, which are easy to install.
Panel ceiling is the most complex flooring option, but at the same time cheaper. It is a structure consisting of load-bearing beams, into which hydro- and vapor barrier is installed, and often there is also a layer of insulation - mineral wool. It can be assembled outside the building itself, but you need to take into account that it is impossible to install a floor ceiling in a bathhouse with your own hands; this will require the participation of at least two people.
In any case, you can’t do without insulation. The ceiling in the bathhouse is constantly exposed to high temperatures and high humidity. Hot steam settles on the walls and ceiling, resulting in condensation forming when it comes into contact with cool air. Uninsulated floors are destroyed due to wetness and temperature changes. Therefore, it will not be possible to do without vapor barrier and insulation, no matter what type of ceiling is chosen (read: “Insulating the ceiling in a bathhouse - methods”).
To do this, it is better to choose materials such as mineral wool, polystyrene foam, expanded clay - when working with them there is no need to involve specialists, and they are also quite cheap. However, experts still do not recommend using polystyrene foam for the reason that at elevated temperatures it can release toxic substances and is classified as a fire hazardous material.
Variety of wooden ceiling designs
A ceiling made of lumber and lining can be made in one of three ways, each of which has distinctive features:
- Option one - creating false ceilings
. This method is the most reliable, but not the cheapest. To lay finishing materials, floor beams should be installed using thick bars or hewn logs. It is these elements of the ceiling structure that are expensive. They are installed on the crown, and taking into account the type of roof, they are attached to the walls. Then boards are nailed to the beams. It looks durable and massive. Lumber can also be stuffed on top, making it completely safe to move around the ceiling or roof area. When hemming ceilings with sheathing boards, steam, heat and waterproofing are laid between the lower and upper rows. - Option two - arrangement of panel ceilings
. According to this technology, first of all, special shields are assembled, consisting of two bars installed in parallel. The boards are stuffed transversely. The already prepared panels are lifted to the ceiling and fixed. If desired, heat and vapor barrier is installed on the outside. It will be good if beams are used to create the base, since they have the required strength. Panel ceilings have a serious drawback - the structure made from lumber is heavy. To raise the shield, the participation of assistants will be required. In addition, it will need to be held for some time while the structure is attached. - Option three - construction of a flat ceiling
. This simplest method of laying ceiling boards can be implemented when the span does not exceed 2.5 meters. In this case, lumber must be fastened simultaneously at both ends of the ceiling. You cannot walk on flooring created in this way.
According to the recommendations of experts, when repairing the ceiling of a room, it is better to choose the third option, since it is less labor-intensive and requires minor financial costs. If the house is just being built, it is better not to save money and stick to the first method. The installed floor beams will simultaneously become the base of the roof being constructed.
Installation of floors and ceilings in the bathhouse
Ceilings and the ceiling in the bathhouse can be made in various ways, the most popular of which are:
- hemmed;
- grazing;
- panel.
Their design differs in the materials and technologies used, and it is better to decide on the type of floors at the stage of constructing walls or a log house.
false ceiling
This design is used in traditional log construction of baths and is characterized by increased strength. It is suitable for baths of any size and layout, including two-story buildings with a recreation room in the attic.
False ceiling in the bathhouse
The main difference between a false ceiling is the strong floor beams made of logs, the so-called matitsa. They are laid on the last crown of the log house. The beams serve as support for the attic floor and tighten the walls of the building, giving it strength. The ceiling is hemmed to the beams from below, the attic floor is installed on top, and the space between the beams is filled with insulation.
Design advantages:
- increased strength;
- good thermal insulation;
- durability.
Minuses:
- it is necessary to lay beams at the stage of wall construction;
- high consumption of material.
A false ceiling can also be mounted in a frame, brick bathhouse or foam block building. To do this, when building walls, windows or grooves are left in the masonry, where beams made of logs or timber are installed.
Flat ceiling
The main difference between this ceiling is that the boards are laid on the walls or in grooves in a log, for which a quarter of the log is cut off. In this case, there are no floor beams, so the method is only suitable for small bathhouses, otherwise the boards will sag. It is difficult to install an attic on a floor; you will have to walk on the insulation. In such baths, the attic is often used as a technical room.
Prices for foam plastic
Styrofoam
Floor ceiling in the bathhouse
Pros:
- cheaper design;
- simple construction and repair.
Minuses:
- it is difficult to make effective insulation;
- Suitable only for small baths and saunas with an unused attic.
Panel ceiling
A prefabricated structure of individual panels allows you to assemble a ceiling from scrap boards and leftover insulation. Boxes are made from tongue-and-groove boards, into which insulation mats are placed and sewn on top. The boxes are laid on a pre-prepared frame made of bars or boards close to each other.
Features of a panel ceiling in a bathhouse
Pros:
- you can use thinner boards and scraps; the prefabricated structure will ensure the required rigidity and strength;
- It is easy to replace individual elements during repairs.
Minuses:
- quite massive design;
- joints and cracks must be carefully sealed.
The choice of ceiling design depends on the size and type of structure and the availability of suitable materials.
Where to use
Of course, the best place to use such a structure as a ceiling made of unedged boards is in a wooden house. It is these buildings that will best be combined with such an unusual finish. In addition, wooden buildings are environmentally friendly and this type of floor finishing will complement the picture very well.
This material can also be used to decorate buildings made of other materials. At the same time, it is not necessary to cover the entire surface of the ceiling with similar boards - you can highlight part of the surface, giving it a special look. Using stains and varnishes, you can highlight the structure of the wood or simply paint the surface, which provides many opportunities for shaping the overall design of the room.
Don’t forget about those areas that are located outside the residential area of the house - terraces, gazebos and various outbuildings. Such decoration is quite appropriate there, and in some cases, it will give these places a unique flavor.
The entire installation and insulation process
Ceiling vapor barrier
→The floor ceiling in the bathhouse can be installed even by a novice and inexperienced builder. The boards are simply laid close to each other on the top rows of walls and secured with self-tapping screws. Then, as already mentioned, from the attic side, bars are attached at intervals of 60 centimeters. At this point, the installation of the ceiling can be called complete; you should proceed to the following “necessary measures.”
→Vapor barrier of the bathhouse ceiling is a very important point and cannot be ignored. It is performed as follows. The foil is applied to the laid boards, from the side of the steam room, with a furniture stapler. The best option is to use Penotherm or its equivalent. Foil insulation is installed with an overlap of 10-12 centimeters. All joints are carefully taped with heat-resistant foil tape. Be sure to place foil on the walls along the entire perimeter of the premises (15-20 cm). This is necessary for better vapor barrier and better thermos effect.
→Then we carefully attach bars 20-25 mm thick to the foil. at a distance of 60-80 cm from each other. This will be the frame for finishing the ceiling. Of course, the best option is lining. We fasten it in a secret way using clamps or nails with a small head. Recently, it has become fashionable to use unedged, well-treated boards in finishing. The ceiling and walls in this case look unusual, but beautiful.
At this point, all work on installing the ceiling of the bathhouse indoors is completed, let’s move on to the attic.
Insulation of the ceiling in the bathhouse
→The next stage is insulation of the bathhouse ceiling. There is a lot of choice here. You can use proven old-fashioned methods, or you can “keep your head down” and purchase modern thermal insulation materials. Kraft paper or ordinary cardboard from packaging boxes is laid out on the laid boards, only from the attic side. And only then the selected insulation for the ceiling is installed.
Mineral wool slabs are considered the most popular and in demand. This is a convenient and practical insulation. Among the leaders are Rockwool, Knauf, Ursu and their analogues. It is no coincidence that the bars were fixed at intervals of 600 millimeters, because these insulation materials have exactly this size in width.
The best option would be to use thin mineral wool slabs or rolls 5 cm thick, but laid in 3-4 layers on top of each other. Layers should be laid “staggered”, avoiding joints on top of each other. In this way, the most optimal thermal barrier is created
Particular attention should be paid to insulation near walls. It is here (at the junction of the ceiling and wall) that “weak spots” are formed and cold bridges arise
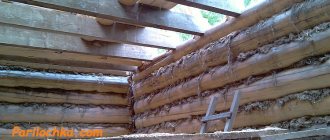
Finishing the ceiling with unedged boards
You can use the old method of insulating the ceiling - clay with shavings or straw (not sawdust). The shavings play the role of a connecting link and prevent the clay from cracking too much. By the way, clay is also an excellent natural vapor barrier. Another option is to use bulk materials. And this is expanded clay, slag earth. But, as a rule, slag and earth do not cope well with the duties of insulation. Using these materials, you will have to install small wooden sides around the entire perimeter of the attic. They are needed to prevent the insulation from spilling or leaking.
Here is another small list of materials that can be successfully used in insulating the ceiling of a bathhouse: penoplex, polystyrene foam, ecowool, polyurethane foam. These options are used much less frequently, although they are quite suitable for such purposes.
→The last point left in installing the ceiling is waterproofing the mineral wool insulation. It is needed in order to prevent atmospheric or other accidental moisture from entering the insulation. Any waterproofing film is appropriate here, for example “Yutafol” or some analogue. We just cover the entire insulation with this film, seal the joints with tape and that’s it. At this point, the do-it-yourself floor ceiling in the bathhouse is almost ready. Now let's summarize...
finishing a wooden house
/ Blog Wooden house construction
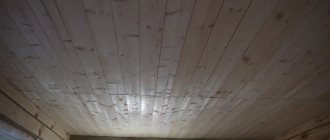
A board as a finishing material for the ceiling of a house made of chopped logs can become a real “highlight” of a log house. Ceiling cladding made of boards can be of any kind; let’s look at the most popular types.
There is no specialized board for the ceiling; modern finishing technologies have made great strides forward and any type of board can be mounted on the ceiling - unedged, classic flooring, thermowood boards.
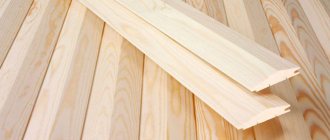
Unedged board - antique finish
An unedged board is obtained by cutting a log lengthwise, the edges are not cut off, so the top and bottom surfaces are smooth, and the edges follow the natural curves of the workpiece. To decorate the ceiling, use an unedged board with barked and unbarked edges.
Stages of preparing unedged boards
- Logs of natural moisture are used to make boards 25 mm thick;
- If you decide to use a debarked board, then manually remove the bark from the edges using a scraper or a landing stage;
- The cleaned workpieces are stacked to dry in natural conditions;
- The required number of boards for cladding the ceiling are processed on a planing machine, after which they are carefully sanded;
- After installation, the boards are cleaned and treated with protective compounds.
An unedged board is indispensable when implementing a design project in any ethnic style.
Country and Russian, rustic and chalet, the “antique” concept – a ceiling made of uncut boards is appropriate everywhere.
The boards are stuffed in two layers so that the gaps in the first row are covered with the sheathing from the second. Beams in such an authentic interior are most often made from untreated logs or rough-hewn beams.
The cost of unedged boards for finishing the ceiling
The cost of unedged boards made from coniferous wood is less than from “durable” deciduous trees (for example, oak). Also, the price depends on the type of lumber, of which according to GOST 5. On average, the cost of 1 m3 of unedged boards is from 2 thousand rubles. up to 5 thousand rubles
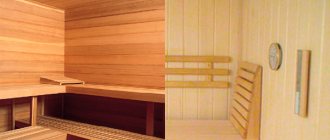
Lining
Lining is a classic for the ceiling in a house made of chopped logs. Lining comes in several categories; the “extra” class material includes lumber of excellent quality. Such lining costs a lot, but the ceiling finish is very smooth, without flaws.
A tongue-and-groove board is lumber with a tongue-and-groove fastening, which is called “tongue and tongue.” When installing such cladding, there are practically no gaps left; if there are any, they are formed due to the profile.
You can diversify the appearance of a ceiling trimmed with clapboard using the following techniques:
- Partial ceiling finishing;
- Installation of lining in different directions;
- The use of two or more types of lining of different colors;
- Installation of decorative beams.
Batten
The floorboard, oddly enough, is also suitable for the ceiling. It also has a “tongue”, so it is installed according to the same rules as lining. The main criterion for choosing a board is the lack of relief.
The floor board is characterized by great strength, because the floor must withstand heavy loads.
This is not relevant for the ceiling , so lumber about two centimeters thick will do.
The range of species offered is much larger than that of classic lining, so if you wish, you can even choose boards from exotic wood.
The ceiling can also be covered with traditional parquet. In this case, finishing will be cheaper, since the parquet is veneered with valuable species, and is not made entirely of them.
After installation , the finished coating is obtained; it does not need to be further decorated.
For parquet, you can use not only paint, oil, colored wax or varnish, but also bleaching, staining, and brushing.
to buy ready-made parquet ; products can have tongue-and-groove fastenings, but the new rotary-corner joint has almost replaced the classics.
Planken - thermowood
This is an excellent (but also the most expensive) ceiling option. Planken is a board that has gone through three stages of processing - drying, heat treatment and special hardening.
After all stages are completed, the wood acquires new physical and mechanical characteristics: it does not absorb moisture, is not susceptible to the influence of pathogenic bacteria, insects and rodents, and lasts much longer. In addition to the mechanical parameters, the planken also acquires a new appearance - a smooth surface with a clear, pronounced wood texture.
Due to its moisture resistance , thermowood (this is another name for planken) can be used to decorate the ceiling in the kitchen and bathroom; it can be used to cover ceilings on the terrace, balcony and open veranda and, of course, in the bathhouse.
Planken can have a straight or beveled section. The second option is more suitable for walls, and the direct option is recommended for decorating ceilings. Thermowood for finishing has its own special fastening system, which creates gaps between products.
Due to the natural gap, the ceiling is perforated - this ensures good ventilation of the structure. This cladding looks great in rooms with high ceilings.
Ceiling made of boards and beams in the attic
When covering the ceiling with boards in the attic, it is necessary to achieve complete tightness, which will reduce the risk of the structure getting wet and blowing through.
This is true not only for wooden paneling, but also for any false or suspended ceilings.
The ceiling in the attic is the roof slopes with rafters and beams, which are the load-bearing elements of any roofing structure.
Load-bearing elements can be hidden under the skin, but most often they are left in plain sight, as this is unusual and original. If there are no beams on the ceiling, then they are imitated. To do this, a timber is installed on top of the finish.
Rafters are usually hidden under boards and used as lathing for thermal insulation materials. In the attic, the ceiling is always insulated, as well as in a house where there is no attic space, as this increases the energy efficiency of the log house. The need for internal insulation of the ceiling always arises, regardless of the external insulation of the roof.
The comfort in the attic and the durability of the wooden ceiling depend on the quality of thermal insulation work
There are many rules for arranging a “roofing pie”. The most important thing is that the joints of the parts of the membrane material are well taped and not simply fixed with staples.
Plank cladding needs constant circulation of fresh air. To do this, leave a small gap between the boards and the base.
Thermal insulation
Since warm air particles rush upward and remain there until they find a way out, an important part in the improvement of the bathhouse is the thermal insulation of the ceiling. It is reproduced using available materials, such as expanded clay, earth with sand, dry earth, sawdust mixed with cement, as well as more modern material - mineral wool
A more expensive material such as perlite would be an excellent option. It is one of the environmentally friendly
It is reproduced using available materials, such as expanded clay, earth with sand, dry earth, sawdust mixed with cement, as well as a more modern material - mineral wool. A more expensive material such as perlite would be an excellent option. It is one of the environmentally friendly.
You can increase the thickness of the insulating layer using wood chips mixed with cement or other insulating materials.
Disadvantages of such coatings
Wood also has its disadvantages. The list of shortcomings will not be as extensive as the listing of positive qualities, but still quite impressive:
- Pests have a detrimental effect on the tree. A special impregnation protects against wood-boring beetles and other insects, but not everyone uses it, fearing the harmful components of such compositions.
- Moisture will also be the enemy of such surfaces - they can swell and become deformed from water.
- The most beautiful solutions are obtained from expensive species, and cheaper varieties do not look so attractive, therefore, the cost of repairs can be very high.
- After installation, such a surface will make the room in which it will be installed significantly lower, since it is mounted either on a specially assembled frame or hemmed along the floor beams, reducing the free space of the room.
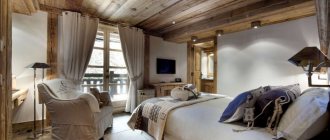
Beautiful examples in the interior
The finishing of the ceiling with dark-tinted panels will be matched by snow-white wall columns, decorated with clapboard, emphasizing the style of the room and creating contrast. And furniture made of natural wood in colors with the ceiling will add harmony to the interior. All the beauty of the solid textures will be highlighted by the lighting located along the perimeter of the ceiling in the form of built-in devices, and the sconces on the columns with yellow lamps will set off the furniture upholstery in beige tones.
Abandoned wooden beams in the form of dark brown logs, made of larch, will create a rough antique effect in a house in the village. Combining such a unique ceiling in contrast with light-colored walls, one can see the effect of monumentality bordering on simplicity. A wooden ceiling, decorated with plaster bas-relief around the edges, will emphasize the eco style, and if you choose furniture with glass elements, the design of the room will be more sophisticated.
Not only do stylish plasterboard structures have several levels, the use of wood is also an interesting and unusual option. Due to several levels, the space is zoned, giving the ceiling visual complexity. It is possible to create a lattice structure from slats or panels, and arrange the squares straight or diagonally. You can emphasize the originality of the design with decorative beams fixed at the end; it is enough to coat the wooden surface with varnish or oils, emphasizing their texture. And harmonious lighting will perfectly highlight the elements, giving the interior uniqueness.
You can see how to cover a wooden ceiling in this video.