- Preparatory work
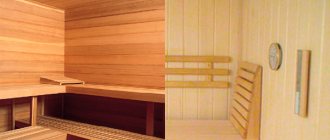
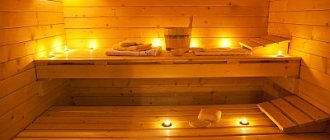
Finishing with clapboard is a solution close to ideal. With the exception of a couple of negative points. The steam, which is now created using expensive steam generators and furnaces, quickly dissipates and the air temperature drops. Yes, and choosing and laying the lining correctly is not so easy. But for a real Russian owner, nothing is impossible!
Wood selection
The modern range of linings is distinguished by its diversity. The choice of wood type for the interior decoration of a bathhouse depends on external features, technical characteristics of the material and personal preferences.
The material for installing the lining in the steam room is chosen from deciduous trees, which will release useful substances during the heating process. This material has a beautiful, even structure and is resistant to high humidity and high temperatures.
Due to the oils contained in the wood, softwood lining is recommended for use in the design of showers and dressing rooms.
Overview of softwood material
Coniferous wood has a relatively low cost and is easy to process. Negative quality - under the influence of high temperature, resin is released, which negatively affects human health. However, softwood lining is also used for internal cladding of steam room walls.
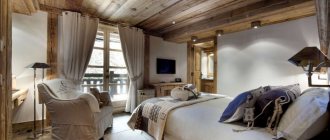
Cedar lining is highly expensive and has an original wood texture. It releases a smaller amount of resin when heated, so it can be used to create a unique design inside the steam room.
Cedar lining looks aesthetically pleasing in any room, including a bathhouse
Among the best lining options for finishing a steam room is African abashi wood. Its unique natural properties are best suited for baths and saunas; this wood does not heat up and it is impossible to get burned if you come into contact with it. It has a pleasant light beige or light yellow color, which when heated turns into chocolate.
External characteristics
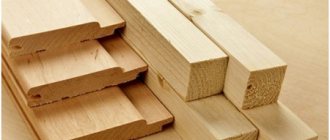
Depending on the purpose, the outer surface and shape of the wooden material can be made in various variations.
For the external cladding of a bathhouse, it is rational to choose wood in the form of a beam or a wide board. This form allows for perfect joining of individual elements, which prevents moisture from entering the cracks. External cladding of the bathhouse with wood that imitates a log will somewhat complicate the process of caring for the surface of the material.
Particular attention should be paid to how to attach the lining to the wall in the bathhouse. It is more rational to nail the lining to the frame using nails, since the use of special fasteners will incur additional costs.
Installation work
When wondering how to upholster a bathhouse with clapboard with your own hands, you should start by selecting the required tool.
Minimum Required
For this you will need:
- A cutting tool such as an electric saw or jigsaw;
- Mounting fasteners, including a stapler and staples for it;
- Screwdriver or screwdriver;
- An electric drill or hammer drill, if the walls are made of solid building material;
- Measuring ruler or tape measure;
- Plumb, rectangle and level;
- Hardware with which to secure the lining in the bathhouse, for example, screws or ordinary nails.
Installation of electrical equipment
Upholstery of a bathhouse with clapboard should begin only after installation of electrical wiring and equipment. Having professional knowledge and skills, this will be very easy to do; otherwise, it is advisable to contact a specialist, since unskilled work can lead to disastrous consequences.
Electrical devices in the bathhouse must be installed in accordance with fire safety regulations
Insulation finishing
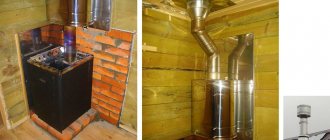
Insulation is a necessary stage in the construction of a bathhouse, since it is associated with the quality of work and saving energy resources. Before deciding how to install the lining in the bathhouse, you should purchase thermal insulation materials.
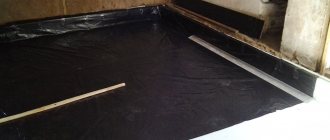
In the simplest version, it can be aluminum foil mounted using brackets. Next, the insulation itself is laid in the gaps between the wooden battens of the sheathing. Upholstery of the bathhouse with clapboard begins only after installing the vapor barrier.
In the photo - vapor barrier using foil
Some hobbyists prefer to lay down the insulation first, then cover it with aluminum foil, and finish with the sheathing. One of such solutions can be seen in the photo below.
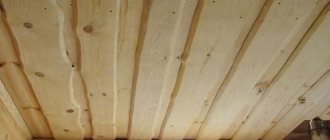
Performing lathing
When wondering how to decorate the inside of a bathhouse with clapboard, it is worth considering the need to install sheathing. Most often it is made using wooden beams. In a certain sequence, the planks are attached to the wall, for which dowels or screws are used.
Installation with nails
The installation process will not be complete without drilling. If the walls have a wooden base, then, as the instructions say, the sheathing can be installed using nails. In both the first and second cases, it is extremely necessary to treat the wood with an antiseptic composition.
Installation of lining
Let's find out how to properly upholster a bathhouse with clapboard. Let's just say one thing: this approach adds excessive beauty, simplicity and benefits.
Dressing room lining
The following minimum rules should be followed:
- Trimming of the lining is carried out only after an accurate measurement of the ceiling height. The panels are fixed along the area of the lock and from the side of the heating element or corner;
- Installation of the lining is done sequentially along the entire perimeter of the internal space of the bathhouse. The last fragment of the panel is trimmed;
- Slopes are made in the same way as with a metal analogue.
Remember that wood is very sensitive to changes in temperature conditions, so before use it is better to let it sit in the room where installation work will be carried out. One day is enough for the lining to acquire the required humidity and temperature. If lining made of cedar or other exotic trees is used in the finishing, the acclimatization time will be different.
When installing the lining, as well as when carrying out paint and varnish work, you should be guided by fire safety rules in order to prevent accidental fire of the structure.
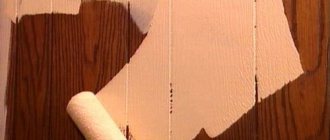
Final work
After fixing the lining, in order to increase its durability, practicality and reliability, antiseptic treatment and impregnation should be performed. Some experts insist on additional coating with special-purpose paints.
Here is one example of how this can happen in practice.
Classification
Creating an ideal wall surface in a bathhouse is possible through the use of high-quality materials. To know how to secure the lining in a bathhouse, it is necessary to distinguish by what characteristics it is divided.
Grade “Extra” and “A” are distinguished by high quality, an ideal smooth surface without various types of external damage, the same texture and color. Grades “B” and “C” do not meet the technical requirements, because there are visible external errors in the material on the surface (knots, deformations, various damages).
If frame
The frame structure is a sandwich made of (for example) boards, OSB or just boards on both sides and insulation inside. Of course, stiffening ribs are added to this - a frame, as well as steam and moisture protection, but the main thing is that insulation is already present. And if the thickness is good, then you can simply cover the OSB with a vapor barrier, fill the sheathing slats and cover the walls in the bathhouse with clapboard.
If it turns out that there is not enough insulation, then additional insulation can be done, and then everything will be the same. Before covering the steam room in the bathhouse with clapboard, you can cover the walls and ceiling with foil as a vapor barrier.
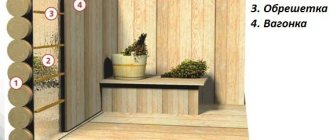
Preparing walls for cladding
The first step is to prepare the walls. The surface of the wall is leveled and cleaned of dirt, mold and other imperfections. Then they are primed with antiseptic agents.
At the second stage, hydro- and thermal insulation is carried out. For waterproofing, multilayer polyethylene film is used. Various types of insulation materials are used to insulate walls.
At the last stage, a special frame is constructed onto which the lining will subsequently be attached.
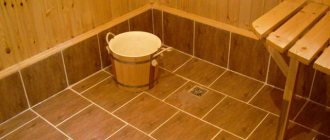
Finishing of the washing room: wood or PVC?
In the washing room, the air temperature is, of course, lower than in the steam room, but the humidity is much higher. That is why ordinary lining is rarely used as a finishing material - only if a special hood is installed on the ceiling. And usually it is moisture-resistant larch. Thus, ordinary wooden lining can be used inside the washing compartment of a bathhouse - if you think carefully about how to treat it. This is necessary to prevent mold from multiplying and black spots and insects from appearing. Basically, bath attendants today use a colorless water-based antifungal agent for these purposes.
But plastic PVC lining, effectively imitating wood, fits perfectly. It is easy to attach, easy to clean and lasts quite a long time. Why not use the same one in a steam room? No plastic is designed for the extreme temperatures that occur in it, but in the washing room it does not deform and does not release any harmful volatile substances into the air.
Plastic lining is also much cheaper than wooden
It is only important to make a vapor barrier and ventilation gaps in the washing room: a lathing is attached, a plastic film is placed on top of it, then there are slats and then there is lining on them
Installation methods
Prolonged exposure to moisture and high temperatures on the lining leads to inevitable damage to the material. The duration of operation depends on the method of laying the lining. The methods of fixing eurolining in a bathhouse determine the nature of the installation work.
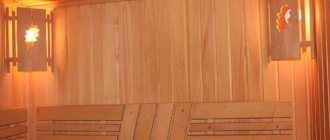
Vertical stripes look very attractive. With this installation option, the joints between the planks are almost invisible.
Horizontal laying of lining has a number of advantages:
- visible changes in the surface and structure of the material are hardly noticeable;
- detection and replacement of lining strips damaged by moisture is much easier and faster;
- visually increases the area of the room;
- The vertical arrangement of the frame slats promotes proper circulation of air masses, which increases the rate of removal of excess moisture.
Fastening the lining at an angle gives the room individuality and additional attractiveness. As a rule, diagonal trim decorates individual elements in the steam room. A combined finishing style is very common.
How to sheathe a steam room correctly
If the argument regarding horizontal laying is accepted, then this is one of the main points on how to properly line a steam room in a bathhouse with clapboard.
Because everything else concerns only the issues of preventing such expansion of wood, which will lead to a violation of the geometry of the wall.
The easiest way would be to avoid swelling of the planks by using boards made of linden wood. Linden is a material that exhibits low expansion when moistened. That is why it is used for the manufacture of bath doors (as well as furniture) - the most sensitive to changes in dimensions.
It would also be worth leaving compensation gaps along the edges of the wall, covering them with decorative strips. These gaps could also serve as ventilation gaps if some distance is left between them and the covering strips.
In general, it’s surprising - in some cases the lining holds up perfectly even in the absence of any tricks for this, but in others it doesn’t just swell, but manages to pull out nails or screws and generally crumble. We believe that its behavior is influenced by the extent to which the tree was dried at the harvesting stage, and, of course, the type of wood as well.
Covering saunas and baths - is there a difference?
But the answer will still be negative. The only difference is that followers of the Russian tradition can use coniferous species in the steam room with less caution, because the Russian bath does not like high temperatures. Well, at least you won’t get burned by the resin if it decides to leak
Resin leaks
BY THE WAY! Since the humidity in the sauna is low, it is more acceptable to place the lining in the bathhouse vertically than in a humid Russian steam room.
Options for fixing the lining
The differences in how to correctly nail the lining in a steam room onto one or another surface determine the technology for carrying out installation work. As a rule, the lining is attached to a wooden frame or sewn onto concrete (brick) walls. There are several methods of fastening.
Through fastening with nails or screws
The fastest and easiest way to attach. During the work process, holes are drilled on the bar, equal in diameter to the thickness of the nail head. After which the lining is nailed to the wall so that the nail is completely embedded in the plank, creating the integrity of the surface.
The disadvantage of this method of fastening is the heating of the metal rod and nail head under the influence of high temperatures. Prolonged exposure to moisture and heat on a nail leads to the formation of rust, which disrupts the aesthetic appeal of the steam room.
The sequence of actions on how to properly nail the lining in a bathhouse is shown in the photo.
Through fastening with nails or screws with masking
This method is chosen if the mounting is made on a concrete wall. A recess is drilled and the paneling is secured to the wall with a thin finishing pin. Then the protruding part is cut and sanded. The result is a neat, unnoticeable fastening.
Installation of lining in this way in a steam room was made possible thanks to the use of a stainless steel pin. Because a part made of wood was deformed and reduced in size under the influence of high temperatures.
Concealed fastening through a groove
Fastening using this technology involves the use of an additional hole (groove) in which the nail head will be hidden. To do this, it is necessary to drill a recess at an angle with a larger diameter than the width of the cap.
The final result depends on how to correctly nail the lining in a bathhouse using this method. Carefully driving the nail into the groove will ensure a smooth surface without visible unevenness or damage. This requires high professionalism and work skills.
Hidden fastening through the shelf
This method of fastening is only possible for eurolining and softline profiles that have a sufficient flange width. A specific configuration feature allows you to hide the head of a driven nail or the head of a screw with the next strip of lining.
Making this fastening does not require any special skills, and the resulting connection will meet all standards of beauty and quality.
Concealed fastening with clamps
It is the fastest and most reliable method of fastening. Before attaching the paneling in a bathhouse using this technology, you need to purchase special fasteners (clasps). Each lining is inserted into the groove of the previous plank. A clamp is placed on the free edge, which is subsequently attached to the frame using a nail or screw.
Regardless of how you install the lining in the steam room, you should take into account the individual characteristics and technical characteristics of the room. The correct choice of material, preparatory work and installation will undoubtedly become the basis for a high-quality and beautiful finish of any bathhouse.
Useful tips
In this matter, you should follow the recommendations:
One of the useful tips for those who use nails to fasten elements. If they are driven deeply into the surface, the attachment point can be hidden behind wooden pins. Don't forget to check your work with a level. At any moment, elements can “go” unevenly
It is important to notice this phenomenon as early as possible and correct it. Do not place the boards too close to each other. Over time, the wood may swell, the lining will change shape - it will not look very aesthetically pleasing. When installing a block house, the first part is mounted on top, finishing is done horizontally
Periodically it is necessary to check the work with a level. If there is high air humidity in the room, waterproofing is needed. Usually the choice is made of roofing felt or plastic film. In the steam room you should use horizontal fastening of the boards. In some options, diagonal placement of material on surfaces is possible. It looks very nice too. Diagonal installation of the very first element must begin from the corner. Finally, the board is cut to the required size. When using sheathing, the step between the bars should be 40 cm. If you decide to use insulation, then the step is equal to the thickness of the insulation (read about insulating a house with clapboard here). If the walls in the house are uneven, you need to fix the frame with bolts or screws.
Lining is an excellent material with its own characteristics and advantages. All the described installation methods allow you to sheathe the surfaces of different rooms soundly, efficiently and for a long time. It is necessary to follow proven methods and methods of using lining. Then you will enjoy the positive qualities of this material for a long time.