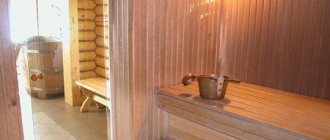
Warm floors have long enjoyed well-deserved popularity. Their different types (water, electric, infrared) are installed in apartments and private houses - it is functional, economical, and comfortable. And it would be quite logical to install a heated floor in the bathhouse from the stove. This will increase the comfort of staying in the steam room and washing room.
Particularly relevant is heated floors in bathhouses with ceramic floors.
Laying schemes
Warm floors are laid according to only two patterns - snail and snake.
Installation with a snake is carried out in rooms with an area of up to 10 m2. If you use such a scheme in large rooms, then only the first half of the floor will be able to be fully heated, while a pronounced drop in temperature will be observed on the second. To compensate for heat losses, a smaller laying step is used. If the standard pipe pitch is considered to be 30 cm, then after passing through half the room it needs to be replaced by 20 cm, and so on for another quarter, then reduced to 15 cm and finishing the installation with this step.
The snail is the most common pipe laying method. It gained popularity due to the simplicity and uniformity of heating the room. If when working with a “snake” we need to bend the pipe by 180°, then when installing the snail it is only 90°, or even bent in a circle. This scheme not only heats the entire room evenly, but also reduces pressure losses along the line.
When installing warm water floors in a bathhouse, it is best to use the snake installation method, since such rooms are usually not large, and the temperature in the circuit is often about 30-350, and at this temperature losses are not terrible.
Errors when mounting the system
Very often, after painstaking work on a water-heated floor, it turns out that inaccuracies were made. As a rule, this is due to incorrect settings of one or another element.
If the floors are installed in such a way that there is no way to regulate their temperature, then the task may be a failure. With intense heating, the floor covering can become so hot that it becomes impossible to walk on it.
Lack of thermal insulation is another issue that is important to approach consciously. In attempts to save money on the use of heat-insulating materials, owners ignore them, which leads to dire consequences. The floor begins to freeze, warms up extremely slowly, and ultimately heat loss is observed.
The problem with the output of taps is another mistake that is made during installation. As a rule, the manifold cabinet is mounted in the dressing room, and not in some other place. That is why it is important to place the bends closer to this place before pouring. In order not to make a mistake in this important issue, it is necessary to follow the pre-prepared project for a water heated floor.
Installation of a water floor in a bathhouse. Design Features
Having confirmed your desire to make your bathhouse more comfortable and cozy, get to work. Installing a heated floor in a bathhouse is not much different from the traditional technology of laying a water circuit in residential premises. The only condition is increased requirements for hydro and thermal insulation of the floor substrate. You choose for yourself what kind of flooring should be used for warm water floors in a bathhouse. Here the important role is played not so much by profitability as by the practical side of the issue.
The main question you have to decide is the following. Where should the heating floor be installed, in which section of the bath? There is no such need for a steam room. But for the washing compartment, dressing room and locker room, heated floors come in handy. The only difference will be in the type of flooring. For the washing room, tiles or porcelain stoneware are used. For the dressing room and dressing room, the best solution would be laminate, parquet board or linoleum.
In practice, various options for equipping warm water floors in a bathhouse are used. The most common arrangement options are:
- warm water floors laid on a wooden base;
- laying a water circuit under a concrete screed;
- use of polystyrene plates.
In each individual case, the choice depends largely on the design features of the building. Large structures usually have concrete foundations. In smaller baths, especially this option, the floors have a wooden structure.
The main condition for the successful operation of warm water floors is an acceptable temperature of the coolant. The water entering the water circuit must have a temperature no higher than 55C. What to do when the water in the coil, in the water jacket or in the tank is significantly higher. The collector is able to solve this problem, so there is no way to do without it. By mixing hot water with waste coolant, an acceptable water temperature in the water circuit is achieved. Only with the addition of water will the warm floor meet the objectives.
We present to your attention a schematic diagram of heating water floors for a bathhouse connected to a heating device. The difference in this case will be in the source of heating the water. Everything else will be approximately the same.
*We have already discussed the choice of pipes for the water circuit. If you constantly use a bathhouse, the ideal option for you would be to use metal-plastic, polyethylene or steel pipes. If a bathhouse is a rare occurrence for you, it is better to get by with corrugated stainless pipes or polypropylene pipes. The layout of the water circuit pipe is selected depending on the configuration of the internal premises and their area.
As a rule, for a given heating system, two pipe laying schemes are chosen: “snail” or “snake”. For small rooms where one water circuit is used, the “snail” installation option looks preferable. This pipeline installation scheme will allow for uniform distribution of heat over the entire floor area. The “snake” scheme is used for rooms where it is planned to install several water circuits.
The water pipe should begin to be laid from the outer walls, gradually moving towards the center of the room. In this case, the optimal installation step must be observed. It will be better if you stop at a step of 30 cm. A step that is too small will cause a large consumption of material, but a step that is too large will create a stable feeling of the difference in temperature of the floor surface.
Not only water, but also antifreeze and other chemical solutions can be used as a coolant.
Types of devices and materials
To make a warm floor in a bathhouse, you can use several installation methods:
How to insulate the floor in a frame bath?
- Concrete screed is the best option for a bathhouse, since it allows you to significantly save on materials and has a high degree of moisture resistance due to the use of cement. However, such a floor can only be used a month after pouring the screed. In addition, if the pipeline is damaged, it is very difficult to find the leak, so the entire screed will need to be dismantled.
- It is very convenient to use special polystyrene boards for heated floors. They are equipped with a reflective foil layer and have special recesses for fixing heating pipes. However, you will still have to pour screed on top of them.
- Laying heating pipes in a wooden floor system is also possible. However, an accurate calculation is needed to determine the location of the holes in the joists for laying the pipeline. But the maintainability of such floors is higher.
Water heated floors: features and installation work
Before making a warm water floor in a bathhouse, you must:
- make sure that the mounting surface is level;
- think over the route of laying pipes;
- select pipe material.
Water often acts as a coolant, but if the bathhouse is not heated additionally, then it makes sense to use antifreeze. This will avoid freezing of the liquid inside the pipes and, accordingly, the risk of their rupture.
Corrugated bending pipe
A warm water floor in a bathhouse has the following advantages:
- environmental friendliness;
- efficiency;
- ensuring gradual natural heating;
- absence of electromagnetic radiation.
It is important to remember that making a heated water floor in a bathhouse with your own hands is quite problematic, since this is a multi-stage process that requires utmost attention. The slightest mistake can lead to incorrect operation of the system
Layers of warm water floor
In particular, the pattern according to which the pipes are laid is carefully selected:
- snail;
- snake;
- double snake.
The distribution of heat also depends on which water floor layout in the bathhouse is chosen. For a bathhouse, a snail is preferable, since it is it that ensures uniform heating of the surface, while a snake cannot provide this: gradually cooling down along the way, the heat transfer liquid may not heat some areas of the floor.
This is appropriate if the steam room itself is a separate building.
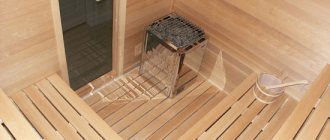
In order to organize a heated water floor in a bathhouse from a stove, it is necessary to install a metal tank above it - it is in it that the water for the entire system will be heated.
Installation diagram for a warm water floor from a stove
There is an option to locate the container below floor level, but in both cases there is a need for a pump: it will ensure proper circulation of liquid in the pipes. Heating the floor in a bathhouse from a stove is a somewhat lengthy process, so a separate wood-burning boiler is often used. Regardless of the method of heating water, the procedure for installing the floors themselves does not change:
Leveling the surface. The base on which the pipes will run must be level. If we are talking about logs and wooden floors, then special openings for pipes are made in the necessary places. Thermal insulation. To increase the efficiency of heat transfer, a layer of thermal insulation material is placed under the system. Installing the mounting surface. Most often, this role is played by a special heat-insulating mat with bosses, between which a flexible pipe is laid. However, fastening can be achieved using other suitable means. Laying the pipe
It is important to take into account that there should be no sharp turns in the turns. Connecting and checking the system. At this stage it is checked whether there are leaks. Screed and laying flooring.
An example of connecting a water floor to a heating circuit
It is important to ensure that there is no slope. The pump will cope with the water supply, but the excess pressure created can quickly damage the entire system. Such a warm floor in a bathhouse under tiles and under a wooden covering is suitable
The system will equally cope with heating.
Forced circulation
Organizing a warm floor with natural circulation will be problematic, because you will need to move the boiler room outside the bathhouse. Why? Since the heat exchanger must be below the floor level of the bathhouse. For this reason, it is easier to make a warm floor from a stone stove with forced movement of the coolant, namely by installing a circulation pump. It is installed on the outlet where the coolant is supplied to the pipe circuits from the buffer tank. Thus, the water circulates, where the cooled water is sent back to the heat capacity, warmed up and returned to the heating circuit.
Water heating system
A practical and affordable way to organize heating of a bathhouse in winter is to install a water system.
Water is used as a coolant, gas, electricity, liquid and solid fuel are used as fuel, and a stove or boiler is used as heating equipment.
Water heating provides quick and uniform heating of bath rooms with the ability to automatically maintain the set temperature.
There are the following options for arranging water heating:
- Radiator heating. Provides for laying pipes along the walls to which water radiators or convectors of the appropriate size and power are connected. The hot coolant from the boiler moves inside the system, providing space heating.
- Underfloor heating. Its operating principle is similar to that in the previous version. The only difference is that the installation of pipes is carried out in a concrete base after its preliminary insulation and waterproofing. This design is of a non-removable type, and therefore requires compliance with installation technology.
Laying features
For electric type
An alternative to water heating in winter is an electric heated floor based on a heating cable. The element provides the release of thermal energy taking into account the heating area: per 1 sq. m – from 160 to 450 W. To install a heated floor in a bathhouse, it is recommended to choose a cable with a power of over 240 W.
These types of systems are equipped with a thermostat to automatically maintain a set temperature based on temperature sensors mounted in the floor base.
The cable design can be single- or double-core. The cable is mounted on a wooden base, while fire safety requirements are observed. The floor is treated with antiseptics and fire retardants.
The cable is laid on a flat base, maintaining a distance of 6 cm from wall surfaces and 12 cm from heating equipment.
After installation is completed, the system is tested for leaks and performance. Then the mesh is installed and concrete is poured. After the base has dried, the decorative coating is installed.
Power calculation
In a typical residential area, even in server regions, the calculated power value is about 100 W/meter of floor. For a bath, the value can be increased, but not more than twice, and so that the heating temperature does not exceed 40 C. A hotter heated floor in the sauna is unsafe.
Self-regulating heating cables do not require thermostats and automatically prevent heating above 40 or 50 degrees. The specific temperature to which the cable can heat up is marked with letters on the outer sheath.
Important! For liquid heated floors, the maximum heating temperature is determined only by the thermostat
Its reliability needs to be given special attention. Liquid heated floors are much more powerful than electric ones
The system requires the installation of a standard heating boiler, so the floor can be combined with wall and floor radiators of any design. All of them, together with the floor, will be connected to one boiler
Liquid heated floors are significantly more powerful than electric ones. The system requires the installation of a standard heating boiler, so the floor can be combined with wall and floor radiators of any design. All of them, together with the floor, will be connected to one boiler.
Diagrams and installation instructions for one boiler
The simplest and most economical way to build a combined heating system in a private house is considered to be a scheme with a radiator and heated floor from one boiler. All elements and the circulation pump are already installed from it.
There are wall-mounted boilers that already have a pump built into them. When using a floor-standing model, it will have to be installed separately.
When directly connected to a gas appliance (this is the model that experts recommend installing when installing a combined heating method in private homes), it is recommended to install a container for condensate. Installing a conventional gas boiler will lead to rapid failure of the heat exchanger.
Gas equipment is placed in rooms with ceilings of at least 2 meters. Ventilation is required.
If a solid fuel model is used, then to connect the heated floor to it, you need to install a buffer tank. Its function is to limit the temperature regime, since it is difficult to directly regulate the temperature.
The principle of operation of heating according to a combined scheme - warm floor and battery from one boiler is as follows. The heated water is directed to the mixing unit, where it rests against the safety head. The thermal head determines its temperature, and if it exceeds the required level, the valve opens and the hot and cold coolant is mixed to the required degree.
Then the water is distributed along the contour lines of the floor and radiators. After passing through the entire pipeline, it returns to the heat generator for heating.
The connection diagram for underfloor heating and radiators from one boiler includes the following elements:
- boiler with expansion tank - heats the coolant;
- hydroarrow - wiring, in the form of a pipe with four branches, through which water moves;
- radiator and sex pump - they supply fluid to the collector unit;
- collector - floor loops are connected to its outputs, and hot water is supplied;
- mixing unit - in it the coolant for the TP is diluted;
- thermostat - a head that opens or closes the flow of water into the circuits.
System installation
After constructing the floor “pie” - leveling the base, hydro and thermal insulation and laying the heating elements, you can proceed to installation work and connecting a combined heating system from one boiler (warm floor and radiators). Let's look at the process step by step:
The boiler is installed and its piping is made (in a private house it is often installed in a separate building). The room must have a chimney and air flow.
The pipes from the radiators are connected to the water heater, and a pump is mounted between them.
The floor circuits are connected through a device in which the water is diluted to the required temperature. For this purpose, the following are used: a mixing unit, a 2- or 3-way valve, they are attached to the supply pipe.
A circulation pump is installed.
The floor contours are connected through a comb to a source of hot water; it is the coolant that will heat the room.
Materials used
It is better to take metal-plastic pipes for the circuit - they are resistant to pressure and do not freeze.
For heating, the following materials are needed:
- pipes – steel and plastic for the system;
- stainless steel or brass container with a capacity of up to 100 l;
- coil - made of black or stainless steel, which serves as a heat exchanger;
- bypass and valve for adjustment;
- circulation pump;
- collector - if several rooms are heated, then a device is required for distributing liquid along the circuits;
- fittings, insulation, fasteners.
You will also need additional materials: reinforcing mesh, waterproofing, priming compounds.
Installation technology
Depending on the base material, it is practiced to install a wooden, polystyrene, or concrete heated water floor.
Concrete
It is widely used in Russian latitudes, it is based on a concrete screed with a flexible pipe; it also uses insulation in tandem with polyethylene film. Mineral wool and penoplex are optimal as thermal insulation materials. Concrete is mixed with special additives (they are also used in the construction of swimming pools), which prevent cracking of the dry mass under conditions of frequent temperature changes.
Preparing the base:
- the screed is made with an inclination corresponding to the direction of drainage of water, the maximum angle is 10°;
- the completely dried layer is covered with a polyethylene vapor barrier;
- insulation is laid on top - mineral wool, penoplex;
- holes are formed in the material into which beacons for future screed are placed;
- The top of the “pie” is covered with a metal reinforcing mesh with a cell size of 10x10 cm.
Polyurethane foam tape is fixed along the perimeter along the walls: a soft membrane compensates for the potential expansion of concrete and prevents it from cracking when heated.
The pipe is laid in a spiral taking into account the following recommendations:
between the turns you need to leave gaps no wider than 40 cm, a distance of 25 cm should be maintained from the outer pipe to the walls; When laying a pipeline, the permissible radius of its bend should be taken into account - this is five times the diameter. The product is sold in the form of reels, they are unwound as they are used, fixed with clamps so that there is space for pipe expansion; the pipes are combined into a circuit in a manifold cabinet.
After trial testing, the concrete screed is poured again. It is important that the ambient temperature is kept in the positive range; a vibrator is used to compact the mass
After trial testing, the concrete screed is poured again
It is important that the ambient temperature is kept in the positive range; a vibrator is used to compact the mass
The optimal layer thickness allows you to leave 2 cm of concrete above the pipes; usually it ranges from 7-8 cm. If a tiled floor covering is planned, 5 cm is enough.
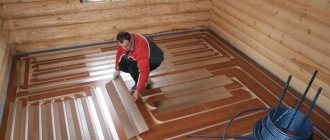
Wood
The flexible pipe is placed in the grooves left between the slats; this space should be wider than 2 cm. Chipboard panels are considered the most budget-friendly base material. Operating procedure:
- The base is leveled and debris is removed.
- A sheathing is formed from timber with a cell side of at least 60 cm, and fiberboard or plywood is stuffed onto it.
- The finished raised floor is covered with a vapor barrier and insulation on top.
- Lay out the boards, in the gaps between which the pipe will be placed. Their height should exceed 2 cm.
- The grooves are insulated with foil to prevent heat leakage downwards, and pipes are placed on it.
- All ends are connected to the manifold cabinet.
- A finishing layer of cladding is formed.
To fix the foil in the gaps, you can use small nails or a stapler. If the raised floor is assembled from fiberboard, foil is glued to the smooth surface of the slabs using double-sided tape.
From polystyrene plates
The base is assembled from segments with ready-made grooves; pipes are inserted into them. Plates are inserted into the gaps to promote more uniform heat distribution. A low and light structure is formed that does not “eat up” the usable space in the room. No labor-intensive concrete screeds are needed here. Polystyrene does not allow moisture to pass through and retains its heat-insulating properties throughout its entire service life.
Installation features:
- the first layer is laid insulation in the form of mineral wool;
- polystyrene foam is installed starting from the far corner, the plates should be placed so that their grooves coincide;
- distribution plates are placed in the holes;
- A flexible pipe is fixed on top.
Polystyrene boards
After checking the functionality of the system, a clean floor covering is formed.
How to choose a stove for a bath
- calculate the required furnace power;
- choose the type of model depending on the type of combustion chamber, based on the size and characteristics of the room;
- decide on the heater (choose a closed or open type);
- For those who prefer to steam while contemplating the fire, they will offer models with doors made of heat-resistant glass.
If, due to its small size, the bathhouse is not equipped with a source of hot water, then our specialists will draw the buyer’s attention to models equipped with tanks, which can be built into the stove, or mounted or remote; in the latter case, they are supposed to be installed in the washing compartment or shower
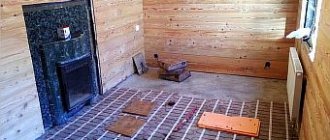
Sequence of installation of a water heated floor in a bathhouse
As was said earlier, water heating has a number of advantages, but requires thorough installation and installation of additional elements such as a water pump and a boiler for heating the liquid. But you can make a warm floor in a bathhouse, powered by a stove, without the need to install a boiler.
The sequence of laying a water floor in a bathhouse:
- Removing old coating. This could be a wooden floor or a concrete screed. The old coating is removed right down to the slab, after which it is necessary to remove all debris and check the floor level. If it is not level enough, then a new concrete screed should be poured, which will only improve the thermal insulation qualities of the room.
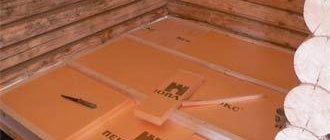
- Laying thermal insulation material. Most often, foam or polystyrene boards are used. These materials are the most durable and reliable, and also have an affordable price. A damper tape should be placed around the perimeter of the room, which is secured using simple self-tapping screws. Modern tape has a special adhesive layer on one side, so installation is greatly simplified.
After laying the foam boards, you should walk on the floor. If the surface “walks” a little, then it is necessary to remove the insulation layer and remove previously unnoticed debris from under it. After the insulation is laid and leveled, it is covered with a thermal insulation film.
Laying thermal insulation
- Pipeline laying. A special film with pre-prepared markings is used as a base for the pipeline. The markings are represented by bosses - small protrusions between which it is convenient to lay water system pipes. It is enough to place a plastic pipe between the bosses and press it down a little until it is fixed in the cavity between the grooves.
Correct pipeline layout
If a simple reinforced frame was used instead of a special film, then the pipes are attached to it using standard plastic clamps or electrical cable ties.
Laying the pipeline on a special surface
- Installation of the manifold cabinet. A manifold cabinet is necessary to collect all communications in one place. All pipelines located on the floor approach this point. Also connected to this cabinet are a liquid supply pipe and a pipe through which the cooled coolant re-enters the boiler.
Preliminary installation of the pipeline under the manifold cabinet
- Fill the screed and lay the flooring. For greater structural strength, it is best to use 2 reinforcing meshes: under the pipeline (at the very beginning of laying the floor) and above it. Next, the entire surface of the finished floor is poured with concrete. There should be no cavities or empty spaces in the screed.
The most popular for such a system are metal-plastic pipes with an internal diameter of 16 mm. They have a long service life and these products are very convenient to work with.
After the screed is ready, the system must be checked by turning on the boiler, heating the water and starting the pump, which will supply coolant to the system. If the pipeline is not sealed, a stain will immediately appear on the concrete screed. Unfortunately, in this case it is necessary to dismantle the floor and install it again.
It is very convenient to use not a boiler in this system, but the heat from a sauna stove. The only drawback of such a system is the impossibility of preheating the room, because to heat the liquid it is necessary to light the stove. But at the same time, there is a certain saving, since there is no need to purchase a boiler.
Pros and cons of installation
The heated floor in the bathhouse will have a hot thermal fluid due to the properties of the combustion intensity of the stove
System Specifics
The first characteristic is that the furnace acts as a boiler, so it is necessary to install a heat exchanger above the combustion chamber. For this, an ordinary metal tank is used. From this tank all circuits will go to the necessary rooms.
In order for the cooled coolant to circulate through the system, it must be equipped with a pump. Without using a pump, the coolant will circulate through the pipes only if the furnace level is below the floor.
Also, for convective circulation it is necessary to use pipes with a large diameter (24 mm), and in most cases a smaller diameter (16 mm) is used. However, even these measures will not ensure effective circulation.
In addition, the bathhouse does not always have a temperature above zero if heat supply is not maintained in it. In such a case, you will have to use antifreeze as a coolant, and the system will have to be disconnected from the entire water heating system.
A wood stove will not be able to ensure the movement of water in a closed circuit, so they use a tank as a pipe coil. The thermal circulation diagram is shown in the picture
It will not be possible to install an oversized heat exchanger; therefore, it is necessary to use a storage tank. It is combined with a system of profile pipes, while on the base it is necessary to install a layer of insulation to eliminate heat loss.
Equipment in the bathhouse system of warm hydraulic floors provides the following advantages:
- No electromagnetic waves, as occurs when using electric heating systems.
- Cozy conditions. Often the floors in the bathhouse are cold, which brings serious discomfort and will cause colds.
Heated floors are especially beneficial in the waiting room to avoid getting sick
- Health safety. The product used as a coolant is environmentally friendly, therefore there is no harm to health.
- Saving on heating. Since circulating water acts as a heating device, good savings on solid fuel can be achieved to create a comfortable climate.
But this system has major disadvantages and difficulties in implementing good operation:
- In winter, you will have to drain the water so that the pipes do not crack when expanding due to freezing. To do this, you will have to take into account a complete drainage system, which is not very comfortable and economical in terms of water use. Perhaps the solution to the problem is to create positive conditions, but heating the stove regularly is also not very convenient. It would be more cunning to use antifreeze together with water.
- To warm up the coolant, a certain amount of heat will be needed, which will be taken from the heat to heat the steam room and washing area.
- Difficult installation process. We will have to implement a difficult scheme covering the entire room and passing under the floor.
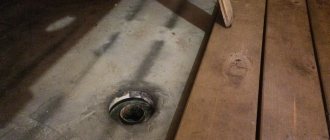
It will be necessary to calculate a drain hole in the floor of the bathhouse so that the moisture does not destroy the thermal insulation material, but goes into the soil behind the wall of the bathhouse
- It will be necessary to provide leak-proof floors so that moisture cannot destroy the insulation material.
As you can see, the best aspects of using a heated hydraulic floor require solving problems of very high difficulty. There are a lot of points to consider, so it is necessary to dwell in detail on the process of improving the floor pie and heating systems.
You can use the following floor improvement options that can be connected to a heating system:
- Concrete screed. is considered an excellent option, as it allows you to save on material. Concrete has a high degree of water resistance. However, work is possible only after the screed has completely dried. To do this you need to wait 4-6 weeks. There is another negative characteristic: areas of leakage in the system will not be easy to determine.
- Polystyrene plate. Not a very typical type of base for a bath, but very effective when used with a heating system. Namely, with a foil surface, it can be perfectly protected from convective and radiated heat. But you will still need to use a concrete screed on top.
- Laying under wooden floors. You can go the very easy way and organize heating specifically for the floorboards. To do this, holes are made in the wood blocks for pipes. The advantage is that the possibility of repairing such a heating arrangement is several times greater.
Example of how a manufactured heated floor runs under the floorboards and in the cross beam system
Main! Foamed polystyrene, mineral wool or expanded clay sand can be used as a layer to protect against heat loss.
For example, let's look at one of the suitable methods for creating a heated hydraulic floor with a concrete screed and a heat-insulating layer. The entire system will consist of the following layers.
- Waterproofing layer. Designed to eliminate the collection of condensation on the floor during heating.
- Insulation layer. Needed to protect against heat loss.
- Reinforcing layer. Protects thermal insulation material from mechanical stress.
- Foil sheet. Allows you to expand the heating efficiency by reflecting heat radiation.
- Pipeline contour in a spiral shape.
- Concrete screed. Allows you to lay a floor covering on top. In this case, it is necessary to take into account the location of the drain hole.
- Finish floor covering. You can use ceramic tiles.
READ MORE: Laminate flooring for the bathroom - tips on how to choose a waterproof laminate flooring and installation instructions
Before installing a heating circuit, you need to worry about the drainage system, since the floor must not leak. To do this you should prepare the following:
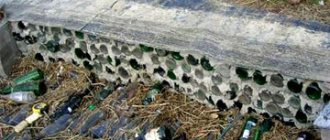
- Remove the soil by 30–40 cm. Make a tunnel under the base and a ditch in order to extend the pipe into the sewer pit. Bury the pipe with an equal distribution of sand. In this case, before laying the pipe, compact the ditch.
- Make a backfill of 15 cm with crushed stone and compact it.
- Make an insulating layer of expanded clay concrete 15–20 cm thick. In this case, you need to ensure that there is a slight slope towards the open end of the drain pipe.
Scheme of how to refine a screed with a heated floor and heated by direct combustion stoves
As soon as the preliminary part of the work is done, we proceed to the actual implementation of the heating system:
- Place two waterproofing barriers overlapping with rolled roofing material and seal the joints with mastic.
- Place thermal insulation material. In this case, it is necessary to store the formed slope.
- Reinforce the insulation layer with reinforcing mesh.
- Lay the pipes, forming a spiral circuit for uniform heating.
- Connect the pipes to a single system and check the functionality of the system.
- As soon as the test “start” is completed, it is allowed to pour the concrete screed. It is necessary to ensure free expansion. To do this, a damper tape is placed along the contour of the room.
- The screed is poured and leveled along the beacons, which are placed in advance in compliance with the slope to the drainage pipe.
- After the screed has completely dried, we begin the process of installing the final floor covering.
It turns out that you can really improve the water heating in the bathhouse. In this case, a direct combustion furnace can be used as a heating device, to which a collector is additionally connected to heat the coolant and a heat exchanger is installed above the stove.
Installation of underfloor heating system
To carry out the work, you will need tools and equipment: a container and mixer for mixing concrete, a spatula, usually scissors for cutting plastic pipes, beacons, a container for heating bitumen.
The materials you need to prepare are: ready-made dry sand-cement mixture (or its individual components), waterproofing (you can take roofing felt and bitumen), thermal insulation (for example, Penoplex), damper tape, clamps, reinforcing mesh, fiberglass, mushroom dowels, plastic pipes diameter 1.6 cm.
Fiber fiber for screed reinforcement
Step 1. The base is cleaned. If defects are found in the form of cracks or potholes, it is necessary to pour a thin screed to level the surface (providing for drainage if necessary). The drainage chute must be made of stainless steel or plastic. After this you will have to wait for the concrete to harden.
Step 2. The base is waterproofed. To do this, heated bitumen is applied in an even layer to the subfloor. Roofing felt sheets are placed on it (with an overlap of 100 mm). After this, the procedure is repeated: a layer of bitumen and a layer of roofing material. In this case, the strips of rolled waterproofing in different layers should be placed perpendicular to each other. The unpleasant smell will disappear over time.
Waterproofing the floor in the bathhouse
Step 3. To reduce heat loss, thermal insulation is installed. She must be tough. The thickness of the sheets is at least 100 mm. During installation, you need to ensure that there are no gaps between the elements.
Laying thermal insulation
Step 4. The metallized substrate is laid.
Step 5. A reinforcing mesh is placed (wire diameter - 4 mm, mesh cell size - 150x150 mm). It is needed to give rigidity to the structure and secure the contours.
Step 6. The perimeter of the room is covered with damper tape. It is made from foamed polyethylene. The purpose of the tape is to compensate for possible thermal expansion of the concrete screed (this effect may cause cracks to appear). It has an adhesive layer applied on it for ease of installation. However, it is recommended to additionally secure the tape with dowel mushrooms.
Step 7. The plastic pipe circuit is laid in a spiral. To do this, at the initial stage, pipes are placed around the perimeter of the room. Gradually, in increments of 25 or 30 cm, they wrap towards the center. From the central point, the contour layout is carried out in the opposite direction (parallel to the previous one) so that in the end there is 12.5 or 15 cm between the pipes.
A circuit of plastic pipes has been laid
The contour is fixed using clamps that secure the pipes to the reinforcing mesh.
Step 8. The thermal circuit is connected to the heat exchanger. A test run of the system is being carried out. It is recommended to leave the heated floor running for two days. This way you can check its functionality and tightness of connections. If no problems are found, you can proceed to filling the system with screed.
Step 9. Mix a solution of CPS and water. For this it is more convenient to use a concrete mixer. But if you don’t have it, you can make do with improvised means (a large container and a shovel). To increase the strength of the base, it is recommended to add fiberglass to the mixture.
How to install heated floors
The progress of work on installing heated floors is as follows. A diagram is being prepared that shows the location of the floor heating system, including all elements of the heated floor and the drainage system. Work begins with the implementation of a rough screed:
- Level and compact the soil.
- Install pipes to carry water into the sewer system.
- Organize a cushion of sand and crushed stone (15 cm), compact it.
- Add 20 cm of expanded clay insulation.
- Fill the screed.
Organize waterproofing:
- Lubricate the rough screed with molten bitumen or waterproofing mastic.
- If bitumen was used, cover it with sheets of roofing material, taking into account an overlap of 10 cm.
- Repeat these layers again.
Install the insulation:
- Use slab insulation with a thickness of at least 50 mm: penoplex, extruded polystyrene foam.
- Control the inclination to the drain hole.
Next, the reinforcing mesh is laid, and a damper tape is attached around the perimeter.
The circuit is fixed to the grid according to the diagram, the equipment is mounted and all elements of the heating system are connected.
Fill the screed while maintaining pressure in the circuits. The system can be started after the screed has completely dried.
When operating, the following must be taken into account:
- In winter, water is drained from the circuits every time. This will help protect the pipes from bursting due to the increase in water volume during frosts.
- The shut-off equipment and pump are repaired in a timely manner. This does not happen often, only when necessary, but it is important to respond in a timely manner and not delay repairs.
If you ignore timely maintenance of your floor heating system, repairs will not be easy.
How densely should the contour be laid on the floor? The smaller the pitch, the warmer it is; on the other hand, the longer the pipe. Most often, a pitch of 100 mm is chosen if this is the only source of heating for the entire room, and 300 mm if the heated floor complements the main heating system.
A pitch of less than 100 mm is technically impossible, because we will get a bend in the pipe, at which the system will not be able to function normally, and a step of more than 300 mm is undesirable, because we will get a noticeable alternation of floor areas of different temperatures and uncomfortable differences in heat and cold.
The pipe length and costs are calculated based on the selected step width, pipe diameter and taking into account bending.
If the length of the circuit exceeds 80 m with a pipe diameter of 16 mm or 120 m with a diameter of 20 mm, several circuits are organized, otherwise we will get the effect of a closed loop - when the pump will not be able to service the circuit and the movement of the coolant through the pipes will stop.