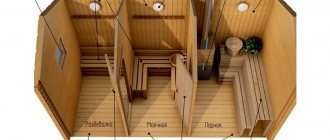
Design and layout of a 3 by 4 bathhouse with a wash room [/caption]
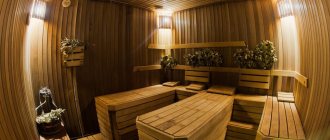
Decorating a bathtub in the shower
The location of the washing room can be planned by knowing the options for its placement, understanding what additional procedures, in addition to direct washing, can be used, and also taking into account your own wishes and capabilities of the existing premises or the costs of its construction.
How to properly make a washing device in a bathhouse - tips with examples
Currently, the bathhouse is a whole complex of special rooms for bathing procedures and relaxation. In addition to the actual washing, there you can take a break from the hustle and bustle, socialize in pleasant company, improve your body health and improve your morale. Further in the material we will talk about what the structure of a bathhouse washing machine is, what materials are best used for finishing and where to start this process.
As a rule, in a modern bathhouse you can find the following premises:
- steam room;
- washing room;
- dressing room;
- restroom.
The decoration of the steam room in the bathhouse with your own hands and the washing room must meet special requirements, since they are the ones that are most intensively used during bathing procedures.
Not so long ago, it was customary to combine a steam room with a washing room in order to save space and better warm up both rooms. However, at present, this idea is increasingly being abandoned, since these rooms are completely different in terms of functional load. In addition, not everyone can tolerate high temperatures in a steam room for a long time. However, everyone is free to decide for themselves what they want.
Water supply technology
The choice of location for the structure depends on access to communications. Automated liquid supply systems facilitate the operation of the steam room. If there is a centralized water supply nearby, then an additional thread is laid to connect to the main line.
When supplying from a well, a pump is installed and the wiring is carried out. Natural sources are divided into 2 groups:
- Underground. Spring and artesian water are suitable for use in washing baths. The collection is carried out by drilling or during the operation of wells.
- Superficial. There are a lot of pathogenic bacteria in open reservoirs, so before being supplied, the liquid goes through a multi-level filter system.
When laying pipes, preference is given to polyethylene or polypropylene types. The inexpensive material is easy to install. Metal models are more durable than plastic counterparts, but have high weight and complex installation (welding equipment).
Underground springSource banya-expert.com
Utility networks in the shower of a bathhouse are often hidden from view under cladding in the walls or in the floor. Open communications are safe and easy to establish. If there is a breakthrough, the parts can be easily replaced without dismantling the partitions or coating. Shut-off valves are needed for hot and cold water. For polypropylene pipes, couplings, clamps and adapters are additionally used. The quantity and type depend on the length of the water pipe.
How to add water Source byrcompany.ru
To prevent the appearance of condensation in the shower bath, during installation, pipes with cold water are placed under hot water. The heated air will not rise up and, after cooling, fall onto the finish. When installed hidden, all elements are additionally protected with thermal insulation, otherwise the cladding and wooden parts will rot from moisture.
Advantages and disadvantages of combination
It would be wise to design a washing room that takes into account the required standards and, at the same time, is the most convenient for the owners of the bathhouse itself. The washing room can be equipped as a separate room, or combined with a steam room. Owners choose the combined option in order to:
- Solve the issue of simultaneous heating of rooms with different purposes.
- Save space.
- Save construction costs.
Experts strongly advise dividing even small rooms with partitions:
Article on the topic: How to ban a subnet in cs 1.6
- The bathing room will provide the opportunity to create the best conditions for any of the rooms. The steam room will have a very pleasant temperature, but the wash room will never be very hot. Moreover, if the sink is combined with a steam room, this can be dangerous to human health. The process of bathing in a heated steam room can lead to heart disease and pressure surges, and the increased level of humidity when visiting a steam room sometimes negatively affects the condition of the lungs.
- It is better to protect the steam room from the high degree of humidity that always accompanies the washing process. This rule is especially important for Finnish-type bath complexes that have an electric stove. For a non-dry type steam room, humidity is a kind of temperature regulator.
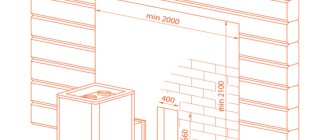
- Despite the fact that the bathhouse is a place of relaxation and rest, you should remember that it is also a room with increased danger. It is the combination of a steam room and a wash room that often becomes the cause of injuries in everyday life. Unlike static steaming, washing is a dynamic process and requires a large area. A stove placed in a washing or shower compartment must be safe. This will even apply to those types of layouts in which the steam room is located in a separate room, but the stove is heated from the shower room. If it is a metal structure, it is important to protect users from accidental burns and touches. To do this, all hot elements must be covered with bricks.
If it is not possible to truly separate the rooms, you can:
- Place the washroom on the first level, and install the steam room on the top.
- Partially limit the steam room area by creating between them not a solid partition, but a light wall with a large passage.
- Use a small insulated shower compartment as a washroom.
- If space allows, you can install a ready-made shower stall.
The advantages of separate placement of washing and steam rooms clearly indicate the need for such a section.
Installation of a shower stall
A modern washing room in a wooden bathhouse cannot function normally without at least one shower stall. Basically, standard booths with dimensions of one meter by meter, one meter and two meters are installed. To drain used water, siphons are installed in the floor under showers, which are sometimes supplemented with trays to allow water to flow directly into the drain pipes.
Any specialized store offers a huge assortment of shower stalls. They fully comply with all sanitation and hygiene standards, and are also easy to use; the only drawback is their fairly high cost.
Modern shower stall in a wooden bath
If it is not possible to purchase a ready-made booth, then you can make it yourself:
- the corner in the washing room is surrounded by a low wall made of plywood or plasterboard;
- the corners are finished with ceramic tiles;
- a large tray is used as a base - this is where the flushed water will flow;
- if necessary, the pallet is reinforced with a wooden or concrete frame and connected to the sewer system;
- Removable unscrewing legs are attached to the bottom of the pallet (for the ability to adjust the height).
Homemade shower stall
Now let's move on to examining the design of the door that leads into the stall. There are no special requirements for its design; it is quite easy to implement. Basically, doors are represented as a metal or plastic frame and a sheet of ordinary plastic attached to it with hinges.
If desired, you can install a bathtub in the washing room, but it will have to be combined with a shower stall. At the same time, it should not be open; you need to surround it with a special sliding wall made of durable plastic.
Important. After each water procedure, the bathtub and shower stall must be thoroughly washed and ventilated to prevent mold.
Decorating the floor in the washroom
Floors in a washing bath require special attention when finishing them, because this component is constantly subject to temperature changes and the influence of moisture.
The floor in the washing area must meet high requirements:
- perfectly passes water through itself;
- ventilate well and dry quickly;
- demonstrate a temperature warm enough for a person to stand on without shoes;
- be resistant to high temperatures;
- do not be a source of draft.
Wooden floor in the washing area in the bathhouse
Concrete floors must have a high-quality insulation system. Therefore, you will need to lay two layers of mineral wool or glass wool. But such floors are more typical for a public bathhouse, while a private bathhouse in most cases is built with wooden floors.
Article on the topic: How to dig a hole for fence posts with a shovel
To decorate the floor in the washing area, it is worth using larch wood.
To ensure your floors function properly, you will need to do the following:
- You need to install logs on top of the base of the bathhouse, and place a subfloor and insulating material between them. For example, mineral wool.
- The flooring is done with a slight slope. A regular board will do for this.
- The polyethylene sheet is installed last. It should be made in the form of a trough and have a drainage ladder.
- The costs of installing such a floor in a bathhouse should be relatively low. The price of a regular board is very affordable for many. At the same time, the strength and durability of the structure will surprise even very picky people.
Interior arrangement of the bathhouse
Features of finishing material for washing
The washing room in a wooden bath is practically not subject to heating, but is in contact with water, which eliminates the possibility of using wood for interior decoration. To maintain the overall design of the premises in a bathhouse made of timber, you can use its high-quality imitation.
When choosing materials for the interior decoration of the washing compartment, the following parameters are taken into account:
- resistance to high humidity;
- environmental safety;
- practicality and durability;
- convenient and affordable installation;
- ease of maintenance;
- price.
The most popular finishing materials include wood, tiles, stone, paint, and plastic.
According to their purpose, they are divided into types: for finishing floor, wall and ceiling surfaces. Each of the available options has its own advantages and disadvantages.
Rest rooms
If the bath area is large, the rest room can be separated from the dressing room. Furniture that is resistant to moisture and temperature changes is placed here. These can be wicker chairs, sofas and tables. There are no special requirements in terms of functionality and design for this room. When developing an interior design project, you can take any style as a basis.
To decorate the walls, lining made of linden, oak, birch, and aspen is used. The floor is covered with porcelain stoneware or tiles. No central lighting required. Spotlights are hung on the ceiling instead of a chandelier.
The recreation room can be functionally combined with an open veranda, a swimming pool, and a barbecue area. A fireplace or its electric imitation will add a special charm to the room.
How to insulate
The floor is insulated during the construction stage, but this is already understandable. There is no way to insulate a torrential one with water draining under the bathhouse , but with the rest it’s already better.
Usually the insulation is placed on a layer of waterproofing (do not forget that it must be sealed and extend onto the walls). This can be polystyrene foam, expanded clay, or any other insulation material that can be poured on top with concrete and it will not lose its thermal insulation properties.
Also, for insulation, it is worth taking measures to seal the underground space - there should be no cracks or holes. But at the same time, if not necessary, then it is very desirable to have vents in the base, which should be closed during procedures, but in general are an important part of ventilation.
There is another option for how to insulate the floor in a steam room. A concrete screed or a clay castle is not always made. Therefore, the insulation can also be placed on boards that are attached to the bottom of the logs. That is, the logs are first attached to the foundation frame or grillage, then the cranial bars are nailed, boards are placed on them, a water barrier in the form of a film is placed on them, for example, and the space between the logs is filled with insulation .
Article on the topic: How to make an estimate for the construction of a bathhouse
It would be worth putting another layer of water barrier on top of the insulation, because water can penetrate from above. Next is the rough floor, and whitewash on top of it. At the same time, we must not forget about the slopes leading to drainage. This option is shown in the picture above. It goes without saying that the drain pipe is brought directly to the level of the finished floor, and the entire wastewater drainage system is done during the laying of the foundation (if it is strip) or later (if it is columnar or pile).
Here's another option in the video below.
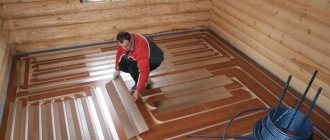
Well, the surest way to make walking on the floor comfortable in any frost is to install electric heating. Most often this is done if the owner is laying ceramic tiles.
Installation of the log system
A mandatory stage in the construction of floors in a bathhouse, in which experts recommend laying the beams horizontally (if there is already a layer of waterproofing), and at a slope of 3 to 100.
Before making the flooring, the master must make sure that the levels of the foundation and coating match. If a leak-proof design is chosen, it is permissible not to fix the floorboards on the joists; in other cases, they need to be secured - each with a pair of nails (on both sides of the planks, driven in at 45 degrees). Attention, it is advisable to tighten the tongue and groove boards first, and they should be finally hammered in only after finishing and drying. At the final stage it is necessary to frame it with a plinth.
Stones
For laying stones, it is best to use jadeite, diabase, and soapstone. All of them are not afraid of high temperatures and do not crack from water, and their evaporation is beneficial for the body. It is best to choose stones with a slight roughness, which will help water stay on the surface longer.
Cracked stones must be promptly replaced with new elements.
Setting up a sauna in your home will allow you to enjoy beneficial procedures at almost any time, so if you have the desire and opportunity, it is better to pamper yourself and your family with this type of bathhouse.
Features of the material for washing
The washing compartment is not exposed to high temperatures, but constant contact with water makes it unfavorable for wood. If the overall design of the bathhouse is wood, and you don’t want to disturb it, then use lining or imitation timber made of larch or aspen. But the material will not be cheap.
Finishing materials for a bath are selected according to the following criteria:
- High water-repellent characteristics.
- Environmentally friendly.
- Easy to install.
- Washing design.
- Price.
Unfortunately, it is difficult to find combinations of all indicators. Among the most commonly used are: ceramic tiles, natural or artificial stone, wood, water-repellent paint and plastic panels. They are divided according to their purpose: for cladding ceilings, walls and floors. Each of the options has positive and negative qualities; let’s consider them in more detail.
Article on the topic: How to make a fence from reinforcement
Ceramic tile
Ceramic tiles are moisture-repellent materials. It is used for finishing floors and walls of the washing compartment. If the walls in the bathhouse are wooden, then before cladding you need to lay waterproofing and level the walls. The tile adhesive used is moisture-resistant. The size and color scheme are selected individually, and a large assortment in construction stores makes ceramic tiles accessible to any budget.
Ceramic tiles are most often used for floors. In the washing department, it is important to properly organize the drainage and perform the screed. The floor should have a slight slope towards the drain, which is discharged under the bathhouse or into the general sewer system.
The advantages of ceramic tiles include:
- Does not allow water to pass through.
- Durability.
- Does not lose strength over the years.
- Does not change color.
- Environmentally friendly.
- Easy to care for.
- Price starts from 120 RUR/m²
- More than 200 colors.
The cons are mainly taken from user reviews:
- The floors in the wash bay slip and it is easy to get injured.
- The walls stop breathing.
- It is difficult to do the installation yourself without a certain skill.
- May break if hit by a heavy or hard object.
If the floors in the washing room are tiled, an overlap should be made on the walls, at least 40 cm, so that water will not get to the wooden structure of the walls. Above the tiles, you can use water-repellent paint on a natural basis.
Wood - pros and cons
Wood in the finishing of the washing room is used for walls. If all other rooms are finished with imitation timber, clapboard or block house, then the washing room can also be finished with this material. But it is better to use cladding made of coniferous wood. A high resin content will make the walls more resistant to moisture.
Larch and aspen are considered the most resistant, but the price for panels made from this wood starts from 350 rubles.
Pine and spruce can be coated with water-repellent compounds and their service life will increase. The following are used as water-repellent compositions:
- Natural oils.
- Wax.
- Water based paint.
Wood, if well processed, will be an excellent finish in a washing bath.
Oils are impregnating compounds and penetrate deep into the wood. Before application, the surface is sanded and cleaned of dust and dirt. It is necessary to apply oils in the washing machine in 2-3 layers. After complete drying, the walls will become less susceptible to moisture. The durability of an oil coating is less than, for example, that of wax.
Wax is one of the most expensive wood coatings. It is applied by rubbing movements using a special soft cloth. Wax creates a film on the surface of the wood that reliably protects the wood, but does not block the penetration of oxygen inside. At the same time, the appearance of the wood only improves, the pattern becomes more expressive, and the shade is deeper.
Article on the topic: How to open a sauna in a residential building
Paint is used only on a natural basis, but water-repellent. It can be matte or glossy. In this case, the color scheme depends only on the owner’s imagination. Apply with a brush or roller in 2 layers. Dries within 12 hours. The only negative is that the surface wears out quickly, so the treatment must be repeated once a year.
Wooden finishes pair well with natural or artificial stone.
Stone in the finishing of the sink
You can use stone to decorate walls and floors in whole or in part. They combine the walls by laying artificial or natural stone in the area where the shower is located. Natural stone is expensive and has a number of advantages:
- Eco-friendly.
- Beautiful appearance.
- Durable.
- Not afraid of mechanical influences.
- Does not allow water to pass through.
The main disadvantages include:
- Heavy material.
- It is difficult to do the finishing yourself.
- A flat surface is required for installation.
- High price.
But the disadvantages can be compensated for by using artificial stone. It is not as environmentally friendly, but lighter. And if you take the right shape, then laying it is no more difficult than tiles. The price of artificial turf is 2-3 times lower than natural turf.
Plastic lining and panels
The most economical way to finish a washroom is to use plastic panels. Moreover, they are wide with a tongue and groove, which makes it possible to create the most airtight finish. Color solutions are different. The use of thin plastic panels resembles the appearance of painted wooden paneling. used for cladding walls and ceilings. The main advantages of the material include:
- Easy installation.
- Lightweight material, therefore easy to install on lightweight sheathing.
- Price from 70 RUR/panel.
- Does not absorb water.
- Aesthetic appearance of the walls after finishing.
The cash in question has a number of negative qualities, which users mention more than once in reviews:
- Afraid of mechanical influences.
- Not environmentally friendly.
- Prevents oxygen from getting inside.
If you purchase low-quality material, it will emit a pungent, persistent odor.
When installing plastic panels, you need to install thorough waterproofing of the walls and ceiling. To do this, a foil film is attached to the surface or PVC as a cost-saving measure. It is necessary to leave a gap of 1-2 cm between the panels and the waterproofing, otherwise condensation may accumulate under the panels and the walls will begin to rot.
Article on the topic: How to properly steam in a sauna YouTube
Installation of plastic panels in the washing compartment is permissible only after the house has completely settled. Otherwise, they may become distorted and the seal will be compromised, and in rare cases the finish will crack.
How to choose the right PVC panels can be seen in the video:
Sink finishing paint
The easiest way to finish a washing gypsum lining and paint it with water-repellent paint. But this method is short-lived and it is necessary to carry out repair work once a year. In addition, when installing gypsum fiber boards, part of the room area is lost. This method is not the best, since it is recommended to use it if a separate closed shower stall is installed in the washing room.
Paints can only be used on a natural basis, and their main disadvantage is their fragility.
Any of the listed finishing materials can be used for interior finishing of a washing room in a bathhouse. But choosing the right material is only half the battle; it is important to carry out the installation correctly and efficiently. If experience is not enough, it is better to entrust the work to professionals.
Gangway installation
Washing baths are rarely equipped with separate shower stalls and trays.
Typically a drain is used to drain the water. So, the ladder kit consists of the following parts:
- A siphon with a water seal that blocks unpleasant odors that can penetrate from the sewer.
- The decorative grille is mounted on the drain body and rests on it. The surface of the grate and the sides of the ladder must be at the same level.
- The drainage ring is designed to ensure that when the waterproofing breaks, water flows back into the drain through the hole located in the ring.
- A steel pressure flange is used to ensure the tightness of the waterproofing connection with the drain body.
- Gangway body.
Drain
The location for installing the drain is determined when designing the washing room. This is due to the fact that the equipment will be mounted in the floor. This directly determines how to make the floor in the washing room. After arranging the drain, care should be taken to connect it to the drain. To do this, you will need to install a pipe with a slope of at least 3°.
Note! The floor should also have a slight slope towards the drain, which will prevent the accumulation and stagnation of water in the washing room.
Materials
To install a ladder, you need to prepare:
- cement;
- sifted sand;
- heat and sound insulating material;
- mastic/adhesive composition;
- waterproofing membrane;
- finishing material for flooring.
Installation technology
Installation of a drain ladder
First you need to lay the thermal insulation material, in our case it will be polystyrene foam. Its thickness should be 4 cm or more. In this case, the foam must be of high density, which will provide good rigidity.
Note! To maintain the slope of the floor to the drainage point, check each step with a level. Make a cutout in the foam for the sewer pipe and drain.
When the preparatory work is completed, you can fill the floor with sand-cement mortar, this way you will fix the ladder. Pre-treat the drain with solvent. In this case, the screed must be laid taking into account the slope necessary to direct the water to the drainage point. Ensure the drain is tight.
Installation of ladder and installation of formwork
Note! After the screed has dried, use silicone sealant to seal the joints of the drain. Remember, water from the washing room should only drain through the drain.
Waterproofing and finishing
Floor waterproofing
You also need to perform waterproofing, into which the fiberglass seal should be embedded. Along the perimeter of the wall, to a height of 10–15 cm, you need to apply waterproofing, and then glue a fiberglass mesh onto it. After this, the second layer of screed should be poured.
After the screed has dried, you can begin finishing the ladder. An adhesive composition is applied to the screed and the tiles/mosaics are laid. In this case, the grate of the ladder should be on the same level with the finishing material. Upon completion of the finishing work, all seams should be sealed with moisture-resistant grout. Wall tiles are laid using the same principle, but this will be discussed further.
Note! If you plan to lay a plank floor, then lay roofing felt on the base, and then install the sheathing.
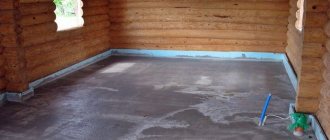
Construction of concrete pavement
Concrete-type coatings are considered more reliable and durable (service life is more than 25 years) than wooden floors.
Technology for manufacturing concrete floors:
- First of all, it is necessary to make a pit to receive wastewater from the washing room. To do this, a drainage pipe with a diameter of 15–20 cm is laid in a dug hole, which is led into the building’s sewer system or into a drainage ditch.
- Then the soil is leveled and a cushion of crushed stone with sand or broken brick up to 20 cm thick is made, and this layer is carefully compacted.
- Before insulating the wash room in the bathhouse, lay a layer of waterproofing made of roofing felt or similar material.
- Then insulation is carried out by backfilling with a layer of expanded clay. The thickness of the layer depends on the climatic conditions of the area (most often the height is 5–10 cm)
- A reinforcing mesh is laid on top of the insulation and filled with cement mortar.
Baths, saunas and swimming pools
In the recent past, the bathhouse was used exclusively for hygienic purposes. Today it’s a completely different matter; a bathhouse is a place to relax with friends, a kind of massage and beauty salon, and even a room for psychological relief. In a word, people visit the bathhouse these days not just to wash themselves, but at the same time to get a boost of energy, improve their health and, if possible, lose excess weight. This article will talk about how best to wash in a bathhouse.
Content:
Today the bathhouse consists of three, and sometimes even four rooms:
rest room;
Article on the topic: How to paint a metal fence forum
Particular attention should be paid to the steam room and sink, since the correctness of their arrangement determines how effective the bathing procedures carried out here will be.
Bathhouse washing photo
Some time ago it was believed that it was better to combine the above two rooms, since this would save space, and therefore the cost of construction; again, it would be easier to heat the combined sections of the bathhouse. Today, most people prefer to equip them separately, since they have different functions. In addition, not all bathhouse visitors can tolerate the high temperature of the steam room well. But still, each specific case requires an individual approach, taking into account the needs of the householder, as well as his capabilities.
Washing in the steam room or separately?
The problem of combining a steam room and a washing compartment is not as simple as it sometimes seems, so it should be decided upon at the stage of developing a bathhouse project. Its decision is often dictated less by the owner’s desire than by objective conditions:
- size of the land plot;
- financial capabilities of the owner;
- availability of necessary materials.
As practice shows, they most often combine a sink with a steam room due to the limited area of future construction and the funds allocated for it.
- If you plan to build a small bathhouse, then you will still have to divide it into at least two rooms: a dressing room, also known as a relaxation room, a locker room and a steam room, in which you are also supposed to wash. The stove is heated from the first room - the dressing room, separating the steam room from the street. And in the steam room and washing room they set up a heater, a lounger for steamers, a bench for basins and other bath accessories, a container with cold water, and another tank in which hot water is heated on the stove.
Advantages of a combined steam room and sink:
- simplicity of structure planning. The stove firebox has access to the dressing room, the stove itself has a heating surface where a tank for hot water is placed, and the heater is located in the steam room;
- saving space, at the same time money, materials, as well as firewood for heating the room.
- the impossibility of washing several people at the same time due to limited space;
- the need to ventilate the room and heat the oven when washing several groups;
- impossibility of washing for people who are not completely healthy due to too high a temperature in the washing room.
In order to reduce some of the negative characteristics of this type of design, it can be recommended to equip the steam room and washing room at different levels, where the shelves for steamers are higher, where it is hot, and the bench for washing is lower, where it is cooler.
Summarizing all of the above, it should be noted that the need to combine two bath compartments is often dictated by a lack of space. The total area of the structure up to 16 m2 requires combination; anything larger than this figure can be divided by building a separate washing room and steam room. But too cramped, even separate rooms, will not bring joy when taking bath procedures.
Article on the topic: How to properly go to the sauna in a fitness club
Arrangement of separate sinks and steam rooms in the bathhouse
Decorating the walls of the washing room
Traditionally, natural wood is preferred for interior decoration of washrooms, since its characteristics meet all requirements.
However, not every type of wood is suitable for these purposes; only moisture-resistant and durable wood is suitable here. In this regard, the following have long been considered the most suitable:
- cedar _ It is suitable for finishing the walls and ceilings of a washing room, since the temperature here is not as high as in a steam room, the degree of heating of cedar wood is insignificant, and therefore cedar resin will not drip. The difficulty is caused by the shortage of cedar lining and its high cost;
- Linden . This is the most suitable material for finishing a bath sink. It does not darken from humidity and time, and when heated, it fills the room with a pleasant aroma that has a beneficial effect on the human body;
- larch. It is difficult to process, but it is extremely moisture resistant, its wood looks very attractive when cut, and the aroma, especially strong when heated, is pleasant and healing;
- Abashi . Recently, African abashi wood, otherwise known as dead wood, has become a popular finishing material for bathhouse washrooms. It hardly heats up and has an expressive texture and color.
Having chosen the type of lining depending on personal preferences and possibilities, they begin to cover the walls. This can be done in several ways by placing the slats:
- vertical;
- horizontally;
- diagonally;
- in various combinations.
Stages of work
- First, a frame is built, while securing the bars in a certain way. When finishing horizontally, they are mounted vertically, and when finishing vertically, they are mounted horizontally. If a diagonal layout of the planks is preferred, the frame bars are also attached diagonally, only in the opposite direction. By using these three cladding methods in any combination, you can get an interior design option that is unsurpassed in beauty.
- You can attach the lining in the following ways:
- using a clamp, which is most suitable for decorative finishing;
- driving nails into the groove at an oblique angle (secret fastening), which is very labor-intensive for a non-professional;
- using through fastening with screws - self-tapping screws directly into the frame block.
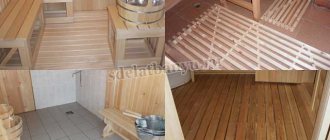
Installation of the floor in the washing room
- The main requirements for the floor in a bathhouse sink are non-slip and easy to keep clean.
- Today, most experts agree that these requirements are met by special unglazed ceramic tiles, moreover, at a very reasonable price, which are laid on a concrete screed.
- To drain water from the sink, wooden drains made from slats or rubber mats are placed on the floor. After each wash, these coatings should be dried thoroughly. It is unacceptable to use any synthetic materials to cover the washroom floor, which, when heated, usually emit substances that are toxic to humans.
Article on the topic: How to melt chocolate in a water bath in a slow cooker
- In addition, when arranging the floor in the sink, you need to take into account that the soil cushion, heat insulator, and bath floor screed should not be fastened to the foundation, this allows it to carry out independent vertical movement along the inner surface of the walls in the winter-spring period. In the absence of this autonomy, the floor tiles will be destroyed in the coming spring.
Ventilation system in the sink
Ventilation of the sink is the cornerstone of the well-being of this section of the bathhouse, since the abundance of moisture accumulating under the floor, without proper ventilation, contributes to the appearance of mold and rot. Underfloor ventilation with air exhaust also ensures normal temperature conditions and floor heating. To create such a hood, a ventilation duct is installed next to the stove. When the oven heats up, a draft is formed in it, and cold, moist air comes out.
Bath ventilation provides:
- optimal temperature conditions;
- constant air flow;
- ventilation and drying of all rooms of the bathhouse.
- Natural. It is created due to the difference in air pressure outside and inside the building and does not require additional costs for installing special equipment.
- Forced. It is provided with the help of additionally installed equipment: fans; air filters; air conditioners and other appliances.
Errors in installing ventilation lead to unpleasant consequences, such as:
- formation and spread of mold;
- wood rotting;
- the emergence of pathogenic microflora hazardous to health.
Water supply in the sink
A sauna sink needs a reliable supply of water. Here, as in the case of calculating the required bath area for a certain number of people, you need to know exactly how many people will take bath procedures at the same time in order to correctly install the water supply from pipes of the required diameter. In order for the washing room to be provided with hot water, you can consider two main options :
- if it is possible to supply gas communications, use a gas heater;
- If there is no nearby gas pipeline, use an electric heater.
In a word, with a centralized water supply and the presence of a sewerage system, the issue of providing a bathhouse with water is, one way or another, resolved.
Article on the topic: How to make a mask from charcoal and gelatin in a water bath
It’s another matter when it is not possible to provide water supply and sewerage to the site or these systems are not provided for by the design of the bathhouse itself, and water, both cold and hot, must be prepared in advance in containers, from which each person pours the required amount of water into a basin.
- In this case, it is necessary to first calculate how much water will be needed to wash a certain number of vacationers. This is done in the following way: there is a known value of the required amount of hot water per person per wash, equal to 7-10 liters. If the water temperature is 80-90°C, then a person uses 3-4 times more cold water at a time. This means that to wash one person, 40-45 liters of water are needed.
- Based on this and knowing the number of people who want to wash, you can correctly calculate the amount of water that should be prepared. Hot water, with this water supply option, is heated in boilers provided by the design of the stove itself, heated with solid fuel (usually firewood, preferably birch).
PVC panels
Finishing a shower in a wooden bath with plastic panels is a possible option. This is also true for buildings made of brick or concrete. But before making a final decision, you need to carefully weigh the pros and cons. The advantages of plastic panels include:
- availability;
- low cost;
- ease of installation;
- light weight;
- ease of care.
The disadvantages include:
- fragility;
- low strength;
- the seams begin to darken after half a year.
Plastic is used both for finishing walls and ceilings. The installation procedure is as follows:
- preparation of the base (when finishing the ceiling - plaster);
- fixing waterproofing;
- installation of sheathing (the same as for wooden lining);
- installation of panels using a tongue-and-groove system.