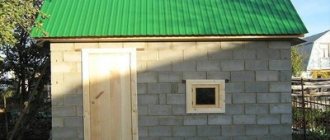
A bathhouse is a structure within which processes involving the use of large amounts of water occur.
This applies to the washing and steam compartments or a room that performs the functions of both at the same time.
To ensure that the building is not exposed to the aggressive influence of a humid environment, it is necessary to get rid of waste water in a timely manner, for which a drain is installed in the foundation. In this article, the reader will find useful information on how to make the foundation of a bathhouse with a drain with your own hands.
Material for the base of the house
Now there are two opinions about the design of the plinth, when the question arises of what material to choose for the plinth of the house:
- the basement part is made of concrete, as a continuation of the monolithic foundation
- the base is made of brick
Laying a brick plinth was not even discussed in the past. The plinth must be brick, period. Just 10 years ago it was not fashionable to raise the foundation higher than 150mm above the ground.
If we compare concrete and brickwork, then in terms of thermal properties, without a doubt, the brick plinth wins. Because, for a residential building, a brick plinth with a masonry thickness of 510-640 mm is laid out. This thickness of a brick wall does not require additional insulation in snowy regions of Russia.
But recently, the technology of insulating concrete walls has come into fashion. And this plinth technology is now preferable when constructing a permanent residential building, because, simultaneously with the insulation of the plinth, horizontal insulation of the blind area is done, which provides an advantage as a protective measure for foundations from freezing.
If you are not going to insulate the basement part of the wall and the blind area of the house from the outside of the house, then without any options, laying a brick base is suitable for you:
- easier
- warmer
- cheaper
- does not require additional finishing
But this is a subjective opinion.
If it is easier for you to monolith the base, then, of course, choose this option. Because in both options, the bathhouse is a structure that does not require a high underground. The maximum height of the base for a bath is 300-400mm.
And if you choose a brick base for a bathhouse, all the same, its thickness will be no more than 250 mm (in brick), due to the fact that it is not necessary to make a wide foundation for a log house from 200-240 mm logs. And this thickness of brickwork is not much warmer than a concrete wall. And during seasonal use (in summer), warm material for the base is not of great importance at positive outside temperatures.
Design
When designing a bathhouse yourself inside, do not forget about the rules. The main rule is compliance with fire safety standards. For example, wooden and other flammable objects should be kept at a meter distance from the stove. The interior decoration of the bathhouse should preferably be natural and environmentally friendly. Therefore, you should not use a budget plastic alternative, which can be painted to look like wood. Despite the monetary benefits, plastic is not practical, since it does not allow vapor to pass through. In addition, under the influence of steam and temperatures it will release harmful substances.
If you want to save money on the inside of a brick bathhouse, you don’t have to decorate it with anything at all. Modern bathhouse design sometimes involves the use of finishing bricks to decorate the walls. The best option for inexpensive finishing of a bathhouse is wood. It requires minimal skills in working with tools; such finishing will not be difficult. If we consider in more detail, it is better to read the design of the bathhouse from the dressing room
When choosing options, it is worth considering that people relax in the room after water procedures, so it is important to provide the most comfortable functionality inside
For example, a full wardrobe, as well as places to relax. Standard set of necessary items: table, benches, wardrobe. The wall finishing material and furniture color can be chosen to suit your taste.
A standard steam room includes: a heater stove, shelves, which are usually built at different levels. The steam room is a very important room for a bath. Arrange shelves according to individual preferences. The higher the shelf, the hotter it will be.
If the shelves and walls of the steam room are decorated with wood, then the place near the stove must be brick or, as an option, natural stone. If the washing room is a separate room, then it also requires a designer approach to design. A standard shower room must have benches, a shower or a tub of cold water (as before, in a Russian bath). The shower room does not necessarily require wood finishing. Decorative tiles or wall panels are suitable as finishing materials.
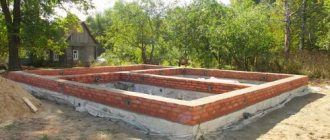
Brick plinth on strip foundation
Basement is the lower part of the external wall of a house, built on a foundation and designed to protect the walls from the destructive effects of moisture. A house without a basement is at risk of mold infestation and rotting, may lose its ability to resist cold weather and increase heat transfer between the interior and the street.
One of the indisputable conditions is the strength of the base, because it bears the entire weight of the walls of the house. That is why the materials used must be of high quality, characterized by frost resistance, low moisture resistance and pressure resistance.
There are three plinth options used in construction:
- Outgoing - goes beyond the wall. This option is justified in two cases - it is part of the building design (esthetically it is more advantageous) or there is a need for enhanced insulation of the basement floor. It must be equipped with a slope or groove for water drainage.
Calculation of bricks for the plinth
The calculation of a brick per plinth for its purchase and delivery is as follows:
- First, the volume of the brickwork is calculated. To do this, we multiply the perimeter of the foundation by the width of the masonry and its height. For example, the dimensions of the foundation are 4x3 m. with a foundation width of 300mm. The perimeter is 14 m. The masonry will be brick-width (250mm) and 4 rows high (70*4=280mm). We obtain the volume of the future masonry equal to: 14m*0.25m*0.28m=0.98 m3.
- In 1 m3 of brickwork, the average consumption of bricks is 400 pcs. We multiply our masonry volume by 400 pieces, we get: 0.98 m * 400 pieces = 392 pieces.
There are 300-330 pieces in a pallet (depending on the manufacturer). This means you need to buy 2 pallets. With reserve. The brick will remain, but it is never superfluous during construction. You can, in the future, make a simple brick grill.
Types and sequence of wall masonry
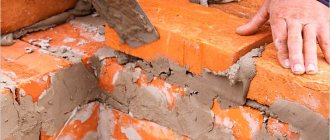
The construction of brick walls should begin after waterproofing the foundation. For this purpose, roll materials such as roofing material, technoelast, glass insulation or various bitumen and bitumen-polymer mastics are used. Most often, walls are built using the single-row ligation system, since it is simple and can be installed alone without much difficulty. This design represents a change in spoon and butt rows of bricks. It is used when it is not planned to use the front layer of facing bricks.
For those who are not familiar with the technology of laying walls: a spoon row is a row of bricks that are laid with their side along the wall, and a butt row is laid with short ends to the outside of the wall.
There are three main types of brick walls:
- Continuous masonry, when bricks are laid in two rows without a gap between the rows.
- Masonry with a ventilation gap of 40–60 mm.
- Lightweight masonry. It consists of two walls, between which insulation is poured, be it expanded clay, fine slag or other analogues.
Most often, it is the third type of structure that is used, since it allows you to reduce the pressure on the foundation and save on building materials, since brick is quite expensive these days.
Solid masonry is no less popular, as it is more durable and reliable.
Regardless of the type of masonry chosen, they all start from the corners. First you need to lay out six rows of bricks on the mortar in the corners. A cord must be drawn along each row. They are wrapped around nails, which are inserted into the seams between the bricks at a distance of 3–4 mm from the vertical of the row. The cord helps determine the evenness of the masonry. A building level and plumb line are also used for this purpose.
If necessary, the base of the bathhouse should be laid out of solid brick, and the walls themselves should be made of hollow brick.
When laying, it is important to work quickly so that the cement mortar does not have time to set. If construction work is carried out in the summer, the brick is pre-moistened with water
The thickness of the layer of such a solution should be 2–3 cm.
There are several variations of solid masonry, including:
- "single-row"
- "multi-row"
They differ in that with a single-row laying there is a constant change of tying and spoon rows, and with a multi-row masonry system the tying rows go through 5-6 spoon rows.
When laying bonded rows, it is necessary to apply the mortar with an indentation of 10 mm when filling joints and by 30–35 mm when laying waste areas. If you have bricks lying around with any defects, do not rush to throw them away; it is better to use them for laying tray rows, in addition to corners and support areas.
Internal load-bearing walls must have a thickness of at least 20 cm. Transverse walls usually consist of halves or quarters of bricks. If the length of such a partition exceeds 1.5 m, then they must be additionally strengthened with a reinforcement belt every three rows.
Door and window frames are installed directly during the masonry process. Wooden blocks as thick as bricks are installed in the side parts of the openings. They are wrapped in a layer of roofing felt and tarred.
Ventilation holes must also be provided here. Usually in such baths a supply and exhaust ventilation system is installed. It consists of two holes: one regulates the air flow, the second is the exhaust hole. The first is best placed under the bottom of the stove, and the second is as far as possible from the heater, 7–8 centimeters below the ceiling level. You can also provide special dampers that will help regulate the air flow in the steam room.
Roof
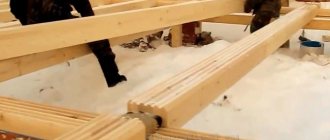
The floor beams are installed directly on the bricks in the prepared holes. The ends of the beams that will be in contact with the brickwork are wrapped with roofing felt, only the end part remains uncovered. The simplest option is a pitched roof. After laying the beams, make the flooring from the boards.
To provide waterproofing, the beams are wrapped in fabric asbestos, which is secured with a stapler. When the beams are hidden, a mixture of clay and sawdust is placed on top. For this roof, a proportion of 2 buckets x 2 buckets is sufficient. When the mixture dries, it is sprinkled with sand.
The chimney location requires special attention. Following the recommendations of specialists will help avoid a fire. Wood should not come into contact with the chimney. This area is sutured with a metal sheet.
Next, the rafter system of the brick bath is assembled and the lathing is performed. Roofing material, for example, slate or corrugated sheet, is laid on top.
The place where the stove will stand and the chimney will pass indoors is insulated with metal.
The space around the chimney in the ceiling area is insulated using expanded clay. The lower reflector is attached to the fittings.
Another sheet of metal is installed on top of the expanded clay layer.
During the construction of the brick bathhouse, the Rus-9 stove was used.
Types of socles
This is determined by the location of the front wall of the plinth in relation to the façade:
- speaker This option is used when it is necessary to increase the load-bearing capacity of the base. In this case, the element is extended two to three centimeters beyond the wall plane. There is a drawback - you will have to take measures to remove rain moisture flowing down the building;
- sinking. The façade wall hangs over the basement. It is best to use this option when durable building materials that do not require additional finishing were used to make the base;
- in one plane. The base part and the wall are in the same plane. This method is rarely used and mainly on outbuildings of secondary importance. The finishing layer is made of one material.
There are no specific requirements for the height of the basement - everything is determined by the presence of the basement and the foundation itself.
Foundation reinforcement
The reinforcing structure is made of reinforcement with a thickness of more than 12 mm for longitudinal laying, and 6-8 mm for perpendicular and vertical laying. To make a reinforcing belt you will need: a grinder, welding wire, a welding machine and a tape measure.
The structure consists of more than four longitudinal, perpendicular and vertical reinforcing rods. The complete structure must be supplemented with formwork, and the finished foundation must rise 5 cm above the ground. Additionally, the corners must be reinforced, and the cut of the reinforcing belt must form a rectangle or square.
The next step in the process of making the foundation of a bathhouse is cutting the reinforcement to a certain length, after which the longitudinal and perpendicular rods are laid out on the ground and tied with wire at the points of contact. It is undesirable to weld the frame, because because of this there is a high probability that it will lose its integrity during the process of compacting the poured solution or during the operation of the finished bath in the future.
The longitudinal reinforcement is laid with an overlap of 30 cm and tied.
The gaps between the perpendicular and vertical reinforcement should be equal to or less than 50 cm. If a strip foundation with a width of 120 cm is laid, then it is advisable to make a frame that has not two, but three longitudinal reinforcing bars.
The same should be done if the foundation has a large height. In addition, in the upper part the frame should be reinforced with U-shaped clamps, which serve to increase the strength characteristics of the belt and minimize the chance of cracking of the strip foundation.
The frame in the corner parts must be supplemented with reinforcement placed at 45 degrees to the horizontal rods.
Laying concrete mortar
- The finished solution is poured into the formwork, leveled, pierced with a probe or bayonet shovel (to remove excess air), and tapped from the outside of the formwork with a wooden hammer.
- If it is possible to connect to the electrical network, then an internal vibrator can be used to compact the concrete mixture.
- At sub-zero temperatures, the strip foundation is covered on top with a film and a layer of sawdust or any insulation.
- After three days, the formwork can be carefully removed.
7. Construction of the base. After making sure that the concrete strip foundation is sufficiently strong, you can proceed to the next stage - constructing the base.
Construction of a recessed brick plinth on a reinforced concrete strip foundation
The following instructions are intended for construction on a ready-made foundation.
Setting angles when building a plinth
One of the most important rules for laying a plinth is the correct alignment of the corners, because incorrectly aligned corners will lead to further curvature of the walls and, accordingly, defects in the construction of the building.
The simplest way is this:
Place a row of dry bricks in all corners, determining the width of the planned base. Angles are set according to level.
Using a tape measure or twine, measure the lengths of all sides and both diagonals - the dimensions must coincide down to centimeters and be correspondingly equal.
It is also worth checking future walls for possible curvature, using the same twine along the inside of the line from corner to corner.
Waterproofing the upper surface of the foundation
Insulation is necessary to further protect the base from groundwater.
Two layers of roofing felt are laid on the foundation in the following ways:
- on bitumen mastic or heated bitumen;
- connection with a burner, treating the surfaces of roofing material.
You can use rubemast, glass roofing material (stekloizol), euroroofing material.
Brick plinth laying
After setting the corners, it’s time to start laying the base. To create it, bricks are usually used, bonded with cement-sand mortar. Only solid red brick is used for construction.
It is advisable to start the laying from the corners, then lay the rows opposite each other on one side with a thickness of the applied mortar of about 20-25mm.
A plumb line checks the accuracy of laying the vertical surface after 3-4 rows of bricks.
After the final check of the corners, the wall laying begins. To make the row even, a thick fishing line is stretched between two corners.
The minimum height is at least 4 laid rows, finishing in the form of natural stone, finishing tiles or siding is allowed.
If the house has basements, ventilation holes are left in each side of the base at a height of 10-15 cm from the soil, measuring from 7 x 25 to 15 x 25 cm. If the length of the building exceeds 3 meters, the vents are in increments of 2.5 meters and covered with nets or small gratings.
Basement waterproofing
To protect against moisture penetration, you need to lay waterproofing materials, making a distinction between the plinth and the brick wall; for cheap construction, you can use, for example, roofing felt, folded in half. Of course, you don’t have to make do with only them; the choice of materials for insulation is now quite extensive. Double waterproofing is necessary in order to protect the house not only from the external influence of the elements, but also from the influence of groundwater on the foundation.
First stage
Undoubtedly, the construction process begins with discussing the design of the future bathhouse with your family members. At this stage, it is worth determining the amount of finance that will be spent on construction, respectively, the choice of material, location, hiring workers, and so on. The most common option is a bathhouse with dimensions of 4*5 meters and an attached terrace. The choice is made in favor of brick as a building material. When building a structure with your own hands, it is worth studying several sources that describe the step-by-step technology of this process and studying the varieties, pros and cons of various types of selected building materials.
So, to build a brick bath you need to purchase the following materials:
- crushed stone, gravel, cement and sand;
- drain pipe;
- the brick itself;
- thermal and vapor insulation material.
Monolithic
The second type, which is also often used in the construction of baths, is monolithic. It is stronger than tape and can withstand heavy loads. It is a monolithic concrete slab. It is not afraid of either freezing or thawing of the soil, or soil displacement.
In such circumstances, the foundation with the bathhouse will move along with the soil and will not be damaged in any way. Based on its characteristics, it is most often built on unstable sandy and heaving soils, which are characterized by a high groundwater level.
Timber and log bathhouses on clay soil do not need such a capital foundation; the previous type is best suited for them. But if you plan to build a bathhouse from blocks, then it is better to choose a monolithic version.
Each type of foundation has several variations, and monolithic is no exception.
The first subtype is a slab on a tape. It is somewhat reminiscent of an inverted bowl, and thanks to the tape it becomes more stable, which is why it is becoming more and more popular abroad.
However, for a bathhouse made of a log house or a heavier structure, a simple monolithic slab is best suited. It is cheaper than a slab on a belt and does not require additional labor.
At the preparatory stage, the site for construction is cleared. Then the excavation of the pit begins to a depth of 1.5 m. The clay from the pit is replaced with sand or gravel, and all this is leveled.
Attention! The surface should be as horizontal as possible. Otherwise, deformation cannot be avoided
It is best to use a laser level or hydraulic level to control the horizon
The next stage is the installation of formwork from building boards, the thickness of which is at least 25 mm. The structure must be rigid, so as to withstand the pressure of concrete when pouring. You can check this by simply kicking the formwork. If it takes the hit, then everything is fine and you can continue.
But even if it breaks, there is no reason to be upset. It would be much worse if it broke from the concrete without fulfilling its main purpose.
Next, reinforcement is installed into the finished formwork. It is laid crosswise in several rows. As a result, we get several grids, the first of which is located 50 mm above the sand cushion, and the last one at the same distance from the surface of the concrete slab. It should be at least 20mm away from the walls.
At the same stage, pipes for ventilation, drainage and water supply are installed. The sewerage system should be laid below the freezing level, and the pipes should preferably be attached to fittings. Once the foundation is poured, it will be impossible to fix anything. There are two options for draining the sewer system: into a central system or into a septic tank. It is often unprofitable to discharge wastewater into a central system, and a septic tank is an ideal option.
How to choose a place for a brick bath
The most important thing is that the place for building a brick bathhouse is dry. Therefore, if there is a lake or river nearby, the point of construction should be at least 30 meters from them, otherwise, during a spring flood, high humidity in the air or even flooding cannot be avoided.
In addition, it is important to take into account fire safety requirements - the distance to any neighbor’s house should be no less than 12 meters - if the bathhouse will be heated with wood. But if a gas or electric boiler is planned for heating, and there will be no smoke, then this distance can be safely reduced to 5 meters
However, a do-it-yourself brick bathhouse can be attached to any other residential building - this will not only save materials, but it will be much easier to install electricity and sewerage.
Types of foundations for baths
I would like to note right away that bathhouses are usually relatively light (compared to a house) buildings; accordingly, the foundation experiences less load and fewer demands are placed on it. And yet, in order for the foundation of the bathhouse to serve for a long time, and its walls not to crack, warp or sag, the foundation must be reliable and solid.
It is known that the foundation is designed to protect walls from absorbing ground moisture and taking on the load from the building. The type of foundation chosen depends on the nature of the soil (its moisture content, density, composition, etc.), groundwater level (groundwater level), the size of the bathhouse and the material from which the walls of the bathhouse will be made. In addition, the foundation is selected based on the nature of the landscape, the slope of the site (for example, if the slope is significant, then it would be better to look towards a pile, columnar, or screw foundation).
The characteristics of individual foundations (such as the depth of a strip foundation, the type of cushion under it) also depend on the depth of freezing of the soil in your region. Let's consider these parameters, and depending on it we will select the foundation.
Ground water level
This is a very important parameter. It is not difficult to determine it - you need to dig a hole to a depth of 2.5 -3 meters with a hand drill or shovel. The hole needs to be covered with polyethylene and monitored for a week or two. If there is water in the hole at a height of more than 2 meters from the surface, the groundwater level is high; if there is no water in the hole, then you are lucky.
The fact is that with a high groundwater level, the foundation needs to be built more thoroughly. After all, what is water? This is the main destroyer of the foundation and the house. In addition to the fact that it can gradually wash minerals out of the soil, leading to a change in its structure, it has the property of expanding when freezing, which creates the so-called. heaving force - the soil, increasing in volume, pushes out the foundation. And if this happened evenly over the entire area of the foundation, then it would not be so scary, but most often this happens unevenly (for example, the northern side of the house, and therefore the foundation under it, freezes faster than the southern one), and because of this unevenly distributed load on the foundation, distortions occur and cracks appear if the foundation is weak (low grade of concrete, shallow depth, poorly reinforced, etc.). We will talk further about how to avoid heaving forces and level them out.
In addition, water getting into the micropores of the foundation or, even worse, being capillarily sucked through the foundation into the masonry (brick, blocks, etc.) and staying in these pores, small cracks, cells, when freezing, expanding gradually destroys the material, therefore Each material has such an indicator as the number of freezing cycles. It follows that the foundation also needs to be carefully waterproofed, as well as the masonry from the foundation. This is usually done with roofing felt or bitumen. But liquid glass, various coating mastics and waterproofing compounds can also be successfully used, as well as adding special additives to the concrete itself to create hydraulic concrete that does not allow water to pass through.
Freezing depth
Another important parameter on which the type of foundation and its depth depends. Let's look at the table of freezing depth by region/city below.
Table of freezing depth by city
Now let's remember our UGV. We will also take into account the heaving properties of individual soils. The most heaving soils are loams and clay, and the least heaving soils are gravelly soils and rocky soils. In general, the rule here is this: the soil that is most inclined to absorb and retain moisture swells the most, and vice versa. So, if our soil is not heaving, then when calculating the depth of the foundation, there is no need to make an adjustment for the freezing depth. But if we have heaving soil, and even a high ground level, then we need to take into account the depth of freezing (the depth of the foundation should be about 20 cm below it), and take a whole range of additional measures - thorough waterproofing, drainage, and always a warm blind area , replacing heaving soil with non-heaving soil - making a cushion under the foundation from crushed stone and sand, and also backfilling around the foundation with non-heaving soil.
Conclusion
A strong foundation is very important for the strength of the entire structure. Therefore, it must be done efficiently. The work is easy to do yourself, which will save you a lot of money.
Also, for greater savings, in some cases you can use the installation of a pile foundation rather than a strip foundation.
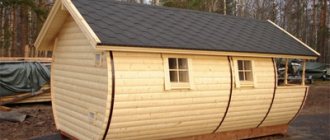
Ready-made bathhouse on a columnar foundation
The dimensions depend on the quality and density of the soil, the choice of fill type, and the thickness of the proposed walls: the foundation for the bathhouse is calculated based on these parameters. It is important to remember here that a deeper and wider structure will be more reliable, but more expensive. You should try to find a balance using the recommendations proposed in the article.
It should be noted that the concrete base for the furnace has its own characteristics in laying and must be separate from the general structure. Its width and depth are determined by the material of manufacture: metal or brick.
Source
Features of foundation construction
The most convenient foundation for building a brick bathhouse is a strip foundation. Its depth should be at least a meter, and even more in clay soils. To set it up you should do the following:
- Step 1. A pit is dug into which 15-20 cm of sand is poured. Next, you need to water it well and compact it.
- Step 2. The second layer is laid on the sand with 10 cm of crushed stone in a cement-sand mortar, and then sand again. And this is how several layers alternate.
- Step 3. Now the formwork is laid and the reinforcement cage is installed, which is then filled with cement mortar. After that, a vapor barrier is laid, consisting of two layers of roofing felt, and for protection from rain, an inclined blind area 1 meter wide is constructed from oily clay, gravel and sand.
- Step 4. A comprehensive drainage and drainage system for the bathhouse is installed
Yes, you will have to spend money on such a foundation, but it’s better not to build it for a brick bathhouse.
Pile
In this case, concreting is used partially, by creating columns at the same distance from each other.
pros
Minus
Tip: when planning a small bathhouse made of lightweight material, it is recommended to use a pile foundation. Such a project will turn out much cheaper, but there will still not be much pressure on the base.
The width of the foundation for a strip bathhouse should be 10 cm larger than the planned walls. At the same time, under the internal partitions you can make it the same thickness as they themselves.
The size of the foundation for a bathhouse in the form of pillars also depends on the size of the building itself. With a small structure, you can install piles 20 cm by 20 cm every one and a half meters, and with a large one - 40 cm by 40 cm every three meters. They must be at least a meter long for any type of soil.