The chimney is element with increased fire hazard, therefore, it is important to responsibly approach the processes of bringing it onto the roof of corrugated sheets and isolating it from the contents of the roofing pie.
It is also important to protect the pipe from moisture penetration , which can significantly reduce the life of the roof.
In this article we will take a detailed look at how to wrap a pipe on the roof with corrugated sheeting and look at waterproofing issues.
Roof cutting of round pipes
To seal sandwich-type pipes made of stainless steel or round ceramic pipes, roof penetrations with a metal or polymer cap are used. In addition, to protect wooden structures from overheating, it is necessary to install a thermal insulating box made of non-combustible material at the place where the pipe passes through the roof, and fill the space between the walls of the box and the pipe with a non-flammable heat insulator. Stone or basalt wool is used as a heat insulator; their melting point is significantly higher than that of the chimney in operating mode.
Exiting the pipe to the roof and installing the cutting
Purchase or make your own pipe from thin-walled metal. Its dimensions must provide a fire-prevention distance from the pipe to flammable structures - at least 25 cm in any direction. The pipe has the form of a box with a lid, with holes on both sides equal to the diameter of the pipe. The pipe must be finished with fireproof insulation - the figure shows finishing with basalt wool with a heat-reflecting layer. You can secure it using heat-resistant sealant and metallized tape.
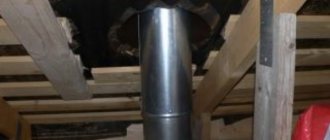
Pipe for passage through ceilings
Mark the place where the pipe passes through the ceilings and cut a hole in it to the size of the pipe using a jigsaw to cover the entire thickness of the heat-insulating “pie”. Install the pipe.
Hole in the ceiling for the pipe
The chimney is removed from sandwich-type pipes through a hole in the pipe, the gaps are treated with heat-resistant sealant with an operating temperature of up to 1000 degrees. Insulation – basalt wool – is placed between the walls of the box and the pipe. The passage is closed from below and above with lids and secured with self-tapping screws.
Installation of pipes in ceilings
Mark the place where the pipe passes through the roof and cut it out in the same way. In this case, the hole will not have a square, but a rectangular shape due to the slope of the roof. Install the lower cutting apron. It is chosen depending on the slope of the roof - the steeper the slope, the more elongated the hole will be.
Hole for pipe exit to roof
Continue installing the pipe through the cut hole; the apron can be temporarily lowered down. The pipe must be tightened with clamps and secured to the roof structural elements with brackets.
Pipe outlet to the roof
Bring the pipe to the roof to the required height
In this case, it is important to follow the rule: the connection of the elements should not be located in the place of passage through the roof or ceiling; if the dimensions of the pipe do not allow it to be made, it is necessary to trim one or more elements. It is better to install clamps securing the pipe at the joints, and seal the joints - this ensures maximum stability of the pipe and fire safety. Roof pipe installation
Roof pipe installation
After the pipe is installed and brought out, the lower apron is secured, and the roof groove of the selected type is put on the pipe. The figure shows a roof section with a metal apron laid on top of the roofing covering - corrugated sheeting. The upper edge of the apron is placed under the overlying sheet of corrugated sheet, and its side parts are cut so that they are in the upper part of the wave of the metal sheet. With such a design and a large roof slope, water will not flow under the apron.
Installation of apron and cutting
For other types of roofing, roof sections of a different type can be used, for example, metal-polymer or with a lead apron.
Different types of roof grooves for round pipes
When using a flexible cutting made of silicone or rubber, a hole is cut in the cap 1/5 smaller than its diameter. The cap is pulled over the pipe and the flexible apron is given the shape of a sheet. They are secured with self-tapping screws, having previously been coated with sealant. For a more durable fastening, it is sometimes necessary to strengthen the roof sheathing - this is done at the stage of cutting out a hole in it.
Installation of silicone groove
A flexible lead apron can also be bent to the shape of a roofing sheet, but when purchasing it, you should take into account the angle of inclination of the slope. The upper edge of the apron must be placed under the overlying sheet of slate or metal.
Cutting with flexible lead apron
Installation work
Having opened the roofing pie, you can proceed to preparing the point for the pipe to pass through the roof.
This operation is performed as follows:
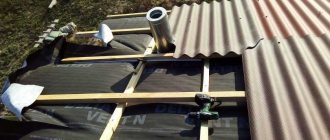
- The roofing material, cut diagonally, is bent outward, and the vapor film is folded into the inside of the box. Moreover, the vapor film is attached to the walls of the box with ordinary staples.
- The chimney pipe is inserted into the box from the attic side and, lifted, mounted on the hose.
- A heat-insulating belt is put on the chimney over the free end of the pipe, from the roof side.
- Next, the pipe is fixed to two collapsible clamps with legs in the form of a self-tapping screw, which is screwed into the beam or rafter.
- After fixing the chimney, before sealing the pipe on the roof, the box is covered with a metal or asbestos sheet from the attic side.
- At the final stage, moisture-resistant, non-flammable insulation (expanded clay) is poured into the box.
After this, the pipe begins to be prepared for sealing the joints between the chimney and the roof.
Expert advice
Before purchasing the necessary materials for arranging an external chimney, the power of the equipment is determined. It affects the diameter of the pipes. You can also use these expert tips:
- if the heating equipment is equipped with forced draft, then it is not necessary to increase the vertical section of the structure; it is enough to remove the horizontal pipe;
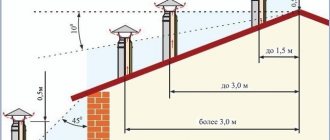
- a horizontal section that is too long helps slow down the smoke flow (the value should not exceed 1-1.5 m);
Rules for installing chimney pipes Source krovgid.com
Inspection holes are installed not only on the outer part of the structure, but also on the internal horizontal element.
kak.hepcinatvp.ru
07/19/2019 admin Comments No comments
A chimney on the roof of a house affects the fire safety of the building, the efficiency of the home’s heating system, and even the aesthetics of the exterior design. After all, this element of the chimney system affects the draft in the air duct, the tightness of the roof, and the contours of the facade of the house. In this article we will tell our readers how to bring a pipe through the roof without disturbing the tightness of the roof, free air exchange in the chimney, or the aesthetics of the facade.
The main difficulties of installing a chimney
The chimney pipe is used to remove combustion products of various types of fuel (gas, coal, firewood, oil products, etc.). Its installation through the roof of the house must be carried out in accordance with the requirements of SNiP 41-01-2003, which are partially outdated. However, this document is guided by supervisory services, so it is necessary to follow the standards specified in it.
The chimney outlet through the roof may be required in the following cases
:
- when building a new house;
- in the process of reconstruction of the roofing system in the presence of a heating unit;
- when installing an autonomous heat supply source in an already operating building.
If the construction of a building or reconstruction of the roof makes it possible to design a chimney outlet taking into account all the requirements, then installing a chimney pipe through a finished roof will create many problems. Typically, this situation arises when the owners of the house want to install a fireplace or stove in an already completed building. If we are talking about an automatic boiler, it is recommended to create a separate extension for the boiler room, or lead the chimney pipe through the wall of the building.
The main difficulty in installing a chimney is that the roofing pie through which the pipe passes largely consists of materials that are not designed for close contact with highly heated objects. The composition of the roofing cake includes
:
- roofing;
- sheathing;
- counter-lattice;
- waterproofing;
- rafters;
- insulation;
- vapor barrier layer;
- internal lining.
Wood, bitumen and polymer materials are sensitive to high temperatures, therefore, according to SNiP, the clearance between a brick, concrete or ceramic chimney pipe insulation and the elements of the roofing pie must be at least 130 mm. If the ceramic pipe is not equipped with insulation, the clearance must be at least 250 mm
. It should also be taken into account that at the point where it passes through the roof, the pipe must have a special thickening - an indentation. Accordingly, a hole of considerable size must be made in the roofing pie. The gap between the pipe and the roof after installing the gas duct needs to be reliably heat and waterproofed in some way.
Negative consequences
A through hole in the roofing pie significantly reduces its performance and durability, since
:
- violation of the integrity of the waterproofing and vapor barrier layers leads to moistening of the insulation, while the thermal insulation characteristics of cotton materials are significantly deteriorated;
- due to the rupture of the thermal insulation layer, the heat loss of the house increases;
- in the under-roof space, air exchange may be disrupted, which provokes the accumulation of moisture and subsequent rotting of the wooden elements of the roof structure;
- the resulting gap not only facilitates the penetration of rainwater into the building, but also the formation of snow pockets in winter;
- if the rafter system is damaged during the hole making process, this significantly affects the strength of the roof.
To avoid problems, the passage of the chimney through the roof should be arranged by erecting its own rafter system (box) around it or installing a standard modular chimney
.
Repairing leaks
The main cause of leakage at the joints of the pipe and roof is a violation of the tightness of the apron structures. To solve this problem, it is necessary to build an additional external apron from bitumen tape.
Before installing it, the roof should be cleaned of dust with a wire brush.
The tape is laid in several layers along the bottom of the pipe and along the adjacent corrugated sheet (or along the apron). Then it must be heated with a burner and pressed down with a wooden plank.
This type of gasket can last for several years.
Serious leaks can only be repaired by replacing the flashing.
Moisture can also get under the roof due to excessive condensate production by the pipe. To reduce its amount, you can build an umbrella on the chimney. Umbrellas are made from metals such as copper, galvanized steel and stainless steel. The cap not only reduces the volume of condensation, but also extinguishes sparks coming out of the chimney, increasing the fire safety of the structure.
READ How to cut Large Diameter Polypropylene Pipes
If the chimney is located close to the edges of the slopes, then leaks may occur due to the accumulation of large amounts of snow masses. To eliminate this problem, the apron is supplemented with a triangular convex structure (with mandatory sealing), which will separate the snow and simplify its removal.
Cutting pipes on metal tiles
Pass-through elements vary depending on the cross-sectional shape of the pipe. For a rectangular pipe, you will need a complete waterproofing assembly, with internal and external aprons. The aprons are installed in a certain sequence and insulated around the perimeter of the chimney pipe, ensuring complete tightness of the passage. The elements are prefabricated and designed specifically for insulating junctions with brick structures and frames with rectangular cross-sections.
The pass-through unit for sandwich pipes is made of a part that is attached to the roofing material, the second part of the kit for connecting to round pipes is a water seal. The passage is assembled so that the water seal funnel in the upper part is in direct contact with the sandwich pipe, with a sealing ring; the material of the ring must be heat-resistant and elastic. Attach the water seal to the roofing material using self-tapping screws, screwing them along the perimeter of the lower part of the funnel. The rubber material of the part is reinforced along the contour with aluminum tapes. In the same way, ventilation shafts are brought to the roof.
Connections of rectangular chimneys through metal roofing tiles are made by placing heat-insulating non-combustible material with an asbestos layer in the gaps between the heating surfaces and wooden elements. A thickness of 5-10 cm of non-combustible thermal insulation is sufficient to prevent the wooden elements of rafters and sheathing from heating up and igniting. Safe bypass designs for round chimneys include metal stops made with oval holes and designed for installation on inclined slopes. The limiter is attached to the sheathing, and a pipe is passed through the hole. The metal sheet of the limiter is not thick enough for the sheathing wood to receive enough heat to ignite. But despite this, non-combustible insulating materials are laid between the chimney pipe and the limiting part.
Features of connection to a coaxial round pipe:
- Penetrations for coaxial pipes are made of ethylene propylene microporous rubber (EPDM). Rubber parts are attached with fastening screws using flanges. Pass-through parts can be designed only for certain diameters, but can also be universal with the ability to be adjusted to the desired diameter;
- During installation, put the penetration part on the pipe, and apply a heat-resistant sealant along the contour of the flange connection. The flange is fixed to the metal roofing tile using self-tapping screws, then the penetration part is slightly bent along the upper edge to fill the gap with sealant. Additional protection against water flowing down the roof is provided by clamps tightened across the top of the penetration. In this way, the chimney pipe can be routed through metal tiles and other roofing materials, excluding slate and ceramic tiles.
Junctions to frame square pipes: fastening of the adjacent strips is carried out using self-tapping screws, but not directly to the surface, but through bends made along the edges of the metal roofing material. This is not a very common type of smooth tile, but installation is carried out similarly to all metal roofs - the lower adjacent part is placed under the upper one. The tiles are installed under the apron in such a way that the top tile relative to the pipe extends onto the apron, blocking the path of flowing water. With precise installation, tightness is practically ensured without waterproofing material and sealant. Frame pipes are the most difficult to finish, and this installation method is used infrequently, and for penetrations through more common embossed metal roofs, such installation is impossible.
Connections to brick pipes begin with markings. Templates are used; you can make such a template from a wooden batten. By applying the template along the contour in the direction from the sheathing, the height will be equal to the height of the apron. Using a grinder, a cut is made for the bends of the apron, the cut is made along the 1 cm markings, then the gap is cleared of dust with brushes or by blowing with a compressor.
After cutting the apron parts with fitting, fix the side and bottom parts, bend them and disassemble the structure to secure the waterproofing and apply silicone sealant to the gaps. The planks are fastened to the sheathing with nails, applying silicone under each head. The outer apron is installed last, completing the assembly, while the gap between the metal tile and the pipe is closed, and the bottom strip is located flush with the pipe.
Basic methods and materials for sealing a chimney
There are several effective methods for sealing a pipe on a corrugated roof, each of which has a number of advantages and disadvantages. Sealing a chimney on the roof is most often done using protective aprons and elastic caps.
Elastic cap
To waterproof circular passages, it is recommended to use an elastic cap. For its production, strong and durable latex is used, which must withstand significant temperature changes and constant exposure to direct sunlight.
The cap is installed in the following sequence:
- The narrow part of the hood must be cut so that the latex fits snugly into the passage.
- Pull the rubber cap onto the pipe until it connects to the roof.
- Attach the base of the cap to the corrugated sheet using a self-adhesive backing. You must first remove the protective layer, and then tightly attach the cap to the roof. Before installing waterproofing, the surface of the corrugated sheet should be thoroughly cleaned of dust and other contaminants.
- The cap is strengthened with self-tapping screws, and the cracks on the roof made of corrugated sheets are sealed using sealant.
- For additional protection, an apron is mounted on top. It can be made in different colors, which allows you to match it to the color of the roof.
Waterproofing a chimney with a round cross-section
Installing the cap is not difficult. The main thing is to purchase this building element of the correct cross-section depending on the diameter of the chimney opening.
Protective aprons
To protect the chimney, not only rubber caps can be used, but also aprons made of various materials. To waterproof a round chimney, it is recommended to use protective aprons made of galvanized steel. In this case, the junction of the apron with the roof is additionally protected with a steel clamp, and all cracks are sealed with sealant.
It is more difficult to seal a chimney with a rectangular cross-section. In this case, the apron should consist of several parts. Sealing in this case occurs according to the following scheme:
- The roof waterproofing is attached to the apron using construction tape.
- It is necessary to make a shallow groove around the perimeter of the chimney.
- The top edge of the strip must be attached to the groove using sealant.
- The protective apron consists of four parts. A separate part is used on each side of the rectangular pipe. The lower part of the apron is tightly attached to the passage. This must be done with an overlap of 10 cm. To fasten the parts, use special self-tapping screws for corrugated sheets.
- To prevent leaks, it is recommended to place a tie under the bottom apron.
- The remaining parts of the chimney seal should be installed using the same principle.
Waterproofing a chimney on a corrugated roof
Waterproofing a corrugated roof is a simple but mandatory process.
It is extremely important to properly seal the joints, as well as choose the optimal material for protective aprons
How to cut a hole
Once the location of the pipe has been determined, you need to mark and prepare a hole in the metal tile.
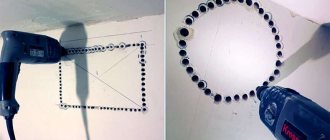
The coating layer, along with the heat and waterproofing, can be cut using a sharp knife or large scissors. There are two ways to make a hole in a metal tile:
- The hole can be made during installation or after the covering has been laid. To prepare a round and rectangular hole, use metal scissors, a jigsaw or nibblers.
- To prepare a hole with a circular cross-section, you need to draw a circle with several intersecting diameters in the center. After that, using metal scissors, you need to make cuts starting from the center of the markings to the edges, then bend the resulting triangles inward.
Briefly about the main thing...
Chimneys can be single- or double-walled. Based on the material of manufacture, metal, brick structures and structures made of sandwich pipes are distinguished. The last option is optimal for private houses. When installing a chimney, the rules for its placement in the room are observed. Its functionality, as well as the presence of draft in the heating equipment, depends on the correct determination of the diameter and height of the structure.
The installation technology through a wooden and brick wall is the same, but there are some nuances: wood is more susceptible to ignition and requires maximum protection. During installation, you must comply with fire regulations, and also take into account possible errors.
Steel apron
To finish the chimney, aprons made of galvanized steel are used. They can later be painted in the desired shade. The configuration of this element may vary. There are ready-made aprons of different sizes on sale.
How is the apron installed?
- The edges of the waterproofing membrane and thermal insulation that were damaged when the pipe was brought to the roof must be secured to the chimney with construction tape.
- To install the wall profile, the pipe is grooved along the entire perimeter (before this, markings should be applied). The upper part of the strip is inserted into the recess and fixed with a high-temperature resistant sealant.
- The first layer of the apron is placed under the profiled covering and fixed with roofing screws.
- The second layer of the protective device is mounted on a profiled sheet with an overlap of 10...15 cm.
Installation diagram of a steel apron All joints are treated with sealant.
The protective apron should be fixed using special self-tapping screws with a rubber seal. If such hardware is not available, you can use homemade rubber gaskets that fit under the fastener heads.
Handmade metal apron
For those who have skills in working with tools and metal, the best option for an apron may be a self-made design.
Table. Tools necessary for the manufacture and installation of an apron.
| № | Tool | Illustration |
| 1 | Screwdriver | |
| 2 | Metal scissors | |
| 3 | Envelope forming pliers (heron) | |
| 4 | Tongs (45 degrees) | |
| 5 | Manual bender (sheet bender) | |
| 6 | Kiyanka |
In addition, you should prepare sheets of metal (smooth) of suitable size and roofing screws.
The task is to make an apron from sheet metal for this chimney.
We will make an apron for this chimney
Step 1. Measurements are taken. This point must be taken with great responsibility, since the functionality of the design depends on it. The height of the apron must be at least 15...20 cm.
Step 2. The four components of the apron are prepared. To bend the sheet, you need a bender. This handheld device replaces a bending machine.
To bend a sheet you need a bender
Metal cutting is done with scissors.
Metal trimming
You will need four blanks:
rear end;
The back part of the edge must be slightly bent so that snow does not fall between the apron and the roofing.
two sidewalls with stiffening ribs;
Sidewalls with stiffening ribs The sidewalls should also have bends.
Fold on the side
front end.
Front It has a more open angle.
Step 3. The rear element is mounted first.
Rear element installation
The part is pressed tightly against the chimney and fixed.
Step 4. The sides are folded into an envelope. This ensures that there are no cuts on the apron. All folds of the envelope are tightly tapped with a mallet.
The sides are folded into an envelope
After the envelope is formed, a semicircle is cut out on the sides (on the side that will be in contact with the back panel).
A semicircle is cut out
A smoothly smoothed transition will also avoid cuts. After processing, the sidewalls look like this.
Sidewalls after processing
Step 5. The sides are pressed tightly against the pipe and screwed to the roof. Self-tapping screws should be fixed on the protrusion of the corrugated sheet.
Step 6. The protruding part of the back part is cut to the size of the side panel, taking into account a small margin. It is necessary for the subsequent bending of the rear element onto the side.
The protruding part of the rear part must be trimmed with a margin
Step 7. The back wall is folded over the protrusion of the side panel. This ensures a tight connection between the two parts. The seam is tapped carefully.
The seam is tapped
The same procedure is carried out with the second sidewall.
Step 8. The front element is installed in place and fixed with self-tapping screws to the chimney and corrugated sheet. This apron piece also has envelope folded side edges. They are also cut in a semicircle.
Fixing the front element
The sides (protruding beyond the chimney) are cut in a semicircle 1...2 cm higher than the front part, after which they are folded onto the walls of the front part, creating a lock. The result was a completely sealed chimney lining.
Sealed chimney liner
The only weak point of this design is the connection of the top of the slats to the pipe. Moisture penetration may occur in these areas. To eliminate this problem, the joints must be treated with sealant.
Workflow - step-by-step technology
Surely you are wondering whether it is possible to install high-quality and reliable ventilation (chimney) yourself and at the same time save not only money, but also time - our answer is positive. The sections below will describe detailed instructions to confirm that this process is possible for independent mastery.
Stage one - preparatory
Initially, you should prepare everything necessary for subsequent work:
- Purchase a pipe, if not available, and fire retardant material.
- Fastening materials.
- Tool: Building level.
- Welding machine - in case the pipe has to be joined.
- Screwdriver.
- Hammer.
- Jigsaw and grinder.
- Wooden beam.
- Finishing material.
Stage two - roof preparation
Now let's move on to the process where you already need to work with your own hands:
- To begin with, on the roof we measure the distance from any rafter beam, which is half a meter plus the diameter of the ventilation pipe.
- We build another beam in the indicated place to increase the stability of the roof.
- Using a regular plumb line from the center of the measured distance, we measure a point on the floor of the attic or attic.
- Around this point we attach a vertical and horizontal beam so that there is an equal distance from each edge to the pipe (its center is the measured point).
Instead of timber, you can use a metal profile
We drill a hole through in the indicated place so that a hole is formed on the ceiling of the first floor. According to the plan, this should be exactly above the stove or half a meter from this place.
As a result, we should get a reinforced box inside which a chimney will be laid. At the same time, it should be installed only in the attic or attic space; in the living room, it is enough to decorate the pipe with finishing materials.
You can avoid the box if you purchase a galvanized pipe casing
The box is necessary for the safe operation of the ventilation system, which often heats up to critical temperatures - protection for both those living in the house and for flammable materials.
Stage three - through hole
Now let's move on to preparing a specific place for the passage of the ventilation pipe in the ceiling of the first floor/floor of the attic:
- If the ceiling is made of wood, you can cut a circle of the required diameter using a chainsaw. We remind you that you need to add 15-20 sms on each side to the diameter of the pipe itself.
- If you have to work with a concrete slab, then a long drill and a hammer drill will help you with this - the tool drills many holes in a circle. A very weakened piece of the slab is knocked out with a sledgehammer.
It is wooden floors that need to be given more attention, for example, the chimney in a bathhouse is the most dangerous area
Let's move on to opening the roof. The best option is when the roofing material has not yet been laid, but this is only possible if the house is at the construction stage.
We will deal with the process of installing a chimney after the facility is put into operation:
- Before removing the pipe through the roof from the corrugated sheet, we cut the material so that it can be bent and left in this position for a while.
- If you are faced with tiles, then all that remains is to carry out only partial dismantling in the place where, according to the plan, the pipe will come out (with a small margin).
- Now that we have a through hole, we can insert the ventilation pipe into the “hole” on the roof.
- Fixation of the chimney itself is carried out by installing collapsible clamps, which in turn are attached to the protective box we built.
- We close the hole in the roof, from the attic side, with an asbestos sheet that will not heat up.
- Now, using the steam film, we attach it to the walls of the pipe box using furniture staples.
The place where the stove stands and connects to the chimney must also be secured using fire-retardant materials
We connect the free end of the pipe to the furnace; it is better to use a welding machine for this; this method ensures the tightness of the connection. You can also use a connecting clamp, but here everything depends on the ideal shape of the products - if there are no defects, then the tightness will be decent. (See also the article Metal pipe clamps: features.)
Selecting an output location
Choosing a convenient place to make a hole in the roof from corrugated sheets for the chimney pipe is half the success. Naturally, the decisive factor in this matter is the location of the stove. Professional stove makers recommend positioning the chimney strictly vertically, but there are more subtle nuances:
Scheme of the chimney outlet through the corrugated roof
- It is best to place the hole for the chimney outlet at the highest point of the roof, that is, closer to the ridge. The optimal distance from the ridge to the pipe is 50-80 cm.
- It is advisable that the hole in the corrugated roof for the pipe does not fall on the elements of the rafter system. To bypass them, use bends and corner sections of the chimney. Using them, you can set the rotation to 90 or 45 degrees.
- The length of the chimney pipe segments is calculated so that the joints are located above or below the places where the ceilings and corrugated roofing pass. Otherwise, making a quality connection will be problematic.
- To ensure good traction, the system should be 1-1.5 larger than the roof ridge. If the pipe is too high, the flow of smoke will have time to cool while passing through it, which leads to the appearance of condensation.
To check whether you have correctly identified the exit location of the future chimney, draw a mark on the corrugated roof with a marker and check its temperature at the end of the day - the pipe should be located in the “cold zone”, that is, remain in the shade for almost the entire day.
Preparatory stage of work
To avoid any difficulties during the pipe installation process, you need to prepare the work site and tools in advance. A hole from corrugated sheeting is cut according to the following technology:
After determining the configuration of the chimney, they plan where the exit to the roof will be located. Let us remind you that it is better to place the pipe vertically. The cross-sectional size of the chimney pipes is selected based on the recommendations of the heating device manufacturer. The thicker and higher the pipe, the better smoke removal from the stove
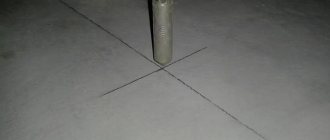
It is important that all segments are of the same cross-section and fit each other, and are inserted without creating a gap. On a corrugated roof, mark the outline of the pipe using a permanent marker. Using a grinder with a thin metal cutter, cut out a hole, moving a couple of centimeters inward from the intended line. You should work with corrugated sheeting carefully and slowly so that the edge of the cut is smooth, without jagged edges that could cause injury during the pipe removal process. You need to make short cuts in the corners of the hole to bend the edges of the corrugated board upward. They cut out the same thing in the ceiling, weigh it
A metal box is installed that will connect the pipe to the rafters. The chimney will pass through the hole inside the box; the distance between their walls should be at least 15 cm.
The insulation, waterproofing film, and vapor barrier membrane are removed from the hole made in the roof. It is necessary that the hole goes through.
Heat-resistant chimney sealants
This type of sealing material has a silicone base to which iron oxides are added. Such additives not only increase the temperature resistance of the sealant, but also give it a reddish tint, which makes the composition invisible when processing brick chimneys.
When using heat-resistant silicone sealants, a number of their important features should be taken into account, in particular:
- Such materials may release acetic acid, promoting an acid reaction. This is the reason that they cannot be used for metal chimneys.
- Some types of heat-resistant sealants are not resistant to solar radiation, which limits their use for roof structures.
- Good adhesion to many substances and materials (brick, ceramics, glass, concrete, etc.) makes their scope of application quite wide.
- Due to their high water resistance, they can be used to seal the upper sections of chimney structures.
- They have good ductility and strength, as a result of which they can be used in structures experiencing significant wind loads.
- The hardening process of silicone sealants takes from several hours to several days, and depends on the temperature and humidity of the environment. The optimal values for these indicators are 25 °C and 50%.
- It is not recommended to use silicone sealants for deep seams or cracks.
- To improve the quality of sealing, before applying the composition, the surfaces of the seams should be cleaned of dust, dirt, grease deposits and other debris.
- Silicone sealants can only be applied to completely dry surfaces.
- Conventional silicone sealants used in construction are not heat-resistant and cannot be used to seal chimney structures.
Pipe passage through a chimney without a factory passage unit
It is possible to remove the chimney without a passage device. In this case, the edges of the hole in the ceiling are also sealed with a fire-resistant heat insulator, and metal strips are placed on top of it. A protective plate made of non-flammable material is put on the sandwich coming from the oven, in which a hole of a suitable diameter is cut, and holes are drilled along the edges for fasteners. Traditionally this is a sheet of metal. Next, the sandwich is passed into a hole in the ceiling and fixed there using some non-flammable guides. For example, you can use drywall profiles or something similar. The main thing is to securely fasten the pipe and observe the basic rule of fire safety: there must be a distance of at least 36 cm from the edge of the pipe to the flammable material.
You can make a passage through the ceiling with your own hands
Important! When installing and securing the chimney, keep in mind that the pipe changes its size due to thermal expansion. It must be secured so that it can move relative to the roof. Then from below (from the ceiling) the pipe is hemmed with non-flammable material
From the attic or second floor side, the voids formed in the groove are filled with a heat insulator. The requirements for it are still the same: tolerance to high temperatures. Expanded clay may be the most budget-friendly. Actually, this completes the exit of the chimney pipe through the ceiling
Then the pipe is lined with non-flammable material from below (from the ceiling). From the attic or second floor side, the voids formed in the groove are filled with a heat insulator. The requirements for it are still the same: tolerance to high temperatures. Expanded clay may be the most budget-friendly. Actually, this completes the exit of the chimney pipe through the ceiling.
You can make a passage through the ceiling with your own hands
Finishing features
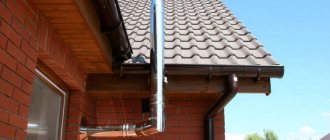
Now you need to trim the space around the pipe from the outside. It is important to close the gaps correctly between the corrugated sheets so that various types of precipitation do not get there. To do this, you can sheathe the space using galvanized metal or stainless steel.
This design is a base made of a flat sheet, to which a cone with a cut off top is attached. It is put on the chimney, after which it is sealed, and the base is fixed to the roof covering. This allows you to get a high-quality and reliable unit that will be reliably protected for decades.
It should be added that there are alternative solutions for finishing this area using a steel apron or aprons made of rubber. In addition, recently a new word has been used in this matter - self-adhesive foil tape, which is made of modified bitumen. This material is equipped with a bitumen layer, which is self-adhesive. In turn, it has a silicone film that must be removed before gluing. And the foil-type top layer perfectly protects the tape from heat and the harmful effects of ultraviolet radiation.