Winter water supply from a well or borehole is also called all-season water supply - such water supply works both in winter and summer. Winter water supply is protected from frost and laid taking into account low temperatures. Thanks to this, it can be used in any weather.
Winter water supply is required for everyone who plans to permanently live in a private house or regularly visit in winter.
In this article we will tell you what rules you need to follow when installing a winter water supply with your own hands so that it lasts all year round, and what mistakes you should avoid.
Features of winter water supply
To install a winter water supply you need:
- The source of water is a well or borehole, where water is available all year round. Before purchasing a plot, be sure to check this point with sellers or neighbors.
- Drain (preservation) system. With its help, water is drained from the entire system during conservation. For example, if you are planning to leave home for a long time. If the trip is planned to be short - for example, for the New Year holidays - then more and more often the water supply is not preserved, but the temperature in the room is left above zero - +5-+10°C.
Why do you need to drain water from pipes?
We all know that water turns into ice at low temperatures. At the same time, the ice expands and begins to put pressure on the walls of the pipes from the inside. They become deformed and connections begin to leak. In addition, the pipes will have to be heated until the ice completely melts. That is, you won’t be able to use the running water for several hours (or even days), and this is inconvenient.
Construction in winter
There is a difference when to build. If you are going to make a strip or slab foundation, it is better to do it in the warm season.
There are also restrictions on building a bathhouse in winter from certain materials; in particular, it is not recommended to build at this time of year from block material - brick or foam concrete blocks.
The reason is that it is inconvenient to lay cement mortar in the cold, and the consequences will be sad: the water will harden already at zero degrees, and in winter it will stay lower for a long time. If the cement hardens with ice inside, then the ice will melt and voids will remain. The masonry will collapse. In addition, a seam made in the cold does not adhere well to the blocks.
But there are solutions! Builders solve the problem this way: they either add additives to the solution that lower the freezing point of water, or heat the solution, or heat it up, or insert electrodes into the seams, which, when connected to the network, release heat, heating the seams.
Log house
Another wall material is round timber or timber. Log houses are erected at any time of the year, but a log bathhouse built in winter from a winter forest is literally overgrown with legends.
The first legend says that in winter the flow of sap stops and therefore (!) there is less water in tree trunks. Well, that's a half-truth. Sap flow actually stops or slows down greatly. But where do the juices go? Are they really evaporating? No, they remain in the trunk until spring. Winter trunks are heavier than summer ones - precisely due to moisture.
The second legend tells that our ancestors cut down forests in winter precisely because they were more suitable for construction than summer ones. A fact is a fact, but for the peasant it was also of great importance how to remove the wood from the forest - after all, it would be easier to drag a log through the snow than through a summer clearing. And there is less gardening and field work in winter.
ADVICE! Do you want more or less dried logs? Take a moisture measuring device with you and start visiting companies that sell logs. Don't listen to stories about the preparation time, believe only your eyes.
Moisture meter
Is it possible to build a bathhouse in winter from timber?
Yes, you can build a bathhouse from timber in winter. Not to pour the foundation, but to assemble the box.
And again, the reasons for this are not at all that frost dries out the wood. There are certain benefits of a completely different kind in installing a bathhouse in winter. For example, at this time of year it is easier to negotiate with a decent crew, which will be in great demand in the summer.
IMPORTANT! But specialists must be real professionals, because for them working with frozen logs is more difficult than with ordinary ones.
The second important point is that mushrooms sleep like bears in winter. For their development, heat is needed no less than moisture and air. But it will not be possible to properly treat logs with an antiseptic in winter - the tree will not absorb it.
As for insulation, especially inter-crown insulation, there is an opinion that it is not necessary to put it in during the assembly of the box in the winter, because when it melts it will pick up moisture and mold will develop there; instead, it is proposed to stuff tow in the spring.
*** Using a bathhouse in winter may seem labor-intensive to some, but everything is paid off by the benefits of the procedures during a period when we are so susceptible to all sorts of illnesses. But for those who are just planning to make a bathhouse in winter, we advise you to think carefully, although this depends on the frostiness of your climate.
Laying depth of winter water supply pipeline
It depends on the region. For example, in St. Petersburg and Moscow, the calculated depth is 1.2-1.4 meters, the pipe is laid 30 cm lower. However, in reality, the soil freezes so deeply only in harsh conditions: there is sand on the site, the groundwater is high, there is no snow or it is being cleared. Often the soil freezes deeply under a house if it stands on stilts or a columnar foundation.
The actual freezing depth in these regions rarely exceeds 60 cm in depth. But we still lay the pipe at a depth of 1.5 meters, and we control this moment using the installer’s photo report.
If you do not know the standard freezing depth of the soil, it can be calculated using the formula. You will find it in document SP 22.13330.2011:
5.5.3 The standard depth of seasonal soil freezing dfn, m, in the absence of long-term observation data, should be determined on the basis of thermal engineering calculations. For areas where the freezing depth does not exceed 2.5 m, its standard value can be determined by the formula:
where Mt is a dimensionless coefficient, numerically equal to the sum of the absolute values of average monthly negative temperatures for the winter in a given area, taken according to SNiP 23-01, and in the absence of data for a specific point or construction area - according to the results of observations of a hydrometeorological station located in similar conditions with the construction area; d0 is the value taken equal to 0.23 m for loams and clays; sandy loam, fine and dusty sands - 0.28 m; gravelly, large and medium-sized sands - 0.30 m; coarse soils - 0.34 m. The d0 value for soils of heterogeneous composition is determined as the weighted average within the freezing depth. The standard depth of soil freezing in areas where dfn > 2.5 m, as well as in mountainous areas (where the terrain, engineering-geological and climatic conditions change sharply), should be determined by thermal engineering calculations in accordance with the requirements of SP 25.13330.
Let's calculate the standard freezing depth in St. Petersburg. Open SP 131 13330.2012, table 5.1: Average monthly and annual air temperatures. It states that in St. Petersburg the average subzero temperature persists for four months: December (-3.9°C), January (-6.6°C), February (-6.3°C), March (-1. 5°C). We add these values and calculate the root. It turns out 4.3. Multiply this by d0.
For clays: 4.3x0.23 = 0.99.
For sandy loam and fine sand: 4.3x0.28 = 1.2.
0.99 and 1.2 are the standard freezing depth in meters.
For Moscow the numbers will be as follows:
For clays: 4.8x0.23 = 1.1.
For sandy loam and fine sand: 4.8x0.28 = 1.3.
Methods for installing winter water supply from a well or borehole
There are two ways to lay a pipeline for winter water supply:
- Laying the pipe below the freezing depth.
- Laying a pipe above the freezing depth with foam insulation and an internal heating cable.
We resort to the second method only in cases where it is impossible or too expensive to bury a water supply system to the required depth. For example, if there is quicksand, rocks or boulders. Most often - if there is granite rock on the site. This can be found in the Vyborg district of the Leningrad region and in Karelia.
In case of quicksand, the pipe can be buried below the freezing depth if you use a backhoe loader or mini-excavator. In this case, the equipment digs a trench, and the installer quickly lays the pipe before the trench is flooded. In this case, you cannot hesitate.
Important! When insulating a pipe, it is better to lay the heating cable inside. In this case, if something happens to the cable, it can be quickly replaced - there is no need to dig up the pipe. In winter conditions this may be difficult and you will have to wait until spring.
There are also various collective farm methods of supplying water to a private home, which can be used in winter. We will talk about them below.
How to install winter water supply below freezing depth
To lay a pipe below the freezing point of the soil, you need:
— Dig a trench from the well (well) to the house to the freezing depth plus an additional 30 cm. Trench width – 60 cm.
— Lay the HDPE pipe in a snake pattern. Most often, to supply water to a private home or cottage, we use 32 HDPE pipes marked with a blue stripe with a wall thickness of 2 mm.
— Fill the trench with soil, compacting it.
There is no need to insulate a pipe in the ground. We insulate only that section of the pipe that goes to the water entry point into the house and is located above the freezing point of the soil. We do the insulation with stenoflex (or an analogue made of foamed polyethylene) in two layers, and we also insert a 3-meter heating cable inside the pipe - no more is needed.
Please note that HDPE pipes do not require a sand cushion; they can be laid directly on the bottom of the trench.
The advantages of this method of laying “winter” pipes: it is relatively cheap and simple.
Minuses:
- A lot of excavation work will be required.
- If you make a mistake with the freezing depth, the water supply will freeze.
Install winter plumbing in a house with insulation
In this case, the pipe can be buried shallowly - at a distance of 40-60 cm from the zero mark. Extruded polystyrene foam is used as insulation.
Some engineers also recommend using polyethylene foam (“Stenoflex”) or mineral wool. However, we do not recommend following this advice. Such materials in the ground will quickly get wet and lose their insulation properties. In theory, you can look for flexible pipes with thermal insulation. They are mainly used for heating, but in theory they can also be used in water supply. However it is expensive.
The pipes used in this installation method are the same - 32 HDPE pipes with a wall thickness of 2 mm (SDR 17).
We fill the pipe in the insulation with soil. Some “experts” suggest filling it with crushed stone, but this is a bad option - the sharp edge of the crushed stone can crush the pipe. Especially if the soil is rocky. Yes, and crushed stone freezes well.
Heating
When planning the installation of winter water supply, you need to keep in mind that insulation only helps reduce heat loss, but cannot provide heat. And if at some point the frost turns out to be stronger, the pipe will freeze. Particularly problematic in this sense is the area where the pipe leads from the underground sewer into the house, even a heated one. Still, the soil near the foundation is often cold, and it is in this area that problems most often arise.
If you don't want to freeze your water supply, heat the pipe. For this, a heating cable or heating plates are used, depending on the diameter of the pipes and the required heating power. Cables can be laid lengthwise or wound in a spiral.
How much does it cost to lay a winter water supply system per 1 linear meter?
installs water supply in:
— Moscow and Moscow region.
— St. Petersburg and Leningrad region.
The cost of laying a pipeline that can be used in winter depends on the region: in St. Petersburg the price of this service is 1000 rubles per linear meter, in Moscow - 1300 per linear meter. The difference in price is due to the difference in labor costs.
We dig water mains mostly by hand. This is cheaper for the client, and besides, the equipment does not damage the site. This is especially important if it is already landscaped.
How to install winter water supply from a well to a house with your own hands
In suburban areas, an autonomous winter water supply from a well is possible. In our articles on the website, we have repeatedly talked in detail about how to organize water supply from a well:
Water supply for a cottage from a well: how to do it yourself, diagrams, photos and detailed instructions - complete instructions on how to make a winter water supply for a private house from a well with your own hands.
Turnkey water supply from a well - about how we install water supply from a well.
Here we will focus only on the main points.
To organize winter water supply from a well you need:
Well.
It is important to know the minimum water level in the well. During a drought or winter, the water level in the well may drop to a minimum, and it will be impossible to use the water supply. If this happens to your neighbors, then it is better to drill a well.
Pump or pumping station.
A pumping station is installed if it is necessary to raise water from a depth of up to 8 meters.
Some well pumping stations, for example Grundfos MQ, are equipped with built-in automation: pressure switch, dry run and flow switch.
The station is installed in the house, in the bathroom or technical room.
Scheme of winter water supply from a well with a Grundfos MQ pumping station
The pump does not have the same restrictions as a pumping station. It is immersed directly into the well and connected to a waterproof outlet. In the diagram it looks like this:
Scheme of winter water supply from a well with a pump
Water supply pipe
– 32 HDPE pipe with a blue stripe. A blue stripe means that the pipe is intended for drinking and technical water supply. It is enough for almost any private home. However, for large cottages it is better to take a pipe with a diameter of 40 mm.
Hydraulic tank.
It is necessary so that there is always some supply of water in the house, and the pump does not turn on every time you need to wash your hands. Most pumping stations have a built-in hydraulic tank. But it can be very small. For example, the Grundfos MQ station has a hydraulic tank of only 800 ml. Ideally, a private home requires a hydraulic accumulator of 50 liters or more.
The hydraulic tank also protects against water hammer – a pressure surge in the system. It occurs when you have already turned off the taps, but the pump has not yet stopped working.
Inside the hydraulic tank body you can see a rubber “bulb” that expands and contracts when the pressure in the system changes
Filters.
We consider a coarse filter or oblique filter, as well as a fine filter, mandatory. The oblique filter protects the water supply from sand and other large particles. An important point when installing the filter: the sump where the debris settles should look down.
The fine filter is installed after the oblique filter. It protects the system from smaller debris. If your water exceeds some indicator (for example, iron), then additional filters can be installed on the system.
Automation
: pressure gauge, pressure switch, dry running relay. There is no need for a dry-running protection relay if water is supplied from the well using a submersible pump with a float. If there is no water, the float is lowered and the pump does not work. When the water arrives, the pump turns on.
If a station is installed, the dry-running relay will protect the system from idle operation. The pressure gauge measures the pressure in the system, the pressure switch controls the pump and maintains good pressure in the autonomous water supply system.
Check valve.
Prevents water from draining from the system back into the well when the pump is not running.
Heating cable.
A necessary item for plumbing a private home in winter. Thanks to it, the part of the pipe that goes above the freezing depth does not freeze. We use food-grade heating cable for installation inside a pipe, with a power of 10 or 13 W/m. It is easier to replace if necessary than the external one.
The food heating cable is inserted into the pipe using a gland - it is included in the kit.
Set of heating food cable for laying inside a pipe with a gland for water, 3 m
Drain valve.
With its help, it will be possible to drain all the water from the system for conservation or repair.
Automatic drain valve
There are automatic drain valves - Unipump, Gileks, Belamos and so on. They open automatically if the pressure in the system drops below 0.3-0.5 atm.
However, there are several problems with using an automatic drain valve:
— It cannot be used with a pumping station. When a surface pump is used, there is no pressure in the outer pipe, so the automatic drain valve will not work.
— Suspensions (coarse sand, pebbles) get into the drain valve, which is why it does not close completely.
— If water remains in the system in winter, the drain valve freezes.
— It is often installed too deep in the well. This results in a water column that is too high. It creates pressure and the valve does not work.
- If the water is high in the well, then it does not drain from the pipe, it remains at the same level. And here it doesn’t matter whether there is a drain valve or not.
You can also install a manual Gilex drain valve. It is installed on a HDPE pipe in the well closer to the bend, and a rope is tied to the tap. For the faucet to work, you need to pull the rope - it will open and the water will drain out. When there is pressure in the system, this may not be easy to do; you will have to apply force, so it is better to tie the rope tightly.
Mounted Gilex drain tap. The rope is threaded through a small hole on the right
Anti-freeze taps
A common reason for the lack of water in the pipeline is a frozen tap. This is especially true if water for domestic needs in winter must be collected from the yard or used for irrigation during periodic frosts. A tap that is installed in the ground is called a hydrant. It is a piece of pipe up to 1.2 m long with a lever at the top and a valve at the bottom. There is another pipe of smaller diameter inside.
Crane example
One end of the hydrant is connected to the water main, the other is above the ground and serves to supply water. When the handle is lifted, the valve of the inner tube, connected to the lever via a rod, is activated. After lowering the handle, the valve shuts off the access of water, and the remaining water flows through the external pipe back into the water supply. This way, no liquid remains in the hydrant, which means there is no risk of it freezing.
Hydrant example
The design and principle of operation of a tap connected to a home network are similar to an underground hydrant, but with some differences. The structure is laid in the wall. At the outer end there is a valve and spout, at the other end there is a check valve with a stem. Product length from 15 to 60 cm for walls of various thicknesses. Since the shut-off valve is located in the positive temperature range, the faucet does not freeze even in severe frost.
By turning the valve, the valve opens and water flows into the spout. When the handle is rotated back, the pipe lumen closes. The remaining liquid is spontaneously removed and the pipe remains empty.
How to install the drain valve correctly?
It is better to install the drain valve below freezing of the soil, that is, at a depth of 1.5-2 meters. If you install the valve in a well, then mount it closer to the adapter or head; if in a well, install it closer to the bend. The installation sequence is as follows:
- A hole is drilled in the HDPE pipe between the adapter and the pump
- The valve is fixed using two removable parts of the seat and mounting screws.
- The sealing ring is installed between the hole and the saddle.
You can install a homemade drain valve in the well:
— Install a tee or saddle with a tap in the well.
— Attach a 20 mm polypropylene pipe to the butterfly ball valve through a 32-20 mm adapter coupling.
— Use a grinder to make a slot in the coupling on the bottom side.
— Mount the pipe, which acts as a rod, in the well using plumbing clamps. To securely fix the pipe, two additional stop sleeves must be installed between the clamps. This is done so that the homemade rod does not “walk” vertically and fly off the tap.
However, such a winter valve has problems - the ball valves turn sour, and after some time it may not turn. We recommend periodically, for example, once a month, opening and closing the tap.
Installation of a deep-well pump
A deep-well pump operates on the principle of a pump. It should be completely submerged under water, but should not lie on the bottom, the distance to which should be at least half a meter. This is necessary to prevent the pump from silting up. It is suspended on a steel cable, to which the cable is attached with insulating tape. The connection must be made on the surface.
The length of the cable should be such that in the summer, when the water level drops, the pump does not end up suspended in the air. The power wire is laid along the pipe into the trench. It can be tied on top or placed under thermal insulation. Moving together is highly undesirable. The entire cable will last indefinitely without the risk of breakdown or short circuit. The pump is attached via a coupling to a pipe that is installed vertically and connected to a horizontal route.
Bypass drain system
The drainage system can be provided in the house using a bypass. The bypass is installed directly in front of the automation and hydraulic accumulator. It is designed in such a way that when the pump is turned off, water drains from the pipe to the check valve, but remains in the internal system. A tap is installed on the bypass line itself. When it is opened, water is drained from the internal system too.
A check valve is usually installed on a horizontal section of pipe. A tap is installed on the bypass line; when it is opened, water is also drained from the system.
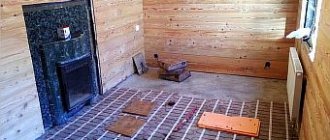
Piping inside the bathhouse
In a bathhouse that is heated occasionally, drain taps are provided in the internal wiring. The pipes from them are discharged into the sewer system.
It is important to ensure drainage:
- from the storage tank;
- cold water from the boiler;
- from a heat exchanger connected to the hot circuit of the water heater.
The drain system takes advantage of the properties of the steam in the heat exchanger. When the firebox is turned off, increased pressure is created. Steam forces liquid to leave the water heater, tank. The taps are opened and the moisture flows down the drain.
A drain valve is also installed at the main entrance. It may be near a sewer or on the street. After this, internal wiring is performed. Any circuit is used - sequential, parallel or mixed. The choice depends on which method of water supply will provide more opportunities to connect consumers with maximum compactness and use fewer pipes.
Points of consumption are located taking into account the interconnection of individual premises. The shower is installed in a place where it is most convenient to supply cold and hot water and organize drainage into the sewer. Its remote location means extra pipe footage and maintenance problems. In practice, the most convenient place for a shower is the room located close to the steam room.
Winter water supply from a well
We wrote about what types of wells there are, about the types of casing pipes, and about choosing a pump here:
Water supply at the dacha from a well: diagrams, structure and instructions with photos on how to do it yourself.
If we are talking about a constant winter water supply from a well, then there are two ways to arrange it:
- Using a caisson.
— Using a downhole adapter.
Caisson
- This is a sealed container that is buried in the ground. It protects the head and automatic water supply from freezing in winter. Installing a caisson is more expensive than installing an adapter, but water can be distributed to several buildings at once. This is convenient if there is not only a house on the site, but also a bathhouse or a guest house. The caisson is made from different materials - concrete, brick, sheet material. We recommend buying caissons made of polypropylene. They are 100% sealed and reliable. They do not wrinkle in the ground and do not freeze in winter. They can be placed in any soil
Another important advantage of the caisson is that part of the automation can be installed in it.
How we install them is described here:
Turnkey construction of a well with a caisson.
Scheme of equipment for all-season water supply from a well with a caisson
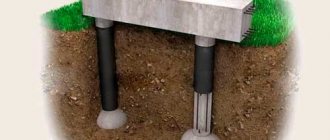
Downhole adapter
– a device for removing a water pipe from the well casing. It is installed below the freezing depth, so it is excellent for arranging winter water supply from a well. However, it is used only when it is necessary to carry out water supply to only one building. It will also be difficult to use if the well casing is narrow - 90 mm. In this case, you will need to either use a caisson or expand the top of the pipe.
Construction of a well with a turnkey adapter.
Scheme of water supply equipment from a well with an adapter
Also, when installing a winter water supply from a well, you will need:
— HDPE pipe 32 mm.
— Hydraulic tank of 50 liters or more.
— Filters – coarse and fine.
— Automation – pressure switch, dry running relay, pressure gauge.
— Drain valve.
- Heating cable.
There are also various artisanal methods for constructing a well:
— Exiting the pipe directly from the head without a caisson or automation. This method may be suitable as a temporary solution for summer water supply, but it cannot be used permanently. Especially in winter.
— An insulated house with a pumping station directly above the well. The output is heated by a heating cable. A house is a more expensive option than a caisson, as more materials are used. There is another argument in favor of the caisson - it is buried in the ground. In winter it is warmer there than on the surface. In addition, caissons are made of polypropylene; they retain heat well. However, the pumping station cannot be installed even in a caisson - it operates at temperatures above +5-+10 °C.
From this photo you can get an idea of what it looks like. Although specifically in this case a pump is used, not a station
Device requirements
A water heater for a country house is somewhat different from a device for a city apartment. A device intended for a summer residence must meet several basic requirements:
- Economical consumption of fuel or energy. You need to decide what is more practical and profitable for you - a wood-burning, gas or electric appliance.
- Suitable tank volume for family needs. For a country house, it is better to purchase devices with a small tank, because they are light and compact. But at the same time, it is necessary to calculate the daily consumption of hot water at the dacha.
- Correspondence of power to technical capabilities. It is worth consulting an electrician regarding the capabilities of your electrical wiring.
- Practicality and ease of use.
First you need to decide what energy the device will use to heat the water. At the dacha, you can use titanium on wood, a gas water heater or an electric appliance.
On this topic:
Installation and wiring of a water heater
Jun 17, 2017
Technical characteristics of the Gorenje FTGSMV6 water heater
Jun 17, 2017
BACK FORWARD 1 of 11
If you have autonomous heating, you can connect the water heater to the heating boiler.
In addition, you need to accurately determine the required volume of hot water and the heating time. The following main parameters are the geometric and technical properties of the device - its size and shape, efficiency and power. These criteria will affect the duration of water heating and energy consumption.
For example, for a large family, a storage water heater with a volume of about 200 liters will be convenient. For a small family, a small flow-through device will be suitable, which will heat the water very quickly.
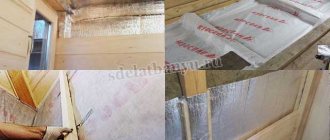
Insulation of equipment for winter water supply
In order for the water supply of a private house to work in winter, it is necessary to keep not only the pipe warm, but also the rest of the equipment: a hydraulic accumulator, a pumping station, automation, filters. If all this is located in the house, in the bathroom, then there is no problem. But sometimes equipment for autonomous water supply is located in an unheated technical room or in a caisson. For normal operation, the temperature in them must be above +5°C. Additionally, the hydraulic accumulator and the station can be insulated with sheets of foam plastic, penoplex, roll insulation with a foil layer, mineral or basalt wool.
Air heating
Instead of laying a cable, the water pipe can be heated by warm air coming from the residential building. To do this, it is laid inside a pipe of larger diameter, which is wrapped on the outside with heat-insulating material. Warm air is supplied inside this pipe using a fan, which prevents the water pipe from freezing. The heated air flow must pass unhindered along the entire length of the pipe, from the entrance to the house to the distribution well. Such a system is suitable only for houses in which people constantly live throughout the winter.
The water in the well is freezing, what to do?
Water in a well freezes under the following conditions:
- If the water level in the well is high - above 2 meters from ground level.
— The upper rings of the well are not insulated.
In order for the water supply from a well to work in the country in winter, the well needs to be well insulated. To do this, the upper rings are wrapped in polystyrene foam, gluing it to the well with a special compound. The depth of insulation is equal to the maximum freezing depth in the region. If your well is already dug in and is freezing, then to install polystyrene foam you will need to first excavate the well. You can also insulate the soil around the well.
Well insulation. We also recommend insulating the soil around the well
Also, to insulate the well, you will need a head in the form of a house.
Well house with gate
Most often it is made of wood. You can do it yourself or order from a company. Such a house protects the well not only from snow and cold, but also from debris.
Insulated house for a well. Additional insulation can be laid between the wooden base of the house and the well. Then the water in the well will definitely not freeze.
Video and diagram output
As you can see, the construction market offers a large number of special materials for thermal insulation of water pipes. You can find modern solutions to this problem or use older developments that will cost much less.
Take care in advance about the arrangement of the water supply and enjoy delicious drinking water in the winter cold!
Methods for defrosting water pipes
If the insulation is not enough, then either the entire system or its individual parts may freeze in extreme cold. The well has a weak point:
The pipes often freeze here
To avoid this, some users lower an incandescent light bulb into the well. It generates heat and prevents water from turning into ice. But this option is dubious and not safe. Moisture can get into the light bulb, it can burn out and even explode.
One of our clients once lowered an old Soviet boiler into a well. Someone was pouring hot water from a kettle onto the pipe. All this can work as a one-time solution if the pipe is already frozen. However, it is better to insulate the well and lay the pipes correctly to prevent such situations.