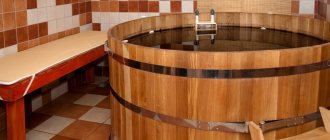
It is difficult to imagine a modern suburban area without a bathhouse. Moreover, the bathhouse is very often the first serious building on a new undeveloped site. You can entrust the construction to hired workers, but it is much more pleasant when all the work is done yourself.
Any building, be it a house, a bathhouse, a garage or a gazebo, begins with laying the foundation. This is mandatory and one of the most important stages of construction. This article will discuss the question: how to lay the foundation for a 3x4 bathhouse with your own hands.
Types of foundations for a bathhouse
Before you begin laying the foundation itself, you need to decide what type of foundation will be used. Basically, when building baths, two types of foundations are used - strip and columnar. Which one will be used in a particular case depends on several factors.
The type of soil under the future building is of great importance. If it is clay, mixed with sand, gravel or hard soil, then the columnar type is quite suitable. If the soil is unstable, is liquefied soil or garden soil, then it would be more advisable to use a strip foundation.
It is important to consider what load will be placed on the foundation being laid. In our case, the size of the building is 3x4, i.e. it's quite small.
If the bathhouse is made of logs or timber, then the columnar type will be the best option. If the walls of the building are built from brick or aerated concrete, then, taking into account the type of soil, it may be necessary to use a strip type.
Where does construction begin?
Any construction begins with the correct choice of location and preparatory work. For the bathhouse, a flat area is selected, protected from the wind and taking into account possible flooding by flood waters. When determining the location of the building, the following recommendations should be taken into account:
- the bathhouse is located within walking distance from a residential building;
- if there is a pool or other body of water, the structure should be brought closer to it;
- the location is selected taking into account the provision of wastewater drainage, the possibility of connecting to a sewerage system, water supply system if available, as well as a safe supply of electricity;
- The bathhouse should be oriented so that the entrance is not on the windy side.
Before construction begins, the site is carefully leveled. All vegetation is removed from it, the grass is mowed, and stumps must be uprooted. If there is a risk of flooding, a drainage system should be planned in advance to remove precipitation and floods. If the site has a waste collection system, the bath drain is combined with it. Finally, the construction and subsequent operation of the bathhouse should not disturb the neighbors.
Material for columnar foundation
The pillar base does not require large expenditures for building materials, therefore it is the most economical.
The material used for the pillars is:
- Logs;
- Reinforced concrete foundation blocks;
- Brick;
- Asbestos-cement pipes filled with concrete mixture;
- Concrete poured into formwork with a reinforced frame.
Regardless of which material is chosen, each pillar must be carefully waterproofed. This is done using roofing felt and bitumen mastic.
If you plan to use wooden poles, then each of them must be additionally thickly impregnated with an antiseptic.
Laying a columnar foundation
The posts must be installed at the corners of the log house, at the intersections of internal walls, as well as under external and internal walls at a distance of no more than 1 m from each other. For a 3x4 bath you will need from 8 to 12 pillars, depending on the internal layout.
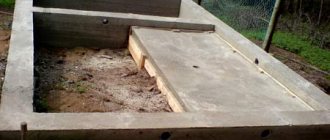
The depth of the hole for the post must be calculated based on the type of soil and the depth of its freezing. For a shallow foundation, which is suitable for a 3x4 bathhouse in most cases, 50-70 cm is sufficient.
The bottom of the hole is filled with sand to about 15-20 cm, the sand is well compacted. Roofing felt is laid on top. The post is waterproofed and installed in the pit. The pole should be raised above the ground by about 30-40 cm.
After installing all the pillars, it is necessary to make a fence - a wall that will connect the pillars and protect the subfloor of the bathhouse from high humidity and cold. For its manufacture, brick or, for example, rubble masonry is used.
Carrying out finishing work
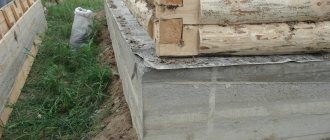
The final stage of foundation manufacturing is carried out after the main hardening of the concrete, i.e. 21-22 days after filling. Only after such a long period of time is it possible to dismantle the formwork. Then it is necessary to apply waterproofing to the side walls. As a rule, protection is carried out by applying ready-made bitumen mastic or molten bitumen. Additionally, it is recommended to apply roofing felt. After this, the remaining gap is filled with earth and thoroughly compacted. Roofing felt waterproofing is also applied on top of the foundation.
The columnar foundation is finally formed after the grillage is made. This element is made in the form of a strictly horizontal wooden beam or metal profile installed around the entire perimeter. The grillage is firmly connected to the pillars using the released ends of the reinforcement or anchor connections.
The sauna foundation is the most important element of the structure, determining its reliability and the quality of further work. Even for such small buildings as a 3x4 m bathhouse, the foundation must meet all safety standards and be built in accordance with all the rules.
Preparing the soil for laying a strip foundation
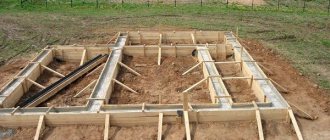
The second popular option when laying a foundation for a 3x4 bathhouse with your own hands is the strip type. Before proceeding directly to its installation, it is necessary to dig trenches in the places where it will be laid.
You need to start with markings; it is important to avoid distortion of right angles. There is a very simple way to measure a right angle. In the situation under consideration (bath size 3x4), you need to do this. Drive a peg where you start digging the trench. Lay out two ropes at approximately right angles - one 4 meters long, the second 3 meters long.
Next, you need to ensure that the distance between the edges of these ropes is exactly 5 meters. If this is achieved, then the angle is perfectly straight.
In most cases, it will be enough to lay a shallow foundation; accordingly, the depth of the dug trench may well be within 40-50 cm. If the soil is unstable and loose, then this size can be increased to 70 cm. The bottom of the trench must be filled with sand, which is compacted tightly. To give additional density, you can pour water on it.
Markup features
General grounds
A method for calculating right angles using improvised means
- Whatever the foundation you mark, in any case, if you do not intend to build rounded walls, its corners should be 90⁰, be it a square or a rectangle. If you do not have the opportunity to use special geodetic instruments, then an ordinary metric tape measure and a skein of thread or cord will do for this. The main thing in this situation is that the thread or cord is not nylon, since such material stretches, but we need the size to be maintained, therefore, we use natural materials or wire.
- We drive a peg into the starting point (in the upper figure this is point B) and stretch two threads from it - one 3m (segment AB), and the other 4m (segment BC), only the dimensions must be maintained exactly so that there is no failure in degrees. Now, if the distance between points A and C is exactly 5 m, then angle ABC will be right. It is noteworthy that the instructions do not require calculations in meters - for a measuring unit you can, for example, take a decimeter or, in general, a piece of cord of indefinite length.
Advice. For a control check, after setting all the angles, you definitely need to check the diagonals to avoid mistakes. Their sizes should be equal, and if errors appear, then the tolerance for them should not be more than 2-3 mm.
Pile and column foundations
Markings for a columnar foundation
Article on the topic: How to make a foundation for a bathhouse from blocks
It has already been said about the right angle when marking, therefore, let’s move on to the designation points for screw piles or for pillars. If we talk about steps, then the “principle, the more often, the better” works here, but not less than three meters. Although, if we are talking not just about a storage room, but a steam bath, with all the equipment, then it is best to reduce the step to 1.5-2 m (see also the article “Foundation from blocks for a bathhouse - tips for independent construction”).
When you determine the perimeter of the building, it is best to pull the thread between the extreme points so that all the piles are strictly on the same line, and since the tension will interfere with drilling, it is better to hammer in the pegs in certain places and remove the cord. Of course, it will be much better if you create such a project on paper, then not only the projections and quantities of materials will be clear, but also their price, which can be immediately calculated.
Columnar foundation. Installation of harness
In addition to the perimeter, there are also adjacent rooms, for example, a steam room, a soap room and a locker room, which need to be separated by walls, which also need support. This is where a drawing comes in handy, where you can calculate the area of each room in advance in order to correctly distribute the pillars or piles for the frame.
There should be support under each strapping beam, as well as at each corner and joint. An exception may be a screw foundation with a grillage made of a steel profile - there the frame is still placed on it, and if at the joints for partitions the beam does not fall exactly on the pile, then this is not so scary - the steel compensates for the load.
Advice. When installing the frame on a verified screw or pile foundation, you still need to check the diagonals of the perimeter, since the beams may shift and the proportions will be disrupted.
Strip foundations
Marking strip foundation
Article on the topic: How to replace the lower crowns of a bathhouse
If you pay attention to the photo above, you will see that for each tape two threads are stretched, and their ends extend beyond the perimeter of the trench, and the angle is obtained at their intersection. This was done for a reason - the distance between the cords determines the required width of the trench, and the fact that the tension is placed outside the perimeter allows you to drive the pegs outside the working area and they do not interfere with the excavation work.
The marking principle here is exactly the same as for a pile or columnar foundation - for each load-bearing wall and partition there must be a foundation, which here will be a monolithic or prefabricated tape.
But, as you yourself understand, stretched threads will interfere with excavation work, so they can be removed after digging the first piece - the main thing is that you clearly mark the boundaries of the trench. Just don’t pull out the pegs - if necessary, you can pull the threads on them again and check the condition of the perimeter and edges of the ditch.
Vents in the basement
It should be remembered that you need to leave space in the tape for sewage drainage and water supply, so that you don’t have to chisel the concrete later. To do this, mark in advance the necessary places where a passage for pipes will be arranged - you can simply lay a pipe with your own hands of a larger diameter than you will use for drainage of water. Also, when pouring the base, you will need to make vents (you can use pieces of pipes), the places for which are marked in advance.
Foundation for a bathhouse with a stove
Perhaps you are planning to build a stove in the bathhouse, then it will also need a solid foundation, especially if the structure is heavy. However, such a foundation can be made not only on a strip foundation, where a platform is simply poured for this, but also on a high grillage of a pile or strip foundation for a bathhouse. It just requires additional supports on which you can pour the concrete slab.
Article on the topic: How to ban by IP in SAMP
Creating formwork
It is more expedient and cheaper to use some old boards or cuttings of new ones for formwork. If this is not possible, then you will have to buy the required quantity.
The formwork must be erected all at once and also in one go, then concrete must be poured into it. The height of this structure depends on the depth of the trench, but for a shallow version it should be about 80-100 cm. The distance from wall to wall of the formwork should be about 20-30 cm.
To prevent the formwork from deforming, it is necessary to install small wooden beams at a short distance between its two sides, which will support the walls and prevent them from collapsing.
Calculation of parameters
This question is quite sensitive and individual. Usually the following formula is used: S > γn · F /(γc · R). Where γc is the conditional work, γn is the value of 1.2 (conventional reliability). F - data on the load on the base. R is the coefficient of soil resistance. Well, S is the area.
For the foundation project you need to know:
- type of soil;
- depth of groundwater;
- the mass of the future bath;
- snow loads (study SNiP and snow load map).
Tape base
The bottom area of all trenches is calculated. The calculated weight of the bathhouse is compared with the figure formed as a result of determining the mass that the soil can handle. If the second value is greater than the first, then the trench parameters (length and width) are optimal for the intended bathhouse. The mass of the foundation is calculated. To do this, its volume is determined: H (height) x D (length) and W (width). The specific gravity of the material is calculated. If the foundation is concrete with reinforcement, then the specific gravity is approximately: 2400 kg/cub.m. This value is multiplied by the volume of the foundation.
Pile-column base
It is important to know here: the thickness of the pillar, the area of the base (bottom) and the number of pillars. Calculation is underway: what mass (in kilograms) can one pillar support?
This will help determine the number of pillars for a given building.
Calculating the area of the base: ideally the bottom has a round shape, this is the radius squared. It is multiplied by 3.14 (Pi).
Calculation of the volume of a pillar: its height is multiplied by the square of the radius and 3.14. There will be some error here, because there is a widening on the bottom side. Its shape is a ball. The volume of both the sphere and the cylinder is calculated.
If the base is columnar, widening will not work, the calculation is optimized.
Calculation of the total mass of the column: its volume is multiplied by the specific mass of the material (reinforced concrete)
Determining the optimal number of pillars for the quality stability of the bathhouse comes down to knowing the approximate mass of the bathhouse and the mass that each pillar can withstand. Then the pillars are evenly located along the perimeter of the building and the length of the partition walls.
Calculations for standard bath parameters
Bathhouse 3x4. Foundation. The materials for filling are calculated. The calculation is influenced by the internal layout of the bathhouse. With the 3 x 4 bathhouse option, such layouts are not enough. The foundation is poured with concrete grade 200 (a composition with M-400 cement is also formed).
For example, in your area the soil freezes to 80 cm. Then the tape is laid at 100–110 cm. The width of the tape (W) = 3 m. Its length (L) = 4 m. Height (H) = 110 cm (taking the maximum recess). Thickness (T) = 40 cm.
When planning with one room, the tape is calculated by adding 10 reserve cm on each side.
Then we get the following values:
- 12.4 m - the entire length of the tape;
- 4.96 sq.m. – bottom of the tape;
- 15.4 sq.m. – external lateral plane;
- 5.5 cubic meters - volume of poured concrete;
- 12,822 kg - its mass;
- 0.259 kg/sq.cm - impact of the foundation on the soil.
To calculate reinforcement, you need to study this table:
| Minimum diameter of longitudinal reinforcement bars | 12 mm |
| Minimum number of reinforcement in the upper and lower chords | 3 rods |
| Minimum diameter of transverse reinforcement bars (clamps) | 8 mm |
| Step of transverse rods (clamps) | 50 cm |
| Overlap amount | 78 cm |
| Overall length for 12mm diameter. | 79.4 meters |
| Total weight of longitudinal reinforcement | 70 kg |
| Total length of transverse reinforcement for a diameter of 8 mm. | 74.4 meters |
| Total weight of transverse reinforcement (clamps) | 29 kg |
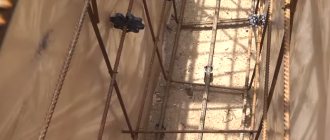
Laying reinforcement and pouring concrete
The calculation of the required amount of reinforcement is approximately as follows - for 1 m of foundation 4 m of reinforcement. The frame is created by fastening four reinforcement rods into a square using iron wire.
When pouring concrete, remember the following:
- The entire solution is poured one day at a time;
- After filling the formwork with concrete, it must be compacted and leveled;
- Drying time for poured concrete is at least 3 weeks;
- No work on the construction of walls can be carried out until the concrete has completely dried.
Types of tape
of strip foundations - monolithic and prefabricated structures . Both types of foundation have their own advantages and disadvantages.
Cast reinforced concrete
Cast reinforced concrete strip is the most common type of support for a bathhouse. Developers are attracted to the monolith because its construction does not require the use of lifting mechanisms, the rental of which is quite expensive.
The disadvantages are the seasonality of the work, which is carried out only in the warm season, the large time costs for assembly, dismantling of the formwork and the wait for 30 days for the load-bearing capacity of the tape to be achieved.
Made
A foundation built from reinforced concrete blocks is advantageous in that wet processes are needed in a small volume for sealing interblock seams and leveling the surfaces of the tape.
The advantage is that the construction of the foundation can be done in the winter season .
Prefabricated elements are used in the arrangement of basements. The construction of a high-height monolithic strip will be extremely unprofitable compared to a prefabricated foundation.
Do-it-yourself foundation for a 4x6 bathhouse
The filling for a slightly larger bath is not fundamentally different from the similar process for a 3x4 bath.
The only thing you will need to take into account is that you will need a little more building materials and, accordingly, the process may be more labor-intensive and time-consuming. Otherwise, you can adhere to the same principles.
Recommended video for viewing:
Laying the foundation for a 3x4 sauna with your own hands is not that difficult. The main thing is to adhere to the basic principles and technologies in this process, as well as show some patience and diligence during the work. And then a self-built bathhouse will delight its owner for many years.
Roof
There are two options: gable or single slope. For a bathhouse measuring 3x3, you can use the simplest option - a lean-to slope.
Installation of pitched roofs
If you choose this option, then you need to do the ceiling right away. For a bathhouse, it must be insulated; you can choose mineral wool (much more expensive and more complex) or polystyrene foam (cheaper and faster). Let's focus on a simple option - foam insulation. It is not afraid of moisture, and there is no need to use various steam and water barriers.
Foam insulation
Characteristics of foam plastic
Prices for foam insulation
PSB foam insulation
Insulation needs to be installed in several stages:
- nail edged boards to the ceiling beams from below, 20 mm thick is sufficient;
- lay foam boards on them. Place them as tightly as possible, avoid gaps. Polystyrene foam can be cut perfectly with a special carpenter's knife under a ruler. During the marking period, provide dimensions 1÷1.5 cm larger - the foam will shrink during installation, the insulation will become airtight;
- Lay any boards on top of the beams, these can be various sections, slabs, etc. The main requirement for them is to withstand the weight of people during the installation of the roof. Once the roofing work is completed, no one will walk on the roof anymore.
Ceiling insulation with foam plastic
If the roof is gable, then make a temporary ceiling, and insulation can be done later. Is everything ready? Great, let's build a roof.
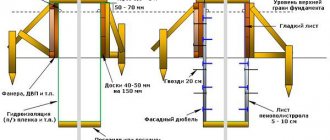
| №№ | Illustration | Description and explanations |
| Step 1. | Check the vertical position and dimensions of the top crown. The dimensions are normal - excellent, there are significant horizontal deviations - no problem, we will level the horizontality with rafters. | |
| Step 2. | Determine the angle of inclination of the slope. We recommend an inclination angle of approximately 20°. Another important point is which direction the rainwater will flow, take into account the features of the site, the location of the entrance doors and the features of existing buildings. | |
| Step 3. | Place a stop for the rafters at the calculated height. It’s simple to do - install vertical supports from beams of a given height, place a horizontal beam on them. The distance between the supports is approximately 1.5 meters. The structure can be assembled without cuts; it is enough to use metal corners and self-tapping screws. In order for the stop to withstand angular forces, secure it with corner boards to the floor beams. | |
| Step 4. | Measure the length of the rafters taking into account the overhang. For our case, 3.2 meters is enough. For rafters, use 50x100 mm boards; for a 3x3 meter bathhouse, 6 pieces are enough. | |
| Step 5. | Install the outer rafters, stretch a rope between them and lay all the rest along it. To secure it to the beams, it’s safer to make notches; if you don’t have the desire or skill, use metal corners. | |
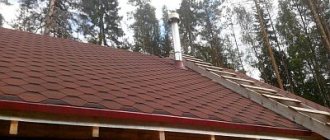
| Step 6. | Ondulin | For the roofing we chose ondulin - one of the cheapest and fairly high-quality materials. You should not use various advertised hydrobarriers. Firstly, if you install the roofing material correctly, there will be no leaks. Secondly, if they exist, then no barriers will help: they will sag under the weight of the water and tear over time. |
| Step 7 | Lathing. Ondulin is in many ways similar to ordinary asbestos slate, the difference is that it has less physical characteristics in terms of the perception of vertical forces. This means that the sheathing should be laid more often; each sheet of ondulin should rest on four slats. The distance between the slats is 35÷40 cm. Instead of slats, you can use narrow unedged boards; they are almost the same in cost, but when nailing ondulin, there is less chance that the nail will “go nowhere.” | |
| Step 8 | Ondulin fastening | Carefully align the first row, do not rush the sheets to arrive immediately; for beginners, it is advisable to lay out the entire row and check its position, and only then pick up a hammer and nails. Ondulin can be fastened with ordinary slate nails; fixation is carried out in the upper wave. The lower the slope angle, the greater the overlap of sheets should be. In our case, the sheets should overlap by about ten centimeters. Be careful not to overdo it with driving force, so as not to damage the wave. If you wish, install a drainage system. |
| Step 9 | Fill up the spaces between the rafters and the wall of the bathhouse on the side of the elevation of the slope with boards, install wind boards. |
That's it, urgent work is done, the log house can be left for the winter. During this time, the bathhouse will shrink and the relative humidity will stabilize to natural values. If you want to wash faster in your own bathhouse, continue construction work.