How to simply increase the efficiency of the stove in the house and bathhouse
Many owners of private houses still do not give up the good old stove, sometimes using it for heating or burning garbage.
There are also houses in which the stove is still the main source of heat during cold winters. Be that as it may, the stove must burn well and also cope with the task of pumping hot air into the rooms. If the stove does not burn or the fuel does not completely burn out in it, then there can be no talk of any good efficiency.
In this case, we advise you to listen to our tips on how to increase the efficiency of the furnace several times. Perhaps this article from the construction magazine samastroyka.ru will help solve the problem with the operation of the stove once and for all.
Pros and cons of homemade structures
Making your own stove structure has both its advantages and disadvantages. It is necessary to take both of them into account in order to soberly assess your strengths and understand whether it is worth undertaking independent production or whether it is better not to save money and order a ready-made solution.
So, the advantages include the following provisions:
- Attractive appearance that can be varied at will. Those who have experience in welding, as well as in everything related to making things on their own, can make a truly unique design that is not inferior in beauty to factory-made analogues.
- Economical. Homemade baths, arranged in the correct way, are not inferior to factory ones in terms of saving fuel or electricity, if this option is chosen.
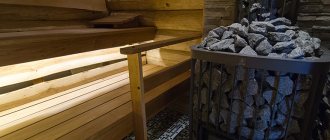
- High performance. A properly designed and built sauna stove is highly efficient, so no heat is wasted - everything is transferred to the steam room.
- Easy to maintain. Homemade stoves are easier to maintain because the person building them knows where everything is, which areas need to be cleaned more thoroughly, and which areas can only be lightly swept.
- Durability. Like factory stoves, home-made stoves last for many years, and if we are talking about brick stoves, they can last for several decades.
- Space saving. Thanks to the variability of the parameters, it becomes possible to rationally fit the stove structure into the bathhouse, without leaving too large gaps or taking up an unreasonably large amount of space.
As for the shortcomings, there are not many of them, but they still exist:
- If a homemade stove is made of stone, then it may be too heavy. This will require additional strengthening of the foundation, which will entail additional costs.
- There is a need to protect the environment, since the amateur stove maker does not always have the necessary knowledge on how to reduce the temperature outside the stove.
- It is necessary to carry out all work with a high degree of professionalism, since an incorrectly made stove will not properly heat the steam room and will generally cause more problems than joy.
Problems with the operation of the oven
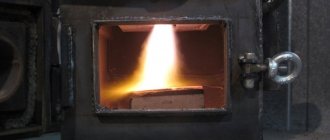
If the stove doesn’t burn, no matter how good the wood or coal you put in it, it won’t work. The problem is obvious and lies in cravings. Once you increase it, the effect is immediately noticeable. Most problems with the operation of the stove are associated with insufficient chimney height.
Therefore, first of all, we pay attention to whether the chimney pipe is of sufficient height. Ideally, it should protrude above the roof of the house by at least half a meter. Although everything here largely depends on the exact location of the building.
The second point is related to insufficient insulation of the chimney. If the chimney pipe is poorly insulated, the stove will take a long time to burn, and there will be many more problems with its operation. If the chimney is made of brick, then there is no need to insulate it, unless you plaster it with clay, and that’s all. In other cases, it is recommended to insulate the chimney pipe.
Frame made of wooden blocks
You can make such a screen yourself.
Wooden frames that cover, for example, a battery under a window, look great in any interior. They look especially harmonious in a room furnished with wooden furniture. The advantages of wooden decorations are that they can be used as shelves for household utensils or souvenirs, as stands, tables, low structures are used as benches. An additional option for using the frame depends on its height and horizontal surface area. The appearance of such decoration depends entirely on the imagination of the owner and the level of his skill.
The work algorithm consists of performing the following actions:
- It is necessary to take measurements carefully.
- Then you need to cut the bars to size.
- Assemble the frame from thin timber (remember that the frame must be strong).
- Then you need to braid the base with cotton tape or slats.
- The finished structure is varnished.
Increasing the efficiency of the furnace - how and due to what?
Those owners of private houses who use stove heating know how long it takes for the stove to burn before it produces heat. At the same time, the air exchange rate is so low that until the temperature rises in each room, at least an hour, or even two, will pass.
As a rule, this happens due to the fact that first the warm air warms up the chimney, and only then begins to flow into the room. You can speed up the process of heating rooms, and generally increase the efficiency of the stove, by installing metal pipes in the chimney.
At the moment when the stove just flares up, heat will already begin to flow into the premises. What does this look like in practice? To do this, you need to place one or more round metal pipes in the chimney elbow. The diameter of the pipes must be at least 200-300 mm. It is important to maintain a slight inclination of the pipes to the slabs.
Hood over the stove
Another way to increase the efficiency of the stove is to install a metal hood above its stoves. The principle of operation of such a hood is simple: hot air enters it and enters the premises through pipes. To do this, the hood is connected to a metal pipe with a diameter of 100 mm.
The hood itself can be made of thin galvanized metal. Then you will need to remove a metal pipe from it, at least a meter. Well, after that, to remove heat, it is even possible to use plastic pipes, for example, cuttings of PVC plumbing pipes.
These simple methods can significantly increase the efficiency of the furnace. Fire the stove efficiently and economically, and you will notice that you can save a lot.
Source
A few highlights
The screen can be harmoniously combined with the interior
First, you need to choose the most effective cladding method, which hides all the pipes and taps as much as possible, matches the style of the interior of the room and has a neat appearance. In order for the structure to last for a long time, the following points should be taken into account:
- reliability, strength and durability of the heating system (if there is any doubt at this point, it is better to construct a collapsible casing);
- the meter, faucet, machine and other heat or pressure regulators must be freely accessible;
- The architecture and geometry of the system will affect the shape of camouflage shields and screens; it may be necessary to design a box.
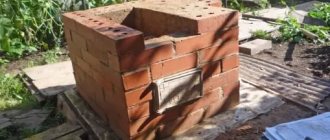
Do-it-yourself metal sauna stove
When asked how a metal stove differs from a stone stove, many answer with a smile and without the slightest hesitation - the material of manufacture. For such an answer you can give a three on the five-point knowledge assessment system. To get a higher score, familiarize yourself with the main and fundamental differences; this knowledge will be very useful to you when making a metal sauna stove with your own hands.
Do-it-yourself metal sauna stove
The stone oven is made of heavy bricks and therefore has a large mass. And all bodies with a large mass are characterized by significant inertia - they heat up for a long time and give off heat for a long time. This is not bad for a bathhouse, but only under one condition - the firebox design must ensure the maximum combustion temperature of the wood, otherwise you will have to heat the premises for a long time.
A metal stove, on the contrary, has a low mass, heats up quickly and cools down just as quickly. These features put forward fundamentally new requirements for the firebox; the wood in it must burn for as long as possible. This is the only way to keep the oven hot for a long time.
Sauna stove firebox
Another important requirement for the firebox is related to the characteristics of the steel. When heated to just +150°C, martensite begins to decompose, it recrystallizes and polygonizes, and the physical properties of the metal change.
Dependence of color on metal heating temperature
Look at the table, at this temperature the metal furnace does not change color, it seems to us that everything is normal, but this is no longer the case. Low-temperature tempering occurs at metal temperatures up to +250°, steel loses its resistance to dynamic loads.
Red-hot furnace metal
The dark brown color of the furnace indicates that the metal has heated up to a temperature of +550°C, and at these temperatures medium-temperature tempering of steel begins, martensite turns into ferrite and cementite. Crystalline transformations of a metal change its linear characteristics. Have you noticed that sheet iron does not return to its original size after strong heating and cooling? It may swell, lose linearity, etc. The appearance of the stove becomes “very original” and far from the original.
Not only stoves, but also metal chimneys suffer from high temperatures
But quite often the metal stove heats up even more and turns bright red. This color appears at a heating temperature of +900°C. And this is already a high tempering, the metal becomes very soft and ductile, and the phenomena of residual deformation increase significantly. The stove may warp, and the welds may not withstand the static forces that appear. How to prevent such negative phenomena? It will not be possible to completely get rid of them, but there are ways to minimize them. They will help increase the operating time of a metal stove and improve the comfort of bathing procedures by increasing the time it takes to maintain a favorable temperature in the room.
Effect of tempering on the mechanical properties of steel
Peculiarities
A bathhouse and a sauna are far from the same thing, so the stoves for them will be completely different. If in a sauna it is necessary to create a high temperature, and the heat should be hard and dry, then in a bath the opposite is true. The temperature also remains high, but due to the high humidity, the heat turns out to be soft and the temperature is practically not felt. Such procedures are useful for both physical and mental well-being.
Linden buildings are extremely rare due to the fact that linden wood is a scarce product, and few people can afford such construction. The stoves here should not be very powerful. The heat should not be strong, since linden baths are classified as light. Of course, the simplest solution is to buy a ready-made stove designed for a certain area of the bathhouse. However, many refuse this decision.
Firstly, you don’t want to overpay. Indeed, a high-quality hand-built stove costs two to three times less than the same option from a reputable manufacturer. Secondly, a stove built with one’s own hands allows the master to express himself. Thirdly, such a design can be made of any size and configuration so that it fits perfectly into your bathhouse. Stoves made to order according to personal measurements are very expensive, so it is much easier to make a stove yourself.
We suggest you read: How to fold a stove in a bathhouse
How to improve the performance of a metal stove
We are confident that this knowledge will help you minimize the negative consequences of heating a metal stove too much. This can be done in two ways: special preparation of the metal and the peculiarities of the firebox design.
Preliminary metal preparation
After all the individual elements of the furnace have been cut out, first release the most heated parts. The sides and top parts and the firebox door heat up the most. Heat them in any way until red and cool slowly. After the holiday, the sheets may warp a little, this is not a big deal; use a hammer to straighten them to their original state. Check the dimensions again, if they have changed within noticeable limits, cut to the required parameters. This simple method will prevent the stove from warping during its operation.
Blanks for oven doors
Example of an installed metal door
Design features of a metal furnace firebox
Most metal stoves produce the maximum amount of heat in a minimum time, firewood burns out very quickly, and surfaces heat up to high temperatures. It is impossible to maintain a normal and stable temperature in the steam room - you have to often add firewood. The room is either too hot or too cold. Why is this happening? Such ovens in most cases have grates. Their presence is justified in stone ovens; we have already mentioned that these ovens need to be heated quickly. Strong combustion of the flame is ensured by a large amount of air entering the flame through the grate.
Metal oven with grate
Grate bars are made of metal rods, sheet metal with numerous drilled holes or cast iron, differ in hole sizes, etc.
Cast iron grate
The firewood lies on the grate, the air flow is not regulated in any way; on the contrary, all measures are taken to increase draft, which automatically speeds up the combustion process. The top part of the oven heats up the most, a little less than the side, and the bottom and front heat up slightly.
Firewood in the firebox lies on the grate
Scheme of operation of the stove-heater
Sheet steel prices
This combustion mode has an extremely negative impact on both the longevity of the stove and the comfort of staying in the steam room. You have to periodically fill the fire with water; if there is not enough water, the flame will quickly flare up again; if there is too much, the combustion may stop altogether. In a word, a bath day brings a headache instead of pleasure.
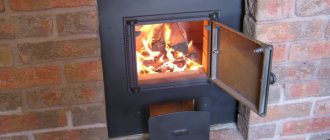
What do we offer? The solution is very simple - do not make grates with a ash pit, let the firewood lie at the bottom of the stove, and not on the grate. Seal the firebox door as much as possible; you can use asbestos cord or mineral wool around the perimeter.
Make holes in the firebox door with an ordinary movable damper to regulate the amount of air supplied. One load of firewood in such a stove will burn for more than an hour; it is possible to regulate the heating temperature of the surfaces. In addition, the entire area of the stove will warm up. Due to the absence of a grate and ash pan, the work on making the stove was simplified, and the efficiency and ease of use increased.
Furnace firebox without grate
Example of a stove door with an adjustable damper
As you can see, all the knowledge was useful to us; it can be used not only during the manufacture of a stove for a bath. We've sorted out the theory, it's time to move on to practice.
Types of potbelly stoves
To make a potbelly stove, a material with heat-resistant properties is required. These include steel and cast iron. Cast iron structures have a longer service life, since the characteristics of the alloy allow them to work at high temperatures without deformation and rapid wear. When creating a thick-walled cast iron body, it becomes possible to retain heat for quite a long time.
In addition to primitive designs, there are a number of devices that differ in their functionality:
- Equipped with a hob designed for cooking food and heating water. The design does not exclude the possibility of installing an oven.
- Devices equipped with a casing located along the body area. It is made of metal or ceramics. This design features improved heat transfer. This becomes possible due to the absorption of heated air into the space of the casing, while it heats up and evenly transfers thermal energy into the heated room.
- Potbelly stoves of gas generator type. They have two chambers in which combustion occurs. The lower one is intended for fuel gasification, and the upper one is for afterburning gaseous substances.
- Small-sized devices. As a rule, such stoves are used as an emergency heat source.
Instructions for making a metal furnace
Step 1. Prepare materials. For manufacturing you need sheet steel, the thicker the better. But this can be very expensive, we recommend using sheets with a thickness of 1.5÷2.0 mm.
Metal sheets 2 mm
Step 2. Make a sketch of the stove indicating all dimensions and parts. Count the number of parts and their total area. This will help you decide on your sheet metal needs.
Draw a sketch of your stove, for example, with chalk on a steel sheet
Diagram - example of a sauna stove
Step 3. Transfer the dimensions to the metal, cut out all the elements of the stove. Strictly observe the angles, they should be equal to 90°, make the opposite sides as identical as possible. You need to cut metal with a cylindrical grinder, follow safety rules. The grinder is a very dangerous tool, you shouldn’t joke with it, you can end up with too serious injuries. Burrs should be removed after cutting the workpieces. Before starting welding, double-check the quantity and dimensions of all parts.
Welding the furnace
Carry out work on a level surface, free the workplace from foreign objects. Let's start with making a heater for the stove.
Step 1. Place two side panels on the edge at right angles and begin making tacks.
We join two blanks at right angles
Adjust the current strength; the electric arc should not overheat the metal - the seam will be uneven and weak. Tack a few millimeters at a time; 4–5 tacks are enough for one corner. Constantly check the position of the sidewalls. After cooling, the weld seam moves the sheets to the side; align their position. Check the corners with a square. In the same way, grab the two remaining sides of the heater.
We produce spot welding
Step 2. Place the two prepared pieces together, adjust the corners if necessary and tack the opposite edges of the heater. You now have a heater box, all that remains is to make the bottom and lid.
Four connected blank sheets forming a box
Step 3. Tack the bottom and lid. When cutting blanks by hand, it is impossible to achieve ideal dimensions; there will always be deviations. This is not scary; before gripping the bottom and lid, install them in such a way that the difference in size is approximately the same on all sides. Gaps of a few millimeters will be welded without any problems. To prevent the lid from falling into the box, place one side on any stand, the main thing is that it is thin and does not disturb the desired position of the part. Make several tacks on each side of the heater; as always, pay attention to the position of the elements and, if necessary, correct deviations.
For the bottom of the internal heater, it is better to take a sheet 10 mm thick. This accounts for the main “blow” of the flame; a bottom that is too thin can burn out quite quickly and smoke will begin to flow into the steam room. When the heater frame is completely sealed, apply full seams.
Making the bottom and lid
Step 4 . Make a door in the heater. Lay the box horizontally and mark it. You can cut a hole with a grinder or welding.
Use a hammer to knock out the cut out rectangle and set it aside
In our version, the heater consists of two parts: internal and external. The outer one should have dimensions around the perimeter larger than the inner one by about 10 centimeters for the passage of flame and smoke into the chimney. The internal heater is installed in the external one on pipes, the diameter of the pipes is arbitrary.
Step 5 . Make holes in the lower part of the outer heater for the pipes, on which the inner heater will stand. If you don't have pipes, you can use metal rods or fittings. Make sure that the holes are horizontal and at the same height on both sides of the sides of the outer heater.
Making holes for pipes
In the same way, grab the outer heater, stove firebox and water tank. Cut holes in the firebox for firewood. We recommend making holes in such a way that the cut parts of the sheet can be used as doors. To do this, make holes in the firebox 1 cm larger than in the heater; from this blank you can make a door for it - material is saved.
Video - Making a metal stove for a bath (part 1)
Assembly of individual furnace elements into a single structure
Furnace elements before connection
Step 1. Prepare four plates for welding two heaters. The dimensions of the plates in length must correspond to the dimensions of the opening of the external heater.
Step 2. Cut holes in the top of the outer heater for the chimney pipe. The dimensions of the hole must correspond to the pipe you have and provide the necessary draft in the firebox.
Prices for chimney pipes
Step 3. Weld metal strips approximately 2 centimeters high along the perimeter of the hole in the stove under the heater; the dimensions of the opening should correspond to the dimensions of the external heater.
Weld a 45x45 m corner from the inside of the firebox; one side of the corner should go into the hole under the heater and form a square. The side of the square should be 0.5÷1 cm smaller than the size of the heater. The structure will rest on these shelves in the oven opening. To increase the sealing of the heater installation, use sheet asbestos, cut strips two centimeters wide from it and place it between the bottom of the heater and the corner stops. The detachable connection will make it easier to install the stove in the steam room. The stove structures are made of thick steel, are large in size and weight, and it is impractical to weld the heater to the stove. It is much more convenient to make it collapsible/dismountable, this will facilitate transportation and installation.
Step 4. Weld the firebox door on the hinges. Double weld all pre-made structures. It is better to lay the seam from the outside and from the inside.
Step 5. Insert the inner heater into place, it should stand on the pipes and be in a vertical position. Using prepared plates, connect the holes of the inner and outer heater. If the fastening of the internal heater is in doubt, secure it on top with pieces of metal, angles or fittings. These fasteners will be hidden; you can use any scrap metal.
Connection of external and internal heater
Welded triangles to strengthen the connection between the outer and inner heaters
The arrow shows the technological hole for cleaning soot
The hole is closed by a door. There is an asbestos cord around the perimeter of the door, the lid is secured with bolts
Step 6. Weld the top cover of the outer heater. Cut a hole in it for the chimney pipe. Check the quality of all seams and correct any gaps if necessary.
The heater is almost ready. The only backward thing is to make a technological hole to clean the soot falling from the pipe and think about installing the furnace. Soot will accumulate on the lid of the inner heater. Make a hole in the side of the outer wall of the heater, close it with a bolted lid, and use asbestos cord to seal it. Carefully grind all corners with a grinder and remove burrs.
We suggest installing the stove on metal legs. The height of the legs is at least 40 centimeters, asbestos must be placed below, and a metal sheet on top. These are fire safety rules.
Video - Sauna stove (stages of assembling a double heater and installing it on a welded combustion chamber)
Video – Sauna stove (final part)
Original ideas
For those who do not like to follow standards, experts offer a number of original solutions. For example, you can cover the battery with a picture frame or install blinds. You can build a kind of fireplace from plasterboard or a screen. Let's consider several options.
Fireplace screen
- The picture frame is covered with fabric or wallpaper to match the walls. The homemade structure is attached like a regular screen.
- To hang blinds, you need to make a metal frame above the radiators, onto which suitable sized blinds are attached.
- Fireplaces decorate rooms made in any style. To make a fireplace you need to prepare:
- mesh screen;
- several picture frames;
- fasteners: self-tapping screws, screws (several pieces).
- First you need to cover the radiator with a mesh screen. Two picture frames are cut and covered with fabric or wallpaper. Their size should correspond to the side walls of the future fireplace and the top surface. One frame is completely covered: this will be the front part of the structure. All frames are fastened together and with a mesh screen. The remaining additions are made at the discretion of the owner: you can install lighting behind the screen, and add fireplace decorations to the front part.
- A radiator in the kitchen or hallway can be perfectly covered with plasterboard. This versatile material can be used to construct diverse structures. If a solid sheet is used, several holes should be drilled in it, necessary for the circulation of warm air.
- If there is an urgent need to camouflage the heating system or there is not enough finance to complete a major structure, you can simply sew special curtains, build a small screen, or simply paint the radiator to match the color of the walls.
Practical advice
We have already mentioned that each master can make his own changes and adjustments during the manufacture of the stove, taking into account his own preferences and individual characteristics of the steam room. The changes concern not only the size of the furnace, but also its design. We give some tips for possible use.
It is better to make the legs in the form of longitudinal slides - the pressure on the flooring is significantly reduced, the loads are distributed evenly over several floorboards. This is very important, the stove itself is quite heavy, and you also need to keep in mind the weight of stones and water. To make the legs, any available metal of suitable size is suitable, and for the slide, you can take a 50x50 mm square. The ends of the slide should not protrude beyond the perimeter of the stove, otherwise your legs may be injured.
Stove with classic legs
Skid legs for better load distribution
You can put refractory bricks on the bottom and sides of the stove - the metal heats up less and the heat lasts longer. There are two types of firebricks: heat-conducting (heavy) and heat-insulating (light). The latter are used for laying smelting furnaces; they keep the surfaces cold, despite the enormous temperature inside. Make no mistake, do not take such materials. Fire-resistant bricks for a sauna stove must conduct heat well, pay attention to this. If you plan to lay bricks, then increase the size of the firebox by the size of the brick.
External facing of a metal stove with bricks
Prices for refractory bricks
The doors of the firebox and heater can be made from plates obtained after cutting out the holes. To do this, make the cuts as even as possible; to reduce the width of the cut, use thin disks. Working with them is more difficult and longer, but in the end you will still save time - you won’t have to waste it on making individual doors. It goes without saying that metal is also saved.
An example of cutting out a door for a firebox
The dimensions of the doors will be smaller than the dimensions of the openings by the width of the cut; the doors may “fall” inside the firebox or heater. To eliminate such situations, stops for the doors should be welded on the back side of the holes. You can use narrow strips of metal. It is advisable to weld the stops along the entire perimeter of the holes, and not at several points, this way you will increase the tightness of closing the doors.
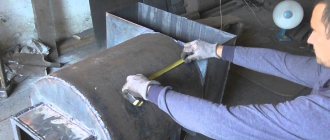
It is better to make a water tank from stainless steel; to weld stainless steel you need to use special electrodes. Adjust the current of the welding machine specifically for stainless steel; remember that it is more difficult to weld and requires some experience.
Stainless steel tank
Ways to increase the efficiency of fireplaces
Fireplaces provide space heating using clean energy generated during combustion. Fireplaces do not have combustion doors, so to increase efficiency, the design of the firebox is made larger in area, but not as deep as that of the stove. In order for thermal energy to be better reflected from the surface of the combustion chamber, the walls of the firebox are expanded towards the room or made to collapse. Providing the rear and side surfaces of the combustion compartment with double walls with an air cushion is also recognized as an effective way to modernize fireplaces. Currently, some Russian and foreign companies have already developed fundamentally new fireplace designs that can provide an efficiency level of about 80%.
Safety precautions
To avoid getting burns from hot surfaces and to reduce the risk of fire, you must follow the safety rules:
- There must be a fire extinguisher in bathhouses.
- Regularly clean furnace equipment from soot and ash.
- Install the stove at a distance of at least 80 cm from the walls, cover them with heat-resistant material with reflective screens.
- Perform a test firing of a homemade stove to check the tightness of the connections.
To protect visitors from possible burns, you can make a protective fence made of wood. Before this, the slats are impregnated with a fire-resistant compound.
After building a bathhouse, a person must choose the appropriate stove equipment. If you don’t have enough money, you can make a stove yourself. To do this, you need to select the material from which the heating unit will be made and prepare the base. After the foundation has hardened, the manufacture of the furnace can begin.
Causes of poor traction
There are a huge number of reasons that cause draft problems, however, the worst thing is if the situation arose as a result of an erroneous design of the chimney (for example, the cross-section of the pipe was incorrectly selected or its height was incorrectly calculated).
In this case, it is possible to increase the air movement in the chimney only using radical methods, that is, simply put, a complete reconstruction of the chimney is required. To do this, you need to seek help from a professional stove maker or do everything yourself, with your own hands.
In fact, any, even the smallest, deviation from the established standards regarding both the design itself and installation can lead to improper operation of the chimney.
- One of the most common causes is soot, which is formed during the burning of wood. Particles of combustion products stick together and settle on the walls of the chimney, which subsequently leads to a decrease in its diameter. As a result, air movement in the chimney is hampered. Therefore, the chimney must be cleaned regularly.
- Violation of ventilation. The worst manifestation of poor chimney performance is backdraft. In this case, the smoke generated as a result of fuel combustion does not exit through the pipe, as it should be, but directly from the combustion chamber enters the room.
- External factors. If you cannot determine the cause of the obstructed smoke escape, you should pay attention to atmospheric phenomena. For example, strong winds or high atmospheric pressure can cause traction problems.
In some cases, backdraft occurs only for a short period of time (1–2 days). This happens mainly when the furnace is fired in cool weather or after a long period of inactivity of the furnace. This is explained by the fact that cold air has already accumulated in the stove, which begins to prevent movement in the chimney and smoke enters the room.
If such problems occur periodically, it is necessary to accurately determine the cause and eliminate it. In addition, it is recommended to use a special device ( draft stabilizer for the chimney) to organize a secondary air supply for optimal force of its movement along the exhaust pipe.
The stabilizer is equipped with a special valve that can prevent the occurrence of too high pressure in case of emergency situations. You can use plain paper to expel cold air.
To do this, you need to burn 2-3 leaves in the stove , and the warm air, rising up the chimney, will push out the cold. After these simple manipulations, you can light the stove. To prevent backdraft from causing you unnecessary trouble, it is necessary to clean the outlet pipe in a timely manner.
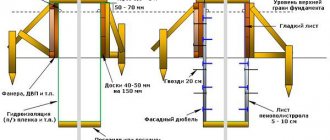
Shallow base
Here is the answer to the question of how to properly install a stove in a bathtub with minimal investment of time and money. Such a foundation is made relatively quickly and easily, but it is suitable for construction only on stable, rain-fed land. The sequence of work on its arrangement is as follows:
- Mark the boundaries of the pit and dig - with a depth, carefully, up to 0.5 m.
- The bottom is compacted, leveled with river sand (5 cm layer), moistened with water and compacted.
- Make a cushion of crushed stone (15-20 cm) and fill it with liquid concrete.
- Wait for it to dry, waterproof the base with resin, install the formwork, strengthen the structure with 20-30 cm of concrete.
- After hardening, remove unnecessary screens and level the foundation horizontally.
Conclusion
The methods for increasing efficiency described in the article are easy to use and suitable for any wood-burning stove. They increase the efficiency of the heating device by 10-25%. As a result, the room will warm up faster, heat will leave the room more slowly, and fuel consumption will be significantly reduced.
But it is important to remember: any modernization will be in vain if the rules for operating the stove are violated. For example, if you use damp firewood, do not clean the ash pit on time, and keep windows and doors constantly open, you will not achieve high efficiency.
Why there is no draft in the chimney: reasons for its absence
There are two fundamentally different situations:
- there was no normal traction initially;
- over time, the traction force weakened, and then completely disappeared (or is insufficient).
The reasons for their occurrence are associated with a number of factors, which we analyzed and combined into key groups - according to the nature, degree, and consequences of their impact. Next, we will look at the most important points and find out how to prevent each of them or eliminate their consequences.