The rocket stove is a modern analogue of the Kan and Ondol heating devices, invented many years ago by Chinese and Korean craftsmen.
This unit is used to heat the house and, according to owner reviews, consumes approximately 80-90% less fuel compared to conventional stoves. The operation of reactive heating units is based on the principle of pyrolysis, in which solid fuel decomposes under the influence of high temperatures, releasing gas. The latter is burned in a combustion chamber releasing a large amount of heat. This method allows you to obtain greater efficiency than when heating with solid fuel.
A special feature of rocket stoves is a characteristic hum during startup, which disappears when the operating temperature is reached. It is thanks to this sound that this type of stove received the name “Rocket”.
What is a rocket stove and why is it good?
The rocket stove or jet stove received its impressive names only for the characteristic sound that it makes when the operating mode is violated (excessive air supply to the firebox): it resembles the roar of a jet engine. That's all, it has nothing more in common with rockets. It works, if you don’t go into details, the same way as all its sisters: wood burns in the firebox, smoke is thrown out into the chimney. Normally, the oven makes a quiet rustling sound.
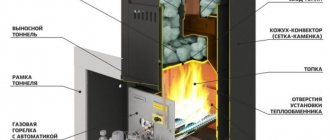
Reaction furnace arrangement option
Where do these mysterious sounds come from? Let's talk about everything in order. Here's what you should know about the rocket stove:
- By purpose it is a heating and cooking unit.
- “Rocket” can be equipped with such an important and necessary element as a bed. Other types of stoves with this option (Russian, bell-type) are much more bulky and complex.
- Compared to conventional metal stoves, the operating time on one load of fuel has been slightly increased - from 4 to 6 hours. This is explained by the fact that this heat generator is based on a top-combustion furnace. In addition, thanks to the presence of adobe plaster, the stove gives off heat for another 12 hours after firing.
- The furnace was developed for use in field conditions.
Design advantages
- Energy independence.
- Simplicity of design: the most available parts and materials are used; if necessary, a simplified version of the rocket stove can be assembled in 20 minutes.
- Ability to work with sufficiently high performance on low-quality raw fuel: bark, wood chips, thin raw branches, etc.
The operating principle of the rocket stove provides the user with a certain freedom in choosing its design. In addition, the unit can be constructed in such a way that only a small part of it will remain visible and, in terms of aesthetics, minimal damage will be caused to the interior of the room.
Jet stove with stove bench
As you can see, the jet stove has something to brag about. But first of all, stove lovers are attracted by the combination of simplicity of design and good, although not the highest, characteristics when working on waste fuel. These very characteristics are the highlight of the “rocket”. Let's try to understand how we managed to achieve such indicators.
The efficiency of a solid fuel heat generator depends on many factors, but perhaps the most determining factor is the degree of afterburning of pyrolysis gases. They appear due to the thermal decomposition of organic fuel. When heated, it seems to evaporate - large hydrocarbon molecules break up into small ones that form flammable gaseous substances: hydrogen, methane, nitrogen, etc. This mixture is often called wood gas.
Small rocket stove
Liquid fuel, for example, waste oil, breaks down into wood gas almost immediately and it burns right there - in the firebox. But with wood fuel the situation is different. The decomposition of solids into a volatile product suitable for combustion - wood gas - occurs in several stages, with intermediate stages also having a gaseous form. That is, we have the following picture: first, a certain intermediate gas is released from the wood, and in order for it to turn into wood gas, that is, to disintegrate even more, it is necessary to prolong its exposure to high temperature.
And the more humid the fuel is, the more “prolonged” the process of complete disintegration becomes. But gases tend to evaporate: in a conventional furnace, the intermediate phase is mostly sucked out by draft into the chimney, where it cools down without having time to turn into wood gas. As a result, instead of high efficiency, we get soot from heavy hydrocarbon radicals.
In a rocket furnace, on the contrary, all conditions are created for the final disintegration and afterburning of the released intermediate gases. In essence, a very simple technique was used: immediately behind the firebox there is a horizontal channel with good thermal insulation. The gases in it do not move as quickly as in a vertical pipe, and the thick heat-insulating coat does not allow them to cool. Thanks to this, the process of decomposition and afterburning is carried out more fully.
At first glance, this solution may seem primitive. But this simplicity is deceptive. Engineers and researchers had to tinker a lot with calculations in order to link the required thrust force with the optimal combustion mode and many other factors. Thus, a rocket stove is a very finely tuned thermal system, when reproducing it it is very important to maintain the correct ratio of the main parameters.
If the manufacture and adjustment of the unit were carried out correctly, the gases will move as expected, while emitting a slight rustling sound; if the regime is violated or the furnace is assembled incorrectly, instead of a stable gas vortex in the gas duct, an unstable one is formed, with numerous local vortices, as a result of which a roaring rocket sound will be heard.
Flaws
- The reaction furnace is manually controlled, and the user constantly has to monitor and adjust it.
- The surface of some elements heats up to high temperatures, so that if accidentally touched, the user may get burned.
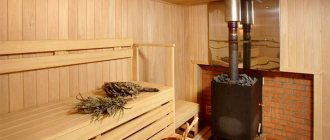
- The scope is somewhat limited. For example, a jet stove cannot be used in a bathhouse, since it is not able to quickly warm up the room.
One more circumstance should be taken into account. It cannot be considered a disadvantage of the stove; rather, it is an important feature. The fact is that the “rocket” was invented in the USA. And the citizens of this country, where any idea can bring good money, are not as willing to share their work as was customary, for example, in the Soviet Union. Most of the drawings and diagrams that have become widespread do not display or distort the most important information. In addition, we simply do not have access to some of the materials used in it.
As a result, home craftsmen, especially those who do not know the intricacies of stove making and heating engineering, often end up with a device that absorbs fuel in huge volumes and is constantly overgrown with soot instead of a full-fledged jet stove. Thus, complete information about the rocket stove has not yet become public property and overseas pictures should be treated with great caution.
Here, for example, is our popular jet furnace design, which many are trying to use as a model.
Drawing: how the stove works
Drawing of a mobile rocket oven
At first glance, everything seems clear, but in fact, much remains “behind the scenes.”
For example, refractory clay is simply designated by the term Fire Clay - without specifying the grade. The mass ratio of perlite and vermiculite in the mixture from which the body of the furnace (in the diagram - Core) and the lining of the element called Riser is not indicated. Also, the diagram does not specify that the lining should consist of two parts with different functions - a heat insulator and a heat accumulator. Without knowing this, many users make the lining homogeneous, which is why the performance of the furnace drops significantly.
Types of jet heating devices. Choosing a design for self-production
Craftsmen have developed several designs of rocket stoves suitable for mobile or stationary use:
- portable units made of metal pipes, cans or buckets;
- jet heating devices from a gas cylinder;
- ovens built from fireclay bricks and metal containers;
- heating heat generators with a stove bench.
The most difficult to manufacture are the structures, the construction of which requires the skills of a mason. However, if you have detailed diagrams of serial layouts, even a novice home craftsman can handle this work.
Portable rocket stove
Portable rocket stoves are mass-produced by industry
Hiking options are represented by the simplest designs, which are based on the same pipe bent or welded from individual sections. The improvements affected only the installation of a partition for arranging the ash pit, in which a slot is made for air leakage. Often the lower part of the loading chamber is equipped with a grate to supply air directly to the combustion zone. The opening for storing firewood is equipped with a door, which subsequently regulates the air supply.
The requirements for a mobile design also extend to convenience during cooking, so the upper section of the chimney must be equipped with a stand for metal utensils.
Gas cylinder unit
The use of a gas cylinder is the next step in the development of jet heating devices. A more complex design can significantly increase the thermal power and efficiency of the furnace. All that is required to make the installation is a household gas cylinder or fuel barrel, sections of thick-walled steel pipes and a metal sheet 3–5 mm thick.
A rocket stove made from a gas cylinder can be used to heat small utility rooms
If you have a piece of steel pipe with thick walls and a diameter of more than 30 cm, a rocket stove can be made from it. This option will allow you to avoid labor-intensive operations associated with disassembling the factory gas tank.
How such a design works can be seen in the diagram below. Firewood loaded into the firebox burns due to the flow of air through the loading window. Afterburning of combustible gases occurs in a pipe installed inside the cylinder due to the supply of secondary air. To enhance the effect, the inner chamber is insulated, which makes it possible to raise the temperature inside above 1000 °C. Hot gases hit the bell as they move and enter the outer chamber, the walls of which act as a heat exchanger. Having given up their energy, the combustion products are discharged through a chimney cut into the lower part on the back side of the cylinder.
To create the draft necessary for stable operation of the rocket stove, the top of the chimney is raised at least 4 m relative to the loading window.
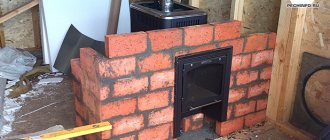
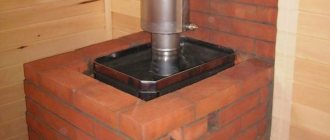
Combined rocket stove made of brick and metal barrel
The use of fireclay bricks for arranging the firebox and internal chambers of a jet heating device transforms the “rocket” into the category of stationary structures. The high heat capacity of the materials used allows heat to be accumulated and released within several hours, which is why such units are often installed in residential premises.
Furnace structure with refractory lining of the working area
Jet stove with stove bench
Like other solid fuel stoves, the "rocket" has the disadvantage that most of the heat is lost through the chimney. Despite this, certain advantages of its design make it easy to get rid of this disadvantage. The thing is that the unit was called reactive for a reason, but because of the high rate of excision of burning gases. This feature can be turned into a benefit by significantly increasing the length of the smoke exhaust channels.
Scheme of a jet stove with a stove bench
This idea found its implementation in massive stationary structures with a couch in the shape of a sofa or bed. It is successfully made from brick or rubble stone, decorated with a plastic mass of clay and sawdust. Thanks to the high heat capacity of the materials used, the stove can retain heat all night, which, combined with high efficiency, makes the heating unit very attractive for installation in residential premises.
When choosing a design for manufacturing at home, you need to take into account the features of its operation. As a camping option, choose a mobile unit - it will be enough to warm up, dry clothes and cook lunch. In order to occasionally heat small technical rooms, a portable structure made from a gas cylinder is used. If you need to heat a small country house or cottage, then there is simply no better option than a jet heating unit with a stove bench.
Types of jet furnaces
Today there are only two types of furnaces of this type:
- A full-fledged stationary heating and cooking rocket stove (also called a large one).
- Small rocket stove: used for cooking in the warm season. Unlike the first option, it is portable and has an open firebox (intended for use outdoors). It is very popular among tourists, as it has a compact size and is capable of developing power up to 8 kW.
Design of a small rocket stove
As already mentioned, a jet stove is easy to manufacture, so we will consider a full-fledged option.
Parts and operation of a jet heat generator
A basic rocket furnace is a device consisting of two pipe fragments connected by a bend at an angle of 90 degrees. The combustion chamber in this heat generator is usually a zone in the horizontal part of the structure. But sometimes fuel is placed in the vertical section of the apparatus, for which a rocket stove is constructed from two pipes of different lengths, mounted vertically and connected by a common horizontal channel.
Primary and secondary air passes through the furnace
The operation of a jet stove is based on two actions: the unhindered passage of wood gases through the pipe and the afterburning of gases produced during fuel combustion. Wood chips and firewood are placed in the firebox of this heat generator after a highly flammable material such as paper ignites. A container with water or other contents is placed on the open section of the pipe. At the same time, a small space is left between the structure and the installed container, which is necessary to create traction.
The processes occurring inside a stationary reactive furnace resemble the operation of pyrolysis heating units
Design and principle of operation
The stove we will try to make is shown in the picture.
Rocket stove: frontal section
As you can see, its combustion chamber (Fuel Magazine) is vertical and is equipped with a tightly closing lid (prevents the leakage of excess air), as in a top-burning stove (the ash pit is designated the Primary Ash Pit). It was this unit that was taken as the basis. But a traditional top-burning heat generator operates only on dry fuel, and the creators of the “rocket” wanted to teach it to successfully digest wet fuel. To do this, the following was done:
- The optimal size of the blower (Air Intake) was selected so that the amount of incoming air was sufficient to burn the gases, but at the same time they did not cool too much. In this case, the principle of top combustion provides some kind of self-regulation: if the fire gets too hot, it becomes an obstacle to the incoming air.
- A well-insulated horizontal channel was installed behind the firebox, called the Burn Tunnel or flame tube. To hide the purpose of this element, it was marked on the diagram with a meaningless flame icon. Thermal insulation (Insulation) must have not only low thermal conductivity, but also low heat capacity - all thermal energy must remain in the gas flow. In the flame tube, the intermediate gas breaks down into wood gas (at the beginning of the section), which then burns completely (at the end). In this case, the temperature in the pipe reaches 1000 degrees.
- Behind the fire tube was a vertical section called the Internal or Primary Vent. In diagrams, secretive Americans often designate this element with the meaningless term Riser. In fact, the primary chimney is a continuation of the fire tube, but it was placed vertically to create an intermediate draft, and at the same time reduce the horizontal part of the furnace. Like the fire tube, the primary chimney has a heat-insulating coating.
Note. Some readers familiar with the design of pyrolysis furnaces may think that it would be a good idea to supply secondary air to the base of the primary chimney. Indeed, the combustion of wood gas would be more complete, and the efficiency of the stove would be higher. But with this solution, vortices are formed in the gas flow, as a result of which toxic combustion products partially penetrate into the room.
Next, the engineers were faced with the task of removing the heat from hot gases having a temperature of about 900 degrees.
A capacious heat accumulator capable of withstanding such temperatures is fireclay brick (withstands up to 1600 degrees), but the stove, as the reader remembers, was intended for field conditions, so a more accessible and inexpensive material was needed. The leader in this regard is adobe (denoted in the diagram by the term Thermal Mass), but its temperature limit is 250 degrees. To cool the gases, a thin-walled steel drum (Steel Drum) was installed around the primary chimney, in which they expand. You can cook food on the cover of this drum (Optional Cooking Surface) - its temperature is about 400 degrees.
To absorb even more heat, a horizontal chimney with a stove bench (Airtight Duct) was attached to the stove, and only then an external chimney (Exhaust Vent). The latter was equipped with a view that closes after heating: it will not allow the heat from the gas duct of the stove to evaporate into the street.
So that the pipe inside the stove could be cleaned from time to time, a secondary ash chamber (Secondary Airtight Ash Pit) with a hermetically sealed cleaning door was installed immediately behind the drum. The main part of the carbon deposits, due to the sharp expansion and cooling of gases, settles in it, so cleaning the external chimney has to be done extremely rarely.
Since the secondary ash chamber has to be opened no more than twice a year, instead of a door, a simpler design can be used - a screw-on lid with a gasket made of asbestos or basalt cardboard.
Advantages and disadvantages
In order to fully understand the mechanism of operation of the rocket stove and begin its manufacture, it is worth studying all the pros and cons of such equipment.
Among the main advantages of a jet stove for heating a home, which made it so popular, the following are noted:
- minimal amount of material used and ease of manufacture;
- high heat transfer of the furnace with afterburning of the released gases due to the principle of pyrolysis in operation;
- low price of the necessary building materials, which means low cost of the unit;
- the ability to add fuel to the firebox without stopping the operation of the furnace;
- uniform heat distribution in a large room thanks to an insulated chimney laid around the perimeter or through the room;
- unpretentiousness in work, the ability to self-regulate the movement of gases through the chimney through draft.
At the same time, the operation of reactive furnaces has the following disadvantages:
- to fire the simplest device, only dry wood is used, since the presence of additional moisture can lead to improper operation of the unit and will cause reverse draft; if you use fuel with excess moisture in a more complex design, the heating device will not warm up to the optimal temperature for the pyrolysis process;
- during operation of the jet unit there is a need to constantly be nearby, ensuring compliance with safety regulations;
- The power of the rocket stove is enough to maintain a comfortable room temperature, but it is not enough for a steam room, so it cannot be used in a bathhouse.
Furnace calculation
Before talking about the size of the oven, we draw the reader’s attention to an important point. The square-cube law applies to all solid fuel heat generators. Its essence can be explained with a simple example.
Imagine a cube with a side of 1 m. Its volume is m3 and its surface area is 6 m2. The ratio of volume to surface area is 1:6.
Let's increase the volume of the body by 8 times. The result is a cube with a side of 2 m, the surface area of which is 24 m2.
Thus, the surface area has only increased 4 times and now the volume to surface ratio is 1:3. In furnaces, the amount of heat released and its power depend on the volume, and heat transfer depends on the surface area. These parameters are interconnected, so you cannot thoughtlessly scale this or that furnace design, adjusting it to the dimensions you need - the heat generator may turn out to be inoperable altogether.
When calculating a rocket furnace, the internal diameter of the drum D is specified, which, as mentioned above, can vary from 300 mm (15 kW furnace) to 600 mm (25 kW furnace). This “fork” is precisely due to the square-cube law. We will also use a derived value - the cross-sectional area of the drum S: S = 3.14 * D^2 /4.
Table: main parameters
| Parameter | Meaning |
| Drum height H | From 1.5D to 2D |
| Height of drum insulating coating | 2/3H |
| Thickness of drum insulating coating | 1/3D |
| Cross-sectional area of the primary chimney | From 0.045S to 0.065S (optimally - from 0.05S to 0.06S). The higher the primary chimney is, the better. |
| Minimum clearance between the top edge of the primary flue and the drum cover | 70 mm. With a lower value, the aerodynamic resistance of the gap for gases passing through it will be excessively large. |
| Flame tube length and area | Length and area of the primary chimney |
| Blower cross-sectional area | Half the cross-sectional area of the primary chimney |
| Cross-sectional area of the external chimney | From 1.5S to 2S |
| The thickness of the adobe cushion under the flue with a stove bench | 50–70 mm (if there are wooden floors under the bed - from 25 to 35 mm) |
| The height of the coating above the flue with a stove bench | 150 mm. It is not recommended to reduce it, otherwise the oven will accumulate less heat. |
| External chimney height | not less than 4 m |
Table: maximum permissible length of the flue with a stove bench
| D (diameter) | Length |
| 300 mm | 4 m |
| 600 mm | 6 m |
Table: volume of the secondary ash chamber
| D (diameter) | Volume | |
| 300 mm | 0.1x(Vk - Vpd) | Where Vк is the volume of the drum, Vпд is the volume of the primary chimney. |
| 600 mm | 0.05x(Vk - Vpd) | |
We calculate intermediate values proportionally (interpolate).
Stove "Antoshka"
This popular version of the tourist-camping type of stove will require a little more time to manufacture independently.
The Antoshka model rocket stove is distinguished by its convenient design. A special feature of this type of furnace is the presence of an additional plane heated during operation of the unit. It is also a stand for a container (hob) and a room heating amplifier. Consequently, the Antoshka stove can be used to provide hot water to a country house or a tourist camp.
Stove "Antoshka"
Materials
In order to make a stove yourself, you need to purchase the following set of materials:
- Square pipes (with material parameters 15 cm×15cm×3 mm. The length is also taken into account, which in this option should be 40.5 cm) - 1 piece and (15cm×15cm×3 mm, also the length of the element is 18 cm) - 1 piece and (10 cm×10cm×3 mm, with product length 60.5 cm) – 1 piece.
- Metal/steel plate (30cm×15cm×3mm) – 1 pc.
- The plate is also made of good, heat-resistant metal (the parameters should be as follows - 15cm × 15cm × 3 mm) - 1 pc.
- High-quality metal corner (5cm×5cm×3, length 30 cm) – 1 pc.
- Larger metal corner (5cm×5cm×3, length 40.5 cm) – 1 pc.
Additionally, you will need reinforcement/rod with a diameter of 8 mm, the length of the material in this version is 30 cm - you will need to purchase 4 such rods.
To make a grate with your own efforts, you will need reinforcement with a diameter of 8 mm, its length is 17 cm - 8 pieces
It is important not to forget to purchase triangular metal gussets that will need to be used to install the hob; the steel in them should be 3 mm - 2 pieces
Tools
To carry out all the necessary work you will need, as in the previous version:
- Bulgarian.
- Welding (for reliable fastening of all elements).
- Marker.
- Metal scissors (for working with small elements).
You should also have safety glasses and gloves.
Manufacturing stages
To make the Antoshka stove you will need to do:
- Mark the existing pipe in the materials (place it vertically).
- Then make neat cuts on it, making them at an angle of 300.
- In the back of the pipe intended for the firebox, cut a hole whose size is 12x10 cm.
Second part of the work:
At the bottom of the element, it is also important not to forget to cut a hole, the size of which will increase slightly and will be 15x15 cm according to the drawing. Next, you will need to connect these two elements. The rear wall of the firebox must be welded with a plate made of fire-resistant and high-quality steel prepared in advance for this purpose.
Afterwards, pieces of metal rods need to be welded to the lower hole of the Robinson rocket stove variation from the outside. The distance at which the work is carried out is 1-1.2 cm. Further work involves the following actions:
- To manufacture such a part of the heating unit as the blower chamber (air intake), a piece of 18 cm in size is used, which is part of a square pipe. Without it, the operation of the oven as a whole is not allowed for safety reasons.
- You need to make a cut on it at an angle of 300 (in the end, the size of this part of the structure is 10x18 cm).
The resulting part should have a bottom and two walls. It is best to place it on stands - this will ensure comfort for subsequent work. They are made from metal corners and attached by welding to the bottom of the structure.
Next, work begins on the main part of the furnace (upper). The steps will be as follows:
The firebox of the future furnace (upper hole) - the pipe included in the materials package is welded to it or otherwise attached (if there is no welding)
It is important to mount it in a strictly vertical position. It is important to remember here that maximum care must be taken. Triangular-shaped products made of metal (it’s better not to skimp on quality here) need to be placed on an edge, which will increase the stability of this part of the structure to create the necessary combination of elements. They are then welded/attached to the pipe and additionally to the top of the structure. The creation of the unit continues by welding a plate measuring 3 dm × 1.5 dm × 3 mm to the edge of the combustion hole, which is located at the top (in front of the master performing the work).
The final part of the creation: you need to weld corners to the top of the vertically located pipe - this will be a stand on which a container for cooking or heating food is installed. The reinforcement needs to be bent (900 - semicircle), the resulting corners are welded to the pipe on four sides at a distance of 30 cm from each other.
Materials and tools
The furnace drum can be made from a standard barrel with a volume of 200 liters and a diameter of 600 mm. The square-cube law allows you to reduce the drum diameter by up to 50%, so for a small oven this element can be made from a household gas cylinder or tin buckets.
The blower, firebox and primary chimney are made of round or profile steel pipes. Significant wall thickness is not required - you can get by with a couple of millimeters - combustion in the furnace is weak. The chimney in a stove bench, through which gases flow in a completely cooled form, can generally be made from metal corrugation.
For thermal insulation (lining) of the furnace section, you will need broken fireclay bricks (fireclay crushed stone) and oven clay.
The outer coating layer (heat accumulator) will be made of adobe.
This is what freshly prepared adobe looks like
Thermal insulation of the primary chimney is made of light fireclay bricks (ShL grade) or river sand rich in alumina.
Parts such as lids and doors can be made from galvanized steel or aluminum. Asbestos or basalt cardboard is used as a sealant.
Note! Ordinary store-bought doors without a seal cannot be used: due to parasitic air leaks, the efficiency of the stove will drop significantly.
Construction raw materials for the construction of a non-standard furnace
The production of jet heating equipment will require:
- barrels with a volume of 200 liters and a diameter of 0.6 meters, an empty liquefied gas cylinder or tin buckets to build a furnace drum;
- square or round steel pipes 2–3 mm thick, which are needed to create a blower, combustion chamber and primary chimney;
- fireclay crushed stone and oven clay as thermal insulation materials;
- adobe, which serves as the outer coating layer;
- fireclay bricks;
- sand from the bottom of the river;
- pieces of sheets of zinc-coated steel or aluminum for the manufacture of lids and doors;
- asbestos or basalt cardboard, which serves as a sealant.
When constructing a rocket stove, you will need a welding machine. And if you plan to make heating equipment from bricks, then you will have to take:
- Master OK;
- mortar spatula;
- hammer-pick;
- jointing;
- sharp-angled sledgehammer;
- level;
- plumb line;
- roulette
Preparatory work
As part of the preparatory work, it is necessary to cut all available rolled products into blanks of the required size. If you decide to use a gas cylinder as a blank for the cap, you need to cut off the welded upper part from it.
Preparing a gas cylinder for use as a hood
Note! If there is gas left in the cylinder, it may detonate during cutting. For safety reasons, such containers are cut only after filling with water.
Note that in most cases, a rocket stove is made from a cylinder. Such a unit is capable of heating a room of up to 50 m2. A “rocket” from a barrel only has to be used at full power in very rare cases.
From the barrel, if the stove is made from it, it is also necessary to cut off the top part. Next, two openings located opposite each other are cut out in the barrel or in the cylinder, through one of which the fire pipe will be inserted, turning into the primary chimney, and the gas duct with a stove bench will be connected to the second.
Tools
To build a rocket-type furnace with your own hands, you need to prepare in advance a set of tools for work, which should consist of:
- trowels for scooping and distributing the solution. It is more convenient to work with a tool with the handle moved slightly to the side;
- picks or hammers - picks for trimming individual parts of brick;
- grinders with a diamond blade for sawing whole blocks into quarters and halves;
- mallets with a rubber tip for leveling bricks in masonry;
- twisted cord - moorings;
- building level;
- square and tape measure;
- shovels.
You also need to stock up on two containers for preparing the solution, concrete and a metal mesh for sifting the ingredients.
Step-by-step instruction
Here is an approximate procedure that should be followed when making this stove:
Making a firebox
The firebox is welded using steel pipe or sheets. The firebox lid must close tightly. It should be made of a steel sheet, around the perimeter of which a strip of basalt cardboard is fixed with screws or rivets. For a tighter closure, the lid can be equipped with a screw clamping mechanism.
This is what the firebox and ash pan look like in a simple rocket stove
The ash chamber (indicated in the diagram as Primary Ash Pit) is separated from the main part of the firebox by a grate welded from a rod with a diameter of 8–10 mm. The grille should be installed on corner shelves that are welded to the inner walls.
The door of the ash chamber must also be airtight. It is made from a steel sheet, to which a steel strip is welded in two rows along the entire perimeter. An asbestos cord or basalt cardboard is placed in the groove between these strips.
All that remains is to weld the fire tube to the firebox.
Primary chimney
- A 90-degree bend and a small section of pipe must be welded to the pipe that serves as the primary chimney, after which this L-shaped structure is placed inside a barrel or cylinder, that is, the future drum.
- The outlet with a piece of pipe welded to it should be brought out into one of the openings in the lower part of the drum so that the primary chimney is located strictly in the center. Let us remind you that the upper cut of the pipe must be located at least 70 mm below the upper edge of the barrel (cylinder).
- After centering the primary chimney, its horizontal tail, which was brought out into the opening in the drum, is welded to its edges with a continuous seam along the entire perimeter.
- After this, the shank of the primary chimney is welded to the flame pipe, and a tire is welded to the drum on top.
- A short piece of pipe should be welded to the second opening in the drum, which will act as a secondary ash pan. It needs a cleaning window. Along its edges, you need to butt-weld the studs to which the lid will be screwed (remember that we decided not to install the door in this place, since we have to open it quite rarely).
- A strip of basalt cardboard should be secured along the perimeter of the lid with screws or rivets.
Chimney installation
We weld the horizontal part of the chimney to the outlet of the secondary ash pan, on which the stove bench will subsequently be installed. If the flue is supposed to be made of metal corrugation, then first you need to weld a short pipe to the ash pan, and then attach the corrugation to it using a clamp.
At the final stage, an external chimney is attached to the horizontal flue.
Furnace lining
The metal part of the stove is ready; now it needs to be properly plastered with heat-insulating and heat-accumulating compounds.
The lining of the combustion part (up to the primary chimney) should be done with a mixture of stove clay and broken fireclay bricks, taken in a 1:1 ratio.
Primary chimney lining
The materials used for lining the primary chimney - light fireclay bricks or river sand - are porous, so when open they will quickly become saturated with soot and lose their thermal insulation properties. To prevent this, the lining on the primary chimney is protected with a thin-walled steel casing, and the ends are coated with oven clay.
In accordance with the square-cube law, the ratio of the volume and surface area of the drum depends on its diameter, therefore the lining of the primary chimney is made differently depending on the size of the furnace. Three options are shown in the figure.
Primary chimney lining options
If the lining is made with fireclay bricks, the cavities between its fragments must be filled with construction sand. If river sand rich in alumina is used, you have to resort to more complex technology:
- The sand is cleared of large debris (careful preparation is not required).
- A thin layer is poured into the casing, compacted and wetted so that a crust forms.
- Subsequent layers are poured in the same way. There should be from 5 to 7 in total.
- The sand lining is dried for one week, then the top is covered with oven clay and the manufacture of the oven continues.
The last step is to coat all parts of the stove with adobe. It is prepared from the following ingredients:
- clay;
- straw (14–16 kg per 1 m3 of clay);
- sand (in small quantities);
- water.
The straw to clay ratio shown is approximate. In some types of clay, more straw can be added, in others, on the contrary, its amount must be reduced.
Preparation for assembling heating equipment
When choosing a location for a rocket stove, follow some rules:
- jet heating equipment is placed only in a room with an area of at least 16 m²;
- Without floorboards under the stove, installation of equipment will be easier;
- It is prohibited to place wooden beams above a structure that produces heat;
- if it is assumed that the chimney will go through the ceilings, then the heating equipment is placed in the middle of the house;
- the heat generator cannot be installed near the external contour of the house, otherwise the room will lose heated air;
- The jet device must not be placed next to walls and partitions of wooden materials.
To make it convenient to add fuel to jet heating equipment, it is wiser to place it facing the entrance. It is important to leave at least a meter of unoccupied area around the rocket stove.
In a small house, builders advise setting aside a place for the stove in the corner. In this case, the firebox should be directed in one direction, and the bed (if it is made) – in the other.
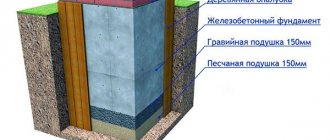
The stove stands on a special platform that protects the floor from high temperatures
Having found a suitable site for the rocket stove, they begin to prepare it for construction work. If boards are laid on the floor in the house, then in the place where the equipment will be installed, they will need to be removed. A hole is dug under the exposed floor, the bottom of which is necessarily pressed.
Before construction work, a special solution should be mixed. It consists of sand and clay combined in a 1:1 ratio. You will need enough water so that the construction raw materials have the consistency of sour cream, that is, ¼ of the amount of dry ingredients.
Ways to improve the jet furnace
Instead of a couch on a gas duct, you can build a water jacket that will be connected to a water heating system. This part can also be made in the form of a coil of copper pipe wound around the chimney.
Scheme of a rocket furnace with a water circuit
Another method of improvement is to organize the supply of heated secondary air to the flame tube.
Drawing of a rocket stove from a cylinder with a secondary air supply
With this design, the efficiency of the stove will be higher, but soot will be more intensively deposited in the primary chimney. To make it easy to remove, the drum cover must be made removable. Naturally, it must be equipped with a seal.
An improved version of the rocket stove from a cylinder
Modernization of rocket heat generator
To expand the scope of application of reactive heating stoves, they are being modified, increasing the convenience and versatility of the design. In mobile structures, the platform intended for cooking is often replaced with a full-fledged stove. It is convenient to use such a hob in your own backyard for household purposes - for preparing food for pets or during the period of preserving food for the winter. A special feature of this type of rocket furnace is a wide and flat horizontal channel into which hot gases from the nozzle are directed. Passing under the surface of the stove, they heat it red-hot, after which they go into the vertical chimney. Comfortable legs give the structure stability, and the original shape allows the unit to be used as a stand or table when it is not in use for its intended purpose.
A jet stove with a stove is a necessary thing in a suburban area
A liquid heat exchanger cannot be installed in the flame tube of a jet furnace, but this does not mean that it cannot be used as a heat generator in a water heating system. To do this, the “rocket” is equipped with a kind of circuit of radiator plates, which create a kind of labyrinth in the afterburning zone. Thanks to their heating, heat is removed from the afterburning chamber to the water jacket. The efficiency of the unit depends on the area and heat capacity of the plates, so they are made in the form of massive metal strips with an area of up to ¾ of the cross-section of the fire channel. It must be said that such a heat exchanger is best used to produce hot water using the rocket stove itself in the traditional way.
Diagram of a rocket unit equipped with a water circuit
The rocket stove with a convector has an original design. To increase heat transfer, vertical tubes are mounted on the surface of the outer casing, performing the same role as the air channels of the buleryan. Cold air is trapped at the bottom of the tube heat exchangers and is heated as it moves upward. This ensures forced convection, which further increases the thermal efficiency of the installation.
Rocket heat generator casing equipped with a convector
How to fire a rocket stove
A rocket stove, like top-burning heat generators, operates at high performance only if its chimney is hot enough. Therefore, before loading the main fuel into the firebox, the unit must be warmed up well (unless, of course, there has been a long downtime and the stove has had time to cool down). To do this, use any “fast” fuel, for example, sawdust, paper, straw, etc., which is placed in the ash pit.
The subsidence of the hum or a change in its tone indicates that the stove is sufficiently warmed up and the main fuel can be added to the firebox. There is no need to set it on fire - it will ignite from the coals remaining after the burning of the “fast” fuel.
Melt the rocket stove through the firebox
A jet stove, like a Bullerjan, cannot adjust to external conditions and fuel quality. The adjustment must be made by the user. After adding the main fuel, the ash flap must be fully opened, and as soon as the unit begins to hum, close it until a rustling sound appears.
In the future, as the fuel burns, the damper has to be closed more and more, still achieving a quiet rustle. If you miss the right moment, an excess amount of air will begin to enter the furnace and pyrolysis in the fire tube will stop due to the cooling of the intermediate gas mixture. At the same time, the stove will remind you of itself with a “rocket” hum.
Features of the structure
To make a jet stove with your own hands, you do not need to have any special skills. Due to its compactness and ease of execution, it can be made in a few hours.
The basis of the design is two vertical chambers of different sizes, connected at the bottom by a common channel. The smaller container is called the combustion chamber. It is used first for ignition, then for burning wood.
The stove is usually heated using flammable materials such as wood shavings, wood chips, paper, and small dry twigs. Using special dampers in the lower compartment of the combustion chamber, you can regulate the traction force.
After the entire system, including the chimney and large chamber, has warmed up, the rocket stove will begin to perform its functions of heating the room. You can determine this moment by how the hum that arose at the beginning subsides.
The room is heated by a smoke duct that runs through the room or along its perimeter. The combustion products, having passed along the entire length of the pipe and given off heat into the room, come out cold. That is, thermal energy is retained to the maximum inside the heated room.
Design options for rocket furnaces
If you need to assemble a rocket stove with your own hands, you should use the drawing of the portable Robinson model; it is constructed from scraps of a profile pipe and a metal stand on legs. All work involves welding. The schemes are quite variable, they allow the use of pipes of a different section, in this case all parameters must be adjusted to the proportions.
For the manufacture of large heating units, a 200 liter metal barrel or a gas cylinder is used. An outer cap is formed from these elements; fireclay bricks or medium-diameter pipes are used to assemble the internal parts. If you take a gas cylinder as a basis, you can end up with both a mobile structure and a full-fledged stationary device with a bench.
The most difficult step prior to assembly is calculating the thermal power of the device. Craftsmen recommend using ready-made drawings indicating the source materials; when choosing a diagram, you need to compare the potential dimensions of the furnace and the heated area.
To increase the efficiency of furnaces, modifications have been developed that can specifically collect heat:
- oven-stove,
- with water circuit,
- with a bed.
The first type is equipped with an extended cooking surface, on which several containers can be used simultaneously. A vertical pipe with a firebox and a door is located directly under the stove, under which there is also a horizontal channel. Hot air heats the hob both directly and through the duct. The outdoor model has stable legs that ensure the reliability and safety of the structure.
The furnace with a water circuit is mounted on a concrete base, which prevents distortions. The fire channel and the combustion chamber, lined with brick, form the lower part; an ash pan is also provided here (firewood is loaded vertically). The steel pipe in the form of a vertical channel is provided with thermal insulation and an outer casing. A heat exchanger with a water jacket is fixed on the latter.
The model with a couch is quite massive; the extension looks like a sofa or bed. If desired, you can lay a mattress here and use the platform as an additional sleeping place. The bed is laid out from stones combined with a clay mass, or bricks.